Kenmore 73102 Owner's manual

Category
Side-by-side fridge-freezers
Type
Owner's manual

This manual is also suitable for

795.7310#
MFL68680474
Rev.00_090617
2
TABLE OF CONTENTS
Warranty..................................................................3
Product Record
....................................................... 4
Important Safety Instructions
........................ 5-7
Electrical & Grounding Requirements 7............
Parts and Features
.............................................. 8
Refrigerator Installation
..............................9-18
Unpacking Your Refrigerator
..........................9
Installation
.......................................................10
Removing/Replacing Handles, Doors, and
Drawers.........................................................11-17
Leveling and Door Alignment
......................18
Using Your Refrigerator
............................19-33
Setting the Controls
..................................19-20
Smart Features
...............................................21
Instructions for Smart Grid
......................22-23
In-Door Ice Bin
...................................................24
Automatic Icemaker
...............................25-26
Food Storage Guide ........................................27
Refrigerator Section
Water Dispenser
...........................................28
Refrigerator Shelves
........................................29
Humidity Controlled Crisper
........................30
03....... rewarD yrtnaP dellortnoC erutarepmeT
Door Bin
............................................................ 30
Air Filter
..................................................... 31
Freezer Section
Extra Ice Bin ....................................................31
Durabase ........................................................32
Durabase Divider .............................................32
.............................................32Pullout Drawers
Water Filter ................................................33-35
Care and Cleaning .....................................36-37
General Cleaning Tips ...................................36
Exterior ..........................................................36
Inside Walls ...................................................36
Door Liner and Gaskets ................................. 63
Plastic Parts ....................................................36
Condenser Coils ..............................................36
Light Bulb Replacement .................................37
Power Interruptions ......................................37
When You Go On Vacation ..........................37
When You Move ..........................................37
Connecting the Water Line ........................ 83 -40
Troubleshooting Guide ..............................41-48
Diagnostics ........................................................ 49
WARRANTY
REFRIGERATOR WARRANTY
KENMORE LIMITED WARRANTY
FOR ONE YEAR from the date of sale this appliance is warranted against defects in material or workmanship when it
is correctly installed, operated and maintained according to all supplied instructions.
WITH PROOF OF SALE, a defective appliance will receive free repair or replacement at option
of seller.
For warranty coverage details to obtain free repair or replacement, visit the web page: www.kenmore.com/warranty
This warranty applies for only 90 DAYS if this appliance is ever used for other than private household purposes.
This warranty covers ONLY defects in material and workmanship, and will NOT pay for:
Disclaimer of implied warranties; limitation of remedies
1. Expendable items that can wear out from normal use, including but not limited to filters, belts, bags or screw-in base
light bulbs.
2. A service technician to clean or maintain this appliance, or to instruct the user in correct appliance installation,
operation and maintenance.
3. Service calls to correct appliance installation not performed by Sears authorized service agents, or to repair
problems with house fuses, circuit breakers, house wiring, and plumbing or gas supply systems resulting from
such installation.
4. Damage to or failure of this appliance resulting from installation not performed by Sears authorized service
agents, including installation that was not in accord with electrical, gas or plumbing codes.
5. Damage to or failure of this appliance, including discoloration or surface rust, if it is not correctly operated and
maintained according to all supplied instructions.
6. Damage to or failure of this appliance, including discoloration or surface rust, resulting from accident, alteration,
abuse, misuse or use for other than its intended purpose.
7. Damage to or failure of this appliance, including discoloration or surface rust, caused by the use of detergents,
cleaners, chemicals or utensils other than those recommended in all instructions supplied with the product.
8. Damage to or failure of parts or systems resulting from unauthorized modifications made to this appliance.
9. Service to an appliance if the model and serial plate is missing, altered, or cannot easily be determined to have
the appropriate certification logo.
Sears Brands Management Corporation, Hoffman Estates, IL 60179
Customer’s sole and exclusive remedy under this limited warranty shall be product repair or replacement as provided
herein. Implied warranties, including warranties of merchantability or fitness for a particular purpose, are limited to
one year or the shortest period allowed by law. Seller shall not be liable for incidental or consequential damages.
Some states do not allow the exclusion or limitation of incidental or consequential damages, or limitation on the
duration of implied warranties of merchantability or fitness, so these exclusions or limitations may not apply to you.
This warranty applies only while this appliance is used in the United States.
This warranty gives you specific legal rights, and you may also have other rights which vary from state to state.
4
PRODUCT RECORD


items of information available whenever you contact Sears concerning your product.
Model No.___________________ Date of Purchase ___________________
Serial No.___________________
Save these instructions and attach your sales receipt for future reference.
5
IMPORTANT SAFETY INSTRUCTIONS
WARNING
SAVE THESE INSTRUCTIONS
To reduce the risk of re, electric shock, or personal
injury when using your product, basic safety precautions
should be followed, including the following.
Read all instructions before using this appliance.
NEVER unplug your refrigerator by pulling on the 

straight out from the outlet.
If the supply cord is damaged, it must be replaced 
by the manufacturer or its service agent or a similarly

a cord that shows cracks or abrasion damage along its
length or at either the plug or connector end.
Do not modify or extend the power cord length. It 

When moving your refrigerator away from the wall, 
be careful not to roll over or damage the power cord.
BASIC SAFETY PRECAUTIONS
This guide contains many important safety messages. Always read and obey all safety messages.
This is the safety alert symbol. It alerts you to safety messages that inform you of hazards that can kill
or hurt you or others, or cause damage to the product.
All safety messages will be preceded by the safety alert symbol and the hazard
signal word DANGER, WARNING or CAUTION. These words mean:
You will be killed or seriously injured if you do not follow instructions.
You can be killed or seriously injured if you do not follow instructions.
Indicates an imminently hazardous situation which, if not avoided,
may result in minor or moderate injury, or product damage.
All safety messages will identify the hazard, tell you how to reduce the chance of injury, and tell you what can happen
if the instructions are not followed.

vapors and liquids in the vicinity of this or any other
appliance.
DO NOT allow children to climb, stand, or hang on the 
refrigerator doors or shelves in the refrigerator. They
could damage the refrigerator and seriously injure
themselves.

between the doors and cabinets are necessarily small.
Be careful closing doors when children are in the area.
Unplug your refrigerator before cleaning or making 
any repairs.
NOTE: It is strongly recommended that any service be

DANGER
WARNING
CAUTION
6
WARNING
DANGER: RISK OF CHILD ENTRAPMENT
SAVE THESE INSTRUCTIONS
Before replacing a burned-out or broken light bulb, 

breaker or fuse box in order to avoid contact with a live


NOTE: Some models have LED interior lighting and

WARNING: Setting either or both controls to the OFF
position does not remove power to the light circuit.

the electrical source and reset the controls (Thermostat,
Refrigerator Control, and or Freezer Control, depending

This refrigerator must be properly installed in 
accordance with the Attention Installer Instructions that
were taped to the front of the refrigerator.
After your refrigerator is in operation, do not touch the 
cold surfaces in the freezer compartment when hands
are damp or wet. Skin may adhere to the extremely cold
surfaces.
Junked or abandoned refrigerators are dangerous, even
if they are sitting for only a few days. If you are getting
rid of your old refrigerator, please follow the instructions
at right to help prevent accidents (child entrapment and

DO NOT touch the automatic ice making mechanism 
while the refrigerator is plugged in.
DO NOT refreeze frozen foods which have thawed 
completely. The United States Department of
Agriculture in Home and Garden Bulletin No. 69 says:
…You may safely refreeze frozen foods that have
thawed if they still contain ice crystals or if they are



not be eaten. Thawed ice cream should be discarded.
If the odor or color of any food is poor or questionable,
dispose of it. The food may be dangerous to eat.
Even partial thawing and refreezing reduces the
eating quality of foods, particularly fruits, vegetables
and prepared foods. The eating quality of red meats

refrozen foods as soon as possible to save as much of
their quality as you can.
BEFORE YOU THROW AWAY
YOUR OLD REFRIGERATOR
OR FREEZER:

Leave the shelves in place so that 
children may not easily climb inside
.
WARNING :
This product contains chemicals known to the State of California to cause cancer and
birth defects or other reproductive harm.
Wash hands after handling. (USA only)
7
ELECTRICAL & GROUNDING REQUIREMENTS
WARNING
Your old refrigerator may have a cooling system


believed to harm stratospheric ozone if released to the
atmosphere. Other refrigerants may also cause harm to
the environment if released to the atmosphere.
IMPORTANT: Please read carefully.
TO CONNECT ELECTRICITY
RECOMMENDED GROUNDING METHOD
The refrigerator should always be plugged into its own
individual properly grounded electrical outlet rated for
115 Volts, 60 Hz, AC only, and fused at 15 or 20 amperes.
This provides the best performance and also prevents

hazard from overheated wires. It is recommended that a
separate circuit serving only this appliance be provided.

or pull chain. Do not use an extension cord.
Where a standard two-prong wall outlet is encountered,
it is your personal responsibility and obligation to have
it replaced with a properly grounded three-prong wall
outlet.
Electrical Shock Hazard
FOR PERSONAL SAFETY, this appliance must be
properly grounded. Have the wall outlet and the circuit

outlet is properly grounded.
If you are throwing away your old refrigerator, make
sure the refrigerant is removed for proper disposal


under provisions of environmental legislation.
USE OF EXTENSION CORDS
Because of potential safety hazards under certain conditions,
the use of an extension cord is not recommended. However,
if you still elect to use an extension cord, it is absolutely

appliance extension cord having a grounding type plug and
outlet, and that the electrical rating of the cord be 15 amperes

Use of an extension cord will increase the clearance needed
for the back of the refrigerator.
3-prong
grounding
plug
3-prong
grounding type
wall receptacle
Ensure proper
ground exists
before use.
CFC/HCFC DISPOSAL
Refrigerator Light
Water Filter
Diagnostics Speaker
Refrigerator Shelves
Air Filter
Durabase
Door Bins
Dairy Bin
Pullout Drawer
Modular Door Bin
Fixed Door Bins
Ice Compartment
(Icemaker and Ice Bin)
Extra Ice Bin
Articulating Mullion
Water Tank Cover
Crisper
Pantry Drawer
Durabase Divider
PARTS AND FEATURES
Use this page to become more familiar with the parts and features of your refrigerator.
NOTE: This guide covers several different models. The refrigerator you have purchased may have some
or all of the items listed below. The locations of the features shown below may not match your model.
Ice Bin
Icemaker
Ice Compartment
Door
B
A
C
D
E
F
C
G
H
I
J
K
L
M
N
Q
P
O
R
9
REFRIGERATOR INSTALLATION
WARNING WARNING
WARNING
UNPACKING YOUR REFRIGERATOR
Remove tape and any temporary labels from your
refrigerator before using. Do not remove any warning-
type labels, the model and serial number label, or
the Tech Sheet that is located under the front of the
refrigerator.
To remove any remaining tape or glue, rub the area
briskly with your thumb. Tape or glue residue can also be
easily removed by rubbing a small amount of liquid dish

water and dry.


products can damage the surface of your refrigerator.
Refrigerator shelves are installed in the shipping position.
Please reinstall shelves according to your individual
storage needs.
Excessive Weight Hazard:
Use two or more people to move and install the
refrigerator. Failure to do so can result in back or
other injury.
Excessive Weight Hazard:
Your refrigerator is heavy. When moving the
refrigerator for cleaning or service, be sure to protect

moving it. Do not wiggle or walk the refrigerator when

Explosion Hazard:

gasoline, away from the refrigerator. Failure to do so

10
REFRIGERATOR INSTALLATION
To avoid noise and vibration, the unit must be leveled
and installed on a solidly constructed floor. If required,
adjust the leveling legs to compensate for unevenness
of the floor. The front should be slightly higher than
the rear to aid in door closing. Leveling legs can be
turned easily by tipping the cabinet slightly. Turn the
leveling legs to the left to raise the unit or to the right to
lower it. (See LEVELING AND DOOR ALIGNMENT
.)
NOTE: Installing on carpeting, soft tile surfaces,
a platform or weakly supported structure is not
recommended.
Install this appliance in an area where the temperature
is between 55°F (13°C) and 110°F (43°C). If the
temperature around the appliance is too low or high,
cooling ability may be adversely affected.
Select a place where a water supply can be easily
connected for the automatic icemaker.
NOTE: The water pressure must be from 20-120 psi or
138-827 kPa or 1.4-8.4 kgf/cm². If the refri
gerator is
installed in an area with low water pressure (below 20
psi), you can install a booster pump to compensate for
the low pressure.
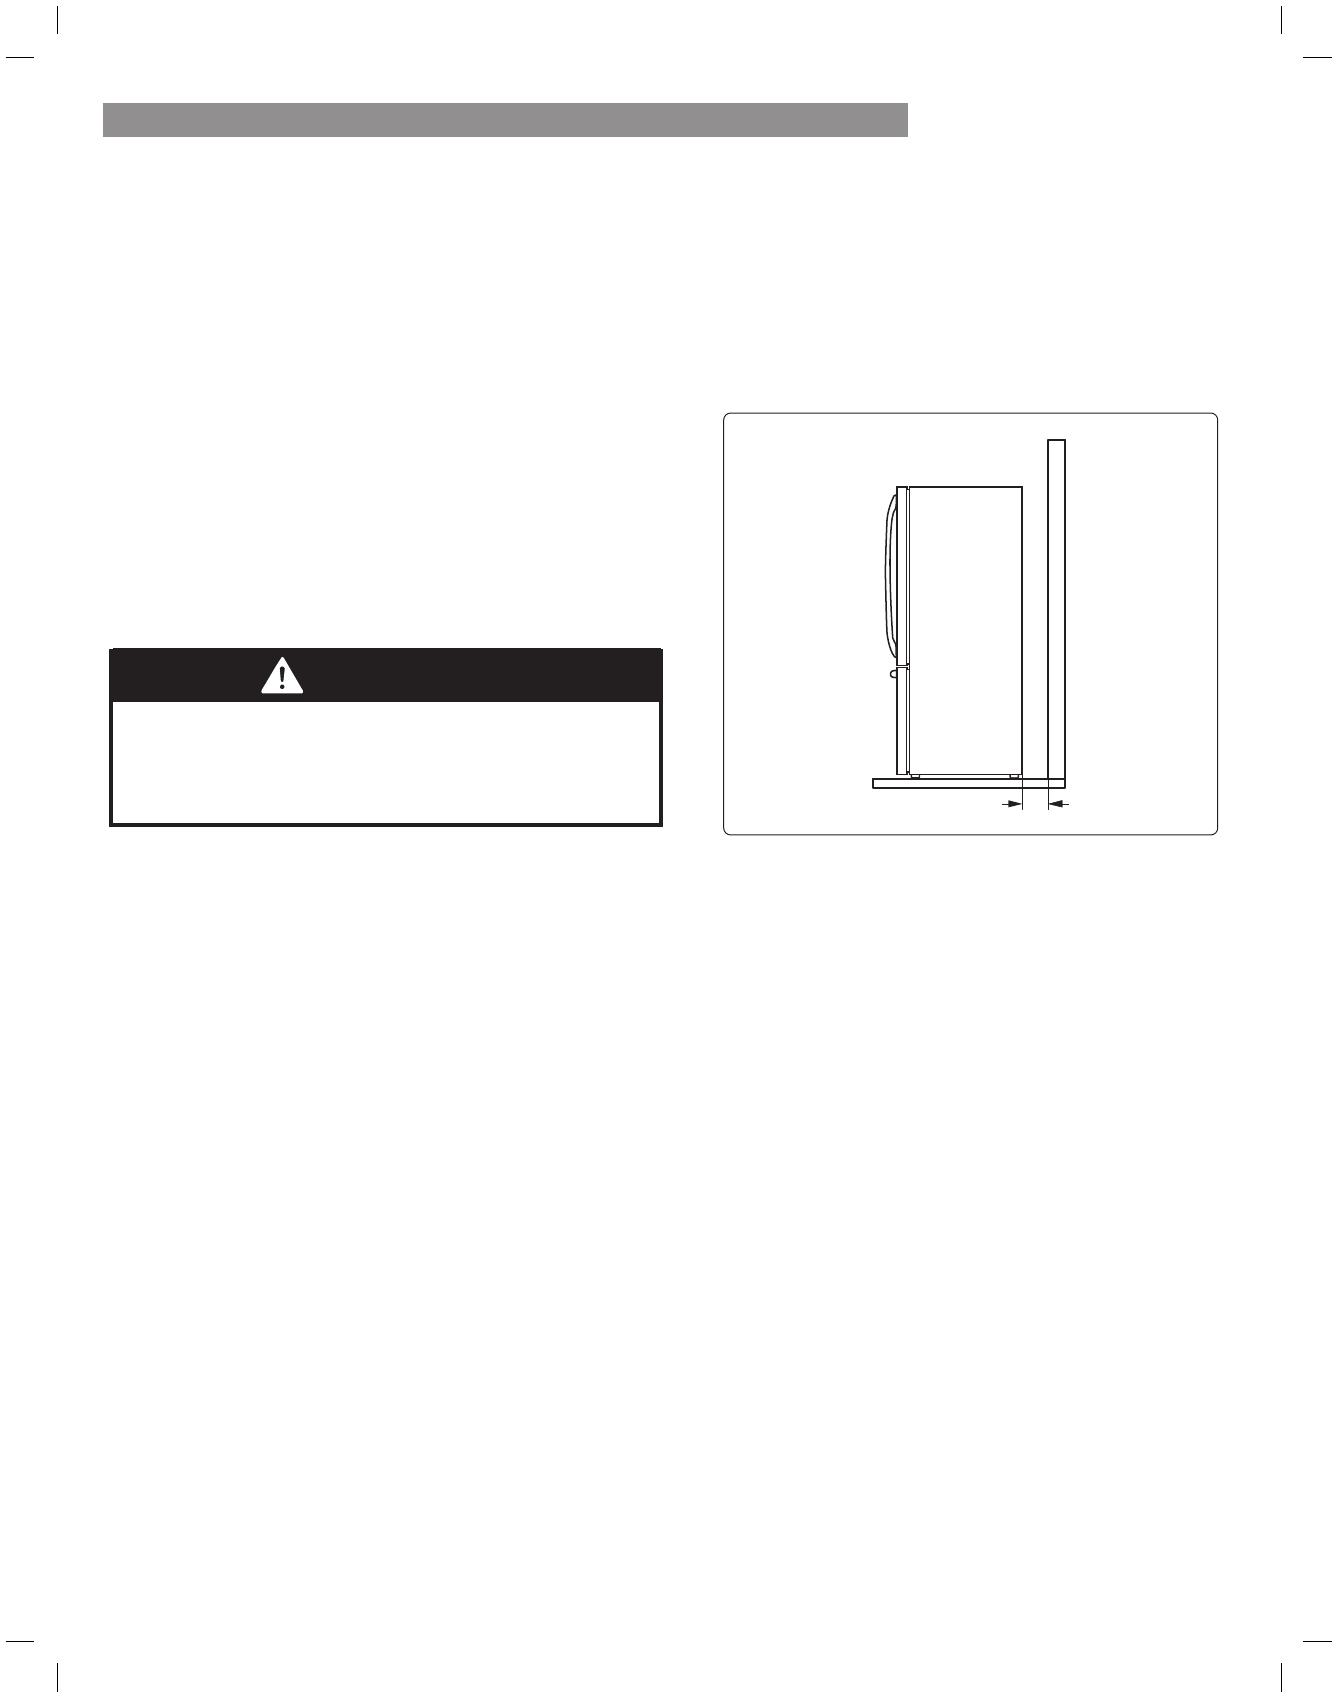
Too small of a distance from adjacent items may
result in lowered freezing capability and increased
electricity consumption charges. Allow at least 24
inches (61 cm) in front of the refrigerator to open the
doors and at least 2 inches (5.08 cm) between the
back of the refrigerator and the wall.
INSTALLATION
The refrigerator should always be plugged into its own
individual properly grounded electrical outlet rated for
115 Volts, 60 Hz, AC only, and fused at 15 or 20 amperes.
This provides the best performance and also prevents
overloading house wiring circuits which could cause a fire
hazard from overheated wires. It is recommended that a
separate circuit serving only this appliance be provided.
REFRIGERATOR INSTALLATION
2" (5.08 cm)
Shock Hazard:
To reduce the risk of electric shock, do not install the
refrigerator in a wet or damp area.
WARNING
This appliance is intended to be used in household and
similar applications such as staff kitchen areas in shops,
offices and other working environments; farm houses
and by clients in hotels, motels and other residential
type environments; bed and breakfast type
environments; catering and similar non-retail applications.
PRIOR TO USE
1. Clean your refrigerator thoroughly and wipe off all
dust that accumulated during shipping.
2. Install accessories such as ice cube bin, drawers,
shelves, etc., in their proper places. They are packed
together to prevent possible damage during shipment.
3. Allow your refrigerator to run for at least two to three
hours before putting food in it. Check the flow of
cold air in the freezer compartment to ensure proper
cooling. Your refrigerator is now ready for use.
11
REFRIGERATOR INSTALLATION
REMOVING AND REPLACING HANDLES
NOTE:Handle appearance may vary from the
illustrations on this page.
Removing Refrigerator Handle
Replacing Refrigerator Handle
Loosen the set screws with a
/ in. Allen
wrench and remove the handle.
NOTE: If the handle mounting fasteners need
to be tightened or removed, use a ¼ in. Allen
wrench.
NOTE: Removing the doors is always recommended when it is necessary to move the refrigerator through a narrow
opening. If it is necessary to remove the handles, follow the directions below.
Place the handle on the door by fitting
the handle footprints over the mounting
fasteners and tightening the set screws
with a
/ in Allen wrench.
NOTE: If the handle mounting fasteners
need to be tightened or removed, use a
¼ in. Allen wrench.
Mounting
Fasteners
Set Screw
Allen
Wrench
Mounting
Fasteners
12
When assembling or disassembling the handles:
Grasp the handle firmly to ensure it will not drop or
cause injury.
Prevent the handle from swinging toward nearby
people or animals.
Insert the bracket hole of the handle into the stopper
bolt of the door exactly, then assemble the set screws
to fix the handle in place.
Check for any gap between the door and handle
after the handle is fixed in place.
WARNING
REFRIGERATOR INSTALLATION
Replacing Freezer Drawer Handle
Place the handle on the door by fitting the handle
footprints over the mounting fasteners and tightening
the set screws with a in. Allen wrench.
NOTE: If the handle mounting fasteners need to be
tightened or removed, use a ¼ in. Allen wrench.
REMOVING AND REPLACING HANDLES (CONTINUED)
NOTE: Handle appearance may vary from the illustrations
on this page.
Removing Freezer Drawer Handle
Loosen the set screws located on the lower side of
eht evomer dna hcnerw nellA .ni
a htiw eldnah eht
handle.
NOTE: If the handle mounting fasteners need to be
tightened or removed, use a ¼ in. Allen wrench.
NOTE: Removing the doors is always recommended when it is necessary to move the refrigerator through a narrow
opening. If it is necessary to remove the handles, follow the directions below.
13
REFRIGERATOR INSTALLATION
Removing the Left Door
WARNING
Electrical Shock Hazard
Disconnect the electrical supply to the refrigerator
before installing. Failure to do so could result in
serious injury or death.
Do not put hands, feet or other objects into the air
vents or bottom of the refrigerator. You may be
injured or receive an electrical shock.
REMOVING AND REPLACING
REFRIGERATOR DOORS
WARNING
Excessive Weight Hazard:
Use two or more people to remove and install the
refrigerator doors. Failure to do so can result in
back or other injury.
1
The water supply is connected to the upper
right part of the rear surface of the refrigerator.
Remove the ring in the joint area. Hold the water
supply connection and gently push the collet (1) to
detach the water supply line (2) as shown.
2
Remove the screw (1) from the hinge cover at the
top of the refrigerator. Lift the hook (not visible),
located at the bottom of the front side of the cover
(2) with a flat-heat screwdriver.
3
Remove the cover and pull out the tube (1).
Disconnect all wire harnesses (2). Unscrew the
ground wire (3).
4
Rotate the hinge lever counterclockwise (1). Lift
the top hinge (2) free of the hinge lever latch.
(1)
(2)
Hinge Lever Latch
CAUTION
When lifting the hinge free of the latch,
be careful that the door does not fall
forward.
5
Lift the door from the middle hinge pin and
remove the door.
NOTE: Place the door, inside facing up, on a
nonscratching surface.
NOTE
Disassembling/Assembling the Water Lines
Collet
Tube
Insert line
Clip
(Correct)
14
REFRIGERATOR INSTALLATION
Removing the Right Door
1
Remove the top hinge cover screw (1). Lift
the hook (not visible), located at the bottom of
screwdriver.
the front side of the cover (2), with a flat-head
2
Detach the wire harness (1).
3
Rotate the hinge lever (1) clockwise. Lift the top
hinge (2) free of the hinge lever latch.
Hinge Lever Latch
CAUTION
When lifting the hinge free of the latch, be
careful that the door does not fall forward.
4
Lift the door from the middle hinge pin and
remove the door.
NOTE: Place the door, inside facing up,
on a nonscratching surface.
Install the right-side door first.
Replacing the Right Door
1
Make sure that the plastic sleeve is inserted in
the bottom of the door. Lower the door onto
the middle hinge pin as shown in the figure.
2
Fit the hinge (1) over the hinge lever latch
and slot it into place. Rotate the lever (2)
counterclockwise to secure the hinge.
Hinge Lever Latch
3
Connect the wire harness (1).
4
Place the cover (1) in its place. Insert and tighten
the cover screw (2).
15
REFRIGERATOR INSTALLATION
Replacing the Left Door
Install the left refrigerator door after the right door is
installed.
1
Make sure that the plastic sleeve is inserted in
the bottom of the door. Install the refrigerator door
onto the middle hinge.
2
Fit the hinge (1) over the hinge lever latch and
slot it into place. Rotate the lever clockwise (2)
and fasten the hinge.
Hinge Lever Latch
3
Connect all the wire harnesses.
4
Push the water supply tube into the hole on the
top case and pull it through the backplate.
5
Hold the water supply connection and gently push
in the collet (1) to connect the water supply line
(2) as shown. Insert the tube at least 5/8 inch (15
mm) into the connector. Insert the clip on the joint
to fasten the tube in place.
Collet
6
Place the cover (1) in place. Insert and tighten the
cover screw (2).
NOTE
Disassembling/Assembling the Water Lines
Collet
Tube
Insert line
Clip
(Correct)
Gently press the collet and insert the tube until only
one line shows on the tube.
(Correct) (Incorrect)
16
REFRIGERATOR INSTALLATION
REMOVING FREEZER DRAWERS
Removing The Freezer Drawer
WARNING:
Use two or more people to remove and
install the freezer drawer. Failure to do so can result in
back or other injury.
NOTE: In the following figues, the Pullout Drawer
located above the freezer drawer is not shown for clarity.
Pull the drawer open to full extension.
Gently lift and pull out the ice bin.
Lift the front of the drawer up, then pull it straight out.
Hold both rails and push them in simultaneously.
CAUTION:
When you remove the freezer drawer, do not hold
the handle. The handle may come off and it could
cause personal injury.
Remove the Durabase basket from the rails.
Remove the screws from the rails at both ends.
Grip both sides of the drawer and pull it up to
remove it from the rails.
17
REFRIGERATOR INSTALLATION
REPLACING FREEZER DRAWERS
Replacing The Freezer Drawer
Pull out both rails simultaneously, until they are fully
extended.
WARNING
If the Durabase divider is removed, there
is enough open space for children or pets
to crawl inside. To prevent accidental
child and pet entrapment or suffocation
risk, DO NOT allow them to touch or go
near the freezer drawer.
DO NOT step or sit down on the freezer
drawer.
Grasp the drawer on each side and hook the
drawer supports into the rail tabs located on both
sides.
tighten the screws located on both sides.
Lower the door into its final position and
Push the drawer back until it clicks into place.
Replace the ice bin in the drawer. Insert the
Durabase basket in the rail assembly.
WARNING:
Use two or more people to remove and
install the freezer drawer. Failure to do so can result in
back or other injury.
NOTE: In the following figues, the Pullout Drawer
located above the freezer drawer is not shown for clarity.
18
screwdriver.
1. Turn the leveling leg to the left to raise that side of
the refrigerator or to the right to lower it. It may take
several turns of the leveling leg to adjust the tilt of the
refrigerator.
NOTE: Having someone push backward against the top of
the refrigerator takes some weight off of the leveling legs.
This makes it easier to adjust the legs.
2. Open both doors again and check to make sure that
they close easily. If the doors do not close easily, tilt
the refrigerator slightly more to the rear by turning
both leveling legs to the left. It may take several more
turns, and you should turn both leveling legs the same
amount.
NOTE: Your refrigerator is uniquely designed with
two fresh food doors. Either door can be opened or
closed independently of the other. You may have to
exert slight pressure on the doors to get them to close
completely.
REFRIGERATOR INSTALLATION
LEVELING AND DOOR ALIGNMENT
Leveling
After installing, plug the refrigerator’s power cord into a
3-prong grounded outlet and push the refrigerator into the
final position.
Your refrigerator has two front leveling legs—one on the
right and one on the left. Adjust the legs to alter the tilt
from front-to-back or side-to-side. If your refrigerator
seems unsteady, or you want the doors to close more
easily, adjust the refrigerator’s tilt using the instructions
below:
NOTE: Tools Required:
/
Door Alignment
The left refrigerator door has an adjustable nut, located
on the bottom hinge, to raise and lower the door for
proper alignment.
If the space between your doors is uneven, follow the
instructions below to align the doors.
Use the wrench (included with the Use & Care Guide) to
turn the nut in the door hinge to adjust the height.
Turn the nut right to raise the door or left to lower it.
19
USING YOUR REFRIGERATOR
SETTING THE CONTROLS
NOTE:
The dispenser will not operate when either
of the refrigerator doors is open.
NOTE:
If the Control Lock LED icon is illuminated, the
dispenser will not work. Disable the Control Lock to use
the dispenser again.
CAUTION:
The control display is operated by touch.
Excessive moisture on the display may cause a
malfunction. Please keep the display clean and dry.
The Refrigerator Control is preset at 37°F (C) and
the freezer control is preset atF (-18°C). These are the
recommended temperature settings for normal use and
conditions. Wait 24 hours for the refrigerator and freezer
to reach these temperatures.
The Refrigerator Temp Control range is from 33°F to 46°F
(1°C to 8°C). The lower the setting, the colder the
refrigerator compartment will become.
The Freezer Temp Control range is from -6°F to 8°F
(-21°C to -13°C). The lower the setting, the colder
the freezer compartment will become.
NOTE:
When changing control settings, wait 24 hours
before making additional adjustments. The controls are set
correctly when milk or juice is as cold as you would like
and when ice cream is rm. If the temperature in either
compartment is too cold or too warm, change the setting
one increment at a time. Wait 24 hours for the change to
stabilize before adjusting again.
The dispenser dispenses water, cubed ice, or crushed ice.
Press the Ice/Water button repeatedly to illuminate the
icon for the desired dispenser mode.
Temperature
Airflow
Be sure not to block vents while loading
food into the refrigerator. Doing so will
restrict airow
and may cause
the refrigerator
temperature to
become too warm or
cause interior moisture
buildup. (See airflow
diagram below.)
Accela Ice
When you touch the Accela Ice
button, the
LED
will light up and will remain on for 24 hours.
The function will automatically shut off after 24 hours.
You can stop this function manually by touching the button
one more time.
This function increases both ice making and freezing
capabilities.
Water Filter Reset
When the "Change Water Filter" text lights up,
change the water filter. After changing the water filter, press
and hold button for three seconds to turn the indicator light
off. You need to change the water filter approximately every
six months.
Ice / Water
1
2
3
USING YOUR REFRIGERATOR
CAUTION
To reduce the risk of scratching
the door or breaking the door
mullion, make sure that the
refrigerator door mullion is
always folded in.
Articulating Mullion
This feature is a metal strip attached to the left door
that articulates (rotates) 90 degrees as the door is
closed, forming a mullion (base) for the left and right
door gaskets to seal against.
Air Filter
The Air Filter helps remove odors from the
refrigerator. The Air Filter has two settings, Auto and
MAX. In Auto mode, the Air Filter will cycle on and
off in increments of ten minutes on and 60 minutes
off. If set to the M AX mode, the Air Filter will stay
on continuously for four hours, cycling on a
nd off in
increments of ten minutes on and ve minutes off.
After four hours, the Air Filter will switch to Auto
mode.
Auto mode is the default mode. (Max LED off)
Press the
Air Filter button once for Max mode. (Max LED on)
Air Filter Reset
Control Lock
When the "Change Air Filter" text lights up, replace
the air filter. After replacing the air filter, press and
hold the Air Filter button for 3 seconds to turn the
LED off. Replace the air filter approximately every
6 months.
Temperature Mode Switch Function (°F <->°C)
If you want to convert °F to °C or vice versa, press and
hold the Freezer Temp and Refrigerator Temp buttons at
the same time for approximately ve seconds.
Demo Mode (For Store Use Only)
To deactivate:
With either refrigerator door opened, press and hold the
Refrigerator Temp and
Accela Ice
buttons at the same
time for ve seconds. The control panel will beep and the
temperature settings will display to conrm that Demo
Mode is deactivated. Use the same procedure to activate
the Demo Mode .
The Demo Mode disables all cooling in the refrigerator
and freezer sections to conserve energy while on
display
in a retail store. When activated, OFF will display on the
control panel.
• When power is initially connected to the refrigerator,
the Lock function is off.
• To lock the control panel and dispenser, press and hold
the Control Lock button for 3 seconds or until the LED
turns on.
• To unlock the controls and dispenser, press and hold the
Control Lock button until the LED turns off.
20
  • Page 1 1
  • Page 2 2
  • Page 3 3
  • Page 4 4
  • Page 5 5
  • Page 6 6
  • Page 7 7
  • Page 8 8
  • Page 9 9
  • Page 10 10
  • Page 11 11
  • Page 12 12
  • Page 13 13
  • Page 14 14
  • Page 15 15
  • Page 16 16
  • Page 17 17
  • Page 18 18
  • Page 19 19
  • Page 20 20
  • Page 21 21
  • Page 22 22
  • Page 23 23
  • Page 24 24
  • Page 25 25
  • Page 26 26
  • Page 27 27
  • Page 28 28
  • Page 29 29
  • Page 30 30
  • Page 31 31
  • Page 32 32
  • Page 33 33
  • Page 34 34
  • Page 35 35
  • Page 36 36
  • Page 37 37
  • Page 38 38
  • Page 39 39
  • Page 40 40
  • Page 41 41
  • Page 42 42
  • Page 43 43
  • Page 44 44
  • Page 45 45
  • Page 46 46
  • Page 47 47
  • Page 48 48
  • Page 49 49
  • Page 50 50
  • Page 51 51
  • Page 52 52
  • Page 53 53
  • Page 54 54
  • Page 55 55
  • Page 56 56
  • Page 57 57
  • Page 58 58
  • Page 59 59
  • Page 60 60
  • Page 61 61
  • Page 62 62
  • Page 63 63
  • Page 64 64
  • Page 65 65
  • Page 66 66
  • Page 67 67
  • Page 68 68
  • Page 69 69
  • Page 70 70
  • Page 71 71
  • Page 72 72
  • Page 73 73
  • Page 74 74
  • Page 75 75
  • Page 76 76
  • Page 77 77
  • Page 78 78
  • Page 79 79
  • Page 80 80
  • Page 81 81
  • Page 82 82
  • Page 83 83
  • Page 84 84
  • Page 85 85
  • Page 86 86
  • Page 87 87
  • Page 88 88
  • Page 89 89
  • Page 90 90
  • Page 91 91
  • Page 92 92
  • Page 93 93
  • Page 94 94
  • Page 95 95
  • Page 96 96
  • Page 97 97
  • Page 98 98

Kenmore 73102 Owner's manual

Category
Side-by-side fridge-freezers
Type
Owner's manual
This manual is also suitable for

Ask a question and I''ll find the answer in the document

Finding information in a document is now easier with AI

in other languages