
March 2023 Humidex GVS-HB Rev. 2.5En
Owner’s Manual
Manufactured by:
Clairitech Innovations Inc.
1095 Ohio Rd.
Boudreau-West, NB
Canada E4P 6N4

Humidex
1
Table of Contents
Table of Contents 1
Service and Warranty 2
FOR CUSTOMER ASSISTANCE 2
CONSUMER LIMITED WARRANTY 3
Before Installing 5
TECHNICAL DATA 5
RECOMMENDED TOOLS REQUIRED FOR INSTALLATION 5
INCLUDED PARTS LIST 5
IDEAL INSTALLATION LOCATION 5
WARNINGS FOR USE 6
Installation 7
How to Operate the Humidex 8
Wiring Diagram 9
Return and exchange Policy 10

Humidex
2
For the following inquiries:
- Service
- Parts
- Accessories
- Additional customer information
Please contact us by:
Phone: 1-888-533-1348
Email: support@clairitech.com
Website: www.humidex.com
Service and Warranty
For customer assistance
To aid in answering questions if you call for service or warranty
purposes, please record below the model and serial number located
on the side of the unit.
Product name:
Model #:
Date of manufacturing:
Serial #:
Dealer name (if any):

Humidex
3
Consumer Limited Warranty
Clairitech Innovations Inc. warrants to the first consumer that this
Humidex product, when shipped in its original container, will be
free from defective workmanship and materials, and agrees that it
will, at its discretion, either repair the defect or replace the defective
product or part thereof with a new or remanufactured equivalent at
no charge to the purchaser for parts or labor for the period(s) set
forth below. All transportation charges are the sole responsibility of
the purchaser.
This warranty does not apply to any appearance item of the
product nor to any additional excluded item set forth below of
which has been damaged, defaced, subjected to improper voltage,
abnormal service or handling, or which has been altered or
modified in design or construction.
In order to enforce the rights under this limited warranty, the
purchaser should follow the steps set forth below and provide
proof of purchase to the servicer.
Neither the sales personnel of the seller nor any other person is
authorized to make any warranties other than those described
herein, or to extend the duration of any warranties beyond the time
period described herein on behalf of Clairitech Innovations Inc.

Humidex
4
The warranties described herein shall be the sole and exclusive
warranties granted by Clairitech and shall be the sole and exclusive
remedy available to the purchaser. Correction of defects, in the
manner and for the period of time described herein, shall constitute
complete fulfillment of all liabilities and responsibilities of
Clairitech to the purchaser with respect to the product, and shall
constitute full satisfaction of all claims, whether based on contract,
negligence, and strict liability or otherwise. In no event shall
Clairitech be liable, or in any way responsible, for any damages or
defects in the product which were caused by repairs or attempted
repairs performed by anyone other than an authorized servicer.
Nor shall Clairitech be liable or in any way responsible for any
incidental or consequential economic or property damage.
Warranty period for
this product:
Two (2) years on parts and labor from
date of purchase.
Additional items
excluded from
warranty coverage (if
any):
Appearance items of the product,
exterior vent and any printed material.
Where to obtain
service:
From the manufacturer. Please call 1-
888-533-1348 if you require any
information.
To obtain supply, accessory or product information, call 1-888-533-
1348 or visit our website at humidex.com/en/services .
IMPORTANT
To properly validate your warranty, you must complete and return
the warranty card within 90 days.
If your device is not registered, proof of purchase will be required
if it requires service after approval from our Service Department.
You can also register your warranty online.
http://www.clairitech.com/support/register.

Humidex
5
Before Installing
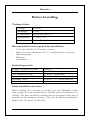
Technical data
Voltage:
115VAC
Amperage
0.26A
Certification:
QPS File# LR1079
Dimensions:
9” x 6.5” x 4”
Capacity:
Up to 750 sq. ft.
Recommended tools required for installation
- 1/4’’ pilot drill bit of 12 inches or more
- Hole saw with a diameter of 4 ½”, reciprocal saw or, jig saw
- Measuring tape
- Hammer
- Screwdriver
Included parts list
Garage Ventilation System
Manual
4” Exhaust Vent
6x #8x9/16” mod white screws
1Pc. Aluminum Tape
4x #6x2” woodscrew
Control Knob
2x #8x1-1/4” truss screws
Humidity Label
2x #8x1-1/4” yellow anchors
Warranty Card
1pc. 4” vinyl flex
Ideal installation location
When looking for a location to install your new Humidex, make
sure to place it on an outside wall so that the unit can exhaust its air
outside. The unit should be installed near an electrical outlet and, if
possible, in the dampest location. The unit should be installed no
higher than 12 inches off the floor.

Humidex
6
Warnings for use
The following warnings will help reduce the risk of fire, electric
shock or injury. Please read and save these instructions.
1) Do not operate any unit with a damaged cord or plug.
Please contact our service department for examination
and/or repair.
2) Do not run cord under any object, which include but
limited to, carpets, furniture, appliances etc. Arrange cord
away from traffic area.
3) The unit MUST exhaust the air outside.
4) Do no vent exhaust air into spaces within walls, ceilings,
attics, crawl spaces or garages.
5) For general ventilating use only. Do not use to exhaust
hazardous or explosive materials and vapors.
6) For use in non-fire rated installations only.
7) Use this unit only in the manner intended by the
manufacturer.
8) When cutting or drilling into wall, do not damage electrical
wiring or other hidden utilities.
9) Always unplug the unit from its power source before
cleaning or servicing.
10) To reduce the risk of electrical fire or shock, do not use
fan with any solid state speed control device.
11) Plug the unit in a general use receptacle provided with a
Class A ground-fault circuit interrupter (GFCI) with open
neutral protection.

Humidex
7
Installation
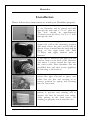
Please follow these instructions to install your Humidex properly.
1. From the inside, mark where the center
of the Humidex will be placed and drill
through the wall with a ¼’’x 12’’ pilot bit.
The hole should be approximately
12 inches from the floor. Cut a 4 ½’’ hole
through the wall.
2. From the inside, place the Humidex
against the wall in the mounting position
and mark where the pilot screws will be
placed. Keep in mind that the knob will be
going on the right hand side. Drill
¼’’ holes, and apply anchors with a
hammer.
3. Use tape to fasten the flex pipe over the
exhaust outlet on the back of the Humidex
and fasten 3 screws around the tape into
the outlet collar. Place Humidex into the
predrilled hole and then secure appliance
by fastening to the anchors.
4. From the outside, stretch and cut any
excess flex pipe. Proceed to place vent
collar into the flex and securing in its
correct position by taping and screwing
into the vent collar.
5. Place all 4 #6 x 2’’ screws in a diagonal
pattern to prevent vent twisting, and to
acquire the best fit around your siding.
After placing in the final screw, use
caulking to properly seal around the vent.
*The garage ventilators picture may not be exactly as shown

Humidex
8
How to Operate the Humidex
After both the Humidex and the exhaust vent are properly
installed. You can install the humidity label that came inside with
the unit. After the label is properly affixed, you can install the
control knob unto the Humidex.
- Humidity label
- Control knob
After installing the decal and knob, plug the Humidex in the closest
outlet. Set the dial to your humidity preference. If you wish to have
the unit on for a continuous basis, turn the dial fully to the right
(20%). If you would like it to run to its minimal capacity, turn the
dial fully to the left (80%).
Manufacturer’s suggested setting is to be placed between 40% and
60% (comfort zone).
The Humidex garage and multipurpose humidity control unit will
reduce moisture levels inside your garage or shed. Whether you
want to keep your wood dry for your furnace or just want a dryer
space, Humidex is the unit that can make it possible.

Humidex
9
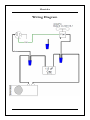
Wiring Diagram

Humidex
10
Return and Exchange Policy
Clairitech Innovations Inc. values its relationship with you and
offers you the option to return most products you purchase directly
from Clairitech Innovations Inc., as set forth in detail below.
Policy
Return period of 30 days for unused products and accessories:
Unless you have a separate agreement with Clairitech Innovations
Inc., or subject to the provisions below, all equipment and
accessories that have not been used, in new condition and in their
original packaging may be returned to Clairitech Innovations Inc.
within 30 days of the date of purchase for a refund of their
purchase price, an equivalent credit note or the exchange of the
product, less shipping and handling charges, resupply fee and
applicable taxes, if already paid.
Return period of 15 days for defective or damaged products
and accessories:
Requests for refund and/or exchange for defective or damaged
merchandise can be made within 15 days of receipt of the
merchandise. After 15 days, the manufacturer's warranty applies.
Note: Any product returned to Clairitech Innovations Inc. without
the prior permission of Clairitech Innovations Inc. will be
considered an unauthorized return; the customer will not receive
any refunds or credit notes for the product and Clairitech
Innovations Inc. will not return the product to the customer.
Damaged products and accessories:
If you have received damaged items, please contact us by phone or
email before destroying or discarding the product and/or
packaging. Failure to comply could see your request denied.

Humidex
11
Fees
Unless the product is defective or the return is a direct result of a
Clairitech Innovations Inc., the refund or credit does not include
any shipping and handling charges shown on your packing slip or
invoice; you are responsible for those and for any damages incurred
during the return shipment.
Procedure
1. Before returning a product, you must first obtain a Return
Authorization Number from Clairitech Innovations Inc. Customer
Service before the end of the applicable return period. Proof of
purchase will also be required.
To contact Clairitech Innovations Inc. Customer Service, please
call 1-888-533-1348 or Email Us
Any product returned to Clairitech Innovations Inc. without the
prior approval of Clairitech Innovations Inc. will be considered an
unauthorized return; the customer will not receive any credit or
refund for the product and Clairitech Innovations Inc. will not
return the product to the customer.
2. Pack the product in its original package
3. Insert all the documents received concerning the order to be
returned. Remember to keep a copy of all the documents provided.
4. To obtain a full refund, the products must be returned in perfect
condition, in their original packaging and with all documents, parts
and accessories.
5. The return costs must be prepaid; we will not accept deliveries
paid at the reception.
6. For your protection, we advise you to provide the shipping
service
7. Five days after the date of issue of the return authorization
number Clairitech Innovations Inc. Customer Service, you must
send the product to the following address:

Humidex
12
ClairiTech Innovations Inc.
1095 ch. Ohio Service Rd
Boudreau Ouest, NB
E4P 6N4 - Canada
8. Upon receipt of your authorized and compliant return, Clairitech
Innovations Inc will issue a credit or refund equal to the purchase
price paid, less shipping and handling charges, restocking charges
and applicable taxes subject to this policy.
9. For assistance please call 1-888-533-1348 or Email Us
10. For any questions regarding warranty terms please call 1-888-
533-1348 or Email Us
NO RETURNS ARE POSSIBLE AFTER 30 DAYS FOLLOWING THE
DATE OF THE BILLING DATE.
CLAIRITECH INNOVATIONS SHALL NOT BE LIABLE FOR, OR
ANY CHARGE OF, A CONSUMER ORDER ERROR.
-
 1
1
-
 2
2
-
 3
3
-
 4
4
-
 5
5
-
 6
6
-
 7
7
-
 8
8
-
 9
9
-
 10
10
-
 11
11
-
 12
12
-
 13
13


Ask a question and I''ll find the answer in the document
Finding information in a document is now easier with AI