Zanussi ZME2002V User manual

Category
Hobs
Type
User manual

This manual is also suitable for

1
Bedienungs- und Einbauanleitung für Einbau-Kochmulden
Operating and Assembly Instructions for Built-in Hobs
Notice d'utilisation et de montage des tables de cuisson
encastrables
Istruzioni per I'uso il montaggio de piani di cottura
Gebruiksaanwijzing en inbouwinstructies voor inbouw-
kookplaaten
Bruksanvisning för inbyggnadshällar
Kalusteisiin asennettavan keittotason käyttö- ja
asennusohjeet
Zanussi
48
325 87-8600 Rev. 11-038
11
Installing the Hob
Check the hob for transport damage. Do
not install the hob if it shows signs of
damage. Be careful at the installation.
The Built-In-Hob correspond to heat
insulation class Y. In other words, a
kitchen unit taller than the hob unit may
be positioned on one side of it, but not on
both sides. On at least one side, there
must be no unit taller than the hob unit
itself.
Cut the tabletop according to the pre-
scribed dimensions or template (cut
exactly in the lines).
- The cutting measures are shown on fig.
2.
Check that the gasket is placed cor-rectly
and in continuity. Place the hob in the
cutout, properly centered.
Use a screwdriver, possibly for cross-
recessed screws, for tightening the
fastening screws, starting at the middle
and proceding with the screw diagonally
opposite, tightening evenly until the edge
of the hob is held firmly against the
tabletop. Fig. 1.
GB
40
28
Fig. 1 40 mm
28 mm
X: The placement of the fastenings
screws.
Stainless steel hobs Enamelled hobs
38
SE
Obs!
Dra inte åt skruvarna mer än
nödvändigt!
Använd inte elverktyg utan
slirkoppling!
Demontering av hällen
Gör hällen strömlös före demonterin-
gen (t.ex. genom att ta ur
säkringarna).
Elinstallation
Anslutningen av hällen till
kontrollenheten får endast utföras av
en elektriker.
Se till att huvudströmmen till hällen
och kontrollenheten är avstängd under
installationen.
Om hällen ansluts med hjälp av
stickkontakt och uttag måste man
kontrollera att de har rätt dimensioner.
Om hällen installeras tillsammans med
en ugn måste även anvisningarna för
installation av ugnens kontrollenhet
följas noggrant.
Vid installationen ska elektrikern se till
att det inte går att vidröra
strömförande delar. Om hällen styrs
av en kontrollenhet ska en
avskärmning installeras!
Avståndet från hällens underdel till
underliggande köksinredning får inte
vara mindre än 110 mm.
Om hällen inte ansluts med stick-
kontakt och uttag ska anslutningen till
nätet utföras med en frånskiljare som
bryter alla faser med ett
kontaktavstånd på minst 3 mm.
De olika kombinationerna med häll/
inbyggnadsugn/kontrollenhet visas i
den bifogade tabellen.
De olika möjligheterna för att
kombinera en häll med en ugn/
kontrollenhet måste kontrolleras enligt
installations- och bruksanvisningarna
innan apparaten installeras.
12
GB
Attention!
Do not tighten more than necessary!
Do not use power tools without an
adjustable slipping clutch!
Important when dismantling the
Hob
Isolate the hob (for instance by
removing the fuses).
Electrical Installation
Connecting the hob with the special
control unit must be carried out by an
eletrician.
Hob and control unit shall be
disconnected from mains during the
installation
If the hob is connected by means of a
plug and socket, use always the
proper size.
If the hob is installed in combination
with an oven, the instructions for
connecting the oven control unit must
also be carefully followed.
The installation must ensure that live
parts cannot be touched incidentally.
If the hob is controlled by means of a
control unit, a partition should be
installed!
The distance between the bottom of
the hob and the carpentry below
should not be less than 110 mm.
If the hob is not connected with plug
and socket, the connection to the
supply shall be effected by means of
an isolating switch which breaks all
the phases with a minimum of 3 mm
contact gap.
The combinations between hobs/
build-in ovens/control units are shown
on the table annexed to the present
instructions.
The possibilities of conbining a hob
with oven/control unit should be
checked on the basis of the relevant
instructions for installation and use
before the apparatus is installed.
37
SE
Installation av hällen
Kontrollera att hällen är oskadad vid
leveransen. Installera inte hällen om
den uppvisar tecken skada. Var
försiktig under installationen.
Inbyggnadshällen ingår i
värmeisoleringsklass Y, dvs att
köksinredning som är högre än hällen
får placeras vid hällens ena sida, men
inte på båda. På minst en sida ska det
finnas ett kökselement som inte är
högre än själva hällen.
Såga ut köksbänken enligt de
föreskrivna dimensionerna eller enligt
mallen (såga exakt i linjerna).
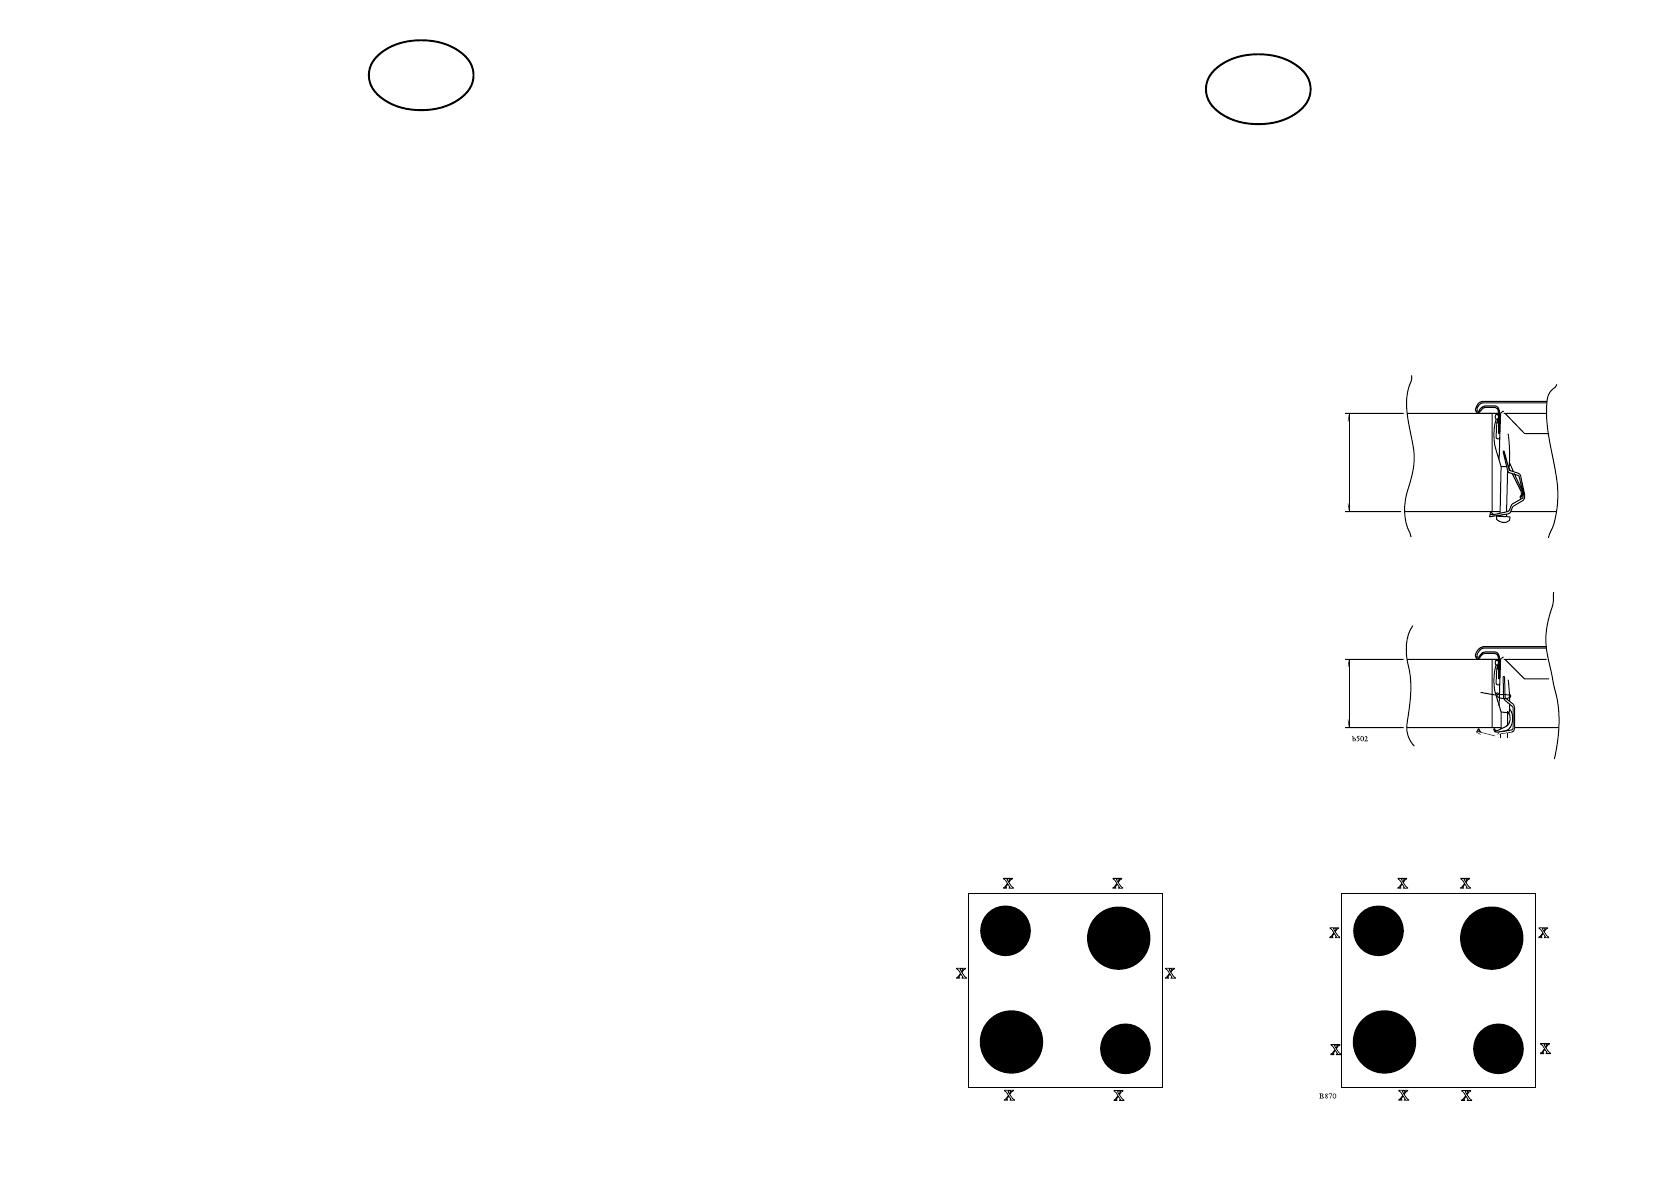
-Utskärningsmåtten anges i fig. 2.
Kontrollera att packningen är rätt
placerad. Placera hällen i hålet och se
till att den är exakt centrerad.
Använd en skruvmejsel, eventuellt en
stjärnmejsel, för att dra åt
fästskruvarna. Börja i mitten och dra
sedan åt skruven som ligger diagonalt
mittemot. Dra åt skruvarna lika
mycket tills hällens kant ligger tätt
mot köksbänken. Fig. 1.
Häll av rostfritt stål Emaljerad häll
X: Fästskruvarnas placering
40
28
Fig. 1 40 mm
28 mm
14
490
50
560
510
580
50
Min. 568
Min. 150
Min. 55
Fig. 2.
With control unit
With build-in oven
Cutting measures as above
GB
35
GR
490
50
560
510
580
50
Min. 568
Min. 150
Min. 55
Ìå ìïíÜäá åëÝã÷ïõ
Ìå åíôïé÷éóìÝíï öïýñíï
ÄéáóôÜóåéò êïðÞò
15
GB
Important Notice for Enamelled
Hobs
Enamelled surfaces are hard as glass
and require special care. Hard and
sharp objects may damage enamel.
Enamelled surfaces may splinter if
heavy objects are dropped on them.
Fruit juice spots should be washed off
before they leave permanent stains.
The daily work in a kitchen will cause
scratches and dull spots. Such
blemishes are, of course, not covered
by our guarantee.
Use normal, mild household
detergents for cleaning the hob never
scouring powder.
Notice!
The plates are provided with a
protective film, which shall be remo-
ved by heating before using the plates
for the first time. Leave the plates
with maximum heat on for 3 minutes.
Protect your plates against moisture
to avoid rusting. Do not place wet
utensils on the plates.
Kitchen utensils get hot on the hob, so
exert care.
Small children should not stay near.
Do not keep temperature sensitive or
inflammable materiale in drawers
immediately below the hob. -This
applies for example to detergents and
aerosols.
Be careful with other kitchen tools
plugged in close to the hob. Their flex
should never touch the hot plates.
34
ZANUSSI
GR
1 2
2 1
4 5
5 3
ÐåñéãñáöÞ ðëáéóßùí åóôéþí:
1= Åóôßá ôá÷åßáò èÝñìáíóçò
145 Ø - 1500 W, 7 âáèìßäåò
Áõôüìáôïò Ýëåã÷ïò
2= Åóôßá ôá÷åßáò èÝñìáíóçò
180 Ø - 2000 W, 7 âáèìßäåò
Áõôüìáôïò Ýëåã÷ïò
3= Åóôßá ôá÷åßáò èÝñìáíóçò
145 Ø - 1500 W, 7 âáèìßäåò
4= Åóôßá ôá÷åßáò èÝñìáíóçò
145 Ø - 1000 W, 7 âáèìßäåò
5= Åóôßá ôá÷åßáò èÝñìáíóçò
180 Ø - 1500 W, 7 âáèìßäåò
ZANUSSI
230-400 V~, 50Hz, 2N~, 5500 W ÊáôáóêåõáóôÞò:
EV-Denmark
Ôýðïò:
HOM 440
ÌÏÍÔÅËËÏ ÁÑ.ÐÑ. ÁÑ.ÓÅÉÑÁÓ
ZME 2002V 941628121
ZMF 2102 941628122
ZMFW 2302 V 941628123
230-400 V~, 50Hz, 2N~, 7000 W ÊáôáóêåõáóôÞò:
EV-Denmark
Ôýðïò:
HOM 430
ÌÏÍÔÅËËÏ ÁÑ.ÐÑ. ÁÑ.ÓÅÉÑÁÓ
ZMFW 2305 W 941628118
ZMF 2105VD 941628119
ZMS 2205VD 941628120
ZME 2005VD 941628125
1 / 1

Zanussi ZME2002V User manual

Category
Hobs
Type
User manual
This manual is also suitable for

Ask a question and I''ll find the answer in the document

Finding information in a document is now easier with AI

Ask the document