Page is loading ...
Page is loading ...
Page is loading ...

iv
目錄
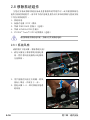
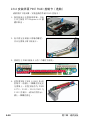
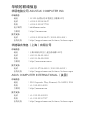
2.8.3 安裝華碩 PIKE RAID 控制卡(選購) ...........................................2-22
2.8.4 NVIDIA
®
Tesla™ GPU 運算模塊(選購) ....................................2-26
第三章:高級安裝
3.1 安裝標準滑軌套件 ......................................................................................................3-2
3.1.1 安裝固定閂至服務器上 ................................................................................3-2
3.1.2 安裝滑軌 ..............................................................................................................3-3
3.1.3 安裝服務器至機架上 .....................................................................................3-4
第四章:主機板信息
4.1 主機板結構圖 ................................................................................................................4-2
4.2 跳線選擇區 .....................................................................................................................4-4
4.3 元件與外圍設備的連接 ............................................................................................4-8
4.4 內部指示燈 ..................................................................................................................4-17
第五章:BIOS 程序設置
5.1 管理、升級您的 BIOS 程序 ..................................................................................5-2
5.1.1 華碩 CrashFree BIOS 3 程序 ...................................................................5-2
5.1.2 使用華碩 EZ Flash 2 升級程序 ..............................................................5-3
5.1.3 BUPDATER 工具程序 .................................................................................5-4
5.2 BIOS 程序設置 .............................................................................................................5-6
5.2.1 BIOS 程序菜單介紹 .......................................................................................5-7
5.2.2 功能表列說明 ....................................................................................................5-7
5.2.3 菜單項目 ..............................................................................................................5-8
5.2.4 子菜單 ...................................................................................................................5-8
5.2.5 操作功能鍵說明 ...............................................................................................5-8
5.2.6 在線操作說明 ....................................................................................................5-8
5.2.7 設置值 ...................................................................................................................5-8
5.2.8 設置窗口 ..............................................................................................................5-8
5.2.9 滾動條 ...................................................................................................................5-8
5.3 主菜單(Main) ..........................................................................................................5-9
5.3.1 System Date [Day xx/xx/xxxx] ............................................................5-9
5.3.2 System Time [xx:xx:xx] .............................................................................5-9
5.4 高級菜單(Advanced menu) ..........................................................................5-10
5.4.1 處理器設置(CPU Configuration) ...................................................5-10
5.4.2 CPU 電源管理設置 .....................................................................................5-12
5.4.3 芯片組設置(Chipset Configuration) ............................................5-14
5.4.4 PCH SATA 設置(PCH SATA Configuration) .......................5-19

華碩 ESC4000 G2 系列用戶手冊
v
目錄
5.4.5 PCH SCU 設置..............................................................................................5-21
5.4.6 PCI 子系統設置(PCI Subsystem Settings) ..............................5-22
5.4.7 Intel TXT(LT-SX) 設置 ...........................................................................5-24
5.4.8 USB 設置(USB Configuration) ......................................................5-25
5.4.9 Trusted Computing ....................................................................................5-26
5.4.10 ACPI 設置 ....................................................................................................5-27
5.4.11 WHEA 設置 .................................................................................................5-28
5.4.12 APM 設置 .....................................................................................................5-28
5.4.13 內置網絡設置(Onboard LAN Configuration) .....................5-29
5.4.14 串口控制面板重新定向 ..........................................................................
5-30
5.4.15 ME 子系統(ME Subsystem) .........................................................5-33
5.4.16 內置設備設置(Onboard Devices Configuration) ...............5-33
5.4.17 運行時錯誤記錄(Runtime Error Logging) ...........................5-34
5.5 服務器管理菜單(Server Mgmt menu) ............................................................5-35
5.5.1 系統事件記錄(System Event Log) ...............................................5-36
5.5.2 BMC 網絡設置(BMC network configuration) .......................5-37
5.6 事件記錄菜單(Event Logs menu) .............................................................5-38
5.6.1 更改 Smbios 事件記錄設置 ....................................................................
5-38
5.7 啟動菜單(Boot menu) .....................................................................................5-40
5.8 監控菜單(Monitor menu) ..............................................................................5-42
5.9 安全性菜單(Security menu) ........................................................................5-43
5.10 工具菜單(Tool menu) ..................................................................................5-44
5.11 退出 BIOS 程序(Exit) ..................................................................................5-45
第六章:磁碟數組設置
6.1 RAID 功能設置 ............................................................................................................6-2
6.1.1 RAID 功能說明 ................................................................................................6-2
6.1.2 安裝 Serial ATA(SATA)硬盤............................................................6-3
6.1.3 在 BIOS 程序中設置 RAID .......................................................................6-3
6.1.4 RAID 設置程序 ................................................................................................6-3
6.2 LSI Software RAID 設置程序 .............................................................................
6-4
6.2.1 創建 RAID 設置 ..............................................................................................6-5
6.2.2 增加或查看一個 RAID 設置 ..................................................................6-11
6.2.3 將虛擬磁碟初始化 .......................................................................................6-12
6.2.4 重新創建損壞的硬盤 ..................................................................................6-16
6.2.5 檢查硬盤數據的一致性 .............................................................................6-18
6.2.6 刪除一個 RAID 設置 ................................................................................6-21
6.2.7 從 RAID 設置中選擇啟動磁碟 .............................................................6-22

vi
目錄
6.2.8 開啟 WriteCache ..........................................................................................6-23
6.3 Intel
®
Rapid Storage Technology enterprise SCU/SATA Option ROM
工具程序
..............................................................................................................................................6-24
6.3.1 創建 RAID 設置 ...........................................................................................6-26
6.3.2 創建一個恢復設置 .......................................................................................6-27
6.3.3 刪除 RAID 磁區 ...........................................................................................6-29
6.3.4 重新設置硬盤為非數組硬盤 ...................................................................6-30
6.3.5 退出 Intel Rapid Storage Technology enterprise 程序 ..........
6-31
6.3.6 修復 RAID 磁盤數組 .................................................................................6-31
6.3.7 在 BIOS 程序中設置啟動數組 ..............................................................6-33
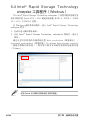
6.4 Intel
®
Rapid Storage Technology enterprise 工具程序(Windows) ..6-34
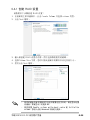
6.4.1 創建 RAID 設置 ...........................................................................................6-35
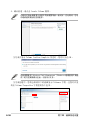
6.4.2 更改 Volume 類型 .......................................................................................6-37
6.4.3 刪除 volume ...................................................................................................6-38
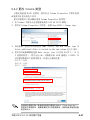
6.4.4 Preferences(偏好選項)........................................................................6-39
第七章:安裝軟件程序
7.1 安裝 RAID 驅動程序 ................................................................................................7-2
7.1.1 創建一張 RAID 驅動軟盤 ..........................................................................7-2
7.1.2 安裝 RAID 驅動程序 ....................................................................................7-5
7.2 安裝 Intel
®
芯片驅動程序 ....................................................................................7-15
7.3 安裝 Intel
®
Network Connection 軟件 .........................................................7-17
7.4 安裝顯示驅動程序 ...................................................................................................7-20
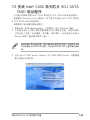
7.5 安裝 Intel
®
C600 系列芯片 SCU SATA RAID 驅動程序 ....................7-23
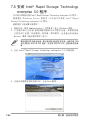
7.6 安裝 Intel
®
Rapid Storage Technology enterprise 3.0 程序 ...........7-24
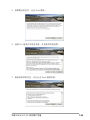
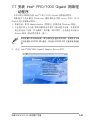
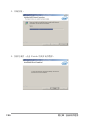
7.7 安裝 Intel
®
PRO/1000 Gigabit 網絡驅動程序 .......................................7-27
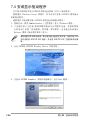
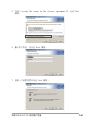
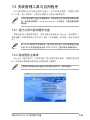
7.8 安裝管理工具與應用程序 ....................................................................................7-31
7.8.1 運行公用與驅動程序光盤 ........................................................................7-31
7.8.2 驅動程序主菜單 ............................................................................................7-31
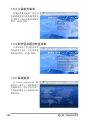
7.8.3 工具軟件菜單 .................................................................................................7-32
7.8.4 製作驅動程序軟盤菜單 .............................................................................7-32
7.8.5 聯絡信息 ...........................................................................................................7-32
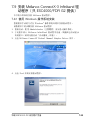
7.9 安裝 Mellanox ConnectX-3 Infiniband 驅動程序(只 ESC4000/FDR
G2 提供) ................................................................................................................................
7-33
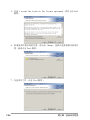
7.9.1 使用 Windows 操作系統安裝 ...............................................................7-33
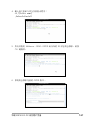
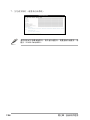
7.9.2 Red Hat
®
Enterprise Linux OS ...........................................................7-36
Page is loading ...
Page is loading ...
Page is loading ...
Page is loading ...
Page is loading ...
Page is loading ...
Page is loading ...

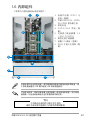
第一章:系統導覽
1-2
1.1 產品包裝內容
以下為本服務器包裝內的組件。
標準元件
若以上列出的任何一項配件有損壞或短缺,請盡快與您的經銷商聯絡。
* ASWM 為 ASUS System Web-based Management 工具程序。
** 本服務器不包含軟驅設備,若您需要使用軟驅創建驅動程序等驅動軟
盤,請於主機前面通過 USB 端口連接 USB 外接軟驅使用。請參考第 7
章的說明。
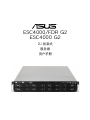
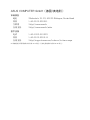
機種型號 ESC4000 G2 系列
機箱 華碩 R21B 2U 機架式機箱
主板 華碩 Z9PG-D16、Z9PG-D16/FDR 服務器主板
硬件組件 1 x 1620W 備援式電源(PSU)
1 x SATAII/SAS 硬盤背板
8 x 可熱插拔之 3.5 英寸硬盤抽取架
1 x 前側 I/O 面板
1 x 前側 USB 面板
7 x 系統風扇(80mm)
1 x 備援式電源(PSU)分配面板
2 x PCIe 擴展面板
1 x 內置 ASMB6 遠端遙控控制卡
1 x PCIe 轉接卡
4 x 導風罩,提供 NVIDIA
®
Tesla™ GPU 運算模塊
1 x 系統導風罩
配件 1 x ESC4000 G2 系列用戶手冊
1 x ASWM* Enterprise 公用程序光盤
1 x ASMB6 用戶手冊
1 x ESC4000 G2 系列驅動與公用程序光盤
1 x ASWM6 公用程序光盤
螺絲一包
2 x AC 電源線
2 x 處理器散熱片(依您所在的地區而有所不同)
1 x 標準式機架安裝套件
4 x 雙 8-pin 電源線
選配配件 1 x 薄型光驅
1 x PCIe PIKE 轉接卡(只支持華碩 PIKE RAID 卡)
1 x PIKE RAID 卡
1 x Trend Micro Server Protect 防毒軟件光盤
1 x 1620W 備援式電源(PSU)模塊
4 x NVIDIA
®
Tesla™ GPU 運算模塊
Page is loading ...

第一章:系統導覽
1-4
(下一頁繼續)
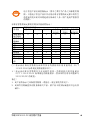
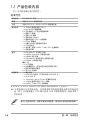
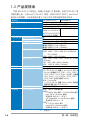
1.3 產品規格表
華碩 ESC4000 G2 系列是一款精心打造的 2U 服務器,內裝 Z9PG-D16 系
列服務器主板,支持 Intel
®
LGA2011 結構、具備 EM64T 技術之 Intel Xeon
®
系列中央處理器,並包含最新內置於主板上的芯片組所提供的相關技術。
機種型號 ESC4000/FDR G2 ESC4000 G2
中央處理器/系統總線 2 x Socket-R LGA2011
Intel
®
Xeon
®
E5-2600 系列處理器
QPI 6.4 / 7.2 / 8.0 GT/s
芯片組 Intel
®
C602 芯片組
Mellanox Connectx-3
MT27514A0-FCCR-FV
FDR 56Gbps 控制器
Intel
®
C602 芯片組
華碩獨家功能 Fan Speed Control 有
ASWM Enterprise 有
內存 總插槽數 16(每個 CPU 4 通道、每個通道 8 DIMMs)
擴展容量 最高可擴展達 128GB(UDIMM)
最高可擴展達 512GB(RDIMM)
最高可擴展達 512GB(LRDIMM)
內存類型 DDR3 800 / 1066 / 1333 / 1600 RDIMM
DDR3 1066 / 1333 / 1600 ECC UDIMM Non-
ECC UDIMM
DDR3 1066 / 1333 LR-DIMM
單條內存大小 1GB、2GB、4GB、8GB、16GB 與 32GB*
(RDIMM)
1GB、2GB、4GB、8GB*(UDIMM)
8GB、16GB 與 32GB(LRDIMM)
擴展插槽 總 PCI/PCI-X/PCI-E 插槽數 9
支持插槽類型 全長/全高:
- 8 x PCI-E 3.0 x16 插槽 (4 at x16 Link 或 8 at
x8 Link) (若插槽 CPU1_PCIE1、CPU1_PCIE3、
CPU2_PCIE2、CPU2_PCIE4 已佔用,則插槽
CPU1_PCIE2、CPU1_PCIE4、CPU2_PCIE1、
CPU2_PCIE3 會自動切換成 x8 link)
半長 / Low-profile:
- 1 x PCI-E 3.0 x16 插槽 (Gen3 x8 link) (提供安
裝增加存儲能力的 PIKE SAS 卡)
其他擴展插槽 選購:PIKE 轉接卡
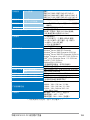
存儲設備 SATA 控制器
Intel
®
C602-A 芯片組支持:
<AHCI>
- 2 個 SATA 3Gb/s 端口;2 個 SATA 6Gb/s 端口
- Intel
®
RSTe(Windows 適用)
- 支持軟件 RAID 0, 1, 10 與 5
- LSI
®
MegaRAID(Linux/Windows 適用)
- 支持軟件 RAID 0, 1, 10
<SCU>
- 4 個 SATA 3Gb/s 端口
- Intel
®
RSTe(Windows 適用)
- 支持軟件 RAID 0, 1, 10 與 5)

華碩 ESC4000 G2 系列用戶手冊
1-5
(列表規格若有更改,恕不另行通知。)
存儲設備 SAS 控制器 選購:
華碩 PIKE 2008 8 端口 SAS 6G RAID 卡
華碩 PIKE 2008/IMR 8 端口 SAS 6G RAID 卡
華碩 PIKE 2108 8 端口 SAS 6G H/W RAID 卡
硬盤插槽 I = 內置
A 或 S 為可熱插拔
8 x 熱插拔 3.5 英寸 SATAII/SAS 硬盤插槽
網絡功能 網絡 2 x Intel
®
82574L Gigabit 網絡 + 1 x 管理用網
絡端口
顯示功能 顯示芯片 Aspeed AST2300 / 16MB
輔助存儲設備:軟驅 / CD/DVD 光驅 1 x 薄型光驅擴展槽
可選擇:不安裝 / 安裝 DVD-RW* 刻錄機
(*北美地區默認為安裝 DVD-RW)
後端面板 1 x 外接式串口
3 x RJ-45 端口(1 個提供 ASBM6 使用)
4 x USB 2.0 端口(前 2 端口,後 2 端口)
1 x 內部 A Type USB 端口
1 x VGA 顯示連接端口
1 x QSFP 端口
-
支持操作系統 Windows
®
Server 2008 R2
Windows
®
Server 2008 R2 Enterprise
Windows
®
Server 2008 Enterprise 32/64-bit
Windows
®
Server 2003 R2 Enterprise 32/64-bit
RedHat
®
Enterprise Linux AS5.7/6.2 32/64-bit
SuSE
®
Linux Enterprise Server 11.2 32/64-bit
CentOS 5.7/6.2 32/64-bit
VMWare ESX4.1/ESXi4.1
(支持版本若有變動,恕不另行通知)
防毒軟件 防毒軟件光盤(選購)
管理解決方案 外部遠端遙控硬件 內置 ASMB6-iKVM,支持 KVM-over-IP 的方式
軟件 華碩 ASWM Enterprise
外觀尺寸 750mm x 444mm x 88mm(2U)
重量(不包含處理器、內存與硬盤) 19 公斤
電源(PSU) 1620W(80+)1+1 備援式電源(PSU)
(依您所在的地區而有所不同)
產品電器額定值
輸入:
1000W:100—120 Vac, 12-10A
1200W:120—140 Vac, 12—10A
1620W:180—240Vac,10.5—8A
50—60Hz Class I
環境條件 操作溫度:10℃ ~ 35℃ / 無運行下
未操作溫度:-40℃ ~ 70℃
未操作濕度:20% ~ 90%(無結露)
Page is loading ...
Page is loading ...
Page is loading ...
Page is loading ...
Page is loading ...
Page is loading ...
Page is loading ...
Page is loading ...
Page is loading ...
Page is loading ...
Page is loading ...
Page is loading ...
Page is loading ...
Page is loading ...
Page is loading ...
Page is loading ...
Page is loading ...
Page is loading ...
Page is loading ...
Page is loading ...
Page is loading ...
Page is loading ...
Page is loading ...
Page is loading ...
Page is loading ...
Page is loading ...
Page is loading ...
Page is loading ...
Page is loading ...
Page is loading ...
Page is loading ...
Page is loading ...
Page is loading ...
Page is loading ...
Page is loading ...
Page is loading ...
Page is loading ...
Page is loading ...
Page is loading ...
Page is loading ...
Page is loading ...

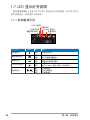
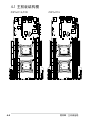
華碩 ESC4000 G2 系列用戶手冊
4-3
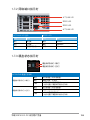
主機板的各項元件
開關與跳線選擇區 頁數
1. Clear RTC RAM (CLRTC1) 4-4
2. VGA controller setting (3-pin VGA_SW1)
4-5
3. LAN controller setting (3-pin LAN_SW1, LAN_SW2)
4-5
4. LSI MegaRAID or Intel RSTe selection jumper (3-pin RAID_SEL1)
4-6
5. ME firmware force recovery setting (3-pin ME_EN1)
4-6
6. DDR3 thermal event setting (3-pin DIMMTRIP1)
4-7
7. PMBus 1.2 PSU select jumper (3-pin SMART_PSU1)
4-7
內部連接插槽 頁數
1. Serial ATA 6.0/3.0 Gb/s connectors (7-pin SATA6G1-2 [藍
色];7-pin SATA3G 3-4 [黑色])
4-8
2. SATA connectors - ISAS connectors (7-pin ISAS1–4 [淺藍色]) 4-9
3. USB connector (10-1 pin USB34, A-Type USB5)
4-10
4. Front fan connectors (4-pin FRNT_FAN1–7)
4-11
5. Serial General Purpose Input/Output connector
(8-1 pin ISGPIO1, SGPIO1)
4-12
6. TPM connector (20-1 pin TPM1)
4-13
7. Power Supply SMBus connector (5-pin PSUSMB1)
4-13
8. SSI power connectors (20-pin PWR1, 8-pin PWR2, 4-pin PWR3)
4-14
9. System panel connector (20-pin PANEL1)
4-15
10. Auxiliary panel connector (20-pin AUX_PANEL1)
4-16
內部指示燈 頁碼
1. Baseboard Management Controller LED (BMC_LED1) 4-17
2. CPU warning LED (ERR_CPU1/2)
4-17
Page is loading ...
Page is loading ...

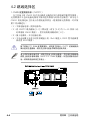
4-6
第四章:主機板信息
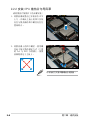
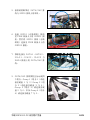
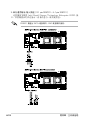
4. LSI MegaRAID 或 Intel RSTe 選擇跳線設置 (3-pin RAID_SEL1)
本跳線帽提供您選擇 PCH SATA RAID 模式來使用 LSI MegaRAID
software 或 Intel
®
Rapid Storage Technology enterprise 3.0 RAID 功
能。若您想使用 LSI MegaRAID software RAID Utility 工具軟件,請將跳
線帽調整為 [1-2](默認值)短路。或是若想要使用Intel
®
Rapid Storage
Technology Enterprise Option ROM Utility 工具程序,請將本跳線帽調整
為 [2-3] 短路。
5. ME 固件強制還原設置 (3-pin ME_RCVR1)
當 Intel Management Engine (ME) 固件損壞時,本跳線帽允許您快速還
原。
Page is loading ...

4-8
第四章:主機板信息
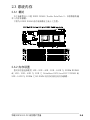
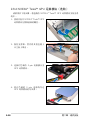
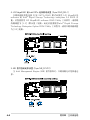
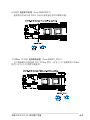
4.3 元件與外圍設備的連接
實際的數據傳輸率,會因您所安裝的 Serial ATA 硬盤規格而定。
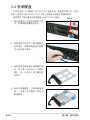
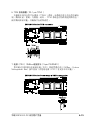
1. Serial ATA 6.0/3.0Gb/s 設備連接插座(7-pin SATA6G1-2 [藍色],
SATA3G 3-4 [黑色])
這些插座為通過 Intel C602 芯片所控制,可以通過細薄的 Serial ATA
6.0Gb/s 或 3.0Gb/s 排線來連接 Serial ATA 6.0Gb/s 或 3.0Gb/s 硬盤。

華碩 ESC4000 G2 系列用戶手冊
4-9
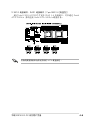
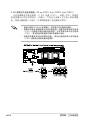
2. SATA 連接端口 - ISAS1 連接端口(7-pin ISAS1-4 [淺藍色])
通過 Intel C602-A PCH 芯片支持 ISAS 1-4 連接端口,可以通過 Serial
ATA 3.0Gb/s 排線連接 Serial ATA 3.0Gb/s 硬盤設備。
實際的數據傳輸率為依所安裝的 SATA 硬盤而定。
Page is loading ...
Page is loading ...

4-12
第四章:主機板信息
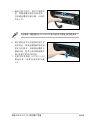
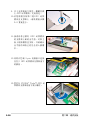
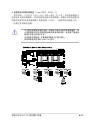
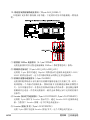
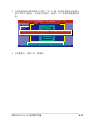
5. 串行通用輸出/輸入插座(8-1 pin ISGPIO1、6-1 pin SGPIO1)
這些插座為提供 Intel Rapid Storage Technology Enterprise SGPIO 接
口,以控制指示燈狀態顯示、設備信息與一般用途信息。
ISGPIO1 插座為 SATA 連接端口 - ISAS 連接端口使用。
Page is loading ...
Page is loading ...
Page is loading ...
Page is loading ...
Page is loading ...
Page is loading ...
Page is loading ...
Page is loading ...

華碩 ESC4000 G2 系列用戶手冊
5-3
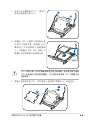
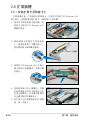
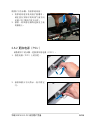
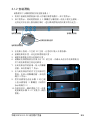
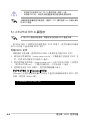
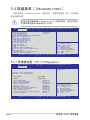
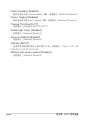
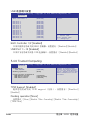
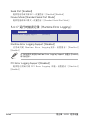
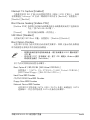
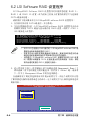
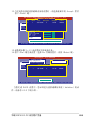
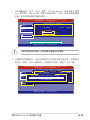
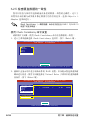
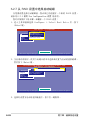
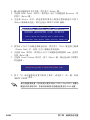
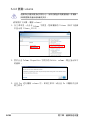
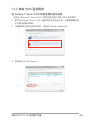
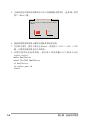
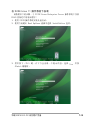
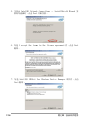
請依照下列步驟,使用 EZ Flash 2 來升級 BIOS:
1. 將已存好最新版 BIOS 文件的 U 盤插入 USB 連接端口。
2. 進入 BIOS 設置程序。來到
Tools
菜單,選擇
EZ Flash 2
後並按下
<Enter> 鍵將其開啟。
5.1.2 使用華碩 EZ Flash 2 升級程序
華碩 EZ Flash 2 程序讓您能輕鬆的升級 BIOS 程序,可以不必再通過啟
動盤的冗長程序或是到 DOS 模式下運行。
請至華碩網站 http://www.asus.com.cn 下載最新的 BIOS 程序文件。
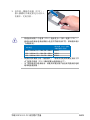
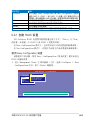
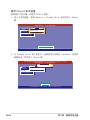
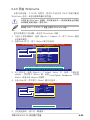
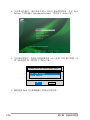
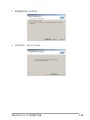
3. 按 <Tab> 鍵來切換至
Drive
字段。
4. 按 上/下 方向鍵來選擇存儲最新 BIOS 版本的 U 盤,然後按下 <Enter>
鍵。
5. 按 <Tab> 鍵來切換
Folder Info
字段。
6. 按 上/下 方向鍵來選擇 BIOS 文件,並按下 <Enter> 鍵運行 BIOS 升級
操作,當完成升級後,重新啟動系統。
Flash Info
MODEL: Z9PR-D16 VER: 0208 DATE: 04/18/2012
Exit
[Enter] Select or Load [Tab] Switch [Up/Down/PageUp/PageDown/Home/End] Move [Esc] Exit [F2] Backup
fs0:\
Drive Folder Info
fs0:\ 04/18/12 10:23p 4194304 Z9PR-D16.ROM
fs1:\
ASUSTek EZ Flash 2 Utility V01.04
File Infor
MODEL: VER: DATE:
Help Info
Page is loading ...

華碩 ESC4000 G2 系列用戶手冊
5-5
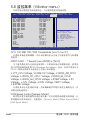
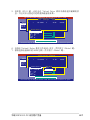
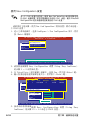
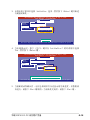
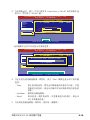
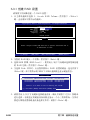
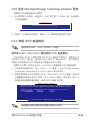
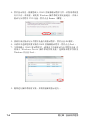
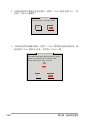
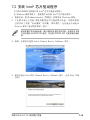
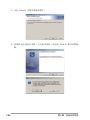
4. 程序會進行檢查文件,然後開始升級 BIOS 文件。
請勿在升級 BIOS 程序文件時關閉或重新啟動系統,此舉將會導致系統
損毀!
5. 完成升級後,程序會回到 DOS 畫面,請重新啟動系統,通過硬盤啟
動。
The BIOS update is nished! Please restart your system.
C:\>
ASUSTek BIOS Update for DOS V1.06 (09/08/04)
Current ROM
Update ROM
Note
Writing BIOS:
FLASH TYPE: MXIC 25L1605A
PATH:
BOARD: Z9PR-D16
VER: 0203
DATE: 04/18/2012
BOARD: Z9PR-D16
VER: 0206
DATE: 04/20/2012
WARNING! Do not turn off power during ash BIOS
Page is loading ...

華碩 ESC4000 G2 系列用戶手冊
5-7
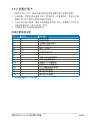
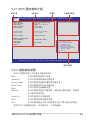
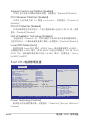
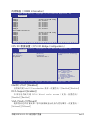
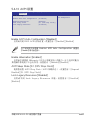
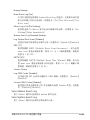
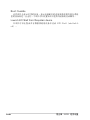
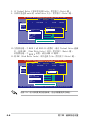
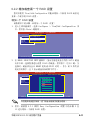
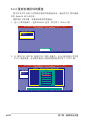
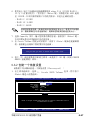
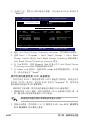
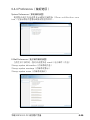
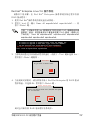
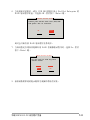
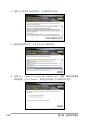
5.2.2 功能表列說明
BIOS 設置程序最上方各菜單功能說明如下:
Main
本項目提供系統基本設置。
Advanced
本項目提供系統高級功能設置。
Server Mgmt
本項目提供系統服務器管理功能設置。
Event Logs
本項目提供事件記錄功能設置。
Boot
本項目提供啟動磁碟設置。
Monitor
本項目提供系監控功能設置,提供顯示系統溫度、電源狀
態與更改風扇設置。
Security
本項目提供安全功能設置。
Tool
本項目提供特殊功能的設置。
Exit
本項目提供退出 BIOS 設置程序與出廠默認值還原功能。
使用左右方向鍵移動選項,可切換至另一個菜單畫面。
5.2.1 BIOS 程序菜單介紹
操作功能鍵
在線操作說明
功能表列
設置值
菜單項目
Version 2.14.1219. Copyright (C) 2011 American Megatrends, Inc.
Aptio Setup Utility - Copyright (C) 2011 American Megatrends, Inc.
Main Advanced Server Mgmt Event Logs Boot Monitor Security Tool Exit
Set the Date, Use Tab to
switch between Data elements.
→←: Select Screen
↑↓: Select Item
Enter: Select Item
+/-: Change Opt.
F1: General Help
F2: Previous Values
F5: Optimized Defaults
F10: Save & Exit
ESC: Exit
BIOS Information
BIOS Vendor American Megatrends
Core Version 4.6.4.1
Compliancy UEFI 2.1; PI 0.9
BIOS Version 0205 x64
Build Date 03/15/2012
System Date [Mon 05/02/2012]
System Time [15:07:28]
Access Level Administrator
Memory Information
Total Memory 16384 MB (DDR3)
Processor
CPU Speed 2600 MHz
Count: 1
Page is loading ...

華碩 ESC4000 G2 系列用戶手冊
5-9
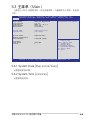
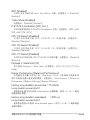
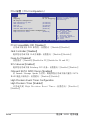
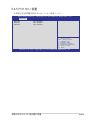
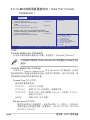
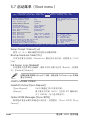
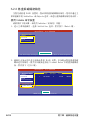
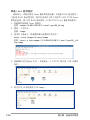
5.3 主菜單(Main)
當您進入 BIOS 設置程序時,首先出現的第一個畫面即為主菜單,內容如
下圖。
5.3.1 System Date [Day xx/xx/xxxx]
設置您的系統日期。
5.3.2 System Time [xx:xx:xx]
設置系統的時間。
Version 2.14.1219. Copyright (C) 2011 American Megatrends, Inc.
Aptio Setup Utility - Copyright (C) 2011 American Megatrends, Inc.
Main Advanced Server Mgmt Event Logs Boot Monitor Security Tool Exit
Set the Date, Use Tab to
switch between Data elements.
→←: Select Screen
↑↓: Select Item
Enter: Select Item
+/-: Change Opt.
F1: General Help
F2: Previous Values
F5: Optimized Defaults
F10: Save & Exit
ESC: Exit
BIOS Information
BIOS Vendor American Megatrends
Core Version 4.6.4.1
Compliancy UEFI 2.1; PI 0.9
BIOS Version 0205 x64
Build Date 03/15/2012
System Date [Mon 05/02/2012]
System Time [15:07:28]
Access Level Administrator
Memory Information
Total Memory 16384 MB (DDR3)
Processor
CPU Speed 2600 MHz
Count: 1

第五章:BIOS 程序設置
5-10
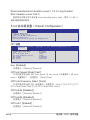
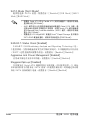
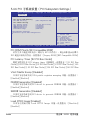
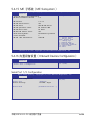
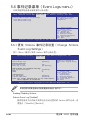
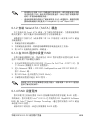
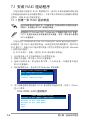
5.4 高級菜單(Advanced menu)
在高級菜單(Advanced menu)裡的項目,為提供您更改 CPU 與其他系
統設備的設置。
請注意當更改高級菜單(Advanced menu)裡的項目時,在字段中輸入
不正確的數值將會導致系統運行不正常。
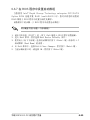
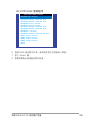
5.4.1 處理器設置(CPU Configuration)
Aptio Setup Utility - Copyright (C) 2011 American Megatrends, Inc.
Main Advanced Server Mgmt Event Logs Boot Monitor Security Tool Exit
CPU Conguration Parameters
Clock Gen Spectrum [Enabled]
Spectrum Percentage [0.20%]
CPU Conguration
CPU Power Management Conguration
Chipset Conguration
PCH SATA Conguration
PCH SCU Conguration
PCI Subsystem Setting
USB Conguration
Trusted Computing
ACPI Settings
WHEA Conguration
APM
Onboard LAN Conguration
Serial Port Console Redirection
ME Subsystem
Onboard Devices Conguration
Runtime Error Logging
→←: Select Screen
↑↓: Select Item
Enter: Select Item
+/-: Change Opt.
F1: General Help
F2: Previous Values
F5: Optimized Defaults
F10: Save & Exit
ESC: Exit
Version 2.14.1219. Copyright (C) 2011 American Megatrends, Inc.
Aptio Setup Utility - Copyright (C) 2011 American Megatrends, Inc.
Advanced
Socket specic CPU
Information.
CPU Confguration
Socket 1 CPU Information
Socket 2 CPU Information
CPU Speed 2600 MHz
64-bit Supported
Hyper Threading [Enabled]
Active Processor Core [All]
Limit CPUID Maximum [Disabled]
Execute Diable Bit [Enabled]
Server Class [Custom]
Hardware Prefetcher [Enabled]
Adjacent Cache Line Prefetch [Enabled]
DCU Streamer Prefetcher [Enabled]
DCU IP Prefetcher [Enabled]
Intel Virtualization Technology [Enabled]
Local APIC Mode [Auto]
→←: Select Screen
↑↓: Select Item
Enter: Select Item
+/-: Change Opt.
F1: General Help
F2: Previous Values
F5: Optimized Defaults
F10: Save & Exit
ESC: Exit
Version 2.14.1219. Copyright (C) 2011 American Megatrends, Inc.

華碩 ESC4000 G2 系列用戶手冊
5-11
插槽 1/2 的處理器信息(Socket 1/2 CPU Information)
選擇欲查看的處理器後,按下 <Enter> 鍵可以顯示該處理器信息。
Hyper Threading [Enabled]
本項目提供您啟用或關閉 Intel Hyper-Threading(超線程)技術,當關
閉(Disabled)時,只會啟動單線程核心。設置值有:[Disabled] [Enabled]
Active Processor Cores [All]
設置值有:[All] [1] [2] [3] [4] [5] [6] [7]
Limit CPUID Maximum [Disabled]
設置這項為 [Enabled](啟用)時,允許既有的操作系統啟動,甚至不需
要 CPU 支持延伸 CPUID 功能。設置值有:[Disabled] [Enabled]
Execute Disable Bit [Enabled]
當搭配結合支持的 OS(Windows Server 2003 SP1、Windows XP
SP2、 SuSE Linux 9.2、Redhat Enterprise 3 Update 3)時,XP 可以防
止某些等級的惡意緩衝區溢出攻擊。設置值有:[Disabled] [Enabled]
Server Class [Custom]
請使用 Intel 推薦的默認值。設置值有:[Enterprise] [High Performance
(HPC)] [Custom]
Hardware Prefetcher [Enabled]
本項目提供您開啟或關閉中間層緩存(mid level cache,L2)streamer
prefetcher 功能。設置值有:[Disabled] [Enabled]
Socket 1 CPU Information
Genuine Intel(R) CPU @ 2.60GHz
CPU Signature 206d5
Microcode Patch 512
Max CPU Speed 2600 MHz
Min CPU Speed 1200 MHz
Processor Cores 8
Intel HT Technology Supported
Intel VT-X Technology Supported
Intel SMX Technology Supported
L1 Data Cache 32 kB x8
L1 Code Cache 32 kB x8
L2 Cache 256 kB x8
L3 Cache 20480 kB
→←: Select Screen
↑↓: Select Item
Enter: Select Item
+/-: Change Opt.
F1: General Help
F2: Previous Values
F5: Optimized Defaults
F10: Save & Exit
ESC: Exit
Version 2.14.1219. Copyright (C) 2011 American Megatrends, Inc.
Aptio Setup Utility - Copyright (C) 2011 American Megatrends, Inc.
Advanced

第五章:BIOS 程序設置
5-12
Adjacent Cache Line Prefetch [Enabled]
本項目為開啟或關閉默認的緩存線程。設置值有:[Disabled] [Enabled]
DCU Streamer Prefetcher [Enabled]
本項目為啟用或關閉 L1 數據 prefetcher。設置值有:[Disabled]
[Enabled]
DCU IP Prefetcher [Enabled]
本項目提供您啟用或關閉下一個基於隨著在載入記錄之上的 L1 線。設置
值有:[Disabled] [Enabled]
Intel Virtualization Technology [Enabled]
當選擇啟用(Enabled)時,可以讓硬件平台同時運行多重的操作系統,
啟用後可以讓一個系統來虛擬成數個系統。設置值有:[Disabled] [Enabled]
Local APIC Mode [Auto]
提供您選擇 Local APIC 模式,若設為 Auto,則會視需求使用 x2APIC,
否則則會使用 xAPIC 模式。使用 xAPIC 時將會關閉超過 254 的 CPUs
APIC IDs。部份操作系統則不支持 x2APIC 模式。設置值有:[Auto]
[x2APIC] [xAPIC]
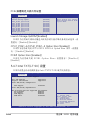
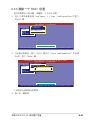
5.4.2 CPU 電源管理設置
Power Technology [Custom]
提供您啟用電源管理功能。設置值有:[Disabled] [Energy Efficient]
[Custom]
This item allows you to
enabled power management
features.
CPU Power Management Confguration
Power Technology [Custom]
EIST [Enabled]
Turbo Mode [Enabled]
P-STATE Coordination [HW_ALL]
CPU C3 Report [Disabled]
CPU C6 Report [Enabled]
CPU C7 Report [Disabled]
Package C State limit [C6]
Energy Performance [Balanced Performance]
Factory long duration power limit 115 Watts
Long duration power limit 0
Factory long duration maintained 1000 ms
Long duration maintationed 0
Recommended short duration power 1 1.2 * Long Duration
Short duation power limit 0
→←: Select Screen
↑↓: Select Item
Enter: Select Item
+/-: Change Opt.
F1: General Help
F2: Previous Values
F5: Optimized Defaults
F10: Save & Exit
ESC: Exit
Aptio Setup Utility - Copyright (C) 2011 American Megatrends, Inc.
Advanced
Version 2.14.1219. Copyright (C) 2011 American Megatrends, Inc.

華碩 ESC4000 G2 系列用戶手冊
5-13
EIST [Enabled]
本項目為啟用或關閉 Intel SpeedStep 功能。設置值有:[Disabled]
[Enabled]
Turbo Mode [Enabled]
設置值有:[Disabled] [Enabled]
P-STATE Coordination [HW_ALL]
本項目提供您更改 P-STATE Coordination 類型。設置值有:[HW_ALL]
[SW_ALL] [SW_ANY]
CPU C3 Report [Disabled]
本項 目為啟用或關閉 CPU C 3(ACPI C2) 回報功能。設 置值 有:
[Disabled] [Enabled]
CPU C6 Report [Enabled]
本項 目為啟用或關閉 CPU C 6(ACPI C3) 回報功能。設 置值 有:
[Disabled] [Enabled]
CPU C7 Report [Disabled]
本項目為啟用或關閉 CPU C7(ACPI C3 回報功能。設置值有:[Disabled]
[Enabled]
Package C State limit [C6]
此為設置 Package C State limit。設置值有:[C0] [C2] [C6] [C7] [No
Limit]
Energy Performance [Balanced Performance]
決定最佳化性能與省電之間。Windows 2008 與升級版本的操作系
統可以根據電源計畫更改此數值。設置值有:[Performance] [Balanced
Performance] [Balanced Energy] [Energy Efficient]
Factory long duratiion power limit 115 Watts
Long duation power limit 0
提供您以瓦數為單位設置 long duration 電源限制。使用 <+> 與 <-> 鍵來
調整想要的數值。
Factory long duratiion maintained 1000 ms
Long duation power limit 0
提供您設置窗口以持續 long duration power。使用 <+> 或 <-> 鍵來調整
想要的數值。

第五章:BIOS 程序設置
5-14
QPI Conguration
Memory Conguration
CPU II0 Bridge Conguration
PCH Conguration
Intel(R) VT for Directed I/O Conguration
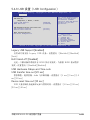
5.4.3 芯片組設置(Chipset Configuration)
QPI 設置
Isoc [Enabled]
設置值有:[Disabled] [Enabled]
QPI Link Speed Mode [Fast]
本項目提供您選擇 QPI link speed 為 fast mode(快速模式)或 slow
mode(慢速模式)。設置值有:[Slow] [Fast]
QPI Link Frequency Select [Auto]
本項目提供您選擇 QPI 連接頻率。設置值有:[Auto] [6.4 GT/s] [7.2
GT/s (Fast Mode Only)] [8.0 GT/s (Fast Mode Only)]
QPI Link0s [Disabled]
設置值有:[Disabled] [Enabled]
QPI Link0p [Disabled]
設置值有:[Disabled] [Enabled]
QPI Link1 [Enabled]
設置值有:[Disabled] [Enabled]
Aptio Setup Utility - Copyright (C) 2011 American Megatrends, Inc.
Advanced
QPI Conguration Page
Current QPI Link Speed Slow
Current QPI Link Freq 8.0 GT/s
Isoc [Enabled]
QPI Link Speed Mode [Fast]
QPI Link Frequency Select [Auto]
QPI Link0s [Disabled]
QPI Link0p [Disabled]
QPI Link1 [Enabled]
Aptio Setup Utility - Copyright (C) 2011 American Megatrends, Inc.
Advanced
Enable/Disable Isoc
Recommended short duration power1 1.2 * Long Duraton
Short duation power limit 0
提供您以瓦數為單位來設置 short duration power limit。使用 <+> 或 <->
鍵來調整想要的數值。
Page is loading ...
Page is loading ...
Page is loading ...
Page is loading ...
Page is loading ...
Page is loading ...
Page is loading ...
Page is loading ...
Page is loading ...
Page is loading ...
Page is loading ...
Page is loading ...
Page is loading ...
Page is loading ...
Page is loading ...
Page is loading ...
Page is loading ...
Page is loading ...
Page is loading ...
Page is loading ...
Page is loading ...
Page is loading ...
Page is loading ...
Page is loading ...
Page is loading ...
Page is loading ...
Page is loading ...
Page is loading ...
Page is loading ...
Page is loading ...
Page is loading ...
Page is loading ...
Page is loading ...
Page is loading ...
Page is loading ...
Page is loading ...
Page is loading ...
Page is loading ...
Page is loading ...
Page is loading ...
Page is loading ...
Page is loading ...
Page is loading ...
Page is loading ...
Page is loading ...
Page is loading ...
Page is loading ...
Page is loading ...
Page is loading ...
Page is loading ...
Page is loading ...
Page is loading ...
Page is loading ...
Page is loading ...
Page is loading ...
Page is loading ...
Page is loading ...
Page is loading ...
Page is loading ...
Page is loading ...
Page is loading ...
Page is loading ...
Page is loading ...
Page is loading ...
Page is loading ...
Page is loading ...
Page is loading ...
Page is loading ...
Page is loading ...
Page is loading ...
Page is loading ...
Page is loading ...
Page is loading ...
Page is loading ...
Page is loading ...
Page is loading ...
Page is loading ...
Page is loading ...
Page is loading ...
Page is loading ...
Page is loading ...
Page is loading ...
Page is loading ...
Page is loading ...
Page is loading ...
Page is loading ...
Page is loading ...
Page is loading ...
Page is loading ...
Page is loading ...
Page is loading ...
Page is loading ...
Page is loading ...
Page is loading ...
Page is loading ...
Page is loading ...
Page is loading ...
Page is loading ...
Page is loading ...
Page is loading ...
Page is loading ...
Page is loading ...
Page is loading ...
Page is loading ...
Page is loading ...
Page is loading ...
Page is loading ...
Page is loading ...
Page is loading ...
Page is loading ...
Page is loading ...
Page is loading ...
-
 1
1
-
 2
2
-
 3
3
-
 4
4
-
 5
5
-
 6
6
-
 7
7
-
 8
8
-
 9
9
-
 10
10
-
 11
11
-
 12
12
-
 13
13
-
 14
14
-
 15
15
-
 16
16
-
 17
17
-
 18
18
-
 19
19
-
 20
20
-
 21
21
-
 22
22
-
 23
23
-
 24
24
-
 25
25
-
 26
26
-
 27
27
-
 28
28
-
 29
29
-
 30
30
-
 31
31
-
 32
32
-
 33
33
-
 34
34
-
 35
35
-
 36
36
-
 37
37
-
 38
38
-
 39
39
-
 40
40
-
 41
41
-
 42
42
-
 43
43
-
 44
44
-
 45
45
-
 46
46
-
 47
47
-
 48
48
-
 49
49
-
 50
50
-
 51
51
-
 52
52
-
 53
53
-
 54
54
-
 55
55
-
 56
56
-
 57
57
-
 58
58
-
 59
59
-
 60
60
-
 61
61
-
 62
62
-
 63
63
-
 64
64
-
 65
65
-
 66
66
-
 67
67
-
 68
68
-
 69
69
-
 70
70
-
 71
71
-
 72
72
-
 73
73
-
 74
74
-
 75
75
-
 76
76
-
 77
77
-
 78
78
-
 79
79
-
 80
80
-
 81
81
-
 82
82
-
 83
83
-
 84
84
-
 85
85
-
 86
86
-
 87
87
-
 88
88
-
 89
89
-
 90
90
-
 91
91
-
 92
92
-
 93
93
-
 94
94
-
 95
95
-
 96
96
-
 97
97
-
 98
98
-
 99
99
-
 100
100
-
 101
101
-
 102
102
-
 103
103
-
 104
104
-
 105
105
-
 106
106
-
 107
107
-
 108
108
-
 109
109
-
 110
110
-
 111
111
-
 112
112
-
 113
113
-
 114
114
-
 115
115
-
 116
116
-
 117
117
-
 118
118
-
 119
119
-
 120
120
-
 121
121
-
 122
122
-
 123
123
-
 124
124
-
 125
125
-
 126
126
-
 127
127
-
 128
128
-
 129
129
-
 130
130
-
 131
131
-
 132
132
-
 133
133
-
 134
134
-
 135
135
-
 136
136
-
 137
137
-
 138
138
-
 139
139
-
 140
140
-
 141
141
-
 142
142
-
 143
143
-
 144
144
-
 145
145
-
 146
146
-
 147
147
-
 148
148
-
 149
149
-
 150
150
-
 151
151
-
 152
152
-
 153
153
-
 154
154
-
 155
155
-
 156
156
-
 157
157
-
 158
158
-
 159
159
-
 160
160
-
 161
161
-
 162
162
-
 163
163
-
 164
164
-
 165
165
-
 166
166
-
 167
167
-
 168
168
-
 169
169
-
 170
170
-
 171
171
-
 172
172
-
 173
173
-
 174
174
-
 175
175
-
 176
176
-
 177
177
-
 178
178
-
 179
179
-
 180
180
-
 181
181
-
 182
182
-
 183
183
-
 184
184
-
 185
185
-
 186
186
-
 187
187
-
 188
188
-
 189
189
-
 190
190
-
 191
191
-
 192
192
-
 193
193
-
 194
194
-
 195
195
-
 196
196
-
 197
197
-
 198
198
-
 199
199
-
 200
200


Ask a question and I''ll find the answer in the document
Finding information in a document is now easier with AI
Related papers
-
Asus ESC4000 User manual
-
Asus ESC4000 User manual
-
Asus Z9PA-U8 User manual
-
-
Asus TS500-E8-PS4 User manual
-
Asus KCMR-D12 C6193 Owner's manual
-
-
-
-
Other documents
-
DeLOCK Controller SATA, 4 port w/ Raid Datasheet
-
MSI Z68A-GD65-G3 User manual
-
MSI X79A-GD65 8D FA User manual
-
Philips SCU 3030NB User manual
-
DFI SD631-Q170 Owner's manual
-
DFI SD330-Q170 Owner's manual
-
DFI PR611-C621 Owner's manual
-
-
-