Page is loading ...

EN GUIDE TO INSTALLATION DK INSTALLATIONSVEJLEDNING
FR GUIDE D'UTILISATION
GR ΟΔΗΓΟΣ ΕΓΚΑΤΑΣΤΑΣΗΣ
PT Manual DE UTILIZAÇÃO
ES MANUAL DE UTILIZACIÓN
DE BEDIENUNGSANLEITUNG
IT MANUALE DI ISTRUZIONI IT
CZ NÁVOD K POUŽITÍ
Decorative Hood
Dekorativ emhætte
Hotte decorative
Διακοσμητικός απορροφητήρας
Exaustor decorative
Campana extractor decorative
Dekorative Dunstabzugshaube
Cappa aspirante decorativa
Dekorativní odsavač par

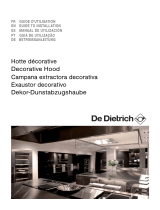
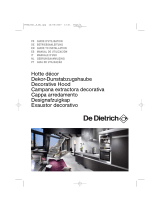
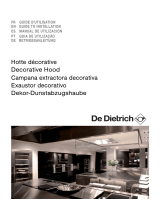
Dans le souci d’une amélioration constante de nos produits, nous nous réservons le
droit d’apporter à leurs caractéristiques techniques, fonctionnelles ou esthétiques
toutes modifi cations liées à leur évolution.
Important :
Avant de mettre votre appareil en marche, veuillez lire attentivement ce guide
d’installation et d’utilisation afi n de vous familiariser plus rapidement avec son
fonctionnement.
2
FR 2
EN 23
PT 44
DE 66
CZ 88
DK 109
GR 130
ES 155
IT 177

1 / A L’ATTENTION DE L’UTILISATEURFR
• DESCRIPTION DE VOTRE APPAREIL
10
500-980
505
900
50
500
303
275
230
60
150

2 / INSTALLATION DE VOTRE APPAREILFR
• MONTAGE DE LA CHEMINEE
• Evacuation extérieure
— Calculez la hauteur nale pour xer
l’étrier en U de support de la cheminée
( g. 3).
— Tracez les 2 trous à l’endroit adapté.
— Percez les 2 trous de 8mm et xez
l’étrier de support de la cheminée en
faisant attention qu’il soit bien dans l’axe
de la hotte ( g. 3).
— Fixez l’étrier plat à l’arrière de la
cheminée inférieure. (fig. 8).
— Posez les 2 cheminées sur la hotte
( g. 7).
— Raccordez la gaine à la sortie de l’air
vers l’extérieur. (fig. 5).
— Effectuez le raccordement électrique de
la hotte au moyen du câble d’alimentation.
— Soulever la cheminée supérieure
jusqu’au plafond et la xer à l’étrier à l’aide
des vis. (fig. 6).
Fig. 6
Fig. 5
Fig. 4
Fig. 3
14
fig. 6
fig. 7
fig. 8

6 / SERVICE APRES-VENTE ET RELATIONS CONSOMMATEURS
Vous trouverez ci-dessous les mentions à insérer dans les notices des produits de la marque
DE DIETRICH :
1- RELATIONS CONSOMMATEURS FRANCE
Pour en savoir plus sur nos produits ou nous contacter, vous pouvez:
consulter notre site : www.dedietrich-electromenager.com
nous écrire à l’adresse postale suivante :
Service Consommateurs DE DIETRICH
5 avenue des Béthunes
CS69526 SAINT OUEN L’AUMONE
95060 CERGY PONTOISE CEDEX
nous appeler du lundi au vendredi de 8h30 à 18h00 au :
Service fourni par Brandt France, S.A.S. au capital social de 100.000.000 euros
RCS Nanterre 801 250 531
.
2- INTERVENTIONS FRANCE
Les éventuelles interventions sur votre appareil doivent être effe ctuées p ar u n prof essionnel qu alifié
dépositaire de la ma rque. Lors d e votre app el, afin de faciliter la prise e n cha rge de votre demande,
munissez-vous des références complètes de votre a ppareil (référence commerciale, référence service,
numéro de série). Ces renseignements figurent sur la plaque signalétique.
OU
B : Référence commerciale
C : Référence service
H : Numéro de série
Vous pouvez nous contacter du lundi au samedi de 8h00 à 20h00 au :
Pièces d’origine :
Lors d’une intervention, demandez l’utilisation exclusive de pièces détachées certifiées d’origine.

Cet appareil est conforme aux règlements délégués (UE) 65/2014 et 66/2014 de la
Commission Européenne, concernant les exigences d’écoconception et d’étiquetage
énergétique des hottes domestiques.
22
Information Eco Design / Fiche technique produitFR
Symbole Valeur Unité
Marque
Référence du produit
Consommation annuelle d’énergie
AEC
93.0
kWh/annum
Index d’efficacité énergétique
EEi
81.3
-
Index d’efficacité fluidodynamique
FDE
17.5
-
Index d’efficacité lumineuse
LE
37.0
-
Index d’efficacité de filtration
GFE
82.8
-
Facteur d’accroissement dans le temps
f
1.4
-
Débit d’air maximum de la hotte
Q
max
647.9
m
3
/h
Débit d’air au point de rendement maximal
Q
BEP
384.0
m
3
/h
Pression d’air au point de rendement maximal
P
BEP
289
P
Consommation d’énergie au point de rendement maximal
W
BEP
176.2
W
Consommation d’énergie du système d’éclairage
W
L
4.0
W
Eclairement moyen du système d’éclairage
E
middle
148
Lux/W
Consommation d’énergie à l'arrêt
P
o
0.00
W
Consommation d’énergie en veille
P
s
--
W
Débit d'air à la vitesse maximale en usage normal -
618.0
m
3
/h
Débit d'air à la vitesse minimale en usage normal -
445.2
m
3
/h
Débit d'air en mode intensif ou boost -
--
m
3
/h
Emission acoustique à la vitesse maximale en usage normal -
71
dB(L
WA)
Emission acoustique à la vitesse minimale en usage normal -
64
dB(LWA)
Emission acoustique en mode intensif -
--
dB(LWA)
De Dietrich
DHD6901B

EN
As part of our commitment to constantly improving our products, we reserve the right
to make changes to them based on technical advances to their technical and functional
features and appearance.
Warning :
Before installing and using your appliance, please carefully read this Guide
to Installation and Use, which will allow you to quickly familiarise yourself with its
operation.
DK
23
EN 23

ENTABLE OF CONTENTS
1 / NOTICES TO THE USER
• Safety recommendations _____________________________________ 20
• Environmental protection _____________________________________ 2
• Description of your appliance _________________________________ 22
2 / INSTALLING YOUR APPLIANCE
• Using the evacuation mode ___________________________________ 23
• Using the recycling mode _____________________________________ 23
• Electrical connections ________________________________________ 24
• Assembling the hood ________________________________________ 25
• Assembling the ventilation shaft
º Outdoor evacuation ______________________________________ 26
º Recycling _______________________________________________ 27
3 / USING YOUR APPLIANCE
• Description of control panel ___________________________________ 28
4 / CARING FOR AND CLEANING YOUR APPLIANCE
• Cleaning the lter cartridges __________________________________ 29
• Changing the carbon lter ____________________________________ 29
• Cleaning the outer surfaces ___________________________________ 30
• Changing the light bulb _______________________________________ 0
• Maintaining your appliance ___________________________________ 31
5 / TROUBLESHOOTING ___________________________________________ 32
6 / AFTER-SALES SERVICE __________________________________________ 3
1 / NOTICES TO THE USER
• Safety recommendations _____________________________________ 25
• Environmental protection _____________________________________ 30
• Description of your appliance _________________________________ 31
2 / INSTALLING YOUR APPLIANCE
• Using the evacuation mode ___________________________________ 32
• Using the recycling mode _____________________________________ 32
• Electrical connections ________________________________________ 33
• Assembling the hood ________________________________________ 34
• Assembling the ventilation shaft
º Outdoor evacuation ______________________________________ 35
º Recycling _______________________________________________ 36
3 / USING YOUR APPLIANCE
• Description of control panel ___________________________________ 37
4 / CARING FOR AND CLEANING YOUR APPLIANCE
lter ____________________________________ 38
38
• Cleaning the outer surfaces ___________________________________ 39
• Changing the light bulb _______________________________________ 39
• Maintaining your appliance ___________________________________ 40
5 / TROUBLESHOOTING ___________________________________________ 41
6 / AFTER-SALES SERVICE __________________________________________ 42
24

Safety and important precautions
These instructions are also available on the
De Dietrich web site.
Please take heed of this advice when installing
and using your appliance. These instructions
are intended to protect your safety and the
safety of others. Keep this manual with your ap-
pliance. If you sell or give the appliance to
anyone else, make sure that you also give them
this manual.
• In order to constantly improve our products,
we reserve the right to to make changes to their
technical, functional or aesthetic characteristics
in line with technological progress.
• Make a note of the references of your appli-
ance on the "Consumer Service" page so that
you can readily find them in future.
25

Important precautions
• This appliance is designed for use by consum-
ers in the home. Do not use it for commercial or
industrial purposes or for any other purpose for
which it is not intended.
• Unpack the appliance as soon as you receive
it. Check its general appearance. Make a note
of any reservations on the delivery slip and
keep a copy.
• This appliance can be used by children aged
under 8 and by persons with diminished physi-
cal, sensory or mental capacities, or persons
without any experience or knowledge, provided
that they are properly attended to or are given
the instructions on how to use the appliance in
complete safety and that any potential risks are
anticipated. Children must not play with this ap-
pliance. The appliance must not be cleaned and
maintained by unattended children.
• Caution: The accessible parts of this appli-
ance may become hot when used with cooking
equipment.
Electrical risks
• All the power supply circuits must be discon-
nected before touching the connection termi-
nals. If the power cord is damaged, it must be
1 / NOTICES TO THE USER EN
26

replaced by the manufacturer, its after-sales
service or a similarly qualified person in order to
avoid any danger.
• The appliance can be disconnected by using
an accessible power outlet or by incorporating a
switch in the fixed lines, in accordance with the
installation rules.
• Do not change or attempt to change the char-
acteristics of this appliance. Doing so can be
dangerous.
• The appliance must only be repaired by an ap-
proved specialist.
• Always disconnect the hood before cleaning
or maintaining it.
• Never use steam or high-pressure tools to
clean your appliance (for the purposes of elec-
trical safety).
• The appliance can be disconnected by using
an accessible power outlet or by incorporating a
switch in the fixed lines, in accordance with the
installation rules.
• Do not change or attempt to change the char-
acteristics of this appliance. Doing so can be
dangerous.
• The appliance must only be repaired by an ap-
proved specialist.
• Always disconnect the the hood before clean
1 / NOTICES TO THE USEREN
27

ing or maintaining it.
• Never use steam or high-pressure tools to
clean your appliance (for the purposes of elec-
trical safety).
Risk of asphyxiation
• The regulations applying to the evacuation of
air must be obeyed. The air must not be sent
into a duct used to evacuate fumes from appli-
ances that use gas or other fuels (this does not
apply to appliances that only emit air into the
room).
• The room must be suitably ventilated when the
range hood is used at the same time as appli-
ances that use gas or other fuels (this does not
apply to appliances that only emit air into the
room).
Risk of fire
• It is forbidden to flambé food or to turn on gas
rings that are not covered by a cooking recipient
beneath the hood, as the flames may sucked in
and damage the appliance.
• Keep a constant eye on fryers used beneath
the hood. When heated to very high tempera-
tures, oil and fat can catch fire.
• Clean the appliance and replace the filters at
1 / NOTICES TO THE USER EN
28

the recommended frequency. Accumulated de-
posits of grease can cause a fire.
• It is forbidden to use the hood above a fuel fire
(wood, coal, etc.).
• If the hood is installed above a gas-fired appli-
ance, leave at least 70 cm between the top of
the range and the underside of the hood. If the
instructions of the range installed under the
hood specify a distance greater than 70 cm,
then this distance must be respected.
1 / NOTICES TO THE USEREN
29

1 / NOTICES TO THE USER EN
Warning
Installation should only be performed by installers and qualifi ed technicians.
Warning
Remove the protective fi lm from the cartridge fi lter before use.
• ENVIRONMENTAL PROTECTION
— This appliance’s packaging material is recyclable. Help recycle it and protect the environ-
ment by dropping it off in the municipal receptacles provided for this purpose.
— Your appliance also contains a great amount of recyclable material. It is marked with this
label to indicate the used appliances that should not be mixed with other waste. This way,
the appliance recycling organised by your manufacturer will be done under
the best possible conditions, in compliance with European Directive 2002/96/
EC on Waste Electrical and Electronic Equipment. Contact your town hall or
your retailer for the used appliance collection points closest to your home.
— We thank you doing your part to protect the environment.
30

1 / NOTICES TO THE USEREN
• DESCRIPTION OF YOUR APPLIANCE
31
500-980
505
900
50
500
303
275
230
60
150

2 / INSTALLING YOUR APPLIANCE EN
• USING THE EVACUATION MODE
• USING THE RECYCLING MODE
If you possess an outlet to the exterior
(pic. 1)
Your hood can be connected to this outlet
using a ue (minimum diameter Ø mm that
is enamelled, in aluminium, exible or made
of in ammable material). If your ue is less
than 125 mm in diameter, you must use the
recycling mode.
If you do not possess an outlet to the exterior
(pic. 2)
All of our appliances can be used in recycling
mode.
In this case, you should add an active
carbon lter which will keep in odours. (See
Chapter 4: Changing the carbon lter.)
— The appliance must be unplugged during installation or when any repairs or maintenance
work is being performed.
— Ensure that the network voltage corresponds to the voltage noted on the identi cation
plate located inside the hood.
— If the electrical installation at your residence requires any changes in order to hook up
your Appliance, call upon a professional electrician.
— If the hood is being used in evacuation mode, do not connect the appliance to a
combustion gas exhaust duct (boiler, chimney, etc.) or to a CMV (controlled mechanical
ventilation) system.
— Under no circumstances should the exhaust duct empty into the attic.
— Install the hood at a safe distance of at least 70 cm from an electric, gas or combined
cooking hob.
pic.1
pic.2
32

2 / INSTALLING YOUR APPLIANCEEN
Warning
This appliance is delivered with a H 05
VVF power cord that has three- 0.75 mm
2
conductors (neutral, phase and ground).
It must be connected to the main power
supply (which should be a 220-240 V single
phase current) via a CEI 60083 standardised
socket that should remain accessible after
installation, in keeping with installation
guidelines.
We cannot be held responsible for any
accident resulting from an inexistent,
defective or incorrect ground lead. The fuse
for your installation must be 10 or 16A. If
the power cable is damaged, call the after-
sales service department in order to avoid
danger.
Warning
If the electrical installation at your
residence requires any changes in order
to hook up your appliance, call upon a
professional electrician.
Warning
If the hood displays any malfunctions,
unplug the appliance or remove the fuse
corresponding to the electrical socket
where your appliance is plugged in.
• ELECTRICAL CONNECTIONS
During installation and maintenance
operations, the appliance must be
unplugged from the electrical grid; fuses
must be cut off or removed.
The electrical connections are made before
the appliance is installed in its housing.
Ensure that:
— the electrical installation has suf cient
voltage,
— the electrical wires are in good
condition,
— the diameter of the wires complies with
the installation requirements.
33

• ASSEMBLING THE HOOD
2 / INSTALLING YOUR APPLIANCE EN
Warning
The hood must be installed
in compliance with all applicable
regulations concerning the ventilation of
premises. In France these regulations are
described in DTU 61.1 from the CSTB. In
particular, the evacuated air should never
be conveyed to a duct used to evacuate
smoke from appliances that use gas or
other combustible fuels. Unused ducts
may only be used after approval from a
competent specialist.
The minimum distance between the cooking
surface and the lowest part of the hood
must be 70 cm at least. If the instructions
for the hob installed under the hood
specify a distance of more than 70 cm, this
requirement must be respected.
Fixing to the wall :
— Mark a vertical line on the wall centred
on the cooktop.
— Mark on the wall the three holes that
have to be drilled, using the supplied
hood suspension hook and observing the
recommended distance. (Pic. 3)
— Drill the three 8 mm diameter holes in a
suitable position and insert the plugs.
— Before xing the hood, mount the non-
return valve on the motor outlet -Secure
the hood’s xing support, ensuring that it is
perfectly level. (Pic. 3)
— Fix the extendable evacuation sleeve
(not included) to the motor outlet without
impeding the movement of the non-return
valve.(Pic. 5)
— Fit and secure the body of the hood on
this support with the screws provided for
this purpose. (Pic. 4)
Pict 2
Pict 3
Pict 1
34
pict. 3
pict. 4
pict. 5

2 / INSTALLING YOUR APPLIANCEEN
• ASSEMBLING THE VENTILATION
SHAFT
• Outdoor evacuation
— Calculate the nal height for xing the
duct support U-bracket (Pic. 3)
— Mark the two holes accordingly
— Drill 8 mm diameter holes and secure
the duct support bracket, ensuring that it is
xed on the same axis as the hood ( Pic. 3)
— Fix the at bracket behind the lower
duct. ( Pic. 8)
— Fix the two ducts to the hood.(Pic. 7)
— Connect the sleeve to the air outlet to the
outside. ( Pic. 5)
— Make the electrical connection to the
hood using the mains supply cable.
— Lift the upper duct up to the ceiling and
x it to the bracket using the screws. ( Pic. 6)
Pict 6
Pict 5
Pict 4
Pict 3
35
pict. 6
pict. 7
pict. 8

2 / INSTALLING YOUR APPLIANCE EN
• Recycling
— Calculate the nal height for xing the
duct support U-bracket. ( Pic. 3)
— Mark the two holes.
— Drill 8 mm diameter holes and secure
the duct support bracket, ensuring that it is
xed in the same axis as the hood. ( Pic. 3)
— Fix the at bracket behind the lower
duct. ( Pic. 8)
— Fit the sleeve adapter on the de ector
(Pic. 9).
— Connect the extendable sleeve to the
de ector. ( Pic. 5)
— Fit the two parts of the duct on to the
hood (Pic. 7).
— Fit the de ector (Pic. 9) into the upper
duct by the ventilation inlets (Pic. 10)
— Make the electrical connection to the
hood using the mains supply cable.
— Lift the upper duct up to the ceiling and
x it to the bracket using the two screws.
Pict 8
Pict 6
Pict 5
Pict 4
Warning
Do not use tools to remove the safety fi lm of hood.
Tip
For optimal use of your appliance, we recommend that you connect the hood to a 150
mm-diameter fl ue (not delivered with the appliance). Minimise the number of angles and
bends and the lengths of the fl ue. In the event that the hood will be operated using outdoor
evacuation, you should ensure a suffi cient infl ow of fresh air to avoid a pressure defi ciency
in the room.
36
( Pic. 6)
pict. 9
pict. 10
/