Black & Decker TCM1000KT User manual
- Category
- Coffee makers
- Type
- User manual

Please Read and Save this Use and Care Book
Por favor lea este instructivo antes de usar el producto
Veuillez lire et conserver ce guide d’entretien et d’utilisation
Model
Modelo
Modèle
❑
TCM1000KT
USA/Canada 1-800-231-9786
Mexico 01-800-714-2503
www.applicaconsumerproductsinc.com
Accessories/Parts (USA/Canada)
Accesorios/Partes (EE.UU/Canadá)
Accessoires/Pièces (É.-U./Canada)
1-800-738-0245
Register your product online at www.
prodprotect.com/applica,
for a chance to WIN $100,000!
Registre su producto en la Internet
en el sitio
Web www.prodprotect.com/applica
y tendrá la oportunidad de GANAR
$100,000!
Inscrivez votre produit en ligne à l'adresse
www.prodprotect.com/applica
et courez la chance de GAGNER
100 000 $!
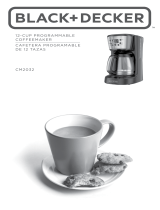
8-CUP PROGRAMMABLE
THERMAL COFFEEMAKER
CAFETERA TÉRMICA
PROGRAMABLE
DE 8 TAZAS
CAFETIÈRE ISOTHERME
PROGRAMMABLE
DE 8 TASSES

2
1
When using electrical appliances, basic safety precautions should
always be followed to reduce the risk of fire, electric shock, and/or
injury to persons, including the following:
q Read all instructions.
q Do not touch hot surfaces. Use handle or knobs.
q To protect against electric shock, do not place cord, plug
or appliance in water or other liquids.
q Close supervision is necessary when any appliance is used
by or near children.
q Unplug from outlet when not in use and before cleaning. Allow to
cool before putting on or taking off parts and before cleaning the
appliance.
q Do not operate any appliance with a damaged cord or plug or
after the appliance malfunctions, or has been damaged in any
manner. Return the appliance to the nearest authorized service
facility for examination, repair, or adjustment. Or, call the
appropriate toll-free number on the cover of this manual.
q The use of an accessory not evaluated for use with this appliance
may cause injury.
q Do not use outdoors.
q Do not let cord hang over the edge of table or counter, or touch
with hot surfaces.
q Do not place on or near a hot gas or electric burner or in
a heated oven.
q Keep the lid on the carafe when in use.
q Do not use this appliance for other than intended use.
q Scalding may occur if the lid is removed during the brewing
cycles.
IMPORTANT SAFEGUARDS
SAVE THESE INSTRUCTIONS.
POLARIZED PLUG (120V Models Only)
This appliance has a polarized plug (one blade is wider than the other).
To reduce the risk of electric shock, this plug is intended to fit into a polarized
outlet only one way. If the plug does not fit fully into the outlet, reverse the plug.
If it still does not fit, contact a qualified electrician. Do not attempt to modify the
plug in any way.
TAMPER-RESISTANT SCREW
Warning : This appliance is equipped with a tamper-resistant screw to prevent
removal of the outer cover. To reduce the risk of fire or electric shock, do not
attempt to remove the outer cover. There are no user-serviceable parts inside.
Repair should be done only by authorized service personnel.
ELECTRICAL CORD
a) A short power-supply cord (or detachable power-supply cord) is to be
provided to reduce the risk resulting from becoming entangled in or tripping
over a longer cord.
b) Longer detachable power-supply cords or extension cords are available and
may be used if care is exercised in their use.
c) If a long detachable power-supply cord or extension cord is used,
1) The marked electrical rating of the detachable power-supply cord
or extension cord should be at least as great as the electrical rating
of the appliance,
2) If the appliance is of the grounded type, the extension cord should
be a grounding-type 3-wire cord, and
3) The longer cord should be arranged so that it will not drape over
the countertop or tabletop where it can be pulled on by children
or tripped over.
Note: If the power supply cord is damaged, it should be replaced by qualified
personnel or in Latin America by an authorized service center.

4
3
INTRODUCTION
Thank you for choosing the Black & Decker
®
8-Cup Programmable Thermal
Coffeemaker. Your new coffeemaker comes with an easy-to-set timer so you can
wake up the aroma and taste of fresh-brewed coffee anytime. Can’t wait until
brewing cycle is finished? The Sneak-A-Cup
®
Interrupt Feature makes it easy to
grab a cup before brewing is done.
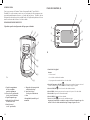
GETTING FAMILIAR WITH YOUR UNIT
TABLE OF CONTENTS
Pages
GETTING FAMILIAR WITH YOUR UNIT ............................... 4
Control Panel .......................................................................... 5
GETTING STARTED ................................................................ 6
Setting the Clock ..................................................................... 6
Cleaning Coffeemaker before First Use .................................... 6
READY TO BREW COFFEE ...................................................... 7
BREWING COFFEE ANYTIME ................................................. 7
BREWING 1-4 CUPS ........................................................... 7, 8
SNEAK-A-CUP
®
INTERRUPT FEATURE ................................... 8
USING YOUR PERFECT POUR
®
THERMAL CARAFE .............. 8
CLEANING .............................................................................. 8
MAINTAINING YOUR COFFEEMAKER ................................... 8
TROUBLESHOOTING ............................................................. 9
WARRANTY INFORMATION ................................................ 30
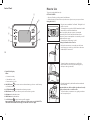
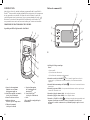
Product may vary slightly from what is illustrated.
1. Brew compartment cover
with quick-release latch
† 2. Removable brew basket (not shown)
(Part # TCM1000-01)
3. Water reservoir cover
4. Water window with cup markings
5. Control panel (see B for details)
6. Sneak-A-Cup
®
interrupt feature
† 7. Perfect Pour
®
carafe
(Part # TCM1000-02)
8. Base
† Consumer replaceable/removable parts
A

6
5
How to Use
This unit is for household use only.
GETTING STARTED
1. Remove all stickers, packing material, and literature.
2. When selecting a location for the unit, make sure to place it away from your cabinets.
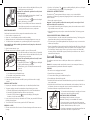
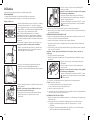
Setting the Clock (C)
1. Plug unit into a standard AC wall outlet. The digital clock
ashes 12:00 AM.
2. To change the time, press the HOUR button then the MIN
button until you reach the desired time.
Note: If you unplug the unit or power is interrupted
momentarily, the unit will remember the last set time.
However if power is interrupted for a few seconds, you will
need to set the time again.
3. To reset the time, follow steps 1 and 2.
Cleaning Coffeemaker before First Use
1. Pull up the water reservoir cover and pour cold water
in the reservoir up to the 8-cup level mark on the water
window (D). Do not overll.
2. To open the brew compartment cover, pull up the
quick-release latch; the cover automatically goes up
and stays in the up position (E).
3. Grip the brew basket by the handle and insert inside the
brew basket (F).
Important: Make sure the brew basket is positioned correctly
in place; otherwise the cover will not close.
4. To close the brew compartment cover, gently press down
until it snaps into place.
Control Panel
B
1. Digital Clock Display:
Shows:
•
Current time of day
• Selected brew cycles
• Preset auto brew cycles
2. ON/OFF Button :
Use to turn unit on and start brewing cycle or to cancel brewing
cycle and turn unit off.
3. AUTO/ON Button :
Activates the auto brewing function.
4. PROG Button:
Allows you to select a specic time for brewing coffee.
5. MIN Button:
Sets desired minutes.
6. HOUR Button:
Sets desired hour.
7. 1-4 CUPS Button :
Use for brewing smaller quantities.
Important: When using this feature, make sure to ll the water reservoir half full. The
coffeemaker will continue the brewing cycle until the reservoir is empty.
C
D
E
F

8
7
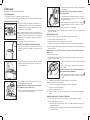
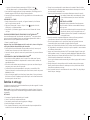
5. Place the carafe on the base and slide it all the way back
until it does not go any further (G).
Important: The carafe must be positioned correctly for unit
to function properly.
6. If the unit is unplugged, plug into electrical outlet. To set
the time, refer to Setting the clock.
7. Press the ON/OFF button. The appears on the digital
display; the brewing cycle begins.
8. When cycle is nished, the unit shuts off automatically.
9. Discard the water from the carafe and rinse the carafe,
carafe lid, and lter basket in warm, sudsy water.
READY TO BREW COFFEE
You do not have to set the clock or program the coffeemaker to brew coffee.
1. Open the brew compartment cover.
2. Insert a No. 4 cone-shaped paper lter into the brew basket.
3. Add ground coffee (we recommend one or two heaping tablespoons for every cup).
4. To close the brew compartment cover, press down gently until it snaps into place.
Important: Make sure the brew basket is positioned correctly into place; otherwise the
cover will not close.
5. Open the water reservoir cover.
6. Fill water reservoir with cold water up to the 8-cup mark. Do not overll.
7. Place the lid onto thermal carafe as shown in Figure
(H).
8. Place the carafe on the base and slide it all the way back
until it does not go any further.
Important: The carafe must be positioned correctly for unit
to function properly.
9. Press the ON/OFF button. The displays on the digital
display and the brewing cycle begins.
10. When brewing cycle is nished, the unit automatically
shuts off.
Tip: Once the coffee has nished brewing:
a. Stir it before serving to blend the avors.
b. Discard the coffee grounds left in the lter.
11. Remove the carafe to pour coffee.
12. After pouring coffee, close the carafe lid by turning it clockwise until it is tightly
locked.
BREWING COFFEE ANYTIME
1. Prepare your coffeemaker as instructed in steps 1-8 under Ready to Brew Coffee.
2. To program and set a time for the coffeemaker to begin brewing your coffee:
a. Press the PROG button; the digital display shows 12:00 PM as the default time.
b. Press the HOUR and MIN buttons to select a time for brewing.
c. Press the AUTO/ON button; the appears on the display, indicating that
the brew cycle will start at the set time.
3. If you want to verify the time you selected for AUTO brew, just press the PROG button
to display the preset time.
4. To cancel the AUTO brew function, press the ON/OFF button twice.
BREWING 1-4 CUPS
1. Fill water reservoir half full as the unit will continue brewing until the water reservoir
is empty.
2. Press the 1-4 Cups button. The appears on the digital display; the brew cycle begins.
3. To stop the brewing cycle, press the 1-4 Cup button again.
SNEAK-A-CUP
®
INTERRUPT FEATURE
The Sneak-A-Cup
®
interrupt feature allows you to pour a cup of coffee while the
coffeemaker is still brewing by temporarily stopping the ow of coffee into the carafe for
about 30 seconds.
1. Remove the carafe from the unit.
Important: To avoid a possible overow after removing carafe, be sure to place it back
under brew basket in 30 seconds or less.
2. To prevent the lid from falling off while pouring coffee, make sure the arrow on the lid
aligns with the arrow on the carafe.
3. When nished pouring coffee, replace carafe under brew basket. The brewing process
continues.
USING YOUR PERFECT POUR
®
THERMAL CARAFE
• For best performance, rinse the carafe with hot water before brewing. This brings up the
temperature and improves the carafe’s thermal properties.
• The carafe spout is specially designed to deliver a dripless pour so you can serve coffee
without any messy drips.
• Coffee is brewed directly into carafe through the closed brew thru lid. Always check that
lid is properly in place when brewing. Coffee may overow if lid is not properly in place.
• The carafe keeps coffee hot up to 4 hours so you can leave it away from coffeemaker
for serving. Always check that lid is properly closed in place when not in use, this will
ensure that coffee stays hot.
Care and Cleaning
This appliance contains no user-serviceable parts. Refer service to qualied service
personnel.
Caution: Do not overexpose the control panel to water. It is not waterproof. Water may
cause permanent damage and make coffeemaker inoperable.
CLEANING
1. Be sure the unit is unplugged and cooled.
2. Open the brew compartment cover.
3. To remove brew basket, grip the handle and pull out.
4. Discard the paper lter with the grounds.
5. Wash the brew basket and carafe lid in the dishwasher, top-rack only or hand-wash in
warm, sudsy water.
6. Wipe the exterior of the thermal carafe and coffeemaker with a soft damp cloth. Do not
use abrasive cleaners or scouring pads. Never immerse the coffeemaker in water.
7. Insert brew basket into compartment and close the cover.
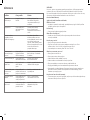
8. To clean the inside of the thermal carafe
(J), wash in warm
sudsy water, rinse well and allow to air dry.
MAINTAINING YOUR COFFEEMAKER
Mineral deposits left by hard water can clog your
coffeemaker. Cleaning is recommended one a months.
1. Open water reservoir cover and pour white vinegar into
the water reservoir up to the 4-cup level mark on the water
window. Add cold water up to the 6-cup line.
2. Open brew compartment cover and insert paper lter into
brew basket. Close brew compartment cover.
G
H
J

10
9
3. Place the thermal carafe with lid secured, all the way into the coffeemaker under
the brew basket and plug in the unit.
4. Press the ON/OFF button and let half of the vinegar solution brew into the thermal
carafe (until the solution level in the water window goes down to "3."
5. Press the ON/OFF button to turn off the unit and let it soak for at least 15 minutes
to soften mineral deposits.
6. Press the ON/OFF button again to turn on the coffeemaker and brew the remaining
cleaning solution into the thermal carafe.
7. When the vinegar solution has nished brewing, discard the paper lter, empty the
thermal carafe and rinse with clean water.
8. Rell the water reservoir with cold water, insert a paper lter in the brew basket and
run another brew cycle to rinse out any remaining vinegar solution.
9. Wash the brew basket, thermal carafe and brew-thru lid as instructed in Cleaning
section.
TROUBLESHOOTING
Problem Possible Cause Solution
Unit does not turn on. Unit is not plugged in. Check to ensure unit is plugged
into a working outlet and the
appliance is turned on.
Unit is leaking. Water reservoir Make sure that the water
might be overlled. reservoir has not been lled
beyond the MAX ll line.
The thermal carafe does For best results, we recommend
not keep the coffee that you rinse the carafe with
hot long enough. hot water before brewing. This
brings up the temperature and
improves the carafe’s thermal
properties.
Brewing takes too long. The unit might Follow procedure under
need cleaning. Maintaining your Coffeemaker.
Coffee is not brewing. Water reservoir Make sure water reservoir
might be empty. has water.
The coffeemaker brews There are no coffee Add desired amount of grounds
only brews water. grounds in the to the paper lter.
paper lter.
The brew basket cover Brew basket might not Insert brew basket correctly.
does not close. be positioned correctly.
Brew basket overows. Carafe might not be Place thermal carafe correctly
positioned all the way on the base.
in on the base.
Grounds are in The lter is not properly Insert lter properly in the
the coffee. inserted in brew basket. brew basket.
Cuando se utilizan aparatos eléctricos, siempre se debe respetar
ciertas medidas de seguridad a fin de reducir el riesgo de un
incendio, un choque eléctrico y (o) lesiones a las personas,
incluyendo las siguientes:
q Por favor lea todas las instrucciones.
q No toque las superficies calientes. Utilice las asas o las perillas.
q A fin de protegerse contra el riesgo de un choque eléctrico, no
coloque el aparato de manera que el cable, el enchufe o el mismo
aparato entre en contacto con agua o cualquier otro líquido.
q Todo aparato eléctrico utilizado en la presencia de menores de
edad o por ellos mismos requiere la supervisión de un adulto.
q Desconecte el aparato de la toma de corriente cuando no esté
en funcionamiento y antes de limpiarlo. Espere que el aparato se
enfríe antes de instalar o retirar las piezas y antes de limpiarlo.
q No se debe utilizar ningún aparato eléctrico que tenga el cable o
el enchufe averiado, que presente un problema de funcionamiento
o que esté dañado. Devuelva el aparato al centro de servicio
autorizado más cercano para que lo examinen, reparen o ajusten.
También puede llamar gratis al número apropiado que aparece en
la cubierta de este manual.
q El uso de un accesorio no evaluado para ser utilizado con este
aparato podría ocasionar lesiones personales.
q Este aparato no se debe utilizar a la intemperie.
q No permita que el cable cuelgue del borde de la mesa o del
mostrador ni que entre en contacto con las superficies calientes.
q No coloque el aparato sobre ni cerca de las hornillas de gas o
eléctricas ni adentro de un horno caliente.
q La jarra debe permanecer tapada cuando está en uso.
q El aparato se deberá utilizar únicamente con el fin previsto.
q Existe el riesgo de quemaduras si uno retira la tapa durante los
ciclos de colado.
INSTRUCCIONES
IMPORTANTES DE SEGURIDAD
GUARDE ESTAS INSTRUCCIONES.
Page is loading ...
Page is loading ...
Page is loading ...
Page is loading ...
Page is loading ...
Page is loading ...
Page is loading ...
Page is loading ...
Page is loading ...

30
29
DÉPANNAGE
Problème Cause possible Solution
L’appareil ne L’appareil n’est pas Vérier que l’appareil est
fonctionne pas. branché. branché dans une prise de
courant fonctionnelle et qu’il
est allumé.
L’appareil fuit. Il est possible que le S’assurer que le réservoir
réservoir d’eau soit d’eau n’a pas été rempli
trop plein. au-dessus du niveau maximum
(MAX).
La carafe isotherme. Pour obtenir les meilleurs
ne garde pas le café résultats possibles, nous vous
chaud assez longtemps. recommandons de rincer la carafe
avec de l’eau chaude avant
l’infusion. Cette opération permet
d’élever la température de la carafe
et ainsi d’en améliorer les
propriétés thermiques.
L’infusion prend Il est possible que Suivre les instructions données
beaucoup de temps l’appareil ait besoin dans la rubrique « Entretien de
à se faire. d’un bon nettoyage. la cafetière ».
Le café ne s’infuse pas. Il est possible que le S’assurer que le réservoir
réservoir d’eau soit vide. d’eau contient de l’eau.
La cafetière n’infuse Il n’y a pas de café Ajouter la quantité désirée de
que de l’eau. dans le ltre en café dans le ltre en papier.
papier.
Le couvercle du panier Il est possible que le Insérer le panier d’infusion de
d’infusion ne se panier d’infusion ne soit façon adéquate.
ferme pas. pas placé correctement.
Le panier d’infusion Il est possible que vous Placer la carafe isotherme
déborde. n’ayez pas glissé la correctement sur son socle.
carafe jusqu’au fond.
Il y a du marc Le ltre n’est pas placé Insérer le ltre de façon
dans le café. correctement dans le adéquate dans le panier
panier d’infusion. d’infusion.
NEED HELP?
For service, repair or any questions regarding your appliance, call the appropriate "800"
number on the cover of this book. Do not return the product to the place of purchase.
Do not mail the product back to the manufacturer nor bring it to a service center. You may
also want to consult the website listed on the cover of this manual.
One-Year Limited Warranty
(Applies only in the United States and Canada)
What does it cover?
• Any defect in material or workmanship; provided; however, Applica’s liability will not
exceed the purchase price of the product.
For how long?
• One year after the date of original purchase.
What will we do to help you?
• Provide you with a reasonably similar replacement product that is either new
or factory refurbished.
How do you get service?
• Save your receipt as proof of the date of sale.
• Check our on-line service site at www.prodprotect.com/applica, or call our
toll-free number, 1-800-231-9786, for general warranty service.
• If you need parts or accessories, please call 1-800-738-0245.
What does your warranty not cover?
• Damage from commercial use
• Damage from misuse, abuse or neglect
• Products that have been modied in any way
• Products used or serviced outside the country of purchase
• Glass parts and other accessory items that are packed with the unit
• Shipping and handling costs associated with the replacement of the unit
• Consequential or incidental damages (Please note, however, that some states do not
allow the exclusion or limitation of consequential or incidental damages, so this
limitation may not apply to you.)
How does state law relate to this warranty?
• This warranty gives you specic legal rights, and you may also have other rights that vary
from state to state or province to province.
Page is loading ...
Page is loading ...

Sello del Distribuidor:
Fecha de compra:
Modelo:
Comercializado por:
Applica de México, S. de R. L. de C.V.
Blvd. Manuel Avila Camacho 2900-902,
Fracc Los Pirules
Tlalnepantla, Edo. de México. C.P. 54040.
R. F. C. AME-001026- PE3.
Servicio y Reparación
Art. 123 y José Ma. Marroquí # 28 D
Col. Centro, Mexico D. F., CP 06050
Servicio al Consumidor,
Venta de Refacciones y Accesorios
01 800 714 2503
Copyright © 2007 Applica Consumer Products, Inc.
Made in People’s Republic of China
Printed in People’s Republic of China
Importado por:
Applica de México S. de R.L. de C.V.
Blvd. Manuel Avila Camacho 2900-902, Fracc Los Pirules
Tlalnepantla, Edo. de México. C.P. 54040
Teléfono: (55) 1106-1400
Del interior marque sin costo
01 (800) 714 2503
Fabricado en la República Popular de China
Impreso en la República Popular de China
Fabriqué en République populaire de Chine
Imprimé en République populaire de Chine
is a trademark of The Black & Decker Corporation, Towson, Maryland, USA
Marca registrada de The Black & Decker Corporation, Towson, Maryland, E.U.
Marque de commerce déposée de la société The Black & Decker Corporation, Towson, Maryland, É.-U.
2007/2-8-43E/S/F
1000 W 120 V 60 Hz
CAT. NO . EHB5 00
TYPE 1 1 60 W 1
AC ONLY
6
-
 1
1
-
 2
2
-
 3
3
-
 4
4
-
 5
5
-
 6
6
-
 7
7
-
 8
8
-
 9
9
-
 10
10
-
 11
11
-
 12
12
-
 13
13
-
 14
14
-
 15
15
-
 16
16
-
 17
17
-
 18
18
-
 19
19


Black & Decker TCM1000KT User manual
- Category
- Coffee makers
- Type
- User manual
Ask a question and I''ll find the answer in the document
Finding information in a document is now easier with AI
in other languages
Related papers
-
Black & Decker CM0755BZ User guide
-
Black and Decker TCM1000KT User manual
-
Black & Decker CM2020R User guide
-
Black & Decker CM4100S User guide
-
-
BLACK DECKER CM1100 User manual
-
-
Black & Decker CM2035B Owner's manual
-
Black & Decker CM2036S User manual
-
Other documents
-
BLACK DECKER CM0755S User guide
-
-
 Black and Decker Appliances CM1650B User guide
-
 Black and Decker Appliances CM2032S User guide
-
BLACK DECKER CM2045B-1 Thermal Programmable 12-Cup Coffee Maker User manual
-
BLACK+DECKER CM2020B Owner's manual
-
 Black and Decker Appliances DE790B User guide
-
 Black and Decker Appliances CM6000 Series Version2 User guide
-
 Black and Decker Appliances CM2020 Series User guide
-


