operating _15operating _15
02 OPERATING
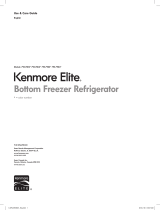
• Position of the Twist ice maker
2
and the Small
box
5
can be switched with each other.
• To get more space, you can remove cover of Top
shelf
1
, Twist ice maker
2
, Fresher box
3
,
top three of the Big boxes
4
and the Small box
5
. It does not affect thermal and mechanical
characteristics. A declared storage volume of
freezer compartment is calculated with these
parts removed.
Do not store glass bottles in the freezer.
USING THE FRESHER BOX
(OPTION)
You can use the Fresher box to store foods or
beverages that needs to be frozen or stored freshly.
• Use the lever on the top of the box to set the
fresher box in Fresh or Fresher.
4
Alarm
1. Door Alarm
Press the Alarm button to activate the
Alarm function.
Alarm indicator will light up and the
refrigerator will alert you with alarm sound if the
refrigerator door is kept open for longer than 2
minutes. To deactivate the Alarm function, press the
Alarm button again.
2. Temperature Alarm
Press the Alarm button to activate the temperature
alarm function. The alarm indicator will light up. If the
freezer compartment is too warm because there has
been a power failure, the signal of “--” fl ashes on the
display. When the Freezer /Temp button is pressed,
the “warmest temperature” which has reached in the
freezer compartment is fl ashed on the display for fi ve
seconds. Then the actual temperature is indicated.
To deactivate the Temperature Alarm function, press
the Alarm button again.
This warning may operate;
- when the appliance is turned on
- the freezer compartment is too warm due to a
power failure
3. Display Off
As standard, the temperature display is switched
off, to switch between on and off mode, press alarm
button for 3 seconds.
5
Eco (Hold 3 sec for Child Lock)
Press the Eco button to activate the
Eco function. Eco indicator will light
up and the freezer will set the limit for
desired temperature range between
-15°C and -18°C.
If you have set the desired temperature to -19°C or lower,
freezer will automatically set the temperature to -18°C.
Press the Eco button for 3 seconds to
activate the child Lock function.
Child lock indicator will light up and all the
buttons on the control panel will be locked.
To deactivate the Child Lock function, press the Eco
button again for 3 seconds.
(For <TYPE A>model, recommed to use Child Lock
1
button to use lock function.)
Eco function cannot be used together
with Power Freeze function. Selecting
Power Freeze button or Freezer button will
automatically deactivate the Eco function.
• Some of the features can be different and
may not be available depending on the
model.
1
2
3
4
5
CAUTION
Fresh
Set the lever in Normal to use the Fresher box
the same way as other big boxes.
Fresher
Set the lever in Fresher if you want to more
long time stored freshly in the Fresher Box.