Page is loading ...

PLEASE READ AND SAVE THIS USE AND CARE BOOK.
POR FAVOR LEA ESTE INSTRUCTIVO ANTES DE USAR EL PRODUCTO.
VEUILLEZ LIRE ET CONSERVER CE GUIDE D’ENTRETIEN ET D’UTILISATION.
Série CTO9500 Series
Accessories/Parts (USA/Canada) 1-800-738-0245
Accesorios/Partes
(EE.UU/Canadá)
Accessoires/Pièces (É.-U./Canada)
USA/Canada 1-800-231-9786
Mexico 01-800-714-2503
www.blackanddecker.com
Digital Advantage
™
Series
Countertop Convection Oven/Broiler
Horno de convección/asador para el mostrador
Four à convection/rôtissoire de comptoir
CTO95OOPub179001-02 3/12/03 11:39 AM Page 1

When using electrical appliances, basic safety precautions should always be
followed, including the following:
■ Read all instructions.
■ Do not touch hot surfaces. Use handles or knobs.
■ To protect against risk of electrical shock, do not immerse cord, plug, or any non-
removable parts of this oven in water or other liquid.
■ Close supervision is necessary when any appliance is used by or near children.
■ Unplug from outlet when not in use and before cleaning. Allow to cool before
putting on or taking off parts and before cleaning.
■ Do not operate any appliance with a damaged cord or plug or after the appliance
malfunctions or is dropped or damaged in any manner. Return the appliance to the
nearest authorized service facility for examination, repair, or electrical or
mechanical adjustment. Or, call the appropriate toll-free number listed on the cover
of this manual.
■ The use of accessory attachments not recommended by Black & Decker may
cause injuries.
■ Do not use outdoors.
■ Do not let cord hang over edge of table or counter, or touch hot surfaces.
■ Do not place on or near a hot gas or electrical burner, or in a heated oven.
■ Use extreme caution when removing tray or disposing of hot grease.
■ Turn all controls to OFF before inserting or removing plug from wall outlet.
■ To turn off toasting, press stop. To stop cooking or baking turn the control to stop.
■ Do not place any of the following materials in the oven: paper, cardboard, plastic
wrap, and the like.
■ To disconnect, grasp plug and remove from outlet. Do not pull by the cord.
■ Do not use oven for other than intended use.
■ Oversize foods or metal utensils must not be inserted in this appliance, as they may
create a fire or risk of electric shock.
■ A fire may occur if the toaster oven is covered or touching flammable material
including curtains, draperies, walls and the like, when in operation. Do not store
any item on top of unit when in operation.
■ Do not store any material, other than manufacturer's recommended accessories, in
this oven when not in use.
■ Do not clean with metal scouring pads. Pieces can break off the pad and touch
electrical parts resulting in a risk of electric shock.
IMPORTANT SAFEGUARDS
SAVE THESE INSTRUCTIONS.
POLARIZED PLUG
This appliance has a polarized plug (one blade is wider than the other). As a safety
feature, this plug fits in a polarized outlet only one way. If the plug does not fit into the
outlet, reverse the plug and try again. If it still does not fit, contact a qualified
electrician. Do not attempt to defeat this safety feature.
ELECTRICAL CORD
The cord of this appliance was selected to reduce the possibility of tangling in or
tripping over a longer cord. If more length is needed, use an extension cord rated no
less than 15 amperes. (For 220 volts rated products, use an extension cord rated no less
than 6 amperes). When using an extension cord, do not let it drape over the working
area or dangle where someone could accidentally trip over it. Handle cord carefully for
longer life; avoid jerking or straining it at outlet and appliance connections.
1 2
■ Extreme caution should be used when using containers constructed of other than
metal or glass. Refer to “Cooking Containers.”
■ Do not cover crumb tray or any parts of the oven with metal foil. This will cause
overheating of the oven.
CTO95OOPub179001-02 3/12/03 11:39 AM Page 2

3 4
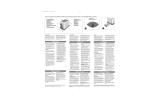
Product may vary slightly from what is illustrated.
† Broil Rack
(Part # 174296-00)
† Bake Pan
(Part # 165335-01
1. ThermaGuard™ Top & Sides
2. Digital Control Panel
(see A below for detailed
view)
† 3. Slide Rack
(Part # 175800-00)
† 4. Removable Crumb Tray
(Part # 174096)
5. Nonstick Interior
6. Vent
† Consumer replaceable
Detail of Digital Control Panel
Clock
Celsius/Fahrenheit
Digital display
Time/Temp/Toast
Bake
Timer
Broil
Convection
Start
Toast
Stop
Bagel
How to Use
This product is for household use only.
Before first use, remove the Slide Rack, Broil Rack and Bake Pan from Oven. Wash in hot,
sudsy water, rinse and dry with dishtowel or paper toweling. Replace Slide Rack in Oven.
To Set the Clock:
You must set the clock for the oven to operate.
1. Plug the unit into a standard wall outlet. The digital display will show 12:00 blinking and
the word "clock" will appear and blink in the upper left corner of the display.
2. Touch the Clock button, then using the + or - on the Temp/Time/Toast button, set the
correct time of day. Touch the Clock button again. The word "clock" will appear steady
in the upper left corner. The clock is now set and will keep the correct time.
For Toasting:
The Toast button is pre-set at 4 (medium).
1. Open Oven door and place bread slices on Slide Rack in Oven; close door. Press the
Toast button; the red indicator will light and blink. The digital display will show the
number 4 and 4 bars. This is the medium setting.
2. Use the + or - from 1 to 7 on the Temp/Time/Toast button for lighter or darker toast.
3. Touch the Start button; the red indicator light will change from blinking to steady.
4. The leftmost bar in the display will blink, and as toasting progresses, the next bar to the
right will blink, and so on until toasting is done. Opening the door during toasting will
automatically cancel the toasting cycle.
5. When toasting is done, five beeps will sound, the bars in the display will be steady, and
the light on the Toast button will go out. The display will return to time of day.
6. For your convenience, the Oven will remember the last toast setting that was
programmed.
For Bagel Setting:
The Bagel button is pre-set at 4 (medium).
1. Open Oven door and place one or more bagel halves on Slide Rack in Oven; close door.
Press the Bagel button; the red indicator will light and blink. The digital display will
show the numeral 4 and 4 bars. This is the medium setting.
2. Use the + or - from 1 to 7 on the Temp/Time/Toast button for lighter or darker bagels.
3. Touch the Start button; the red indicator light will change from blinking to steady.
4. The leftmost bar in the display will blink, and as the bagel cycle progresses, the next
bar to the right will blink, and so on until the cycle is done. Opening the door during
toasting will automatically cancel the bagel cycle.
5. When bagel cycle is done, 5 beeps will sound, the bars in the display will be steady,
and the light on the Bagel button will go out. The display will return to time of day.
6. For your convenience, the Oven will remember the last bagel setting that was
programmed.
For Baking:
The Oven will automatically preheat to the temperature you set for baking. To cancel
baking at any time, press the Stop button twice.
1. Press the Bake button; the red indicator will light and blink. The digital display will show
350, and a small F (Fahrenheit) in the lower left corner will blink.
A
CTO95OOPub179001-02 3/12/03 11:39 AM Page 4

3. When the Oven reaches the set temperature, 2 beeps will sound.
4. Open the Oven door and place pan containing food on Slide Rack. Close the door and
press the Timer Set button.
Note: The fan will stop when the door is opened and will restart when the Oven door is
closed.
2. The oven is pre-set to 350º F. If you want to cook, bake or roast at this temperature, just
press the Start button. The Oven will automatically preheat to 350º F. The display will
blink the rising temperature as it preheats.
3. When the Oven reaches the set temperature, 2 beeps will sound.
4. Open the Oven door and place pan containing food on Slide Rack. Close the door and
press the Timer Set button.
5. Timer is pre-set for 2 hours. To set the time you want to cook, press the Timer Set button
and use the + or – on the Temp/Time/Toast button until the desired cooking time is
reached.
6. Press the Start button. The red indicator on the Bake button will change from blinking
to steady. The display will alternate between the temperature set and the cooking time,
counting down the time as it cooks.
7. When cooking time has elapsed, the Oven will beep 5 times then shut off. The display
will return to time of day.
For Broiling:
Broiling temperature is pre-set. To cancel broiling at any time, press the Stop button twice.
1. Place food to be broiled on Broil Rack set in Bake Pan.
2. Open Oven door and place Bake Pan on Slide Rack.
3. Press the Broil button. The red indicator will light and blink; the display will show “brl”
blinking.
4. Press the Timer Set button. Timer is pre-set for 2 hours. To set the time you want to broil,
press the Timer Set button and use the + or – on the Temp/Time/Toast button until the
desired cooking time is reached.
5. Press the Start button. The red indicator on the Broil button will change from blinking to
steady. The display will alternate between “brl” and the cooking time, counting down
the time as it cooks.
6. When broiling time has elapsed, the Oven will beep 5 times then shut off. The display
will return to time of day.
Timer:
1. The Timer Set button can be used as a kitchen timer for up to 2 hours.
2. Press the Timer Set button. Timer is pre-set for 2 hours.
3. To set time, press the Timer Set button and use the + or – on the Temp/Time/Toast button
until the desired time is reached.
4. Press the Timer Set button again. The display will show the time set and count down
until set time has elapsed.
5. When time has elapsed, the Oven will beep 5 times and the display will return to time
of day.
For Convection:
Use the Convection setting for baked goods such as pies, cookies and biscuits when you
want acrisper, browner baked goods, and when cooking roasts, whole chickens or
chicken pieces to get a crisply browned skin.
The Oven will automatically preheat to the temperature you set for the convection setting.
1. Press the Convection button; the red indicator will light and blink. The digital display will
show 350, and a small F (Fahrenheit) in the lower left corner will blink.
2. The oven is pre-set to 350º F. If you want to convection cook at this temperature, just
press the Start button. The fan inside the Oven will automatically start and the Oven will
preheat to 350º F. The display will blink the rising temperature as it preheats.
IMPORTANT: Before cleaning any part, be sure the Oven is off, unplugged, and cool.
Always dry parts thoroughly before using Oven after cleaning.
1. Clean the Glass Door with a nylon pad and sudsy water. Do not use a spray glass
cleaner.
2. To remove the Slide Rack, open the door, pull the rack forward and out. Wash the Slide
Rack in hot, sudsy water or in a dishwasher. To remove stubborn spots, use a polyester
or nylon pad. To replace the Slide Rack, open the door completely and slide the Rack
into the rack support grooves of the interior of the Oven and close the door.
3. Wash the Bake Pan and Broil Rack in hot, sudsy water or in dishwasher. To minimize
scratching, use a polyester or nylon pad.
Crumb Tray
Grasp the handle at the front of the Oven and pull out the Crumb Tray. Dispose of crumbs
and wash the Tray in hot, sudsy water. Remove stubborn spots with a nylon mesh pad. Be
sure to dry thoroughly before slipping the Tray back into the Oven.
Nonstick Coating
1. Unplug the Oven and allow it to cool, then wipe with a soapy sponge or nylon pad after
each use.
2. Do not use a chemical oven cleaner. Do not use any abrasive cleansers or scouring
pads as they may harm the coating. Dry with paper towel or soft cloth.
Exterior
The ThermaGuard™ top & sides won’t burn your hand if accidentally touched. However,
allow the oven to cool completely before cleaning. Wipe the exterior with a damp cloth or
sponge and dry with paper towel or soft cloth.
Cooking Containers
1. The inside dimensions of this Oven are 10.3" x 4.9" x 14.25" (26 cm x 12 cm x 36 cm). This
size allows for many different types of baking containers. Keep the inside dimensions of
the oven in mind when purchasing cooking containers.
2. Metal, ovenproof glass without lids, or ceramic bakeware may be used in your Oven.
Follow manufacturer’s instructions. Be sure the top edge of the container is at least 1"
(2.54 cm) away from upper heating elements.
3. Some frozen foods are packaged in containers suitable for microwave or regular ovens.
Check package instructions. If there are any questions regarding the use of a specific
container, contact the food manufacturer.
4. Some items which should never be used in your Oven:
• Glass lids on glass or metal bakeware. (If a cover is needed, use aluminum foil and be
careful that it does not touch the heating elements.)
• Air-tight packages such as sealed pouches or cans.
• Plastic wrapping or paperboard covers.
Care and Cleaning
5 6
CTO95OOPub179001-02 3/12/03 11:39 AM Page 6

2. In medium saucepan, melt butter. Remove from heat. Add cocoa and stir until dissolved.
Add hot water and stir again.
3. With wire whisk, blend in sugar, flour, salt, vanilla and evaporated milk.
4. Stir until batter is smooth. Mix in pecans and pour into pie crust (batter will be thin).
5. Bake on convection setting for 55-60 minutes, or until knife inserted in center comes
out clean.
6. Cool and serve garnished with sweetened whipped cream, if desired.
Makes: 8 servings.
Baked Ziti with Chicken Sausage
1 pound (454g) Italian flavored chicken sausage links 1 tablespoon chopped fresh basil
2-1/2 cups ziti pasta 1/2 teaspoon salt
16 ounces (454g) ricotta cheese 1/8 teaspoon pepper
1 package (8 ounces) (227g) shredded mozzarella 1 jar (25 to 32 ounces)
cheese, divided (708-908g) spaghetti sauce
1/4 cup grated Parmesan cheese 1/4 cup water
1. Position sausage links on broil rack tray over bake pan and broil 12 to 13 minutes.
Turn and broil until done on other side. Remove from oven and cut into 1/4-inch (.64 cm)
slices.
2. Cook ziti according to package directions; drain when done.
3. In medium bowl, combine ricotta cheese, 4 ounces (113g) mozzarella cheese, Parmesan
cheese, basil, salt and pepper. Blend well.
4. Preheat oven at 400˚F (204˚C). Transfer ziti to oven pan. Dot with cheese mixture; top
with sausage slices, pushing slices down into mixture. Pour spaghetti sauce over top.
Add water to spagetti jar, cover and shake. Drizzle over contents of oven pan. Spread
sauce evenly over top to cover all ziti and sausage pieces.
5. Bake at 400˚F (204˚C) for 30 minutes. Sprinkle with remaining mozzarella cheese and
cook 5 to 10 minutes longer, or until cheese melts and is lightly browned.
Makes: 8 servings.
Spicy Tortilla Lasagna
2 tablespoons vegetable oil 1/2 teaspoon ground cumin
2 medium zucchini, sliced into 1/4-inch Salt and pepper to taste
(.64 cm) slices (about 1 pound/454g) 3/4 cup bottled salsa, favorite kind
3/4 cup frozen corn 6 corn tortillas (6-inch/15 cm size)
1/4 cup ricotta cheese 1 jar (7 ounces/198g) roasted red
1-1/4 cups shredded Monterey Jack cheese peppers, drained and patted dry
with jalapeno peppers, divided 3 tablespoons chopped fresh
cilantro
1. Brush bottom of bake pan with oil. Arrange zucchini slices on bottom and sprinkle corn
over top. Broil for 5 minutes. Turn zucchini over and broil 5 minutes more. Remove from
oven and transfer vegetables to bowl. Preheat oven at 450˚F (232˚C).
2. While vegetables are broiling, stir together ricotta cheese, 1 cup Monterey Jack
cheese, cumin and salt and pepper to taste.
3. Place 2 tortillas on bottom of oven pan. Spread 1/4 cup salsa over tortillas. Top with half
the cheese mixture, half the zucchini/corn mixture, half the red peppers, and
1 tablespoon cilantro. Repeat with another layer of tortillas, salsa, cheese,
and vegetables in same order.
4. Top with remaining 2 tortillas, salsa, cilantro and 1/4 cup Monterey Jack cheese. Cover
pan with aluminum foil and bake at 450˚F (232˚C) for 30 minutes. Let stand, covered,
for 5 minutes before serving.
Makes: 2 servings.
7 8
Recipes
Spiced-Up Burgers
1/2 cup catsup 1/4 teaspoon cinnamon
1 small onion, chopped 1/4 teaspoon nutmeg
2 cloves garlic, minced 3-1/2 pounds (1.58 kg) lean ground beef
2 tablespoons molasses 1/2 (.22 kg) pound bacon, cooked
1-1/2 tablespoons Worcestershire sauce and crumbled
1 teaspoon salt Lettuce and tomato slices
Rolls
1. In large mixing bowl, combine catsup, onion, garlic, molasses, Worcestershire sauce,
salt, cinnamon, and nutmeg. Mix thoroughly.
2. Add meat and bacon. Mix thoroughly. Then shape into 12 oval shaped burgers.
3. Position half the burgers on broil rack. Broil burgers about 25 minutes, turning halfway
through. Repeat with remaining burgers.
4. Serve with lettuce and tomato slices on fresh rolls.
Makes: 12 burgers.
Vegetable-Walnut Stuffed Sole
1/2 tablespoon olive oil 1 medium stalk celery, chopped
1/2 cup parsley leaves, finely chopped 3 green onions, chopped
1/4 cup dill weed, chopped 6 sole fillets (about 2 pounds total)
1/2 cup walnut halves, toasted and chopped 2 lemons, cut into wedges
14 mushrooms, chopped
1. Heat olive oil in 10-inch (25 cm), nonstick skillet.
2. Reserve 1 tablespoon each chopped parsley and dill weed for garnish.
3. Add remaining herbs to skillet, along with walnuts, mushrooms, celery, and green
onions. Stir to mix, and sauté until lightly browned.
4. Using half the lemon wedges, drizzle sole with lemon juice. Divide filling evenly on the
skin side of sole fillets, spreading it evenly along each fillet. Roll up each fillet and
carefully place in baking dish.
5. Squeeze additional lemon juice over sole, and top with reserved herbs.
6. Bake in preheated 350°F (177°C) Oven.
7. Bake for 25 – 30 minutes, or until fish flakes easily when tested with a fork. Transfer to
platter for serving, and garnish with reserved herbs, remaining lemon wedges and
additional dill weed, if desired.
Makes: 6 servings.
Chocolate Pecan Pie
1 freshly prepared, unbaked pie crust 1/2 cup all-purpose flour
in deep 9" (23 cm) pie plate Pinch salt
1/2 cup butter 1-1/4 teaspoons vanilla
3 tablespoons cocoa 1 can (5 ounce/148 ml) evaporated milk
3/4 cup hot water 1-1/2 cups pecan halves
2 cups sugar
1. Using convection setting, preheat Oven at 350°F. (177°C).
• Containers larger than those recommended.
• Containers with warnings against use in range-type or toaster ovens.
CTO95OOPub179001-02 3/12/03 11:39 AM Page 8

NEED HELP?
For service, repair or any questions regarding your appliance, call the appropriate "800"
number on the cover of this book. Do not return the product to the place of purchase.
Do not mail the product back to the manufacturer nor bring it to a service center. You may
also want to consult the website listed on the cover of this manual.
One-Year Limited Warranty
What does it cover?
• Any defect in material or workmanship
For how long?
• One year after the date of original purchase.
What will we do to help you?
• Provide you with a reasonably similar replacement product that is either new or factory
refurbished
How do you get service?
• Save your receipt as proof of the date of sale
• Check our on-line service site at www.prodprotect.com/applica, or call our toll-free
number, 1-800-231-9786, for general warranty service
• If you need parts or accessories, please call 1-800-738-0245
What does your warranty not cover?
• Damage from commercial use
• Damage from misuse, abuse or neglect
• Products that have been modified in any way
• Products used or serviced outside the country of purchase
• Glass parts and other accessory items that are packed with the unit
• Shipping and handling costs associated with the replacement of the unit
• Consequential or incidental damages (please note, however, that some states do not
allow the exclusion or limitation of consequential or incidental damages, so this limitation
may not apply to you)
How does state law relate to this warranty?
• This warranty gives you specific legal rights, and you may also have other rights that
vary from state to state or province to province.
28
3. Déposer deux tortillas dans le fond du plat de cuisson. Étendre 120 ml (1/4 t) de sauce
sur les tortillas. Garnir de la moitié du mélange de fromage, de la moitié du mélange de
courges et de maïs, de la moitié des poivrons rouges et de 15 ml (1 c. à table) de
coriandre. Répéter avec une autre couche de tortillas, de sauce, de fromage et de
légumes, dans cet ordre.
4. Garnir des deux tortillas qui restent, de sauce, de coriandre et de 60 ml (1/4 t) de
fromage monterey. Recouvrir le plat de papier d’aluminium et faire cuire à 232 ˚C (450 ˚F)
pendant 30 minutes. Laisser reposer, couvert, pendant 5 minutes avant de servir.
Donne : Deux portions.
27
CTO95OOPub179001-02 3/12/03 11:39 AM Page 28
/