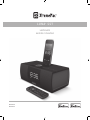
XtremeMac ipu-lss-11 User manual
- Category
- Docking speakers
- Type
- User manual
Page is loading ...

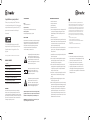
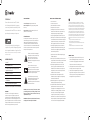
Contents
04 English
10 Française
17 Italiano
24 Deutsch
31 Español
38 Português

4
5
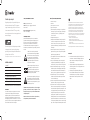
Congratulations on your purchase!
Thank you for purchasing Luna SST dual alarm
clock with detachable speaker. The following pages
explain the features and operation of Luna SST, so
please take a few moments to read through
this manual.
For a customized waking experience and full
integration with this product, download the free
XtremeMac alarm clock app from the iTunes
App Store.
Note: app only works with iPhone and iPod touch models.
Package contents:
ImPortant
Please read all safety instructions before proceeding. The
answers to most set up and performance questions can be
found in this manual or in the Troubleshooting Tips. If you have
any further questions about the operation or use of this product
please contact our consumer care team for assistance before
returning it to the place of purchase.
customer servIce
Email:
support@xtrememac.com
Telephone number:
1-866-392-9800 (Toll free within the United States)
Hours of operation:
Monday through Friday, 12pm – 9pm EST
ProDuct saFetY
When used in the directed manner, this unit has been designed
and manufactured to ensure your personal safety. However,
improper use can result in potential electrical shock or fire
hazards. Please read all safety and operating instructions
carefully before installation and use, and keep these
instructions handy for future reference.
The lightning flash with arrowhead, within an
equilateral triangle, is intended to alert the
user to the presence of uninsulated "dangerous
voltage" within the product’s enclosure that
may be of sufficient magnitude to constitute a
risk of electric shock to persons.
Caution: To prevent the risk of electric shock,
do not remove cover (or back). No user-
serviceable parts inside. Refer servicing to
qualified service personnel.
The exclamation point within an equilateral
triangle is intended to alert the user to
the presence of important operating and
maintenance (servicing) instructions in the
literature accompanying the appliance.
CAUTION: To prevent electric shock do not use this (polarized)
plug with an extension cord, receptacle or other outlet unless
the blades can be fully inserted to prevent blade exposure.
WARNING: To reduce the risk of fire or electric shock, do not
expose this appliance to rain or moisture.
ImPortant saFetY InstructIons
1. Read these instructions.
2. Keep these instructions.
3. Heed all warnings.
4. Follow all instructions.
5. Do not use this apparatus near water - This apparatus shall
not be exposed to dripping or splashing, and no objects
filled with liquids, such as vases, shall be placed on the
apparatus.
6. Clean only with dry cloth.
7. Do not block any ventilation openings. Install in accordance
with the manufacturer’s instructions. The apparatus should
not be situated on a bed, sofa, rug or similar surface that
may block the ventilation openings.
8. Do not install near any heat sources such as radiators, heat
registers, stoves, or other apparatus (including amplifiers)
that produce heat.
9. No naked flame sources, such as lighted candles, should be
placed on the apparatus.
10. Protect the power cord from being walked on or pinched—
particularly at plugs, convenience receptacles, and the
point where they exit from the apparatus.
11. Do not install in an area which impedes the access to the
power plug. Disconnecting the power plug is the only way
to completely remove power to the product and must be
readily accessible at all times.
12. Power source—Use only the power supply that is included
with this unit. Do not substitute with any other power
supply.
13. Unplug this apparatus during lightning storms or when
unused for long periods of time.
14. Refer all servicing to qualified service personnel. Servicing is
required when the apparatus has been damaged in any way,
such as power-supply cord or plug is damaged, liquid has
been spilled or objects have fallen into the apparatus, the
apparatus has been exposed to rain or moisture, does not
operate normally, or has been dropped. For service, refer to
qualified service personnel, return to the dealer, or call the
XtremeMac service line for assistance.
This equipment has been tested and found to comply with the limits for a Class B
digital device, pursuant to Part 15 of the FCC Rules. These limits are designed to provide
reasonable protection against harmful interference in a residential installation. This
equipment generates, uses and can radiate radio frequency energy and, if not installed
and used in accordance with the instructions, may cause harmful interference to radio
communications. However, there is no guarantee that interference will not occur in a
particular installation. If this equipment does cause harmful interference to radio or
television reception, which can be determined by turning the equipment off and on,
the user is encouraged to try to correct the interference by one or more of the following
measures:
• Reorient or relocate the receiving antenna.
• Increase the separation between the equipment and receiver.
• Connect the equipment into an outlet on a circuit different from that to which the
receiver is connected.
• Consult the dealer or an experienced radio/TV technician for help.
This class B digital apparatus complies with Canadian ICES-003.
gettIng starteD
1. Remove unit and AC adapter from the box and properly
dispose of any plastic or foam packaging material. Gently
peel off the protective film from the center of unit.
2. Place unit on a level surface close to a power outlet
following the precautions listed in the safety warnings.
3. Open battery compartment cover on the bottom of the
unit by sliding it back and lifting up the edge without the
perforated dots. Insert on 3 AAA batteries for alarm and time
backup and close cover.
4

6
7
1
14
3
3
2
3
4
5
8
9
3
7
6
22
1 2 3 4
1 1 8
3 5
5
6
7
4
2
usIng Luna sst wIth sPeaker connecteD
1. Untie and extend the FM antenna connected on the back of
the unit for best reception.
2. If located in the US, skip to step 5. If located outside the US,
select the appropriate wall adapter. If already attached to
the unit, skip to step 5.
3. Using a small object like a pen, press the button under the
wall adapter to release the adapter.
4. Gently slide in the appropriate wall adapter. You will hear a
click when it is properly locked into place.
5. Connect the AC adapter jack to the back of the unit labeled
12V and then connect the other end of the adapter to a
power outlet.
usIng Luna sst wIth the sPeaker DetacheD
PLace sPeaker uP to 10 Feet/3 meters awaY From maIn unIt
1. Gently turn over the unit with the display and speakers
facing toward you.
2. Remove shorter speaker cable from the jacks by pushing in
the tab and pulling up. Repeat on other end and put cable in
a safe spot for reconnecting at a later date.
3. Connect longer speaker cable to the jacks on the bottom of
the unit by inserting the cable until you hear a click.
4. With the unit display facing toward you, gently slide the
right speaker toward you and pull outward.
5. Remove the two brackets on the speaker or unit by gently
sliding to unlock and pulling outward. Keep brackets in a
safe place for reconnecting.
6. Turn main unit upright and place back on a flat surface close
to a power outlet. Place the detachable wired speaker on a
flat surface up to 10 feet /3 meters away.
7. Untie and extend the FM antenna connected on the back of
the unit for best reception.
8. If located in the US, skip to step 11. If located outside the
US, select the appropriate wall adapter. If already attached
to the unit, skip to step 11.
9. Using a small object like a pen, press the button under the
wall adapter to release the adapter.
10. Gently slide in the appropriate wall adapter. You will hear a
click when it is properly locked into place.
11. Connect the AC adapter jack to the back of the unit labeled
12V and then connect the other end of the adapter to a
power outlet.
Note: For an enhanced and customized waking experience, don’t forget to
download the XtremeMac alarm clock app from the iTunes App Store to your
iPhone or iPod touch device.
reconnectIng the sPeaker
1. Unplug the AC adapter from the power outlet.
2. Bring detachable speaker closer to the main unit and
remove the speaker cable on the bottom of the unit.
3. With the unit display facing toward you, place the two
brackets (one on the top of the unit and one on the bottom)
into the main unit by sliding and locking into place.
4. With the speaker facing you, line up the dot on the bottom
center of the main unit with the dot on the bottom center of
the detachable speaker and gently slide back into place.
5. Connect the shorter speaker cable to the jacks on the
bottom of the unit and set the SST switch on the back of the
unit to off.
6. Connect the AC adapter jack to the back of the unit labeled
12V and then connect the other end of the adapter to a
power outlet.
settIng the tIme wIth Your IPoD or IPhone
Make sure the switch on the back of the unit is set to “Auto.”
Dock your iPod or iPhone and the unit will automatically pull
the time from your device.
To change the time to 24 hour time, press and hold the source
button. The display will blink with 12 or 24 hour time mode. Turn
the control knob to choose 24 hour and press to confirm
the setting.
settIng the tIme manuaLLY
1. Make sure the switch on the back of the unit is set to "Set".
2. Press and hold the source button. The display will blink with
12 or 24 hour time mode. Turn the control knob to choose
between 12 hour and 24 hour time and press the control
to set. The display will then advance to set the time.
3. Turn the control knob to change the hour, AM or PM in 12
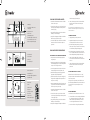
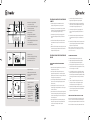
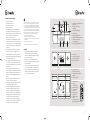
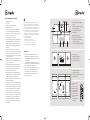
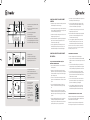
1. LED display
2. Control knob - volume / snooze /
FM frequency
3. Play/pause controls
4. Source control
5. Alarm/FM radio presets
6. Detachable speaker – Alarm 1 sound
7. Snooze and Alarm 1 on/off control
8. Alarm 2 sound (attached speaker)
1. SST I OFF switch
2. Set clock switch
3. AUX in jack
4. 12V - 2A power jack
1. Battery compartment
2. Speaker cable jack
3. Detachable speaker alignment dots
4. Speaker brackets
1. Power button
2. Source
3. Volume controls
4. Play / pause
5. Next / previous track
6. Bass controls
7. Treble controls
8. Alarm / FM radio presets
9. Snooze / nap / sleep control

8
9
2. Carefully place your device into the dock well.
3. Press play on the device or on the on the unit and use the
controls on the unit or the included remote to adjust
the volume.
LIstenIng to the Fm raDIo
1. Press the source button on the top of the unit until radio is
shown on the top of the display.
2. Turn the control knob or use the remote to change the
frequency. The tuning mode on the unit will time out after 5
seconds and the control knob will then control the volume.
Press the source button to enter back into tuning mode.
3. Use the control knob on the unit or use the remote to
control the volume.
settIng the raDIo Presets
1. When listening to the radio, use the control knob to tune to
the station you want to set as a preset.
2. Press and hold the preset button (alarm 1 or 2) on the unit or
on the remote until the corresponding number appears on
the display. Repeat for second preset.
3. To recall the radio presets, simply press the corresponding
preset button while in FM radio mode.
usIng the LIne-In jack
1. Connect a 3.5mm audio cable (available at www.xtrememac.
com) to the headphone or line out jack of an audio device
and plug the other end of the cable into the "Aux" jack on
the back of the unit.
2. Press the source button on the unit to Aux and press play
on the device. Use the controls on the unit or the device to
control the volume.
usIng the aLarm cLock aPP to set the aLarms
The XtremeMac alarm clock app will allow you to enhance and
customize your waking experience. You can set your alarms on
the go, specify snooze time, set volume ramping for the alarms
and much more.
1. Download the XtremeMac alarm clock app from the iTunes
App Store to your iPhone or iPod touch model.
2. Launch the app and customize your alarm settings.
3. When all settings are complete, dock your iPhone or iPod
touch and press the sync button for each alarm you would
like to sync with the unit. The unit is now set with the
updated alarm times.
troubLeshootIng tIPs
no Power
Check AC adapter connection
Connect the AC adapter into the jack in the back of Luna labeled
"Power" and then plug the AC adapter into the wall outlet.
Check wall outlet function
Plug another device into the same outlet to confirm the outlet
is working.
no sounD From sPeakers
Check audio source
Push the source button on the top of the unit or on the remote
to select the desired audio source.
Check volume level
Turn the control knob or use the remote to adjust the volume.
Check iPod connection
Remove your iPod from the dock well and re-dock to make sure
it is properly connected.
Check the iPod/iPhone
Try restarting your device and then re-docking to ensure a
proper connection.
Poor Fm recePtIon
Check FM antenna
Untie and extend the FM antenna on the back of the unit. With
the FM radio on, play with the positioning of the antenna.
hour mode (indicated by an AM or PM on the right of the
time) and press to accept and advance to the minutes.
4. Turn the control knob to change the minutes and press to
accept. The time is now set.
settIng the aLarms
1. Press and hold the alarm 1 or alarm 2 button on the top of
the unit or on the remote. The display will show the alarm
time and the hour will blink.
2. Turn the control knob to change the hour and press to
accept and advance to the minutes.
3. Turn the control knob to change the minutes and press to
accept and advance to the wake to source. The source will
be displayed at the top of the display.
4. Turn the control knob to change the source (Chime, iPod/
iPhone, or radio) and press to accept and advance to set the
alarm volume level.
5. Turn the control knob to change the alarm volume level
(from 3 to 30) and press to accept. The alarm is now set.
6. Repeat process for second alarm.
turnIng on anD oFF the aLarm
To activate the alarm, press the alarm 1 or alarm 2 button on the
unit or the remote. Luna SST will show "Alarm 1" and/or
"Alarm 2" on the display to show that it is activated. If you
do not see the appropriate alarm on the display, press the
corresponding alarm button on the top of the unit or on the
remote to turn on the alarm. Press the corresponding alarm
button again to turn off the alarm.
Note: If the source is set to iPod/iPhone, select the track on your device that would
like to wake to otherwise the alarm will sound to the next song on your iPod.
If the source is set to radio, select a radio station that you would like to wake to
otherwise the alarm will sound to the last radio station played.
usIng the sst Feature
On the back of the unit set the switch to SST. This feature is
for using the detachable speaker for a companion or separate
sounding alarm. When activated, alarm 1 will sound only from
the detached speaker and alarm 2 will sound only from the
speaker on the main unit. If the alarm is set to chime, the buzzer
will sound from the bottom of the main unit only.
Note: When playing music, the music will play from both speakers for true stereo sound.
aDjustIng the DIsPLaY brIghtness
When music is not playing and the alarm is not sounding, simply
turn the control knob to adjust the display brightness.
When music is playing, press the control knob once and
"Dimmer" will appear on the display. Turn the control knob to
adjust the display brightness. The unit will time out after about
five seconds and return back to volume mode.
usIng the snooze/naP/sLeeP controL
To snooze: Alarm must be sounding.
Press the control knob on either the main unit or the snooze
button on the detachable speaker to snooze when the alarm
sounds. The default snooze time is 9 minutes, but can be
adjusted through the XtremeMac alarm clock app. To cancel the
snooze, turn off the alarm by pressing the corresponding alarm
button.
To Activate Nap Timer: No audio can be sounding
Press and hold the control knob until the nap timer appears on
the display. Turn the control knob to adjust the nap time from
1 – 120 minutes and press to set. The unit will sound with your
iPhone/iPod if docked or the buzzer if no device is docked. To
view and change remaining nap time, press the control knob
once and rotate the knob to adjust the duration.
Press and hold the control knob to cancel. "Nap" will disappear
from the display.
To Activate Sleep Timer: Audio must playing (other than from
an alarm)
Press and hold the control knob until the sleep timer appears on
the display. Turn the control knob to adjust the sleep time from
1 – 60 minutes and press to set. To view and adjust remaining
sleep time, press the control knob once and rotate the knob to
adjust the duration.
Press and hold the control knob to cancel. "Sleep" will disappear
from the display.
Note: Turning off the audio source will also turn off the sleep timer.
PLaYIng anD chargIng Your IPoD/IPhone
1. Use the insert designed for your iPhone or iPod and gently
press it into the universal dock well.
Page is loading ...
Page is loading ...
Page is loading ...
Page is loading ...
Page is loading ...
Page is loading ...
Page is loading ...
Page is loading ...
Page is loading ...
Page is loading ...
Page is loading ...
Page is loading ...
Page is loading ...
Page is loading ...
Page is loading ...
Page is loading ...
Page is loading ...
Page is loading ...

Made in China | Fabriqué en Chine. Designed in the USA. © Imation Corp. XtremeMac, Luna and the “X” logo are trademarks of Imation Corp.
“Made for iPod” and “Made for iPhone” mean that an electronic accessory has been designed to connect specifically to iPod or iPhone,
respectively, and has been certified by the developer to meet Apple performance standards. Apple is not responsible for the operation of this
device or its compliance with safety and regulatory standards. iPhone, iPod, iPod classic, iPod nano and iPod touch are trademarks of Apple
Inc., registered in the U.S. and other countries.
Distributed by Imation Enterprises Corp., Oakdale, MN, USA. Imation shall not be liable for any lost data or incidental or consequential
damages related to this product.
Printed in China 05242010
XtremeMac.com
Imation Europe B.V., Siriusdreef 46-52, 2132 WT Hoofddorp, The Netherlands
-
 1
1
-
 2
2
-
 3
3
-
 4
4
-
 5
5
-
 6
6
-
 7
7
-
 8
8
-
 9
9
-
 10
10
-
 11
11
-
 12
12
-
 13
13
-
 14
14
-
 15
15
-
 16
16
-
 17
17
-
 18
18
-
 19
19
-
 20
20
-
 21
21
-
 22
22
-
 23
23
-
 24
24


XtremeMac ipu-lss-11 User manual
- Category
- Docking speakers
- Type
- User manual
Ask a question and I''ll find the answer in the document
Finding information in a document is now easier with AI
in other languages
- italiano: XtremeMac ipu-lss-11 Manuale utente
- français: XtremeMac ipu-lss-11 Manuel utilisateur
- español: XtremeMac ipu-lss-11 Manual de usuario
- Deutsch: XtremeMac ipu-lss-11 Benutzerhandbuch
- português: XtremeMac ipu-lss-11 Manual do usuário
Related papers
-
XtremeMac Luna Voyager II User guide
-
XtremeMac X2 User manual
-
-
XtremeMac Soma Travel Owner's manual
-
XtremeMac Tango Bar Owner's manual
-
-
-
-
-
Other documents
-
RCA RC59i Quick start guide
-
Nathan Luna Fire 250 RX Run Chest-Waist Light Operating instructions
-
VIETA VH-MI120 User guide
-
Lenco iPD-5100 Owner's manual
-
Memorex Mi4014 User manual
-
GPX CR1807 User manual
-
Johnson RSV155 User manual
-
-
 AXIL Radio Despertador User manual
-
Lenco IPT-6 G Owner's manual
