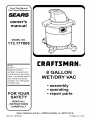
Craftsman 113.177805 Owner's manual
- Category
- Electric laundry dryers
- Type
- Owner's manual
This manual is also suitable for
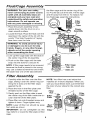
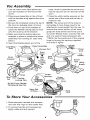
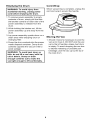
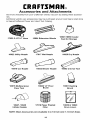
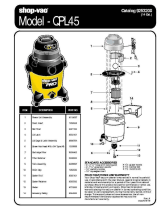
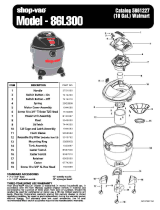
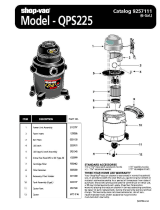
Craftsman 113.177805 is a powerful and versatile wet/dry vac that can tackle a variety of cleaning tasks around the home. With its 8-gallon capacity, it can handle even the biggest messes. The vac comes with a variety of attachments, including a crevice tool, utility nozzle, car nozzle, and wet nozzle, making it perfect for cleaning everything from floors to cars to upholstery. The vac also features a built-in float that automatically shuts off the motor when the tank is full, preventing overflow. And with its double-insulated construction, the vac is safe to use in wet or dry conditions.
Craftsman 113.177805 is a powerful and versatile wet/dry vac that can tackle a variety of cleaning tasks around the home. With its 8-gallon capacity, it can handle even the biggest messes. The vac comes with a variety of attachments, including a crevice tool, utility nozzle, car nozzle, and wet nozzle, making it perfect for cleaning everything from floors to cars to upholstery. The vac also features a built-in float that automatically shuts off the motor when the tank is full, preventing overflow. And with its double-insulated construction, the vac is safe to use in wet or dry conditions.


-
 1
1
-
 2
2
-
 3
3
-
 4
4
-
 5
5
-
 6
6
-
 7
7
-
 8
8
-
 9
9
-
 10
10
-
 11
11
-
 12
12
-
 13
13
-
 14
14
-
 15
15
-
 16
16


Craftsman 113.177805 Owner's manual
- Category
- Electric laundry dryers
- Type
- Owner's manual
- This manual is also suitable for
Craftsman 113.177805 is a powerful and versatile wet/dry vac that can tackle a variety of cleaning tasks around the home. With its 8-gallon capacity, it can handle even the biggest messes. The vac comes with a variety of attachments, including a crevice tool, utility nozzle, car nozzle, and wet nozzle, making it perfect for cleaning everything from floors to cars to upholstery. The vac also features a built-in float that automatically shuts off the motor when the tank is full, preventing overflow. And with its double-insulated construction, the vac is safe to use in wet or dry conditions.
Ask a question and I''ll find the answer in the document
Finding information in a document is now easier with AI
Related papers
-
Craftsman 11317313 Owner's manual
-
-
-
-
-
-
-
-
-
Sears 113.177905 Owner's manual
Other documents
-
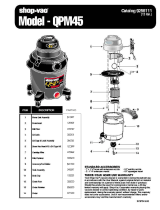 Shop Vac QPM45 Owner's manual
-
Royal 84L350 Owner's manual
-
 Shop Vac QPL45 Owner's manual
-
 Shop Vac 3333.OH Owner's manual
-
RIDGID 50323 Installation guide
-
 Shop Vac 33340 Owner's manual
-
 Sportsman 802900 Operating instructions
-
 Shop Vac QPS35 Owner's manual
-
 Shop Vac 86L300 Owner's manual
-
 Shop Vac QPS225 Owner's manual


