Page is loading ...

Super High Resolution WDR Dome Camera
User Manual
SCD-3081
SCD-3081-ENG-new.indd 1 2011-2-16 12:12:28

High Resolution WDR Dome Camera
User Manual
Copyright
©2011 Samsung Techwin Co., Ltd. All rights reserved.
Trademark
is the registered logo of Samsung Techwin Co., Ltd.
The name of this product is the registered trademark of Samsung Techwin Co., Ltd.
Other trademarks mentioned in this manual are the registered trademark of their respective company.
Restriction
Samsung Techwin Co., Ltd shall reserve the copyright of this document. Under no circumstances, this document
shall be reproduced, distributed or changed, partially or wholly, without formal authorization of Samsung Techwin.
Disclaimer
Samsung Techwin makes the best to verify the integrity and correctness of the contents in this document, but
no formal guarantee shall be provided. Use of this document and the subsequent results shall be entirely on
the user’s own responsibility. Samsung Techwin reserves the right to change the contents of this document
without prior notice.
Warranty
If the product does not operate properly in normal conditions, please let us know. Samsung Techwin will resolve
the problem for free of charge. The warranty period is 3 years. However, the followings are excluded:
If the system behaves abnormally because you run a program irrelevant to the system operation.
Deteriorated performance or natural worn-out in process of time
•
•
SCD-3081-ENG-new.indd 2 2011-2-16 12:12:29

Before operating the camera, confirm the camera model and correct input power voltage.
To help you understand this manual thoroughly, we’ll introduce our model description.
■ SCD-3081 SERIES
• NTSC MODEL • PAL MODEL
SCD-3081N
SCD-3081P
■ MODEL DESCRIPTION
• SCD-3081X
_
•SIGNAL SYSTEM
N→NTSC MODEL
P→PAL MODEL
SIGNALSYSTEMSIGNALSYSTEM
SCD-3081-ENG-new.indd 3 2011-2-16 12:12:29

4_ safety information
safety information
CAUTION
RISK OF ELECTRIC SHOCK.
DO NOT OPEN
CAUTION:
TO REDUCE THE RISK OF ELECTRIC SHOCK, DO NOT REMOVE
COVER (OR BACK) NO USER SERVICEABLE PARTS INSIDE. REFER
SERVICING TO QUALIFIED SERVICE PERSONNEL.
This symbol indicates that dangerous voltage consisting a risk of electric
shock is present within this unit.
This exclamation point symbol is intended to alert the user to the presence
of important operating and maintenance (servicing) instructions in the
literature accompanying the appliance.
WARNING
To prevent damage which may result in fire or electric shock hazard, do not expose this
appliance to rain or moisture.
To prevent injury, this apparatus must be securely attached to the floor/wall in accordance
with the installation instructions.
WARNING
Be sure to use only the standard adapter that is specified in the specification sheet.
Using any other adapter could cause fire, electrical shock, or damage to the product.
Incorrectly connecting the power supply or replacing battery may cause explosion, fire,
electric shock, or damage to the product.
Do not connect multiple cameras to a single adapter. Exceeding the capacity may cause
abnormal heat generation or fire.
Securely plug the power cord into the power receptacle. insecure connection may cause
fire.
When installing the camera, fasten it securely and firmly. The fall of camera may cause
personal injury.
•
•
1.
2.
3.
4.
5.
SCD-3081-ENG-new.indd 4 2011-2-16 12:12:29

English_5
● SAFETY INFORMATION
Do not place conductive objects (e.g. screwdrivers, coins, metal parts, etc.) or containers
filled with water on top of the camera. doing so may cause personal injury due to fire,
electric shock, or falling objects.
Do not install the unit in humid, dusty, or sooty locations. Doing so may cause fire or
electric shock.
If any unusual smells or smoke come from the unit, stop using the product. in such case,
immediately disconnect the power source and contact the service center. continued use in
such a condition may cause fire or electric shock.
If this product fails to operate normally, contact the nearest service center. never
disassemble or modify this product in any way. (samsung is not liable for problems caused
by unauthorized modifications or attempted repair.)
When cleaning, do not spray water directly onto parts of the product. doing so may cause
fire or electric shock.
CAUTION
Do not drop objects on the product or apply strong shock to it. Keep away from a location
subject to excessive vibrationor magnetic interference.
Do not install in a location subject to high temperature (over 50°C), low temperature (below
-10°C), or high humidity. Doing so may cause fire or electric shock.
If you want to relocate the already installed product, be sure to turn off the power and then
move or reinstall it.
Remove the power plug from the outlet when then there is a lightning. Neglecting to do so
may cause fire or damage to the product.
Keep out of direct sunlight and heat radiation sources. It may cause fire.
Install it in a place with good ventilation.
Avoid aiming the camera directly towards extremely bright objects such as sun, as this
may damage the CCD image sensor.
Apparatus shall not be exposed to dripping or splashing and no objects filled with liquids,
such as vases, shall be placed on the apparatus.
The Mains plug is used as a disconnect device and shall stay readily operable at any time.
Do not expose the camera to radioactivity. Radioactivity exposure may damage the CCD.
6.
7.
8.
9.
10.
1.
2.
3.
4.
5.
6.
7.
8.
9.
10.
SCD-3081-ENG-new.indd 5 2011-2-16 12:12:29

safety information
6_ safety information
FCC STATEMENT
This device complies with part 15 of the FCC Rules. Operation is subject to the following two
conditions :
This device may not cause harmful interference, and
This device must accept any interference received including interference that may cause
undesired operation.
CAUTION
This equipment has been tested and found to comply with the limits for a Class A digital
device, pursuant to part 15 of FCC Rules. These limits are designed to provide reasonable
protection against harmful interference when the equipment is operated in a commercial
environment.
This equipment generates, uses, and can radiate radio frequency energy and, if not
installed and used in accordance with the instruction manual, may cause harmful
interference to radio communications. Operation of this equipment in a residential area is
likely to cause harmful interference in which case the user will be required to correct the
interference at his own expense.
IC Compliance Notice
This Class A digital apparatus meets all requirements of the Canadian
Interference.-Causing Equipment Regulations of ICES-003.
1)
2)
Correct disposal of batteries in this product
(Applicable in the European Union and other European countries with separate battery return systems.)
This marking on the battery, manual or packaging indicates that the batteries in this product should not be
disposed of with other household waste at the end of their working life. Where marked, the chemical symbols
Hg, Cd or Pb indicate that the battery contains mercury, cadmium or lead above the reference levels in EC
Directive 2006/66. If batteries are not properly disposed of, these substances can cause harm to human health
or the environment.
To protect natural resources and to promote material reuse, please separate batteries from other types of waste
and recycle them through your local, free battery return system.
Correct Disposal of This Product
(Waste Electrical & Electronic Equipment)
(Applicable in the European Union and other European countries with separate collection systems)
This marking on the product, accessories or literature indicates that the product and its electronic accessories
(e.g. charger, headset, USB cable) should not be disposed of with other household waste at the end of their
working life. To prevent possible harm to the environment or human health from uncontrolled waste disposal,
please separate these items from other types of waste and recycle them responsibly to promote the sustainable
reuse of material resources.
Household users should contact either the retailer where they purchased this product, or their local government
office, for details of where and how they can take these items for environmentally safe recycling.
Business users should contact their supplier and check the terms and conditions of the purchase contract.
This product and its electronic accessories should not be mixed with other commercial wastes for disposal.
SCD-3081-ENG-new.indd 6 2011-2-16 12:12:29

English_7
● SAFETY INFORMATION
important safety instructions
Read these instructions.
Keep these instructions.
Heed all warnings.
Follow all instructions.
Do not use this apparatus near water.
Clean only with dry cloth.
Do not block any ventilation openings. Install in accordance with the manufacturer’s
instructions.
Do not install near any heat sources such as radiators, heat registers, or other apparatus
(including amplifiers) that produce heat.
Do not defeat the safety purpose of the polarized or grounding-type plug. A polarized plug
has two blades with one wider than the other. A grounding type plug has two blades and
a third grounding prong. The wide blade or the third prong is provided for your safety. If
the provided plug does not fit into your outlet, consult an electrician for replacement of the
obsolete outlet.
Protect the power cord from being walked on or pinched particularly at plugs,
convenience receptacles, and the point where they exit from the apparatus.
Only use attachments/accessories specified by the manufacturer.
Use only with cart, stand, tripod, bracket, or table specified by the
manufacturer, or sold with the apparatus.
Unplug this apparatus when a card is used. Use caution when moving
the cart/ apparatus combination to avoid injury from tip-over.
Refer all servicing to qualified service personnel. Servicing is required when the apparatus
has been damaged in any way, such as powersupply cord or plug is damaged, liquid has
been spilled or objects have fallen into the apparatus, the apparatus has been exposed to
rain or moisture, does not operate normally, or has been dropped.
Apparatus shall not be exposed to dripping or splashing and no objects
filled with liquids, such as vases, shall be placed on the apparatus
1.
2.
3.
4.
5.
6.
7.
8.
9.
10.
11.
12.
13.
14.
SCD-3081-ENG-new.indd 7 2011-2-16 12:12:30

8_ contents
INTRODUCTION
9
9
Features
11
What’s included
12
Component names and
Functions
INSTALLATION
13
13
Installation
16
Adjust the panning and tilting
while watching the monitor
CONNECTION
17
17
Connecting to Monitor
17
Connecting to Power
18
Using Coaxial Communications
SETUP
19
19
Menu Configratio
n
19
Menu Setu
p
contents
TROUBLESHOOTING
36
36
Troubleshootin
g
SPECIFICATIONS
37
37
Specification
s
39
Dimensio
n
SCD-3081-ENG-new.indd 8 2011-2-16 12:12:30

English_9
● INTRODUCTION
FEATURES
Ultra High Resolution
By adopting a diagonal 6mm (1/3”) 520K pixel (NTSC), 610K pixel (PAL) Color Double
Density CCD, the camera produces clear picture quality with a horizontal resolution of
650 TV lines for color and 700 TV lines for BW.
Excellent Sensitivity
The Built-in high sensitivity COLOR CCD produces a clear image.
- Color : 0.1 Lux (50IRE, @F1.2), 0.0002LUX (SENS-UP, x512)
- B/W : 0.01 Lux (50IRE, @F1.2), 0.00002 LUX (SENS-UP, x512)
Intelligence
Without assistance from an external sensor, this camera independently detects and
traces objects while examining stillness and movement to activate the alarm.
SSNR3 (Samsung Super Noise Reduction) Function
The high-performance SV-V DSP chip effectively removes low-light gain noise and
afterimage to provide clear images even in dark environments.
Day & Night(ICR)
The camera identifies whether it is day or night and automatically switches to the
appropriate mode, depending on its environment. By day, the camera switches to color
mode in order to maintain optimal color. At night, it switches to B/W mode so as to obtain
better picture definition.
PROFILE
You can set a mode according to the camera installation conditions.
- BASIC, DAY/NIGHT, BACKLIGHT, ITS, INDOOR, USER
PIP
Displays a full-size image along with the thumbnail.
SSDR(Samsung Super Dynamic Range)
For images with high contrast between bright and dark areas from difficult lighting
conditions such as backlighting, this camera selectively illuminates darker areas while
retaining the same light level for brighter areas to even out the overall brightness.
WDR
By adopting a proprietary SV-V DSP chip, the camera delivers clear, high quality pictures
even when the scene is backlight, by increasing exposure in dark areas while decreasing
it in bright areas; a corrected image with clear details results.
VPS(Virtual Progressive Scan)
Adopting Samsung's unique development, the VPS(Virtual Progressive Scan) enhances
the sharpness of moving subject's outline. The VPS enables elective output in progressive
mode using the existing interlaced input and effectively enhances the sharpness of
captured pictures from video and still images. The function effectively removes blurred
outline problems resulting in excellent road monitoring and improved license plate
recognition.
introduction
SCD-3081-ENG-new.indd 9 2011-2-16 12:12:30

10_ introduction
introduction
DIS (Digital Image Stabilizer)
The DIS function compensates for any camera movement, to produce more stable
pictures.
Miscellaneous Functions
HLC (High Light Compensation), SENS-UP, REVERSE, D-ZOOM, SHARPNESS and
PRIVACY functions are provided.
Communication
Coaxial communication methods are supported.
- Protocol: Pelco Coaxitron
OSD
The camera’s OSD is complimented by 17 languages.
- NTSC: English, Korean, Japanese, Spanish, French, Portuguese
- PAL: English, Chinese, German, Italian, French, Spanish, Russian, Czech, Polish,
Romanian, Serbian, Swedish, Danish, Turkish, Portuguese.
SCD-3081-ENG-new.indd 10 2011-2-16 12:12:30

English_11
● INTRODUCTION
WHAT’S INCLUDED
Check if the following items are included in the product package.
SCD-3081 User Manual Quick Set-up Guide
M4 Tapping Screw 3EA Video Output Cable
Super High Resolution WDR Dome Camera
User Manual
SCD-3081
P.No : PT01-000076A
ENGLISH
SCD-3081 Quick Set-up Guide
FRANÇAIS
ESPAÑOL
Guía Rápida para la Configuración del SCD-3081
SCD-3081 Guida rapida all’impostazione
ITALIANO
Průvodce pro rychlé nastavení SCD-3081
ČESKY
SCD-3081 Anleitung zur Schnelleinrichtung
DEUTSCH
❶
Domekuppel
❷
Abschirmkappe
❸
Supporto Pan : Für die Steuerung des Schwenkwinkels der Kamera.
➍
x3.9 Objektiv mit variabler Brennweite : 2.8 ~ 11mm (F1.2).
➎
Funktion-Setup-Schalter : Anzeigen des Bildschirmmenüs und Bewegen des Cursors in vier
Richtungen zur Statusbestä oder nach Änderung eines Elements.
➏
Videoausgang für Anschluss von Monitor
➐
Drehbasis : Für die Steuerung des Drehwinkels der Kamera
➑
Netzeingang : Schließen Sie die für das jeweilige Modell angegebene Stromversorgung hier an.
❾
Erdungsanschluss
❿
D & N Eingang Anschlussterminal : Sie können zwischen Tag- und Nachtmodi umschalten, indem Sie ein
externes Signal an diesen Anschlussterminal anschließen.
⓫
MD Output Anschlussterminal :
Bewegungserkennungssignale werden durch diesen Anschluss ausgegeben.
⓬
Video-Out-Anschlussbuchse : Über diesen Port werden Videosignale ausgegeben. Diesen Port mit
dem Port “Video IN” an einem Monitor verbinden.
❶
Cubierta del Domo
❷
Tapa Protectora
❸
Base de Paneo : Controla el ángulo de paneo de la cámara.
➍
Módulo del Lente Varifocal x3,9 : 2.8 ~ 11mm (F1.2).
➎
Botón de Configuración de Funciones : Muestra el menú en la pantalla y desplaza el cursor en las
cuatro direcciones para confirma estado o el cambio de un elemento seleccionado.
➏
Terminal de Salida de Video al Monitor
➐
Base de rotación : Commande de l’angle de rotation de la caméra.
➑
Terminal de entrada de alimentación : Conecte aquí la alimentación apropiada para cada modelo.
❾
Terminal de toma de tierra
❿
Terminal de entrada D y N :
Puede cambiar al modo Día y Noche conectando una señal externa a este terminal.
⓫
Terminal de salida MD : La salida de las señales de detección de movimiento se realizan a través de
este terminal.
⓬
Puerto de Salida de Video : Permite la salida de las señales de video. Conecte este puerto al puerto
de entrada de un monitor.
❶
Couvercle du dôme
❷
Boîtier de protection
❸
Base panoramique : Commande de l’angle panoramique de la caméra.
➍
Module de lentille avec zoom x3.9 : 2.8 ~ 11mm (F1.2).
➎
Commutateur de configuration des fonctions : Affiche le menu sur l’écran et déplace le curseur
dans les quatre directions, pour confirmer, ou après une modification d’un élément sélectionné.
➏
Terminal de sortie vidéo vers le moniteur
➐
Base de rotation : Permet de commander l’angle de rotation de la caméra.
➑
Terminal d’entrée d’alimentation : Raccordez l’alimentation selon la manière spécifiée ici pour
chaque modèle.
❾
Borne de mise à la terre
❿
Borne d’entrée D & N :
Vous pouvez basculer enter le mode Jour et Nuit en connectant un signal externe à cette borne.
⓫
Borne de sortie MD : Les signaux de détection de mouvement sont émis via cette borne.
⓬
Prise de sortie vidéo : Les signaux vidéo sont émis via ce port. Raccordez ce port au port d’entrée
(IN) d’un moniteur.
❶
Custodia a cupola
❷
Custodia di protezione
❸
Supporto Pan : Controllo angolo di rotazione orizzontale (pan) della videocamera.
➍
Sistema varifocale x3.9 : 2.8 ~ 11mm(F1.2).
➎
Pulsante Impostazione funzioni : Visualizza il menù e permette di scorrere il cursore in quattro
direzioni per confermare o modi la voce selezionata.
➏
Terminale uscita video al Monitor
➐
Supporto girevole : Controllo angolo di rotazione della videocamera.
➑
Terminale alimentazione : Collegare l’alimentazione secondo le indicazioni del modello utilizzato.
❾
Terminale di massa
❿
Terminale di ingresso D & N : È possibile passare al modo Day & Night (Giorno e notte) collegando un segnale
esterno a questo terminale.
⓫
Terminale di uscita MD :
I segnali di rilevazione movimento vengono trasmessi tramite questo terminale.
⓬
Jack Video in uscita : Porta in uscita per il segnale video. Collegare la porta alla porta video in entrata
di un monitor.
❶
Kryt kopule
❷
Kryt
❸
Základna otočení : Kontroluje úhel otočení kamery.
➍
x3,9 varifokální čočka : 2.8 ~ 11mm(F1.2).
➎
Tlačítko nastavení funkce : Na obrazovce zobrazí nabídku a přesune kurzor do čtyř směrů k
potvrzení či po změně vybrané položky.
➏
Výstup obrazu do monitoru
➐
Základna rotace : Kontroluje rotační úhel kamery.
➑
Terminál vstupu napájení : Připojte napájení, jak je to uvedeno pro každý model.
❾
Uzemňovací svorka
❿
Konektor vstupu denního a nočního režimu : Můžete přepnout mezi režimy Day (Den) a Night (Noc)
připojením externího signálu k tomuto konektoru.
⓫
Konektor výstupu detekce pohybu : Signály detekce pohybu vystupují z tohoto konektoru.
⓬
Připojení výstupu obrazu : Skrze tento výstup vychází signál obrazu. Tento výstup připojte ke
VSTUPU obrazu monitoru.
MAIN SETUP
1.LENS DC
2.EXPOSURE
3.WHITE BAL ATW
4.BACKLIGHT OFF
5.SSNR3 ON
6.DAY/NIGHT AUTO
7.PROFILE BASIC
8.SPECIAL
9.EXIT SAVE
Ķ
Ķ
Ķ
Ķ
Ķ
Ķ
Ķ
Ķ
Ķ
IMAGE ADJ / CAM TITLE / SYNC / INTELLIGENCE / PRIVACY
/ DIS / LANGUAGE / RETURN
DC
BRIGHTNESS / SHUTTER / AGC / SENS-UP / RETURN
ATW / OUTDOOR / INDOOR / MANUAL / AWC
�
SET
OFF / USER BLC / HLC / SSDR / WDR
ON / OFF
SAVE / NOT SAVE / RESET
AUTO / EXTERN / COLOR / B/W
BASIC / DAY/NIGHT / BACKLIGHT / ITS / INDOOR / USER
Guide d’installation rapide du SCD-3081
EINST HAUPTMENÜ
1.LENS DC
2.BELICHTUNG
3.WEIβAB ATW
4.GEGENLICHT AUS
5.SSNR3 EIN
6.TAG/NACHT AUTO
7.PROFIL GRUND
8.SPEZIAL
9.BEENDEN SAVE
Ķ
Ķ
Ķ
Ķ
Ķ
Ķ
Ķ
Ķ
Ķ
ATW / AUßEN / INNEN / MANUELL / AWC
Ą
SET
DC
HELLIGKEIT / SHUTTER / AGC / SENS-UP / ZURÜCK
AUS / BEN BLC / HLC / SSDR / WDR
EIN / AUS
SAVE / NOT SAVE / RÜCKS
GRUND / TAG/NACHT / GEGENLIGHT / ITS / INNEN / BEN
AUTO / EXTERN / COLOR / S/W
BILDEINST / TITEL KAM / SYNC / INTELLIGENCE / PRIVAT
/ DIS / SPRACHE / ZURÜCK
SAVE / NOT SAVE / RESET
CONFIG PRINCIPAL
1.LENTE DC
2.EXPOSIC
3.BAL BLAN ATW
4.CONTRALUZ OFF
5.SSNR3 ON
6.DIA/NOCHE AUTO
7.PROFIL BÁSICO
8.ESPEC
9.SALIR SAVE
DC
BRILLO / SHUTTER / AGC / SENS-UP / VOLVER
ATW / EXTER / INTER / MANUAL / AWC
Ą
SET
OFF / USUA BLC / HLC / SSDR / WDR
ON / OFF
BÁSICO / DIA/NOCHE / CONTRALUZ / ITS / INTER / USUA
AUTO / EXTERNO / COLOR / N/B
AJUST IMAG / TITULO CAM / SYNC / INTELIG. /
PRIVACIDAD / DIS / IDIOMA / VOLVER
Ķ
Ķ
Ķ
Ķ
Ķ
Ķ
Ķ
Ķ
Ķ
CONFIG PRINCIPALE
1.LENS DC
2.EXPOSITION
3.BAL BLC ATW
4.CONTRE-JOUR ARRET
5.SSNR3
MARCHE
6.JOUR/NUIT AUTO
7.PROFIL BASIQUE
8.SPECIAL
9.QUITTER SAVE
DC
ATW / EXTER / INTER /MANUEL / AWC
Ą
SET
ARRET / UTIL BLC / HLC / SSDR / WDR
MARCHE / ARRET
SAVE / NOT SAVE / REINIT
AUTO / EXTERNE / COULEUR / N/B
BASIQUE / JOUR/NUIT / CONTRE-JOUR / ITS / INTER / UTIL
Ķ
Ķ
Ķ
Ķ
Ķ
Ķ
Ķ
Ķ
Ķ
REG IMAGES / TITRE CAM / SYNC / INTELLIG. /
MASQUAGE / DIS / LANGUE / RETOUR
LUMINOSITE / OBTURATEUR / AGC / SENS-UP / RETOUR
CONFIG PRINCIPALE
1.OTTICA DC
2.ESPOSIZIONE
3.BIL BIANCO ATW
4.CONTROLUCE OFF
5.SSNR3 ON
6.GIORNO/NOTT AUTO
7.PROFILO BASE
8.SPECIALE
9.USCITA SAVE
Ķ
Ķ
Ķ
Ķ
Ķ
Ķ
Ķ
DC
LUMINOSITÀ / OTTURATORE / AGC / SENS-UP / RITORNO
ATW / ESTERNO / INTERNO /MANUALE / AWC
Ą
SET
OFF / UTENTE BLC / HLC / SSDR / WDR
ON / OFF
Ķ
SAVE / NOT SAVE / RESET
AUTO / ESTERNO / COLORE / B/N
BASE / GIORNO/NOTT / CONTROLUCE / ITS / INTERNO / UTENTE
Ķ
REG IMMAGINE / TITOLO CAM / SYNC / INTELL. /
PRIVACY / DIS / LINGUA / RITORNO
HLAVNÍ NASTAVENÍ
1.OBJEKTIV DC
2.EXPOZICE
3.VYVÁŽENÍ BÍLÉ ATW
4.PODSVÍCENÍ VYP
5.SSNR3 ZAP
6.DEN/NOC AUTO
7.PROFIL
ZÁKLADNÍ
8.SPECIÁL
9.VÝSTUP ULOŽIT
DC
JAS / CLONA / AGC / SENS-UP / RETURN
ATW / VENKU / UVNITŘ / RUČNÍ / AWC�SET
VYP / UŽIVATEL BLC / HLC / SSDR / WDR
ZAP / VYP
ULOŽIT / NEUKLÁDAT / RESETOVAT
AUTO / VENKOVNÍ / BARVA / ČB
ZÁKLADNÍ / DEN/NOC / PODSVÍCENÍ / ITS / UVNITŘ / UŽIVATEL
ÚPRAVA SNÍMKU / NÁZEV KAMERY / SYNC / INFORMACE /
SOUKROMÍ / DIS / JAZYK / RETURN
Ķ
Ķ
Ķ
Ķ
Ķ
Ķ
Ķ
Ķ
Ķ
www.samsungtechwin.com
www.samsungsecurity.com
SAMSUNG TECHWIN CO., LTD.
Samsungtechwin R&D Center, 701, Sampyeong-dong, Bundang-gu, Seongnam-si, Gyeonggi-do, Korea, 463-400
TEL : +82-70-7147-8740~60 FAX : +82-31-8018-3745
SAMSUNG TECHWIN AMERICA Inc.
1480 Charles Willard St, Carson, CA 90746, UNITED STATES
Tol Free : +1-877-213-1222 FAX : +1-310-632-2195
www.samsungcctvusa.com
SAMSUNG TECHWIN EUROPE LTD.
Samsung House, 1000 Hillswood Drive, Hillswood Business
Park Chertsey, Surrey, UNITED KINGDOM KT16 OPS
TEL : +44-1932-45-5300 FAX : +44-1932-45-5325
SALES NETWORK
Super High Resolution WDR Dome Camera
Quick Set-up Guide
SCD-3081
R
E
D
(
M
D
_O
U
T
W
H
I
T
E
(
E
X
T
_
D
N
)
B
L
A
C
K
(
G
N
D
)
➑
➏➐
➌
⓬
❶
➍
➎
➋
⓫
❿
➒
R
E
D
(
M
D
_
O
U
T
W
H
I
T
E
(
E
X
T
_D
N
)
B
L
A
C
K
(
G
N
D
)
➑
➏➐
➌
⓬
❶
➍
➎
➋
⓫
❿
➒
R
E
D
(
M
D
_O
U
T
W
H
I
T
E
(
E
X
T
_
D
N
)
B
L
A
C
K
(
G
N
D
)
➑
➏➐
➌
⓬
❶
➍
➎
➋
⓫
❿
➒
R
E
D
(
M
D
_O
U
T
W
H
I
T
E
(
E
X
T
_D
N
)
B
L
A
C
K
(
G
N
D
)
➑
➏➐
➌
⓬
❶
➍
➎
➋
⓫
❿
➒
R
E
D
(
M
D
_O
U
T
W
H
I
T
E
(
E
X
T
_
D
N
)
B
L
A
C
K
(
G
N
D
)
➑
➏➐
➌
⓬
❶
➍
➎
➋
⓫
❿
➒
R
E
D
(
M
D
_O
U
T
W
H
I
T
E
(
E
X
T
_
D
N
)
B
L
A
C
K
(
G
N
D
)
➑
➏➐
➌
⓬
❶
➍
➎
➋
⓫
❿
➒
❶
Dome Cover
❷
Shield Case
❸
Pan Base : Control panning angle of camera.
➍
x3.9 Vari-focal Lens Module : 2.8 ~ 11mm (F1.2).
➎
Function Setup switch: Display the menu on the screen and move the cursor to four directions to
confirm status or changing a selected item.
➏
Video Output Terminal to Monitor
➐
Rotate Base : Control rotating angle of camera.
➑
Power input terminal : Connect the power as specified for each model here.
❾
Ground Terminal
❿
D & N Input Terminal :
You can switch to Day & Night Mode by connecting an external signal to this terminal.
⓫
MD Output Terminal : Motion detection signals are output through this terminal.
⓬
Video Output Jack : Video signals are output through this port. Connect this port to the Video IN port
of a monitor.
SCD-3081-ENG-new.indd 11 2011-2-16 12:13:23

12_ introduction
introduction
COMPONENT NAMES AND FUNCTIONS
OVERVIEW
❶
Dome Cover
❷
Shield Case
❸
Pan Base : control panning angle of camera
❹
3.9 Vari-focal Lens Module 2.8 ~ 11.0mm (F1.2)
❺
Function Setup Switch : Display the OSD menu and move the cursor up, down,
left,and right amend or confi rm changes.
❻
Video Output Terminal to Monitor
➐
Rotate Base : control rotating angle of camera.
➑
Power Input Connector
➒
Ground Terminal
❿
D & N Input Terminal : You can switch to Day & Night Mode by connecting
an external signal to this terminal.
⓫
MD Output Terminal: Motion detection signals are output through this terminal.
⓬
Video Output Jack
Be sure to connect the Day & Night input terminal to GND when using an external input.
RED (MD_OUT
WHITE (EXT_DN)
BLACK (GND)
➑
➏➐
➌
⓬
❶
4
5
2
⓫
❿
➒
M
SCD-3081-ENG-new.indd 12 2011-2-16 12:13:24

English_13
● INSTALLATION
The installation should be done by qualifi ed
service personnel or system installers.
If the ceiling material is not strong enough to
hold the installation screws, the camera may
fall off. Reinforce the ceiling as needed.
To change the position of the cable, take away
the Hole Cover and pass the cable through.
INSTALLATION
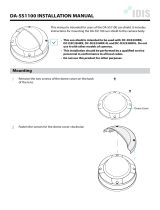
1) Separate the dome cover by turning anti-clockwise.
2) Separate the shield case by pulling from the camera body.
installation
* To install the dome cover on the camera
body, turn the latches in locking
direction as shown in the figure-1.
Latch
Locking direction
[Figure-1]
Locking direction
(Clockwise)
Main Body
(Camera)
Shield Case
Dome cover
Unlocking direction
(Anti-clockwise)
Original position of
the cable
Hole Cover
M
SCD-3081-ENG-new.indd 13 2011-2-16 12:13:26

installation
14_ installation
WHEN USING THE CEILING BRACKET
M
[Figure-2]
M4 tapping
screw
Pan Base
fixation
screw
1) Hold down the lock lever on the bottom of the
camera in the UNLOCK position and turn it
counter clockwise with the other hand to
remove the ceiling bracket from the main body.
2) Place the separated ceiling bracket so that
the “Front” side faces the area to be
monitored and install it with the M4 tapping
screws.
3) To combine the main body with the ceiling
bracket, make sure that the pan base fixation
screw face the opposite side of the “Front”
side of the ceiling bracket and rotate it
clockwise.
4) Adjust the camera lens to face the area to be
monitored and fix the main body and the
dome cover by aligning the grooves and
rotating the body clockwise.
If you want to install the camera with the ceiling bracket combined, fix it using two M4 tapping
screws at the side of the main body. (refer to the [Figure-2])
An arrow for installing
directions
M4 tapping
screw (provided)
Ceiling bracket
Lock Lever
Unlocking
direction
Dome cover
Locking
direction
CAMERA
SCD-3081-ENG-new.indd 14 2011-2-16 12:13:27

English_15
● INSTALLATION
COLOR DOME CAMERA SCD-3080
13
Ceiling bracket
Locking
direction
Shield Case
Unlocking
direction
Main Body
(Camera)
Dome cover
Lock Lever
IF DETACHING THE CAMERA FROM THE INSTALLATION POSITION
1) Remove the dome cover as well as the shield
case.
2) Hold down the lock lever on the bottom of
the camera in the UNLOCK position and turn
it counter clockwise with the other hand to
remove the ceiling bracket from the main
body.
SCD-3081-ENG-new.indd 15 2011-2-16 12:13:28

installation
16_ installation
ADJUST THE PANNING, TILTING & ROTATION WHILE WATCHING THE MONITOR
You can adjust camera to any direction by using Pan, Tilt, Rotate mechanism.
Pan Base moves by 176˚ to each side direction and 352˚ on the whole.
Tilt Base covers total 73˚ angle(0˚ ~ 73˚).
Rotate Base moves by 174° to each side direction and 348° on the whole.
Methods of adjustment
The case of wall installation
1
After mounting the camera on a wall, adjust the panning angle so that the
correct viewing angle is attained and the titling is correctly orientated.
2
And then adjust the tilting angle by rotating the tilt base.
➌
Loosen the rotate base hold screw and adjust rotate base for the best view
4
Tighten rotate base securing screw.
The case of ceiling installation
1
After mounting the camera on a ceiling, adjusting the panning angle to the
correct viewing position by rotating the pan base.
2
And then adjust the tilting angle by rotating the tilt base.
➌
Loosen the rotate base hold screw and adjust rotate base for the best view
4
Tighten pan and tilt securing screw.
When you want to adjust the Pan/Tilt/Rotate Base, loosen, adjust and then tighten the Pan/Tilt/
Rotate Base screws.
1.
2.
M
73˚
174˚
176˚
Pan Base
Tilt Base
Rotate Base
174˚
176˚
SCD-3081-ENG-new.indd 16 2011-2-16 12:13:29

English_17
● CONNECTION
connection
CONNECTING TO MONITOR
Connect the VIDEO-OUT jack to the VIDEO-IN jack of monitor.
As the connecting method varies with the instruments, refer to the manual supplied
with the instrument.
Only connect the cable when the power is turned off.
If necessary, you can connect the monitor to the REMOTE jack on the back of your
camera.
CONNECTING TO POWER
Connect the adaptor to the power input connector as shown in the figure below.
The recommended adaptor specification for SCD-3081N/3081P is DC 12V / 500mA or AC 24V /
300mA.
When the resistance value of copper wire is at [20°C(68°F)]
Copper wire size
(AWG)
#24 (0.22mm
2
) #22 (0.33mm
2
) #20 (0.52mm
2
) #18 (0.83mm
2
)
Resistance (
Ω
/m) 0.078 0.050 0.030 0.018
Voltage Drop (V/m) 0.028 0.018 0.011 0.006
As shown in the table above, voltage decreases as the wire gets longer. Therefore use of
an excessively long adaptor output line for connection to the camera may
affect the performance of the camera.
CCTV Camera
Monitor
---- Power Input
Terminal
SCD-3081-ENG-new.indd 17 2011-2-16 12:13:30

18_ connection
connection
* Standard voltage for camera operation : DC 12V ±10%, AC 24V ± 10%
* There may be some deviation in voltage drop depending on the type of wire and the
manufacturer.
Be sure to connect power only after all the installation is complete.
Note that AC/DC adaptor is not supplied with camera.
Ground should be connected to the GND terminal.
USING COAXIAL COMMUNICATIONS
Coaxial Communications System
OSD Control method
CAMERA DVR CONTROLLER
SET MENU/ENTER OSD KEY
UP UP KEY JOYSTICK UP
DOWN DOWN KEY JOYSTICK DOWN
LEFT LEFT KEY JOYSTICK LEFT
RIGHT RIGHT KEY JOYSTICK RIGHT
- Video Cable
The camera’s video output port is connected to the monitor with a BNC coaxial
cable, shown below : If the distance between the camera and the monitor exceeds
the recommended maximum, please use an auxiliary video amp.
It is recommended that pure copper coax cable is used and not copper coated steel, as this will
cause issues with the communication over the coaxial cable.
To ensure image quality, please connect only one-way video output from camera to other video
display devices.
Distance Recommended Cable Specifi cation
300m 3C2V(RG-59/U)
450m 5C2V(RG-6/U)
600m 7C2V(RG-11/U)
DVR
•
: BNC
•
---- : RS-485
M
M
M
E
N
U
SEAR
CH
MUL
T
I
REC
M
E
N
U
PRESET
G
R
O
UP
TRACK
CAM
1
2
3
4
5
6
7
8
9
0
MON
CLO
SE
OPEN
N
EAR
F
AR
WIDE
TELE
P
T
Z
DVR
MTX
SE
TU
P
ESC
FUNC
ENT
ER
1 2 3 4
5 6 7 8
9 10 11 12
13 14 15 16
ALARM HDD NETWORK BACKUP REC
DVD RECORDER
REC
ZOOM
MODE
FREEZE
AUDIO
BACKUP
ALRAM
SEARCH
TELE WIDE VIEW PRESET
MENU
RETURN
USB
OPEN/CLOSE
SCD-3081-ENG-new.indd 18 2011-2-16 12:13:32

English_19
● SETUP
•
: BNC
•
---- : RS-485
setup
MENU CONFIGRATION
Setup Menu
LENS
●
DC
EXPOSURE
●
BRIGHTNESS
●
SHUTTER
●
AGC
●
SENS-UP
●
RETURN
WHITE BAL
●
ATW
●
OUTDOOR
●
INDOOR
●
MANUAL
●
AWC
→
SET
BACKLIGHT
●
OFF
●
USER BLC
●
HLC
●
SSDR
●
WDR
SSNR3
●
ON
●
OFF
DAY/NIGHT
●
AUTO
●
EXTERN
●
COLOR
●
B/W
PROFILE
●
BASIC
●
DAY/NIGHT
●
BACKLIGHT
●
ITS
●
INDOOR
●
USER
SPECIAL
●
IMAGE ADJ
●
CAM TITLE
●
SYNC
●
INTELLIGENCE
●
PRIVACY
●
DIS
●
LANGUAGE
●
RETURN
EXIT
●
SAVE
●
NOT SAVE
●
RESET
MENU SETUP
Use the Function Setup switch beside of the lens.
Function Setup switch
SCD-3081-ENG-new.indd 19 2011-2-16 12:13:33

20_ setup
setup
Select a desired function using the Function Setup switch.
Place the cursor over a desired item.
Set up a selected item by using the Function Setup switch.
To finish the setting, select ‘EXIT’ and press the Function Setup switch.
An item with the icon also has sub menus. To select a sub menu, select an item with the icon
and press the Function Setup switch.
An item with the - - - icon is unavailable due to function settings.
LENS
Using this function, you can control the screen brightness.
When the SETUP menu screen is displayed,
select‘LENS’by using the Function Setup
switch so that the arrow indicates‘LENS’.
The Lens mode has sub menu site as listed
below.
- BRIGHTNESS : Adjusts the video brightness.
- FOCUS ADJ : To adjust the lens focus correctly, you must activate the Focus
Settings mode. To activate the Focus Settings mode, adjust the lens focus,
and then deactivate the settings mode.
- You can adjust the shutter value of ESC shutter mode.
2.
3.
4.
1.
2.
Press the Function Setup switch.
Main setup menu is displayed on the monitor screen.
1.
MAIN SETUP
▶ 1.LENS DC
2.EXPOSURE
3.WHITE BAL ATW
4.
BACKLIGHT OFF
5.
SSNR3 ON
6.
DAY/NIGHT AUTO
7.PROFILE BASIC
8.SPECIAL
9.EXIT SAVE
Change the status
by moving the
setup switch left or
right.
Select the function
by moving up or
down direction of
function setup switch.
MAIN SETUP
▶ 1.LENS DC
2.EXPOSURE
M
SCD-3081-ENG-new.indd 20 2011-2-16 12:13:33
/