Hotpoint HTX24GASK0WW Owner's manual
- Category
- Washer dryers
- Type
- Owner's manual

Dryers
Safety Instructions . . . . . . . . 2–3
Operating Instructions . . . 4-5
Control Panel . . . . . . . . . . . . . . . . . . . . 4
Dryer Features . . . . . . . . . . . . . . . . . . . 6
Loading and Using the Dryer . . . . . . 6
Venting the Dryer . . . . . . . . . . . . . . . . 8
Care and Cleaning . . . . . . . . . . . 7
Troubleshooting Tips . . . . 9-10
Consumer Support
Consumer Support . . . . . . . . . . . . . . 12
Warranty . . . . . . . . . . . . . . . . . . . . . . . 11
Write the model and serial
number here:
Model # __________________
Serial # ___________________
You can find them on a label
on the front of the dryer
behind the door.
Owner’s Manual
234D2431P003
49-90550-1 03-16 GE
Printed in Mexico

2
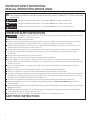
IMPORTANT SAFETY INFORMATION.
READ ALL INSTRUCTIONS BEFORE USING.
This is the safety alert symbol. This symbol alerts you to potential hazards that can kill you or hurt you and others. All
safety messages will follow the safety alert symbol and the word “DANGER”, “WARNING”, or “CAUTION”. These words
are defined as:
Indicates a hazardous situation which, if not avoided, will result in death or serious injury.
Indicates a hazardous situation which, if not avoided, could result in death or serious injury.
Indicates a hazardous situation which, if not avoided, could result in minor or moderate injury.
DANGER
WARNING
CAUTION
IMPORTANT SAFETY INSTRUCTIONS
To reduce the risk of fire, explosion, electric shock, or injury to persons when using your appliance, follow basic
precautions, including the following:
Read all instructions before using the appliance.
DO NOT dry articles that have been previously cleaned in, washed in, soaked in or spotted with gasoline, dry-cleaning
solvents, or other flammable or explosive substances, as they give off vapors that could ignite or explode.
DO NOT place items exposed to cooking oils in your dryer. Items contaminated with cooking oils may contribute to a
chemical reaction that could cause a load to catch fire.
DO NOT allow children to play on or in this appliance. Close supervision of children is necessary when this appliance
is used near children. Before the appliance is removed from service or discarded, remove the door to the drying
compartment.
DO NOT reach into the appliance if the drum is moving.
DO NOT install or store this appliance where it will be exposed to the weather.
DO NOT tamper with controls,
repair or replace any part of this appliance or attempt any servicing unless specifically
recommended in the user maintenance instructions or in published user repair instructions that you understand and have
the skills to carry out.
DO NOT use fabric softeners or products to eliminate static unless recommended by the manufacturer of the fabric
softener or product.
DO NOT use heat to dry articles containing foam rubber or similarly textured rubber-like materials.
Clean lint screen before or after each load. DO NOT operate the dryer without the lint filter in place.
Do not store combustible materials, gasoline or other flammable liquids near the dryer.
Keep area around the exhaust opening
and adjacent surrounding areas free from the accumulation of lint, dust and dirt. Keep dryer area clear and free from items
that would obstruct the flow of combustion and ventilation air.
The interior of the appliance and exhaust duct should be cleaned periodically by qualified service personnel.
Unplug the appliance or turn off the circuit breaker before servicing. Pressing the Power or Start/Pause button DOES NOT
disconnect power.
DO NOT operate this appliance if it is damaged, malfunctioning, partially disassembled, or has missing or broken parts, including a
damaged cord or plug.
DO NOT spray any type of aerosol into, on or near dryer at any time. Do not use any type of spray cleaner when cleaning dryer
interior. Hazardous fumes or electrical shock could occur
.
See “Electrical Connection” located in the Installation Instructions for grounding instructions.
SAVE THESE INSTRUCTIONS
WARNING

3
GEAppliances.com
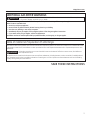
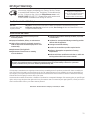
ADDITIONAL GAS DRYER WARNINGS
For your safety, the information in this manual must be followed to minimize the risk of fire or explosion
or to prevent damage, personal injury, or death.
- DO NOT store or use gasoline or other flammable vapors and liquids in the vicinity of this or any other appliance.
- WHAT TO DO IF YOU SMELL GAS:
• DO NOT try to light any appliance.
• DO NOT touch any electrical switch; DO NOT use any phone in your building.
• Clear the room, building, or area of any occupants.
• Immediately call your gas supplier from a neighbor’s phone. Follow the gas supplier’s instructions.
• If you cannot reach your gas supplier, call the fire department.
- Installation and service must be performed by a qualified installer, service agency, or the gas supplier.
WARNING
State of California Proposition 65 Warnings:
The California Safe Drinking Water and Toxic Enforcement Act requires the governor of California to publish a list of substances known
to the state to cause cancer, birth defects or other reproductive harm and requires businesses to warn of potential exposure to such
substances.
WARNING
This product contains one or more chemicals known to the State of California to cause cancer, birth defects or
other reproductive harm.
Gas appliances can cause low-level exposure to some of these substances, including benzene, carbon monoxide, formaldehyde and
soot, caused primarily by the incomplete combustion of natural gas or LP fuels. Exposure to these substances can be minimized by
properly venting the dryer to the outdoors.
SAVE THESE INSTRUCTIONS

4
To reduce the risk of fire, electric shock, or injury to persons, read the IMPORTANT SAFETY INSTRUCTIONS before
operating this appliance.
WARNING!
WARNING
WARNING
Explosion Hazard
Fire Hazard
Keep flammable materials and vapors, such as gasoline, away
from dryer.
DO NOT dry anything that has ever had anything flammable on it
(even after washing).
Failure to do so can result in death, explosion, or fire.
No washer can completely remove oil.
Do not dry anything that has ever had any type of oil on it
(including cooking oils).
Items containing foam, rubber, or plastic must be dried on a
clothesline or by using an air dry cycle.
Failure to follow these instructions can result in death or fire.
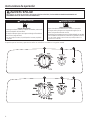
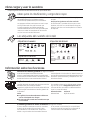
Throughout this manual, features and appearance may vary from your model.
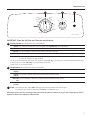
Operating instructions
A B C
A B C

5
IMPORTANT: Clean the lint filter each time you use the dryer.
Drying Cycles
(Not all features are on all models)
Cottons For cottons and most linens. For most loads, select Optimum Dry (on some models).
Casuals For wrinkle-free, permanent press and delicate items, and knits.
Delicates On some models. For delicate items, special-care fabrics and knits.
Time Dry Set the Cycle Selector at the desired drying time.
Quick Fluff For freshening or fluffing up already dry clothing, fabrics, linens and pillows. Use with Air Fluff No Heat.
Provides 10 minutes of no heat tumbling.
Sensor cycles automatically determine fabric dryness. Select Less Dry if you want your clothes slightly damp at the end
of the drying cycle. Select More Dry if you want them to feel drier.
Timed cycles run for a selected time.
Temperature (Not all features are on all models)
Cottons For regular to heavy cottons.
Regular
Casuals For synthetics, blends, delicates and items labeled permanent press.
Medium
Delicates On some models. For delicates, synthetics and items labeled tumble dry low.
Low
Air Fluff On some models. For fluffing items without heat. Use the Time Dry cycle.
No Heat
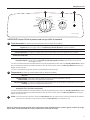
Start³&ORVHWKHGU\HUGRRU6HOHFWStart. Opening the door during operation will stop the dryer.
To restart the dryer, close the door and select Start to complete the cycle.
A
B
C
NOTE: Drying times will vary according to the type of heat used (Electric, Natural or LP gas), size of load, types of fabrics,
wetness of clothes and condition of exhaust ducts.
GEAppliances.com
Medium
Low
Regular
Casuals
Time Dry
Cottons
Delicates
Casuals
Delicat
es
Cott
ons
Temperature
More D
r
y
More Dry
Less Dry
Optimum Dry
80 M
in.
70
50
40
30
20
Less Dry
Cool Down
Cool Down
60
Start
P
ush
to S
tart
M
or
e Dry
Less Dry
End of
Cycle Signal
Cool
D
own
A B C

6
The alloy steel used to make the dryer drum provides
the highest reliability available in a GE dryer.
If the dryer drum should be scratched or dented
during normal use, the drum will not rust or corrode.
These surface blemishes will not affect the function or
durability of the drum.
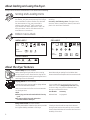
Drum Lamp (on some models)
Before replacing the light bulb, be sure to unplug
the dryer power cord or disconnect the dryer at the
household distribution panel by removing the fuse or
switching off the circuit breaker.
Reach above dryer
opening from inside the drum.
Remove the
bulb and replace with the same size bulb.
Drying Rack (on some models)
A handy drying rack may be used for drying delicate
items such as washable sweaters.
Hook the rack over the lint filter so the rack extends
into the dryer drum.
NOTE:
The drying rack must be used with the Time Dry
cycle.
Do not use this drying rack when there
are other clothes in the dryer.
If your model did not come with a drying rack,
order one on-line at GEApplianceparts.com today,
24 hours a day or by phone at 800.626.2002
during normal business hours.
Part Number Accessory
WE01X25160 Drying Rack
About the dryer features.
Alloy Steel Drum (on some models)
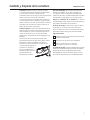
Machine
wash
cycle
Normal
Permanent Press/
wrinkle resistant
Gentle/
delicate
Hand wash
Do not wash Do not wring
Water
temperature
Hot
(50C/120F)
Warm
(40C/105F)
Cold/cool
(30C/85F)
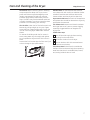
WASH LABELS
Tumble
dry
Dry
Normal
Permanent Press/
wrinkle resistant
Gentle/
delicate
Do not tumble dry
Do not dry
(used with
do not wash)
Heat
setting
High
Medium
Low
No heat/air
Special
instructions
Line dry/
hang to dry
Drip dry
Dry flat
In the shade
DRY LABELS
Bleach
symbols
Any bleach
(when needed)
Only non-chlorine bleach
(when needed)
Do not bleach
BLEACH LABELS
About loading and using the dryer.
Always follow the fabric manufacturer’s care label when laundering.
Sorting and Loading Hints
As a general rule, if clothes are sorted properly for
the washer, they are sorted properly for the dryer.
Do not add fabric softener sheets once the load
has become warm. They may cause fabric
softener stains. Bounce
®
Fabric Conditioner
Dryer Sheets have been approved for use in all
GE Dryers when used in accordance with the
manufacturer’s instructions.
Do not overload. This wastes energy and causes
wrinkling.
Do not dry the following items: fiberglass items,
woolens, rubber-coated items, plastics, items with
plastic trim and foam-filled items.
Fabric Care Labels
Below are fabric care label “symbols” that affect the clothing you will be laundering.

7
Care and Cleaning of the Dryer. GEAppliances.com
The Exterior: Wipe or dust any spills or washing
compounds with a damp cloth. Dryer control
panel and finishes may be damaged by some
laundry pretreatment soil and stain remover
products. Apply these products away from the
dryer. The fabric may then be washed and dried
normally. Damage to your dryer caused by these
products is not covered by your warranty.
The Lint Filter: Clean the lint filter before each use.
Remove by pulling straight up. Run your fingers
across the filter. A waxy buildup may form on the
lint filter from using dryer added fabric softener
sheets.
To remove this buildup, wash the lint screen in
warm, soapy water. Dry thoroughly and replace.
Do not operate the dryer without the lint filter in
place.
Vacuum the lint from the dryer lint filter area if you
notice a change in dryer performance.
Stainless Steel: To clean stainless steel surfaces,
use a damp cloth with a mild, non-abrasive cleaner
suitable for stainless steel surfaces. Remove the
cleaner residue, and then dry with a clean cloth.
Dryer Interior and Duct: The interior of the appliance
and exhaust duct should be cleaned once a year by
qualified service personnel.
The Exhaust Duct: Inspect and clean the exhaust
ducting at least once a year to prevent clogging.
A partially clogged exhaust can lengthen the
drying time.
Follow these steps:
1
Turn off electrical supply by disconnecting
the plug from the wall socket.
2
Disconnect the duct from the dryer.
3
Vacuum the duct with the hose attachment
and reconnect the duct.
The Exhaust Hood: Check from the outside that
the flaps of the hood move freely when operating.
Make sure that there is not wildlife (birds, insects,
etc.) nesting inside the duct or hood.

8
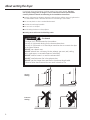
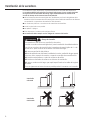
For the best drying performance, the dryer needs to be properly vented. The dryer
will use more energy and run longer if it is not vented to the below specifications.
Carefully follow the details on Exhausting in the Installation Instructions.
Use only rigid metal 4” diameter ductwork inside the dryer cabinet. Use only rigid metal or
UL listed flexible metal 4” diameter ductwork for exhausting to the outside.
Do not use plastic or other combustible ductwork.
Use the shortest length possible.
Do not crush or collapse.
Avoid resting the duct on sharp objects.
Venting must conform to local building codes.
About venting the dryer.
Correct
Venting
Incorrect
Venting
- Fire Hazard
WARNING
This dryer MUST be exhausted to the outdoors.
Use only 4” rigid metal ducting for the home exhaust duct.
Use only 4” rigid metal or UL-listed dryer transition duct to connect the dryer
to the home exhaust.
DO NOT use a plastic vent.
DO NOT exhaust into a chimney, kitchen exhaust, gas vent, wall, ceiling,
attic, crawl space, or concealed space of a building.
DO NOT install a screen in or over the exhaust duct.
DO NOT install a booster fan in the exhaust duct.
DO NOT use duct longer than specified in the exhaust length table.
Failure to follow these instructions can result in death or fire.

9
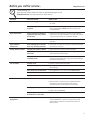
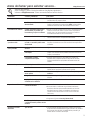
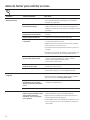
Problem Possible Causes What To Do
Dryer doesn’t start Dryer is unplugged • Make sure the dryer plug is pushed completely into
the outlet.
Fuse is blown/circuit breaker • Check the house fuse/circuit breaker box and replace
is tripped fuse or reset breaker. NOTE: Most electric dryers use
2 fuses/breakers.
Dryer doesn’t heat Fuse is blown/circuit breaker is • Check the house fuse/circuit breaker box and replace
tripped; the dryer may tumble both fuses or reset both breakers. Your dryer may tumble
but not heat if only one fuse is blown or one breaker tripped.
Gas service is off • Make sure gas shutoff at dryer and main shutoff are
fully open.
Dryer shakes or Some shaking/noise is normal. • Move dryer to an even floor space, or adjust leveling legs
makes noise Dryer may be sitting unevenly as necessary until even.
Greasy spots on clothes Improper use of fabric softener • Follow directions on fabric softener package.
Drying dirty items with • Use your dryer to dry only clean items. Dirty items can
clean ones stain clean items and the dryer.
Clothes were not • Sometimes stains which cannot be seen when the
completely clean clothes are wet appear after drying. Use proper washing
procedures before drying.
Lint on clothes Lint filter is full • Clean lint screen before each load.
Improper sorting • Sort lint producers (like chenille) from lint collectors
(like corduroy).
Static electricity can attract lint • See suggestions in this section under Static occurs.
Overloading • Separate large loads into smaller ones.
Paper, tissue, etc. left in pockets • Empty all pockets before laundering clothes.
Static occurs No fabric softener was used • Try a fabric softener.
• Bounce
®
Fabric Conditioner Dryer Sheets have been
approved for use in all GE Dryers when used in
accordance with the manufacturer’s instructions.
Overdrying • Try a fabric softener.
• Adjust setting to Less Dry.
Synthetics, permanent press • Try a fabric softener.
and blends can cause static
Inconsistent Type of heat • Automatic drying times will vary according to the type
drying times of heat used (electric, natural or LP gas), size of load,
types of fabrics, wetness of clothes and condition of
exhaust ducts.
Troubleshooting Tips
Save time and money! Review the charts on the following pages, or visit
GEAppliances.com. You may not need to call for service.
Before you call for service…
GEAppliances.com

10
Before you call for service…
Problem Possible Causes What To Do
Clothes take too long Improper sorting • Separate heavy items from lightweight items (generally,
to dry a well-sorted washer load is a well-sorted dryer load).
Large loads of heavy fabrics • Large, heavy fabrics contain more moisture and take
(like beach towels) longer to dry. Separate large, heavy fabrics into smaller
loads to speed drying time.
Controls improperly set • Match control settings to the load you are drying.
Lint filter is full • Clean lint filter before every load.
Improper or obstructed • Check installation instructions for proper
ducting ducting/venting.
• Make sure ducting is clean, free of kinks and
unobstructed.
• Check to see if outside wall damper operates easily.
• Check the Installation Instructions to make sure the
dryer venting is correct.
Blown fuses or tripped • Replace fuses or reset circuit breakers. Since most dryers
circuit breaker use 2 fuses/breakers, make sure both are operating.
Overloading/combining loads • Do not put more than one washer load in the dryer
at a time.
Underloading • If you are drying only one or two items, add a few items
to ensure proper tumbling.
Clothes are wrinkled Overdrying • Select a shorter drying time.
• Remove items while they still hold a slight amount of
moisture. Select a Less Dry setting.
Letting items sit in dryer • Remove items when cycle ends and fold or hang
after cycle ends immediately.
Overloading • Separate large loads into smaller ones.
Clothes shrink Some fabrics will naturally shrink • To avoid shrinkage, follow garment care labels exactly.
when washed. Others can be
safely washed, but will shrink
• Some items may be pressed back into shape after drying.
in the dryer
• If you are concerned about shrinkage in a particular
item, do not machine wash or tumble dry it.

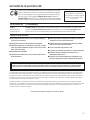
GE Dryer Warranty.
11
What GE Will Not Cover:
Service trips to your home to teach you how
to use the product.
Improper installation, delivery or maintenance.
Failure of the product if it is abused, misused, or
used for other than the intended purpose or used
commercially.
Replacement of the light bulb.
Replacement of house fuses or resetting
of circuit breakers.
Damage to the product caused by accident, fire, floods
or acts of God.
Incidental or consequential damage caused by possible
defects with this appliance.
Damage caused after delivery.
Product not accessible to provide required service.
Defects or damage due to operation in freezing
temperatures.
Products which are not defective or broken, or which are
working as described in the Owner’s Manual.
This warranty is extended to the original purchaser and any succeeding owner for products purchased for home use within the
USA. If the product is located in an area where service by a GE Authorized Servicer is not available, you may be responsible for a
trip charge or you may be required to bring the product to an Authorized GE Service location for service. In Alaska, the warranty
excludes the cost of shipping or service calls to your home.
Some states do not allow the exclusion or limitation of incidental or consequential damages. This warranty gives you specific legal
rights, and you may also have other rights which vary from state to state. To know what your legal rights are, consult your local or
state consumer affairs office or your state’s Attorney General.
Warrantor: General Electric Company. Louisville, KY 40225
All warranty support provided by our Factory Service Centers,
or an authorized Customer Care
®
technician. To schedule service,
on-line, 24 hours a day, visit us at GEAppliances.com or call
800.GE.CARES (800.432.2737). Please have serial number and
model number availa ble when calling for service.
Staple your receipt here.
Proof of the original purchase
date is needed to obtain
support under the warranty.
(;&/86,212),03/,(':$55$17,(6³<RXUVROHDQGH[FOXVLYHUHPHG\LVSURGXFWUHSDLUDVSURYLGHGLQWKLV/LPLWHG
Warranty. Any implied warranties, including the implied warranties of merchantability or fitness for a particular
purpose, are limited to one year or the shortest period allowed by law.
For The Period Of: GE Will Replace:
One Year Any part of the dryer which fails due to a defect in materials or workmanship. During this
From the date of the limited one-year warranty, GE will also provide, free of charge, all labor and related service costs
original purchase to replace the defective part.

12
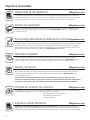
Consumer Support.
GE Appliances Website
GEAppliances.com
Have a question or need assistance with your appliance? Try the GE Appliances Website 24 hours a day,
any day of the year! For greater convenience and faster service, you can now download Owner’s Manuals,
order parts or even schedule service on-line.
Schedule Service GEAppliances.com
Expert GE repair service is only one step away from your door. Get on-line and schedule your service at your
convenience 24 hours any day of the year! Or call 800.GE.CARES (800.432.2737) during normal business hours.
Real Life Design Studio GEAppliances.com
*(VXSSRUWVWKH8QLYHUVDO'HVLJQFRQFHSW³SURGXFWVVHUYLFHVDQGHQYLURQPHQWVWKDWFDQEHXVHGE\
people of all ages, sizes and capabilities. We recognize the need to design for a wide range of physical and
mental abilities and impairments. For details of GE’s Universal Design applications, including kitchen design
ideas for people with disabilities, check out our Website today. For the hearing impaired, please call 800.TDD.
GEAC (800.833.4322).
Extended Warranties GEAppliances.com
Purchase a GE extended warranty and learn about special discounts that are available while your warranty
is still in effect. You can purchase it on-line anytime, or call 800.626.2224 during normal business hours.
GE Consumer Home Services will still be there after your warranty expires.
Parts and Accessories GEAppliances.com
Individuals qualified to service their own appliances can have parts or accessories sent directly to their homes
(VISA, MasterCard and Discover cards are accepted). Order on-line today, 24 hours every day or by phone
at 800.626.2002 during normal business hours.
Instructions contained in this manual cover procedures to be performed by any user. Other servicing generally
should be referred to qualified service personnel. Caution must be exercised, since improper servicing may
cause unsafe operation.
Contact Us GEAppliances.com
If you are not satisfied with the service you receive from GE, contact us on our Website with all the details
including your phone number, or write to: General Manager, Customer Relations
GE Appliances, Appliance Park
Louisville, KY 40225
Register Your Appliance GEAppliances.com
5HJLVWHU\RXUQHZDSSOLDQFHRQOLQH³DW\RXUFRQYHQLHQFH Timely product registration will allow for enhanced
communication and prompt service under the terms of your warranty, should the need arise.
You may also mail in the pre-printed registration card included in the packing material.

Secadoras
Instrucciones
de seguridad . . . . . . . . . . . . . . . 2–3
Instrucciones de operación . . 4-5
Cómo cargar y usar la secadora . . 6
Funciones de la secadora . . . . . . . . 6
Panel de control . . . . . . . . . . . . . . . . . . 4
Ventilación de la secadora . . . . . . . . 8
Cuidado y limpieza
. . . . . . . . . .7
Consejos para la solución
de problemas . . . . . . . . . . . . . 9-10
Soporte al consumidor
Garantía . . . . . . . . . . . . . . . . . . . . . . 12
Soporte al consumidor . . . . . . . . . . 11
Escriba el número de modelo
y de serie aquí:
No. de modelo _____________
No. de serie _______________
Estos números se encuentran
en una etiqueta en la parte
delantera de la secadora,
detrás de la puerta.
Manual del
propietario
Impreso en México
234D2431P003
49-90550-1 03-16 GE

2
INFORMACIÓN DE SEGURIDAD IMPORTANTE.
LEA TODAS LAS INSTRUCCIONES ANTES DE USAR.
Éste es el símbolo de alerta de seguridad. El mismo alerta sobre potenciales riesgos que le pueden producir la muerte
o lesiones tanto a usted como a otras personas. Todos los mensajes de seguridad estarán a continuación del símbolo
de alerta de seguridad y con la palabra “PELIGRO”, “ADVERTENCIA” o “PRECAUCIÓN”. Estas palabras se definen como:
Indica una situación de riesgo que, si no se evita, producirá la muerte o lesiones graves.
Indica una situación de riesgo que, si no se evita, podría producir la muerte o lesiones graves.
Indica una situación de riesgo que, si no se evita, podría resultar en lesiones menores o moderadas.
PELIGRO
ADVERTENCIA
PRECAUCIÓN
INSTRUCCIONES IMPORTANTES DE SEGURIDAD
Para reducir el riesgo de incendio, explosión, descargas eléctricas o lesiones sobre las personas al usar su
electrodoméstico, siga las precauciones básicas, incluyendo lo siguiente:
Lea todas las instrucciones antes de usar este electrodoméstico.
NO seque prendas que en forma previa hayan sido secadas, lavadas, penetradas o manchadas con gasolina, solventes de
limpieza en seco, u otras sustancias inflamables o explosivas, ya que despiden vapores que se podrían encender o explotar
.
NO coloque prendas expuestas a aceites de cocción en su secadora. Las prendas contaminadas con aceites de cocción
podrán contribuir a una reacción química que podría hacer que una carga de ropa se prenda fuego
.
NO permita que los niños jueguen sobre o dentro de este electrodoméstico. Cuando el electrodoméstico se use cerca de
niños, será necesario supervisarlos de cerca
.
Antes de que este electrodoméstico quede fuera de uso o se descarte, retire la
puerta del compartimiento de secado
.
NO introduzca las manos en la secadora cuando el tambor se encuentre en movimiento
.
NO instale ni guarde este electrodoméstico donde quede expuesto a los factores climáticos
.
NO manipule indebidamente los controles,
reparar ni reemplazar cualquier parte del electrodoméstico o realizar cualquier
otro trabajo técnico, a menos que esto sea específicamente recomendado en las instrucciones de mantenimiento del
usuario o en instrucciones publicadas sobre reparaciones del usuario, que entienda y para las cuales posea las destrezas
necesarias.
NO utilice suavizantes de tela ni productos para eliminar la estática, a menos que esto sea recomendado por el fabricante del
suavizante de tela u otro producto
.
NO utilice calor para secar artículos que contengan gomaespuma o materiales de goma con textura similar.
Limpie la rejilla para pelusas antes o después de cada carga
.
NO utilice la secadora si el filtro de pelusas no se encuentra
colocado
.
No guarde materiales combustibles, gasolina u otros líquidos inflamables cerca de la secadora.
Evite la acumulación
de pelusa, polvo o tierra alrededor del área de la apertura de ventilación y áreas adyacentes. Mantenga el área de la
secadora despejada y libre de objetos que puedan obstruir el flujo del aire de la ventilación y combustión.
La parte interior del electrodoméstico y el conducto de ventilación se deberán limpiar periódicamente por personal calificado
del servicio técnico
.
Desenchufe el electrodoméstico o apague el disyuntor antes de realizar el servicio técnico. Presionar el botón Power
(Encendido) o Start/Pause (Inicio/Pausa) NO desconecta el encendido
.
NO utilice este electrodoméstico si se encuentra dañado, funcionando mal, parcialmente desensamblado, o si tiene partes
faltantes o rotas, incluyendo un cable o enchufe dañado
.
NO rocíe ningún tipo de aerosol dentro, sobre ni cerca de la secadora en ningún momento. No use ningún tipo de limpiador
en espray para limpiar el interior de la secadora. Se podrán producir vapores o una descarga eléctrica.
Para acceder a las instrucciones de conexión a tierra, lea los “Conexión Eléctrica” ubicados en las Instrucciones de Instalación
.
GUARDE ESTAS INSTRUCCIONES
ADVERTENCIA

GEAppliances.com
ADVERTENCIAS ADICIONALES SOBRE LA SECADORA A GAS
Para su seguridad, siga las instrucciones de este manual a fin de minimizar riesgos de incendio o
explosión, o para evitar daños, lesiones personales o la muerte.
- NO guarde ni use gasolina u otros vapores y líquidos inflamables cerca de éste ni de otros electrodomésticos.
- QUÉ DEBE HACER SI HUELE GAS:
• NO intente iluminar ningún electrodoméstico.
• NO toque ningún interruptor eléctrico; NO use teléfonos en su edificio.
• Haga que se retiren los ocupantes de la sala, edificio o área.
• De inmediato llame a su proveedor de gas desde el teléfono de un vecino. - Siga las instrucciones del proveedor de gas.
• Si no se puede comunicar con su proveedor de gas, llame al departamento de bomberos.
- La instalación y las reparaciones deberán ser realizadas por un instalador calificado, agencia de servicios o el proveedor de gas.
3
GUARDE ESTAS INSTRUCCIONES
Advertencias de la Proposición 65 del Estado de California:
La Ley sobre Agua Potable Inocua y Tratamiento de Residuos Tóxicos de California (California Safe Drinking Water and
Toxic Enforcement Act) solicita al Gobernador de California que publique una lista de sustancias que el estado reconoce
que producen cáncer, defectos de nacimiento u otros daños reproductivos y solicita a las empresas que adviertan sobre la
posible exposición a tales sustancias.
Este producto contiene uno o más químicos que el Estado de California entiende que producen cáncer,
defectos en el nacimiento u otros daños reproductivos.
Los electrodomésticos a gas puedan causar una exposición de bajo nivel a algunas de estas sustancias, incluyendo
benceno, monóxido de carbono, formaldehido y hollín, ocasionado principalmente por la combustión incompleta de
gas natural o combustibles de LP. La exposición a estas sustancias puede ser minimizada ventilando correctamente la
secadora hacia el exterior.
ADVERTENCIA
ADVERTENCIA

WARNING
WARNING
4
Para reducir el riesgo de incendios, descargas eléctricas o heridas, lea las INSTRUCCIONES IMPORTANTES DE
SEGURIDAD antes de utilizar este electrodoméstico.
¡ADVERTENCIA!
Riesgo de Explosión
Riesgo de Incendio
Mantenga cualquier material y vapores inflamables, tales como
gasolina, alejados de la secadora.
NO seque nada que alguna vez haya tenido algo inflamable en
éste (incluso luego de lavar).
Si no se cumple con esto, se podrá producir muerte, explosión
o incendio.
Ninguna lavadora puede eliminar el aceite por completo.
No seque nada que alguna vez haya tenido algún tipo de
aceite (incluyendo aceites de cocina).
Las prendas con gomaespuma, goma, o plástico deberán ser secadas
en un tendedero o utilizando un ciclo de Air Dry (Secado con Aire).
Si no se siguen estas instrucciones se podrá producir la
muerte o un incendio.
ADVERTENCIA
ADVERTENCIA
Instrucciones de operación
Es posible que las funciones y apariencias varíen con relación a su modelo a lo largo del manual.
A B C
A B C

5
NOTA: los tiempos de secado variarán de acuerdo al tipo de calor utilizado (eléctrico, natural o gas LP), volumen de carga,
tipo de telas, nivel de humedad de la ropa y estado de los conductos de escape.
Ciclos de secado (No todas las características están en todos los modelos)
Cottons Para telas de algodón y la mayoría de las telas de hilo. Para la mayoría
(Algodones) de las cargas, seleccione Optimum Dry (Secado Óptimo) (en algunos modelos).
Casuals (Casuals) Para artículos que no se arrugan, planchado permanente y delicados, así como artículos tejidos.
Delicates (Delicadas) En algunos modelos. Para artículos delicados, telas de cuidado especial y tejidas.
Time Dry Programe el Cycle Selector (Selector de ciclo) al tiempo de secado deseado.
(Secado Cronometrado)
Quick Fluff Para esponjar o refrescar prendas, telas, telas de hilo y almohadas que ya se encuentran secas.
(Esponjado Rápido) Use la opción de Air Fluff No Heat (Esponjado Sin Calor). Proporciona 10 minutos de
centrifugado sin calor.
Los ciclos automáticos detectan automáticamente el nivel de sequedad de las telas. Seleccione Less Dry (Menos Seco) si desea
que sus prendas permanezcan levemente húmedas al final del ciclo de secado. Seleccione More Dry (Más Seco) si desea que
tengan un tacto más seco.
Los ciclos cronometrados se ejecutan durante un período determinado de tiempo.
Temperatura (No todas las características están en todos los modelos)
Cottons (Algodones) Para telas de algodón de normales a pesadas.
(Regular)
Casuals (Casuals)/ Para telas sintéticas, tejidos de mezcla y artículos etiquetados como de
Medium (Medio) permanent press (planchado permanente).
Delicates (Delicadas)/ En algunos modelos. Para artículos delicados, de tela sintética y etiquetados como tumble
Low (Bajo) dry low (centrifugado de secado lento).
Air Fluff (Esponjado) En algunos modelos. Para esponjar artículos sin utilizar calor. Use el ciclo de Time Dry
No Heat (Sin Calor) (Secado Cronometrado).
Los ciclos automáticos detectan automáticamente el nivel de sequedad de las telas. Seleccione Less Dry (Menos Seco) si desea
que sus prendas permanezcan levemente húmedas al final del ciclo de secado. Seleccione More Dry (Más Seco) si desea que
tengan un tacto más seco.
Inicio³&LHUUHODSXHUWDGHODVHFDGRUD6HOHFFLRQHStart (Iniciar). Abrir la puerta durante la operación detendrá la secadora.
Para reiniciar la secadora, cierre la puerta y seleccione Start (Iniciar) para completar el ciclo.
A
B
C
IMPORTANTE: limpie el filtro de pelusa cada vez que utilice la secadora.
GEAppliances.com
Medium
Low
Regular
Casuals
Time Dry
Cottons
Delicates
Casuals
D
elicat
es
Cottons
Temperature
More Dr
y
More Dry
Less Dry
Optimum Dry
80 Min.
70
50
40
30
20
Less Dry
Cool Down
Cool Down
60
Start
P
ush
to S
tart
More Dry
Less Dry
End of
Cycle Signal
Cool
D
own
A B C

6
El tambor giratorio de acero de aleación (en algunos modelos)
El acero aleación usado para construir el tambor
giratorio de la secadora proporciona la alta
confiabilidad en una secadora GE. Aunque se
abolle o raye el tambor de la secadora durante
el uso normal, no se oxidará ni corroerá. Estas
imperfecciones de la superficie no afectarán el
funcionamiento o durabilidad del tambor.
Bombilla del tambor giratorio (en algunos modelos)
Antes de reemplazar la bombilla del tambor
giratorio, asegúrese de desconectar la secadora del
tomacorriente o de desconectar la secadora del panel
de distribución de su casa removiendo el fusible o
interrumpiendo el circuito eléctrico. Meta la mano por
encima de la apertura de la secadora desde el interior
del tambor. Quite la bombilla y reemplácela con una
del mismo tamaño.
Rejilla de secado (en algunos modelos)
La rejilla de secado se puede usar para secar artículos
delicados tales como suéteres lavables.
Enganche la rejilla sobre el filtro de la pelusa de forma
tal que la rejilla se extienda en el tambor giratorio de
la secadora.
NOTA:
La rejilla de la secadora solamente se debe usar
con los ciclos Secado Con Tiempo.
No use esta rejilla cuando esté secando otra ropa
en la secadora.
Si tu modelo no viene con la rejilla de secado, ordena
hoy uno vía on-line a GEApplianceparts.com, las
24 horas del día o por teléfono al 800.626.2002 en
horario normal de trabajo.
Número de Pieza Accesorio
WE01X25160 Rejilla de secado
Información sobre los funciones.
ETIQUETAS DE LA LEJÍA
Cómo cargar y usar la secadora.
Siempre siga las instrucciones del fabricante de la ropa cuando lave.
Ideas para la clasificación y carga de la ropa
Como regla general, si la ropa es clasificada
apropiadamente para la lavadora, estará
clasificada apropiadamente para la secadora.
No agregue toallitas suavizantes una vez la ropa
se haya calentado. Esto podría causar que
la ropa se manche. Las toallitas suavizantes
acondicionadoras Bounce
®
se han aprobado para
usarse con todas las secadoras GE de acuerdo
con las instrucciones del fabricante.
No sobrecargue. Esto desperdicia energía y causa
arrugas.
No seque los siguientes artículos: artículos
de fibra de vidrio, prendas de lana que no sean
lavables, artículos con recubrimientos de goma,
plásticos, artículos con bordes plásticos o rellenos
de espuma.
Las etiquetas del cuidado de la tela
Aqui puede ver “símbolos” de etiquetas para indicar el cuidado de las telas.
Tumble
dry /
Secado
con giro
Dry / Seco
Normal
Permanent Press/
wrinkle resistant /
Resistente a arrugas
Gentle/
delicate /
Gentil/
Delicado
Do not tumble dry /
No use secado
con giro
Do not dry
(used with
do not wash) /
No secar (No lavar)
Heat
setting /
Temperatura
de secado
High / Alto
Medium / Mediana
Low / Baja
No heat/air /
Sin calor/Con aire
Special
instructions /
Instrucciones
especiales
Line dry/
hang to dry /
Cuelgue para secar
Drip dry /
Ropa que no se arruga
Dry flat /
Extendido
In the shade /
En la sombra
Ciclo de
lavado en
máquina
Normal
Planchado permanente/
resistente a arrugas
Suave/
delicado
Lavar a mano
No lave
No escurr
Temperatura
del agua
Caliente
(50°C/120°F)
Tibia
(40°C/105°F)
Fría/fresca
(30°C/85°F)
Símbolos de
blanqueador
Cualquier blanqueador
(cuando se necesita)
Sólo blanqueador sin cloro
(cuando se necesita)
No use blanqueador
ETIQUETAS DE SECADO
ETIQUETAS DE LAVADO

7
Cuidado y limpieza de la secadora. GEAppliances.com
El exterior: Pásele un trapo y elimine el polvo
o cualquier derrame de productos de lavandería
con un trapo húmedo. Los productos de
tratamiento para quitar mugre y manchas podrían
dañar el panel de control de la secadora
y afectar su apariencia. Aplique estos productos
a cierta distancia de la secadora. Luego las telas
podrán lavarse y secarse normalmente. Los daños
causados a la secadora por estos productos no
están cubiertos bajo su garantía.
El filtro de pelusa: Limpie el filtro de pelusa antes de
cada uso. Retire el mismo presionando hacia arriba.
Pase los dedos por el filtro. Es posible que se forme
una acumulación de cera en el filtro de pelusas
debido al uso de suavizantes de tela agregados a la
secadora.
Para eliminar dicha acumulación, lave la rejilla
para atrapar pelusas con agua tibia y jabón. Seque
totalmente y realice el reemplazo. No utilice la
secadora sin el filtro de pelusas y la rejilla en sus
correspondientes lugares.
Si observa un cambio en
el funcionamiento de la
secadora, aspire la pelusa
del área del filtro de
pelusas de la secadora.
El acero inoxidable: Para limpiar las superficies
de acero inoxidable, use un trapo húmedo con
un limpiador suave, no abrasivo apropiado para
superficies de acero inoxidable. Remueva el residuo
del limpiador y luego seque con un trapo limpio.
Interior y conducto de la secadora: Un técnico
calificado debe limpiar la parte interna del aparato y
del conducto de salida una vez por año.
El ducto de escape: Inspeccione y limpie el ducto
de escape por lo menos una vez al año para
evitar los obstrucciones. Un escape parcialmente
taponado puede prolongar el plazo de secado.
Siga estos pasos:
1
Apague el suministro eléctrico desconectando
el enchufe de la pared.
2
Desconecte el conducto de la secadora.
3
Aspire el conducto con la conexión
de manguera y vuelva a conectarlo.
La salida de escape:
Inspeccione del exterior que las
aletas de la salida de escape se mueven libremente
durante la operación. Asegúrese de que ningún
animal (pájaros, insectos, etc.) haya hecho su nido
en el interior del conducto o en la salida de escape.

8
Para obtener el mejor desempeño, la secadora debe estar ventilada adecuadamente.
La secadora utilizará más energía y funcionará más tiempo si no se ventila siguiendo
las especificaciones indicadas más abajo. Siga cuidadosamente los detalles en la
sección de Escape en las Instrucciones de instalación.
Utilice únicamente ducto de metal rígido de 4ļ de diámetro en el interior del gabinete de la
secadora. Utilice únicamente ducto de metal rígido o ducto flexible de metal de 4” de diámetro
con aprobación UL para ducto de ventilación hacia el exterior.
No use ductos plásticos u otros ductos de materiales combustibles.
Use la longitud más corta posible.
No aplaste ni pliegue.
Evite descansar el conducto sobre objetos filosos.
La ventilación debe complir con los códigos de construcción locales.
Ventilación de la secadora.
Ventilación
adecuada
Ventilación
inadecuada
ADVERTENCIA
- Riesgo de incendio
Esta secadora DEBE tener una ventilación al exterior.
Use sólo un conducto de metal rígido de 4” para la ventilación de salida doméstico.
Use sólo un conducto de transición de la secadora de metal rígido de 4” o de
la lista de UL para conectar la secadora a la salida del hogar.
NO use una ventilación del plástico.
NO use la salida de una chimenea, la salida de la cocina, ventilación de gas, pared,
cielo raso, ático, espacio de rastreo, o espacio escondido de una edificación.
NO instale una pantalla en o sobre el conducto de salida.
NO instale un ventilador de refuerzo en el ducto de ventilación.
NO use un conducto más largo que aquél especificado en la tabla de longitud
de salida.
Si no se siguen estas instrucciones se podrá producir la muerte o un incendio.
Page is loading ...
Page is loading ...
Page is loading ...
Page is loading ...
-
 1
1
-
 2
2
-
 3
3
-
 4
4
-
 5
5
-
 6
6
-
 7
7
-
 8
8
-
 9
9
-
 10
10
-
 11
11
-
 12
12
-
 13
13
-
 14
14
-
 15
15
-
 16
16
-
 17
17
-
 18
18
-
 19
19
-
 20
20
-
 21
21
-
 22
22
-
 23
23
-
 24
24


Hotpoint HTX24GASK0WW Owner's manual
- Category
- Washer dryers
- Type
- Owner's manual
Ask a question and I''ll find the answer in the document
Finding information in a document is now easier with AI