Kenmore 580.75119 Owner's manual

Category
Split-system air conditioners
Type
Owner's manual

This manual is also suitable for

Owner's Manual
Manual del Propietario
®
THROUGH-THE-WALLAIRCONDITIONER
ACONDICIONADODEAIREA TRAVESDEPARED
Model, Modelo 580.75119
Sears, Roebuck and Co., Hoffman Estates, IL 60179 U.S.A.
www.sears.com
TABLE OF CONTENTS ........................2
WARRANTY ..............................................2
SAFETY .....................................................3
Important Safety Instructions ...................... 3
ELECTRICAL REQUIREMENTS .......4
INSTALLATION ........................................5
Installation Requirements ......................... 5
Installation ................................................ 6
Procedure A ............................................. 7
Procedure B ............................................. 8
Procedure C........................................... 10
OPERATION ...........................................12
How and Why ......................................... 12
Normal Sounds ...................................... 12
Capacity and Running Time ................... 12
Features ................................................. 13
Using the Air Conditioner ....................... 13
Air Conditioner Features ........................ 14
MAINTENANCE .....................................16
Air Filter Cleaning ................................... 16
Air Conditioner Cleaning ........................ 16
How to Remove the Front Grille ............. 16
How to Replace the Front Grille ............. 16
TROUBLESHOOTING .........................17
Before Calling for Service ...................... 17
ESPANOL ................................................18
MASTER PROTECTION
AGREEMENTS ......................................35
SERVICE NUMBERS ............ Back Cover
FULL ONE YEAR WARRANTY ON
THROUGH-THE-WALL AIR CONDITIONER
For one year from the date of purchase, when this
air conditioner is operated and maintained for
normal room cooling according to instructions in this
owner's manual, Sears will repair this air
conditioner, free of charge, if defective in material or
workmanship.
WARRANTY SERVICE IS AVAILABLE BY
CONTACTING SEARS SERVICE AT 1-800-4-
MY-HOME ®.
This warranty applies only while this product is in
use in the United States.
This warranty gives you specific legal rights, and
you may also have other rights which vary from
state to state.
Sears, Roebuck and Co., D/817WA,
Hoffman Estates, IL 60179 U.S.A.
-2-
IMPORTANT SAFETY INSTRUCTIONS
The safety instructions below will tell you how to use your room air conditioner to avoid harm to yourself or
damage to your ROOM AIR CONDITIONER.
V!_W:_;t_II_[_FOR YOUR SAFETY
Do not store or use gasoline or other flammable
vapors and liquids in the vicinity of this or any other
appliance. Read product labels for flammability and
other warnings.
PREVENT ACCIDENTS
To reduce the risk of fire, electrical shock, or injury
to persons when using your air conditioner, follow
basic precautions, including the following:
Be sure the electrical service is adequate for the
model you have chosen.
If the air conditioner is to be installed in a window,
you will probably want to clean both sides of the
glass first. If the window is a triple-track type with a
screen panel included, you may want to remove
the screen completely before installation.
Be sure the air conditioner has been securely and
correctly installed according to the instructions in
this manual.
Save this manual and installation instructions for
possible future use in removing or reinstalling this
unit.
Use gloves when handling the air conditioner.
Be careful to avoid cuts from sharp metal fins on
front and rear coils.
V!_W,.1;i_ll_[dELECTRICAL INFORMATION
The complete electrical rating of your new room air
conditioner is stated on the serial plate. Refer to the
rating when checking the electrical requirements.
Be sure the air conditioner is properly grounded.
To minimize shock and fire hazards, proper
grounding is important. The power cord is
equipped with a three-prong grounding plug for
protection against shock hazards.
Your air conditioner must be plugged into a
properly grounded wall receptacle. If the wall
receptacle you intend to use is not adequately
grounded or protected by a time delay fuse or
circuit breaker, have a qualified electrician install
the proper receptacle.
Do not run air conditioner with packing sheet of
the back of the sleeve, and packing corner and
blue tape of the air conditioner. This could result in
mechanical damage within the air conditioner.
Do not use an extension cord or an adapter
plug.
_ Avoid fire hazard or electric shock.
Do not use an extension cord or an adapter plug.
Do not remove any prong from the power cord.
Grounding type
wall receptacle
Do not under any
circumstances cut,
remove, or bypass
the grounding prong
from this plug.
Power supply cord
with 3-prong
grounding plug
ENERGY SAVING IDEAS
The capacity of the room air conditioner must fit
the room size for efficient and satisfactory
operation.
Install the room air conditioner on the shady side
of your home. A window that faces north is best
because it is shaded most of the day.
Do not block air flow inside with blinds, curtains, or
furniture; or outside with shrubs, enclosures, or
other buildings.
Close the floor and wall registers and the fireplace
damper so cool air does not escape up the
chimney and into the duct work.
Keep blinds and drapes in other windows closed
during the sunniest part of the day.
Clean the air filter as recommended in the
MAINTENANCE section of this manual.
Proper insulation and weather stripping in your
home will help keep warm air out and cool air in.
External house shading with trees, plants or
awnings will help reduce the air conditioner's work
load.
Operate heat producing appliances such as
ranges, washers, dryers, and dishwashers during
the coolest part of the day.
-3-
OBSERVEALLLOCALCODESAND
ORDINANCES.
DONOT,UNDERANYCIRCUMSTANCES,
REMOVETHEPOWERSUPPLYCORD
GROUNDPRONG.
ELECTRICALGROUNDISREQUIREDON
THISAPPLIANCE.
208/230-volt60Hzand115-volt60Hz,AC
only,15Afusedandproperlygrounded
electrical supply is required. A time delay fuse
or time delay circuit breaker is recommended.
Use a dedicated circuit, serving only this
appliance.
DO NOT USE AN EXTENSION CORD.
RECOMMENDED GROUNDING METHOD
For your personal safety, this appliance must
be grounded. This appliance has a power
supply cord with a 3-prong grounding plug. To
minimize possible shock hazard, the cord must
be plugged into a mating grounding type wall
receptacle and grounded in accordance with
the National Electrical Code (ANSt/NFPA 70)
latest edition and all local codes and
ordinances. If a mating wall receptacle is not
available, it is the personal responsibility and
obligation of the customer to have a properly
grounded 3-prong wall receptacle installed by a
qualified electrician.
115V~ 230V~
Power cord may include a current interrupter
device. A test and reset button is provided on the
plug case. The device should be tested on a
periodic basis by first pressing the TEST button
and then the RESET button. If the TEST button
does not trip or if the RESET button will not stay
engaged, discontinue use of the air conditioner and
contact a qualified service technician.
NOTE:The shape may be different according to its model.
Use Wall Receptacle Power Supply
_) tandard 125V,
3-wire grounding
receptacle rated
15A, 125V AC
Standard 250V,
3-wire grounding
receptacle rated
15A,250V AC
Standard 250V,
3-wire grounding
receptacle rated
2OA,250V AC
Use t5 AMP. time
delayfuse or 15AMP.
circuit breaker.
Use 20AMP. time
delay fuse or 20AMP.
circuit breaker.
AWARNING
Electrical Shock Hazard
Plug into a grounded 3 prong outlet.
Do not remove ground prong.
Do not use an adapter.
Do not use an extension cord.
Failure to follow these instructions can result in
death, fire, or electrical shock.
3-prong
grounding
plug
Reset-
Test
Ground
prong
supply
cord
(208/230-volt 60 Hz)
--3-prong
grounding
type wall
receptacle
(115-volt 60 Hz)
-4-
INSTALLATION REQUIREMENTS
If you use an existing wall sleeve, you should
measure its dimensions.
Install the new air conditioner according to these
installation instructions to achieve the best
performance. All wall sleeves used to mount the
new air conditioner must be in good structural
condition and have a rear grille to securely attach
the new air conditioner. (FIG. 1)
With the Kenmore folding sleeve, you can
maintain the best performance of the new air
conditioner.
19-2//32"
(499 ram) 24-2q32"
(626 ram)
6ram)
Air Conditioner
ram)
FIG. !
ELECTRICAL SERVICE
Check your available electrical service. The power
supply available must be the same as that shown
on the unit nameplate (found on left side of cabinet).
All models are equipped with a 3-prong service plug
to provide proper service and safe positive
grounding. Do not change plug in any way. Do not
use an adapter plug. If your present wall outlet does
not match your plug, call a qualified electrician to
make the necessary corrections. SAVE CARTON
for storage and this OWNER'S MANUAL for future
reference. The carton is the best way to store unit
during winter or when not in use.
INSTALLATION HARDWARE
2 Size options
2 Size options
ITEM NAME OF PARTS Q'TY
_'1_ i PLASTIC GRILLE 1
i HORIZONTAL INSULATION STRIPS 2
i AROUND INSULATION STRIPS 2
SUPPORT BLOCK 2
::BAFFLE 1
@ i TRIM FRAME 2
i SHIM 2
{8_ i PLASTIC NUTS AND WASHER SCREWS 4
_B_ GRILLE REAR I
To avoid risk of personal injury, property damage,
or product damage due to the weight of this
device and sharp edges that may be exposed:
Air conditioners covered in this manual pose an
excessiveweight hazard. Two or more people
are needed to move and install the unit.
To prevent injury or strain, use proper lifting and
carrying techniques when moving unit.
Carefully inspectlocation where air conditioner
will be installed. Be sure itwill support the weight
ofthe unitover an extended periodof time.
Handle air conditioner with care. Wear
protective gloves whenever lifting or carrying the
unit. AVOID the sharp metal fins offront and
rear coils.
Make sure air conditioner does not fall during
installation.
REQUIRED TOOLS:
Tight Fitting gloves
Standard screwdriver
Phillips screwdriver
Pliers
Sharp knife
3/8-inch open end
wrench or adjustable
wrench
1/4-inch hex socket
and ratchet
Tape measure
Electric drill
1/4-inch drill bit
-5-
INSTALLATION
We strongly recommend the removal of the
oldwall sleeve and the installationof a new
Kenmore folding Wall Sleeve,
If you decide to keep the existing wall sleeve,
you haveto redirect the louvers at the back of the
wall sleeve illustration. The use of pliers is
recommended. If you DO NOT redirect,you run
the risk of poor performance or product failure.
This is not covered under the terms of the
Kenmorewarranty.
Pick a location which will allow the conditioned air to
blow into the area you want. Good installation with
special attention to the proper position of the unit will
lessen the chance that service will be needed.
NOTE: All wall sleeves used to mount the new Air
Conditioner must be in sound structural condition
and have a rear grille that securely attaches to
sleeve, or rear flange that serves as a stop for the
Air Conditioner,
_-'_ Remove old air conditioner from existing wall
sleeve.
_1 Clean the interior of an existing sleeve.
(Do not disturb seals.)
D Wall sleeve must be securely fastened in wall
before installing the air conditioner. Use the
nails or screws through sleeve into wall, if
needed. Repaint sleeve if needed.
_4J Prepare the wall sleeve for installation of the
unit. If you plan to use your existing wall sleeve,
and it is not Kenmore, use procedure B or C
below.
ITEMS IN INSTALLATION HARDWARE
You may not need all parts in the kit. Discard unused
_arts
Plastic grille
Horizontal insulation Strips
Around Insulation Strips
Support Block
Baffle
Shim
Trim Frame
Washer Screw
Nuts(Plastic)
Grille Rear
ITEM (inches)
263/4 x 161/2
13/8 x 5/8 x 273/18
13/8 x 13/8 x 273/18
13/8 x 3/4 x 611/2
13/8 x 13/8 x 611/2
13/4 x 13/8 x 45/18
14 x 41/2 x 1/8
13x 1 x3/4
Qty.
1
1
1
1
1
2
1
2
2
4
4
1
HOW TO INSTALL
D Identify the existing wall sleeve before installing
the unit from the listed below.
Brand Wall Sleeve Dimensions (inches)
White-Westinghouse
Frigidaire
Carrier (52F series)
General Electric
/Hotpoint
Width
25-1/2
26
Whirlpool 25-7/8
Fedders/Emerson 27
Sears/Kenmore 25-7/8
Emerson/Fedders 26-3/4
Carrier (51S Series) 25-3/4
Friedrich 27
Height Depth
15-1/4 16, 17-1/2
or 22
15-5/8 16-7/8
17-1/8
16-1/2
or 23
16-3/4 16-3/4
or 19-3/4
15-17/32 16-23/32
15-3/4 15
16-7/8 18-5/8
16-3/4 16-3/4
Procedure Brand Depth(inches)
A Sears/Kenmore 16-23/32
White-Westinghouse
Frigidaire Carrier 16, 17-1/2
or 22
(52F series)
B General Electric
16-7/8
/Hotpoint
Whirlpool 17-1/8 or 23
Carrier (51S series) 18-5/8
16-3/4
Fedders/Emerson
or 19-3/4
C
Emerson/Fedders 15
Friedrich 16-3/4
Q Install new unit into wall sleeve.
CAUTION: When installation is completed,
replacement unit MUST have a rearward slope as
shown. To achieve 1/4" slope, remove the backing
from the 13" shim strips and attach them as shown
below in Fig. 2. Place the higher portion of shim to
the front of the rib on base of wall sleeve.
I 'r highI [
SHIM PLACEMENT
JI3/4 " High
UNiT Wall Sleeve
UNIT INSTALLATION
FIG. 2
-6-
PROCEDURE A
O If are using the new sleeve (optionally
you
supplied with your unit),skip to step 3.
Otherwise, install the plastic grille from the kit.
Cut the plastic grille to 25-1/2" wide and 15-1/4"
high. Place the plastic grille to the inside of the
wall sleeve at the rear flange.
FIG. 3
_"_ Fasten the 4 washer screws to secure the grille
to the wall sleeve. If you need plastic nuts to
mount plastic grille to the inside of the wall
sleeve, there are plastic nuts in the installation
kit. The nuts are installed from the inside of the
sleeve and are pressed into the square holes of
the rear flanges.
FIG. 4
_J Remove the backing from the Horizontal
Insulation strip 13/8 x 3/8x 273/16 and attach that
to the inside bottom of the sleeve as shown
below. Remove the backing from the Around
Insulation strip 13/8 X 3/4X 611/2 and attach that
to the inside front of the sleeve as shown
below.
FIG. 5
D Remove the metal rear grille and replace it with
the plastic rear grille to improve unit energy
efficiency. The plastic grille reduces the amount of
hot air discharge that recirculates through the unit.
PIastic rear grille
Steel rear
FIG. 6
_JTo assemble trim, snap the tab of each piece
into the slot of the other piece as shown below.
Slide trim over the front of the air conditioner
until trim is flush with sleeve as shown below.
Trim (2 ea)
Wall
FIG. 7
Air conditioners covered in this manual pose
an excessive weight hazard. Two or more
people are needed to move and install the unit.
To prevent injury or strain, use proper lifting
and carrying techniques when moving unit.
When handling the air conditioner, be careful
to avoid cuts from sharp metal fins on front and
rear coils.
Make sure air conditioner does not fall during
removal.
, If unitdoesnotoperateafterinstallationcheck,to be
surethecircuitinterrupterhasnotbeentripped.Refer
totheTroubleshootingguideforresetprocedure.
-7-
PROCEDURE B
H Redirect the louvers at the back of the wall
sleeve to 60 ° angle as shown in the FIG 8. The
use of pliers is recommended.
Rear Louvers
(Top View)
7 51/6"
FIG. 8
I_lf the wall sleeve already has a rear grille, skip
to step 4. If the wall sleeve does not have a rear
grille or Iouvered panel, install the plastic grille
from the kit. Cut the plastic grille to 25-1/2" wide
and 15-1/4" high. Place the plastic grille to the
inside of the wall sleeve at the rear flange.
Place the plastic grille
FIG. 9
I[_ Fasten the 4 washer screws to secure the grille
to the wall sleeve. If you need plastic nuts to
mount plastic grille to the inside of the wall
sleeve, there are plastic nuts in the installation
kit. The nuts are installed from the inside of the
sleeve and are pressed into the square holes of
the rear flanges.
or
Fasten the screws
FIG. 10
_J Remove the backing from the Horizontal
Insulation strip 13/8x 5/8x 273/16 and attach that
to the inside bottom of the sleeve as shown
below. Remove the backing from the Around
insulation strip 13/8 x 3/4 x 61 I/2 and attach that to
the inside front of the sleeve as shown below.
FIG. 11
1_4J Remove the metal rear grille and replace it with
the plastic rear grille to improve unit energy
efficiency. The plastic grille reduces the amount of
hot air discharge that recirculates through the unit.
Plastic rear grille
Steel rear grille
FIG. 12
ir_lf the depth of your existing wall sleeve is less
than or equal to 18", skip to step 7. Otherwise,
cut the baffles and the support blocks according
to length "A" in the table below.
Depth"D"oftheexisting
wallsleeve(inches)
18 <D _<18-5/8
18-5/8<D_<19-3/4
19-3/4<D _<22
Length"A"
(inches)
3/4
1-3/4
4
_ upport
Block
._[_ Baffle
_J FIG. 13
-8-
PROCEDURE B
W Remove the backing from the support blocks
and attach them to the inside of the wall sleeve
as shown FIG 14. Slide the baffle into slots of
the support blocks.
Wall
Sleeve
D Install the new unit into the wall sleeve.
I_1 Assemble trim as described in Step 6,
Procedure A.
Block
FIG. 14
. Airconditionerscoveredinthismanualposean
excessiveweighthazard.Twoor morepeopleare
neededtomoveandinstalltheunit.
Topreventinjuryor strain,useproperliftingand
carryingtechniqueswhenmovingunit.
. Whenhandlingtheairconditioner,becarefultoavoid
cutsfromsharpmetalfinsonfrontandrearcoils.
Makesureairconditionerdoesnotfallduring
removal.
. If unitdoesnotoperateafterinstallationcheck,to be
surethecircuitinterrupterhasnotbeentripped.Refer
totheTroubleshootingguideforresetprocedure.
-9-
PROCEDURE C
H Redirect the louvers at the back of the wall
sleeve to 60 ° angle as shown in the FIG 15.
The use of pliers is recommended.
7 13,/6 **
002 &to°
Rear Louvers
(Top View)
FIG. 15
I_lf the wall sleeve already has a rear grille, skip
to step 4. If the wall sleeve does not have a rear
grille or Iouvered panel, install the plastic grille
from the kit. Cut the plastic grille to 26-1/2" wide
and 15-1t2" high. Place the plastic grille to the
inside of the wall sleeve at the rear flange.
Place the plastic grille
FIG. 16
I[_ Fasten the 4 washer screws to secure the grille
to the wall sleeve. If you need plastic nuts to
mount plastic grille to the inside of the wall
sleeve, there are plastic nuts in the installation
kit. The nuts are installed from the inside of the
sleeve and are pressed into the square holes of
the rear flanges.
or
Fasten the screws FIG. 17
_J Remove the backing from the Horizontal
insulation strip 13/8 x 13/8 x 273/16 and attach that
to the inside bottom of the sleeve as shown
below. Remove the backing from the Around
insulation strip 13/8 x 13/8 x 611/2 and attach that
to the inside front of the sleeve as shown below.
FIG. 18
El
If the depth of your existing sleeve is less than
or equal to 18", skip to step 7. Otherwise, cut
the baffles and the support blocks according to
Length "A" in the table below.
Depth"D"oftheexisting
wailsleeve(inches)
18 <D_<18-%
18-5/8<D <19-3/4
19-3/4<D <_22
Length"A"
(inches)
3/4
1-3/4
4
_ upport
Block
k_ Baffle
FIG. 19
r_l Remove the backing from the support blocks
and attach them to the inside of the wall sleeve
as shown FIG 20. Slide the baffle into slots of
the support blocks
Wall
7 13'/6")
Sleeve
Block
"_. FIG. 20
-10-
PROCEDURE C
[H'.,_I]II[e] _1
lil
To achieve rearward slope for unit draining,
remove the backing from the 13" shim strips
and attach them as shown below in Fig. 22.
The higher portion of shim is to be placed in
front of the rib on the base of wall sleeve.
h,0h_ r-
l High
FIG. 21
FIG. 22
_J_ Remove the metal and it with
rear
grille replace
the plastic rear grille to improve unit energy
efficiency. The plastic grille reduces the
amount of hot air discharge that recirculates
through the unit.
Airconditionerscoveredin thismanualposean
excessiveweighthazard.Twoor morepeopleare
neededto moveandinstalltheunit.
Topreventinjuryorstrain,useproperliftingand
carryingtechniqueswhenmovingunit.
°Whenhandlingtheairconditioner,becarefultoavoid
cutsfromsharpmetalfinsonfrontandrearcoils.
, Makesureair conditionerdoesnotfallduring
removal.
Ifunitdoesnotoperateafterinstallationcheck,tobe
surethecircuitinterrupterhasnotbeentripped.Refer
totheTroubleshootingguideforresetprocedure.
Plastic rear grille
Steel rear
_'_ Install the new unit into the wall sleeve
_1'_ Assemble trim as described in Step 6,
Procedure A.
FIG. 23
-11-
HOW AND WHY
Your room air conditioner provides the following
functions to make hot weather living more
comfortable:
Cools and circulates room air.
Lowers humidity by removing excess moisture.
Filters out summertime dust, dirt, and some
airborne impurities.
The air conditioner performs these functions by
drawing room air through a filter which traps dust
and dirt particles. The air then passes over a
cooling coil which refrigerates the air and removes
excess moisture. The same air is then returned to
the room- cooler, drier, and cleaner. Moisture
removed from the room air is carried to the outside
and evaporated.
Your air conditioner is designed to be easy to
operate and to provide plenty of cooling power.
NORMAL SOUNDS FIG.24
Aside from the regular fan motor and compressor
sounds coming from your air conditioner, you will
once in a while hear a pinging sound. This is the
result of moisture being picked up from the air in the
room and thrown against the air conditioner's fan.
This is normal and should not be cause for concern.
Also, do not be alarmed if you hear a slight hissing or
gurgling sound coming from your air conditioner after
it is off. These are normal coolant noises.
CAPACITY AND RUNNING TIME
Proper unit size is important in deciding the desired
comfort for the area you want to cool. The proper
size is determined by the number of square feet in
the area to be cooled.
Whenever the heat or humidity load is above normal
the air conditioner must run longer and more often
to keep the desired temperature you have selected.
Under heavy heat load conditions the air conditioner
may need to run constantly to keep the temperature
you want.
At times using the MED FAN setting to circulate the
room air may make it comfortable even though you
do not have the air conditioner set to cool the air.
This will decrease your cost of use.
Unit Vibration
The unit may vibrate
and make noise
because of poor wall
or window
construction.
Fan
You may hear air
movement from the
fan.
Compressor
The modern high
efficiency compressor
may have a high pitched
hum or pulsating noise
that cycles on and off.
Condenser
You may hear
droplets of water
hitting the condenser,
causing a pinging or
clicking sound.
FIG. 24
WATER DRAIN VALVE
When the outside temperature drops below 58°F
and the unit is set for heating, a drain valve opens
up to release water from the base pan. This is
normal and prevents water from freezing in the base
pan and interfering with the outdoor fan.
-12-
FEATURES
THE UNIT
1 5 7 3 6 2 8 4 FIG.25
1. CABINET
2. HORIZONTAL AIR DEFLECTOR
(Vertical Louver)
3. VERTICAL AIR DEFLECTOR
(Horizontal Louver)
4. AIR DISCHARGE
5. FRONT GRILLE
6. INLET GRILLE (Air intake)
7. AIR FILTER
8. VENT CONTROL
USING THE AIR CONDITIONER
_To reduce the risk of fire, electric
shock, or injury to persons, read the important
SAFETY instructions section before operating this
appliance.
To begin operating the air conditioner after
installation, follow these steps:
1. Plug in the air conditioner. (To prevent electrical
hazards, do not use an extension cord or an
adapter plug.)
2. Set the TEMP control to the coolest setting.
3. Set the MODE control at the highest COOL level.
4. Adjust the louvers for comfortable air flow.
5. Once the room has cooled, adjust the TEMP and
MODE control to the setting you find most
comfortable.
NOTE : If the air conditioner is turned off, wait 3
minutes before restarting. This allows pressure
inside the compressor to equalize. Failure to wait 3
minutes before restarting may cause inefficient
operation.
If you move the TEMP control to a warmer, then
immediately back to a cooler setting, the unit will
shut off. Wait 3 minutes before restarting.
Refer to the AIR CONDITIONER FEATURES
section for other settings.
VENT CONTROL
The Vent Control allows the air conditioner to either
recirculate inside air (CLOSE) or exhaust air to the
outside (OPEN). (FIG. 26)
The CLOSE position is used when maximum
cooling is desired. It may also be used for air
recirculation without cooling when the air
conditioner is set in the FAN position.
The OPEN position removes stale air from the
room and exhausts it to the outside. Fresh air is
drawn into the room through your home's normal
air passages.
The OPEN or CLOSE position can be used with
any fan selection.
PULL OPEN / PUSH CLOSE
FIG. 26
-13-
CONTROLS
MODE
OFF
0
HEAT COOL
TEMP
OFF
FAN ONLY
LOW COOL
HIGH COOL
LOW HEAT
HIGH HEAT
: Turns air conditioner off.
: Fan operationwithout cooling or heating.
: Cooling with low fan speed operation.
: Cooling with high fan speed operation.
: Heating with low fan speed operation.
: Heating with high fan speed operation.
Turnthe TemperatureKnob to thedesired setting.
The centralposition isa normal settingfor averageconditions.
You can changethis setting, if necessary,in accordancewith your
temperaturepreference.
Thethermostatautomaticallycontrols coolingor heating, butthe fan
runscontinuously wheneverthe air conditioner is in operation.
If the room istoo warm,turn the thermostatcontrolclockwise.
If the room istoo cool, turnthe thermostatcontrol counterclockwise.
Thecompressor willturn on and offto keepthe roomat the set temperature.
Inthe heatingoperation, the electricheaterwill turn on and off to keepthe roomat theset temperature.
When the air conditioner has been operated in the I
cooling or heating mode and isturned off or set to|
the fan position,wait at least 3 minutesbefore
resettingto the coolingoperation again. J
A slight burning odor may come from the
unit when first switching to HEAT after the
cooling season is over. This odor, caused
by fine dust particles on the heater, will
disappear quickly. This is normal operation.
-14-
HORIZONTAL AIR-DIRECTION
ADJUSTMENT
• The horizontal air direction is adjusted by moving
vertical louver.
• The vertical louver control levers are located in the
right and left side of the air discharge.
FIG. 27
VERTICAL AIR-DIRECTION ADJUSTMENT
• The vertical air direction is adjusted by moving the
horizontal louvers.
FIG. 28
-15-
AIR FILTER CLEANING
The Air Filter will become dirty as it removes dust
from the inside air. It should be washed at least
every 2 weeks. If the Air Filter remains full of dust,
the air flow will decrease and the cooling capacity
will be reduced, possibly damaging the unit.
Pull the inlet grille forward and pull out the air filter.
(FIG. 29)
Wash the Air Filter under the faucet with warm
water. Be sure to shake off all the water before
replacing the filter. (FIG. 30)
FIG. 29 FIG. 30
AIR CONDITIONER CLEANING
Clean the front grille and inlet grille by wiping with a
cloth dampened in a mild detergent solution.
The cabinet may be washed with mild soap or
detergent and lukewarm water, then polished with
liquid appliance wax.
To ensure continued peak efficiency, the condenser
coils (outdoor side of the unit) should be checked
periodically and cleaned if they become clogged
with soot or dirt from the atmosphere. Brush or
vacuum exterior coils to remove debris from fins.
FIG. 31
HOW TO REMOVE THE FRONT
GRILLE
Open the inlet grille.
Remove the screw securing the Front Grille.
Push the grille up from the bottom and pull the top
of the grille away from the case to lift the top tabs
out of their slots.
I
FIG. 32
HOW TO REPLACE THE
FRONT GRILLE
Attach the front grille to the cabinet by inserting the
tabs on the grille into the slots on the front of the
cabinet. Push the grille in until it snaps into place.
FIG. 33
-16-
BEFORE CALLING FOR SERVICE
Check the following list to be sure a service call is really necessary. A quick reference to this manual may
help you avoid an unneeded service call.
THE AIR CONDITIONER WILL NOT OPERATE
Check if...
The CurrentinterrupterDeviceistripped,
Walt plug disconnected.
House fuse blown or circuit breaker tripped.
Power is OFF.
Unit was turned off and then on too quickly.
TEMP Control set warmer than room temperature.
Then...
Press the RESET button located on the power cord plug.
If the RESET button will not stay engaged, discontinue use of the
air conditioner and contact a qualified service technician.
Push plug firmly into walt outlet.
Replace fuse with time delay type or resetcircuit breaker.
Push the power button.
Set unit off and wait 3 minutes before restarting.
Turn TEMP Control clockwise to a cooler setting.
AIR FROM UNIT DOES NOT FEEL COLD ENOUGH.
Check if... Then...
FAN SPEED set at LOW. Push FAN SPEED button to set at HI.
TEMP Control set too warm. Set TEMP Control to a lower temperature.
Room temperature below 70°F (21°C). Cooling may not occur until room temperature rises above 70°F (21°C).
Temperature sensing tube touching evaporator coil, Straighten tube away from evaporator coil.
located behind front grille.
THE AIR CONDITIONERCOOLING, BUT ROOM18TOO WARM-ICE FORMINGON COOLING COIL BEHIND INLET GRILLE.
Check if... Then...
Outdoor temperature below 70°F (21°C). To defrost the coil, set the MODE to FAN, FAN speed to High.
Air filter may be dirty. Clean air filter. Refer to Maintenance section ofowner's manual.
To defrostthe coil,setthe MODE to Coot, Fan speed to high, and the
TEMP Control set too low. Temp control to a higher temperature.
THEAIR CONDITIONERCOOLING,BUT ROOM18TOO WARM
Check if... Then...
Dirty airfilter- air restricted. Clean air filter. Refer to Maintenance section ofowner's manual.
TEMP Control set too warm. Set TEMP Control to a lower temperature.
Front of unit is blocked by drapes, blinds, furniture, etc. Clear blockage in front of unit.
Air distribution is restricted.
Doors,windows, registers, etc. open. Cold air escapes. Close doors, windows, registers, etc.
Unit recently turned on in hot room. Allowadditionaltimeto removestoredheatfromwalls,ceiling,floor,andfurniture.
THE AIR CONDITIONER TURNS ON AND OFF RAPIDLY.
Check if... Then...
[ Outside temperature is extremely hot. I Set FAN SPEED on HI to minimize thecooling load. J
NOISE WHEN UNIT IS COOLING.
Check if... Then...
[ Sound offanhittingwater-from the moistureremova,system.[ This isnorma, when hur_s higt_ Close doors, windows, and registers.J
/ Window vibration - poor installation. / Refer to installation instructions or check with installer. /
WATER DRIPPING INSIDE ROOM WHEN UNIT IS COOLING.
Check if... Then...
The airconditioner is improperly installed. Tiltinstallationair conditionerinstructionsslightlyor tocheckthe outsidewith installer,to allow water drainage. Refer to
WATER DRIPPING OUTSIDE WHEN UNIT IS COOLING.
Check if... Then...
The unit is removing large quantities of moisture This is normal during excessively humid days.
from humid room.
-17-
INDICE ......................................................18
GARANTiA ..............................................18
SEGURIDAD ...........................................19
Instrucciones importantes de seguridad ---19
REQUlSlTOS ELI_CTRICOS .............2o
INSTALAClON ........................................21
Requisitos de instalaci6n ....................... 21
Instalaci6n .............................................. 22
Procedimiento A..................................... 23
Procedimiento B..................................... 24
Procedimiento C..................................... 26
FUNClONAMIENTO .............................28
C6mo y por que ...................................... 28
Sonidos normales .................................. 28
Capacidad y tiempo de funcionamiento----28
Caractedsticas ....................................... 29
Uso del aparato de aire acondicionado .....29
Caractedsticas del aparato de aire
acondicionado ........................................ 30
MANTENIMIENTO ................................32
Limpieza del filtro de aire ....................... 32
Limpieza del aparato de aire
acondicionado ........................................ 32
Como extraer la rejilla frontal ................. 32
C6mo volver a colocar la rejilla frontal ...32
RESOLUClON DE PROBLEMAS----33
Antes de Ilamar al servicio tecnico ......... 33
ACUERDOS DE PROTECClON
ESPEClALIZADA ..................................35
NUMEROS DE SERVIClO
TI_CNICO .................................. Contraportada
GARANTiACOMPLETADE UNANO DEL
APARATO DEAIREACONDICIONADODE
PARED
Durante unaSo, a contar a partir de la fecha de compra, cuando
este aparato de aire acondicionado funoione para el enfriamiento
normal de una habitacion y reciba mantenimiento, todo ello
segt_nlas instruociones de este Manual del propietario, Sears
reparara este aparato de aire acondicionado, de farina gratuita, si
tuviera algt:lndefecto de fabricaoion o materiales.
EL8ERVIClO DEGARANTiAPUEDE
CONTACTARSEEN EL8ERVICIO DEATENCION
AL CLIENTEDESEARSEN EL1-800-4-MY-HOME®.
Esta garantia se aplica s6to durante el uso deeste produoto en
los Estados Unidos.
Esta garantia te concede derechos legales especificos y puede
que usted tenga otros dereohos adicionates que varian segQnel
estado.
Sears,Roebuckand Co., D/817WA,Hoffman
Estates,IL 60179 EE.UU.
-18-
INSTRUCCIONES IMPORTANTES DE SEGURIDAD
Las instrucciones de seguridad que se indican abajo le dir&n como utilizar su aparato de aire acondicionado
para evitar daSos a si mismo y daSos a su APARATO DE AIRE ACONDICIONADO.
[l'!_lJl_;tl:_II_r;1PARA8U 8EGURIDAD
No aImacene ni utilice gasolina ni otros liquidos ni gases
inflamables cerca de este u otro electrodomestico. Lea
las etiquetas de los productos para conocer su
inflamabiIidad y otras advertencias.
EVITAR ACCIDENTES
Para reducir el riesgo de incendio, eIectrocucion o heridas a
personas at utilizar su aparato de aire acondicionado, siga
las precauciones b&sicas, incIuyendo las siguientes:
Aseg0rese de que et servicio electrico es adecuado para el
modelo que ha escogido.
Si el aire acondicionado va a instatarse en una ventana,
seria conveniente que Iimpiara primero ambos lados deI
cristal. Si la ventana tiene tres guias de desIizamiento, con
un panel pantaIIa incIuido, puede que desee extraer
compIetamente Ia pantalla antes de Ia instaIacion.
Aseg0rese de que el aparato de aire acondicionado se ha
instalado de modo seguro y correcto segOn Ias
instrucciones en este Manual. Guarde este manual y las
instrucciones de instalaci6n para su posible uso futuro para
extraer o volver a instaIar esta unidad.
Utilice guantes cuando maneje el aparato de aire
acondicionado. Preste atencion para evitar cortes de las
afitadas aIetas de metal en las bobinas frontal y posterior.
INFORMA¢ION ELI_CTRICA
El valor nominal electrico completo de su nuevo aparato de aire
acondicionado se especifica en su etiqueta identificativa.
Consulte el valor nominal al comprobar los requisitos etectricos.
AsegQrese de que et aparato de aire acondicionado tiene
una toma de tierra adecuada. Para reducir al minimo el
riesgo de electrocucion y de incendio, es importante tener
una toma de tierra adecuada. El cable de aIimentacion esta
equipado con un enchufe de tres clavijas con toma a tierra
para proteger contra eIectrocucion.
Su aparato de aire acondicionado debe estar enchufado a
un enchufe de pared con una toma de tierra adecuada. Si
el enchufe que quiere utitizar no tiene una toma de tierra
adecuada o no esta protegido por un fusible temporizado o
un interruptor de corriente, haga que un electricista
cuaIificado instate el enchufe apropiado.
No haga funcionar el aparato de aire acondicionado con la
lamina de embataje en la parte posterior det aIojamiento o
con la cinta azul y las esquineras det aparato de aire
acondicionado. Esto podria tener como consecuencia la
producci6n de da_os mecanicos at aparato de aire
acondicionado.
No utilice un cable extensor ni un enchufe adaptador.
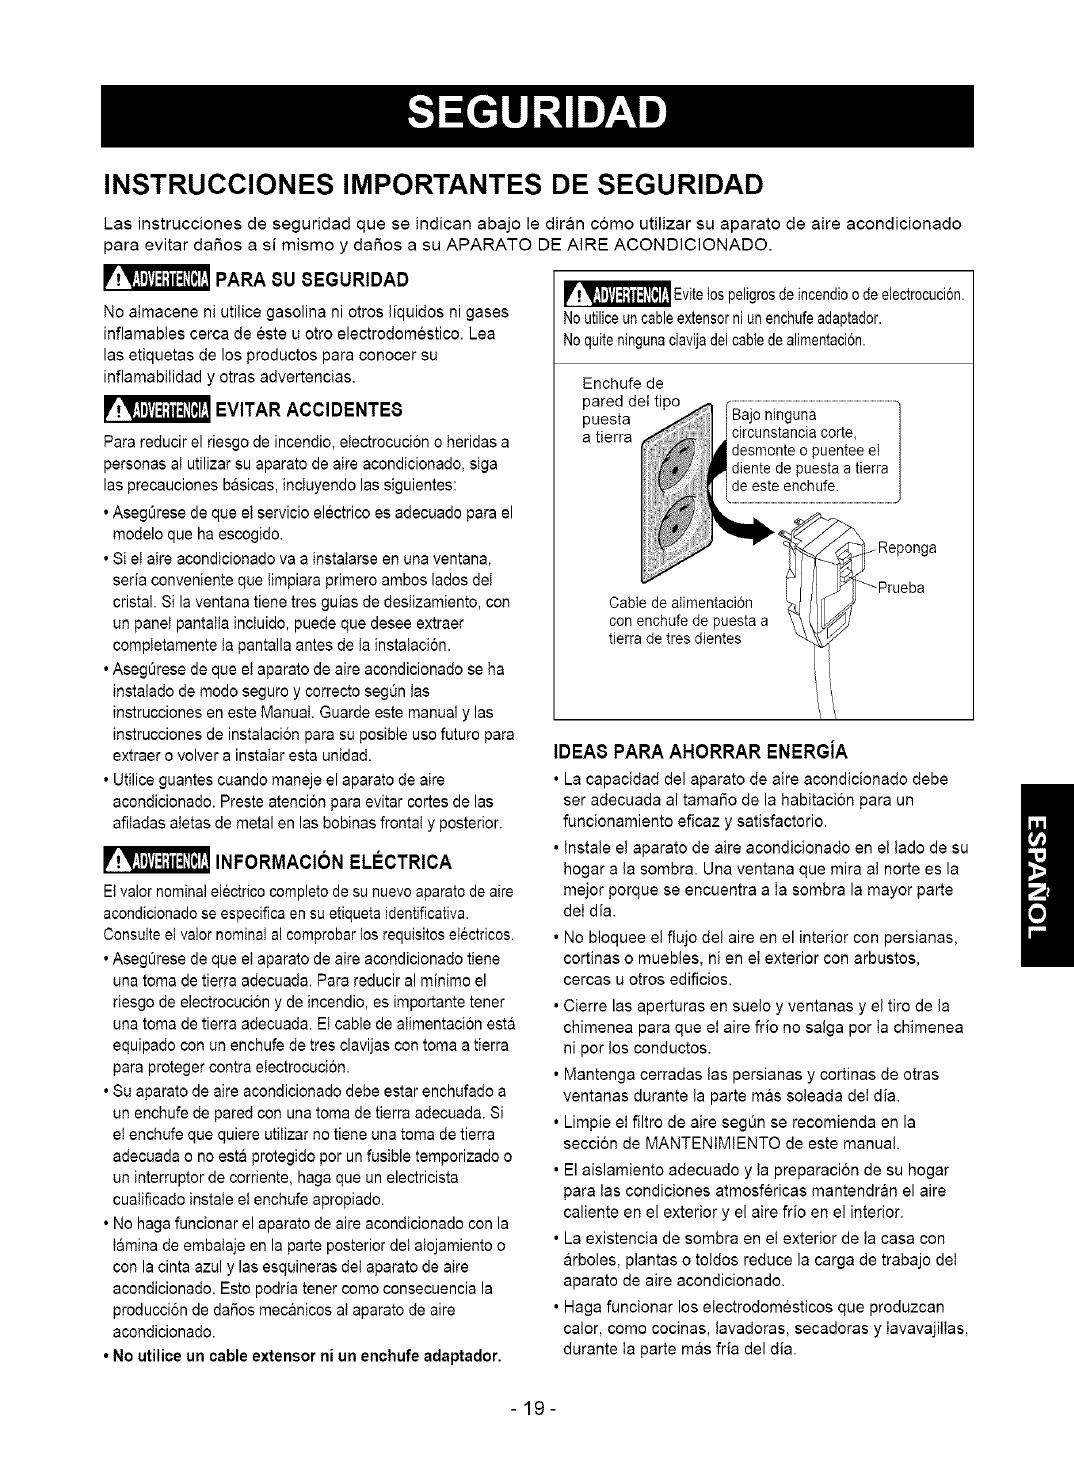
_Eviteios de incendio de electrocucion.
peligros
O
Noutiliceuncableextensorni unenchufeadaptador.
Noquite ningunaclavija del cabledealimentaei6n.
Enchufe de
pared deI tipo
puesta
a tierra
ninguna
circunstancia corte_
desmonte o puentee el
diente de puesta atierra
de este enchufe.
Cable de aIimentaci6n
con enchufe de puesta a
tierra de tres dientes
Reponga
Prueba
IDEAS PARA AHORRAR ENERGiA
La capacidad del aparato de aire acondicionado debe
ser adecuada al tamafio de la habitacion para un
funcionamiento eficaz y satisfactorio.
Instale el aparato de aire acondicionado en el lado de su
hogar a la sombra. Una ventana que mira al norte es la
mejor porque se encuentra a Ia sombra la mayor parte
deI dia.
No bloquee el flujo del aire en el interior con persianas,
cortinas o muebles, ni en el exterior con arbustos,
cercas u otros edificios.
Cierre las aperturas en suelo y ventanas y el tiro de la
chimenea para que el aire frio no salga por Ia chimenea
ni por los conductos.
Mantenga cerradas las persianas y cortinas de otras
ventanas durante la parte mas soleada deI dia.
Limpie el filtro de aire segOn se recomienda en la
seccion de MANTENIMIENTO de este manual.
El aislamiento adecuado y la preparacion de su hogar
para las condiciones atmosfericas mantendran el aire
caliente en el exterior y el aire frio en el interior.
La existencia de sombra en el exterior de la casa con
arboles, plantas o totdos reduce la carga de trabajo deI
aparato de aire acondicionado.
Haga funcionar los electrodomesticos que produzcan
calor, come cocinas, lavadoras, secadoras y Iavavajillas,
durante Ia parte mas fria del dia.
-19-
RESPETE TODOS LOS CODIGOS Y
REGLAMENTOS.
BAJO NINGUNA CIRCUNSTANCIA CORTE,
QUITE O EVITE EL USO DE LA CONEXION A
TIERRA DE ESTA CLAVIJA.
LA TOMA A TIERRA ES NECESARIA EN ESTE
ELECTRODOMI_STICO.
Esnecesaria una fuente de alimentaci6n electrica
de 208/230 voltios, 60 Hz y 115-voltios, 60 Hz, s61o
AC, confusible de 15 A y correctamente puesta a
tierra. Se recomienda el uso de un fusible o
interruptor de retardo. Utilice un circuito dedicado,
Onicamentepara este electrodomestico.
NO USE CABLE ELECTRICO DE EXTENSION.
MI_TODORECOMENDADODE CONEXION A
TIERRA
Por su propia seguridad este aparato debe
conectarse a tierra. Este aparato viene equipado
con un cable de alimentaci6n y una clavija de tres
terminales. Para reducir al maximoel peligro de
choque electrico, el cable debe estar conectado a
una conexi6n de pared con conexi6n a tierra, y esta
conexi6n debe hacerse de acuerdo con la Oltima
edici6n del C6digo Electrico Nacional (ANSI/NFPA
70), asi como con losc6digos y reglamentos
locales. Si no existe una conexi6n de pared
adecuada, el cliente tiene la responsabilidad y la
obligaci6n de mandar instalar, con un electricista
calificado, una conexi6n de pared adecuada de tres
terminales con conexi6n a tierra.
115V~
_=====_
230V~
Elcabledealimentaci6npuedeincluirundispositivo
interruptordecorriente.Lacarcasadeienchufecuenta
conunbot6ndepruebayotrodereinicio.Eldispositivo
debecomprobarseperi6dicamentepresionando
primeroelbot6nTESTydespuesRESET.
Sielbot6nTESTnosedesconectao sielbot6n
RESETnopermaneceactivo,suspendaelusodelaire
acondicionadoyp6ngaseencontactoconunt@nico
deserviciocualificado.
NOTA:La forma puede serdiferente segQnsu modelo.
Utiliceelenchufedelapared Consumode Energia
Standard 125V,
enchufe de 3
Lineas de
15A, 125V AC
Standard 250V,
enchufe de 3
Lineas de
15A, 250V AC
Standard 250V,
enchufe de 3
Lineas de
20A, 250V AC
Utilice unfusible de
15AMP.o un
Interrupter de 15AMP.
Utilice unfusible de
20AMP. o un
Interrupter de 20AMP.
A ADVERTENCIA
Peligro de choque electrico
Conecte en una conexi6n de pared de 3 terminales
No quite la terminal de conexi6n a tierra
No use adaptadores
No use cable electrico de extensi6n
Si no se siguen estas instrucciones, puede ocasionarse
ia muerte, un incendio o un choque electrico,
Enchufe de puesta a
tierra de 3 dientes
Cable de
alimentaci6n
--Enchufe de
pared del tipo
de puesta a
tierra de 3
dientes
Diente de
puesta a tierra
(208/230-voltios 60 Hz) (115-voltios 60 Hz)
- 20 -
  • Page 1 1
  • Page 2 2
  • Page 3 3
  • Page 4 4
  • Page 5 5
  • Page 6 6
  • Page 7 7
  • Page 8 8
  • Page 9 9
  • Page 10 10
  • Page 11 11
  • Page 12 12
  • Page 13 13
  • Page 14 14
  • Page 15 15
  • Page 16 16
  • Page 17 17
  • Page 18 18
  • Page 19 19
  • Page 20 20
  • Page 21 21
  • Page 22 22
  • Page 23 23
  • Page 24 24
  • Page 25 25
  • Page 26 26
  • Page 27 27
  • Page 28 28
  • Page 29 29
  • Page 30 30
  • Page 31 31
  • Page 32 32
  • Page 33 33
  • Page 34 34
  • Page 35 35
  • Page 36 36

Kenmore 580.75119 Owner's manual

Category
Split-system air conditioners
Type
Owner's manual
This manual is also suitable for

Ask a question and I''ll find the answer in the document

Finding information in a document is now easier with AI

in other languages