
Colour television
Operating instruction
21PT2324
cover pg 1-2_21PT2324_71 03/25/04, 11:01 AM1
21PT2324

IMPORTANT
Before you begin:
Make sure your package includes the following items:TV and mains cord,
remote control, Instruction manual, antenna cable (optional) and Coaxial
cable (optional).
Attention:
1. Read your manual first – your Philips TV comes with a well-designed
remote control and onscreen display to ensure your TV is easy to
operate.
2. The tips provided in this manual will save you time and money as
charges for TV installation and adjustments of customer controls are
not covered under the warranty.
3. For information outside of this manual, such as sales locations and
other Philips products, please visit www.philips.com which will
automatically link you to your local Philips website.
4. Please refer to the ‘Troubleshooting Tips’on page 11 before calling for
service.
5. In case of a need to call for service, we recommend you to call from
your room where your TV is located and have on hand your remote
control, warranty card, TV model and serial number.
6 Do not discard packaging materials:
• without thorough inspection for parts and that accessories that may be
packed separately inside the carton.
• during the warranty period should you need to exchange the set.
Recycling:
The materials used in your set are either reusable or can be recycled.
To minimise environmental waste, specialist companies collect used
appliances and dismantle them after retrieving any materials that can be
used again (ask your dealer for further details).
Disclaimer: Graphics in this manual are for illustration purpose and may not represent the
actual product
cover pg 1-2_21PT2324_71 04/08/04, 2:40 PM2

General Operating manual-21PT2324/71 1
Table of Contents
Installation
Installing your television set . . . . . . . . . . . . . . . . . . . . . . . . . . . . . . . . . . . . . . . . . . . .3
The keys on the TV set . . .. . . . . . . . . . . . . . . . . . . . . . . . . . . . . . . . . . . . . . . . . . . . . .3
Remote cont
rol keys . . . . . . . . . . . . . . . . . . . . . . . . . . . . . . . . . . . . . . . . . . . . . . . . . . 4
Language
. . . . . . . . . . . . . . . . . . . . . . . . . . . . . . . . . . . . . . . . . . . . . . . . . . . . . . . . . . . . . . .5
Tuner Mode. . . . . . . . . . . . . . . . . . . . . . . . . . . . . . . . . . . . . . . . . . . . . . . . . . . . . . . . . . . . 5
Auto Store . . . . . . . . . . . . . . . . . . . . . . . . . . . . . . . . . . . . . . . . . . . . . . . . . . . . . . . . . . . . 6
Channel
Edit . . . . . . . . . . . . . . . . . . . . . . . . . . . . . . . . . . . . . . . . . . . . . . . . . . . . . . . . .. 6
Operation
Picture settings . . . . . . . . . . . . . . . . . . . . . . . . . . . . . . . . . . . . . . . . . . . . . . . . . . . . . . . .7
Sound settings. . . . . . . . . . . . . . . . . . . . . . . . . . . . . . . . . . . . . . . . . . . . . . . . . . . . . . . . ..7
Feature settings . . . . . . . . . . . . . . . . . . . . . . . . . . . . . . . . . . . . . . . . . . . . . . . . . . . . . . . .7
Format . . . . . . . . . . . . . . . . . . . . . . . . . . . . . . . . . . . . . . . . . . . . . . . . . . . . . . . . . . . . . . . . 8
Signal Strength . . . . . . . . . . . . . . . . . . . . . . . . . . . . . . . . . . . . . . . . . . . . . . . . . . . . . . . . .8
Acti
ve Control . . . . . . . . . . . . . . . . . . . . . . . . . . . . . . . . . . . . . . . . . . . . . . . . . . . . . . . . .9
Personal Zapping . . . . . . . . . . . . . . . . . . . . . . . . . . . . . . . . . . . . . . . . . . . . . . . . . . . . . . 9
Peripherals
Video recorder . . . . . . . . . . . . . . . . . . . . . . . . . . . . . . . . . . . . . . . . . . . . . . . . . . . . . . 10
Practical information
Tips . . . . . . . . . . . . . . . . . . . . . . . . . . . . . . . . . . . . . . . . . . . . . . . . . . . . . . . . . . . . . . . . . . 11
Glossary . . . . . . . . . . . . . . . . . . . . . . . . . . . . . . . . . . . . . . . . . . . . . . . . . . . . . . . . . . . . . 12
Specification
. . . . . . . . . . . . . . . . . . . . . . . . . . . . . . . . . . . . . . . . . . . . . . . . . . . . . . . . ..13
p1-2_21PT2324_71 03/25/04, 11:54 AM1

2 Operating manual-21PT2324/71 General
Safety information
• Disconnect mains plug when :
– the indicator light below the TV screen is flashing continuously.
–a bright white line is displayed across the screen.
– there is a lightning storm.
– the set is left unattended for a prolonged period of time.
• cleaning the TV screen. Never use abrasive cleaning agents. Use a slight damp chamois
leather or soft cloth.
• No naked flame sources, such as lighted candles, should be placed on top of the TV or in
the vicinity.
• Do not place your TV set under direct sunlight or heat.
• Leave at least 10 cm around each side of TV set to allow for proper ventilation.
•Avoid placing your set (e.g. near the window) where it is likely to be exposed to rain
or water.
• No objects filled with liquids should be placed on top the TV so as to avoid dripping
or splashing of liquids on the set.
Useful information
• Do not leave your set on standby mode for a prolonged period of time. Switch off set
to allow it to be demagnetised. A demagnetised set supports good picture quality.
• Do not shift or move the set around when it is switched on. Uneveness in colour in
some parts of the screen may occur.
•Never attempt to repair a defective TV yourself. Always consult a skilled service
personnel.
p1-2_21PT2324_71 03/25/04, 11:54 AM2

Installation Operating manual-21PT2324/71 3
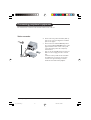
Positioning the television set
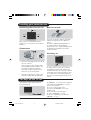
Installing your television set
Place your TV on a solid, stable surface,
leaving a space of at least 10 cm around the
appliance.
Connections
10 cm10 cm
10 cm
• Insert the aerial plug into the x socket at
the rear of the set.
If you are using an indoor aerial, reception
may be difficult in certain conditions. You
can improve reception by rotating the
aerial. If the reception remains poor, you
will need to use an external aerial.
• Insert the mains plug into a wall socket.
Diagram may differ from the actual plug.
Remote control
Insert the two R6-type batteries (supplied)
making sure that they are the right way
round.
The batteries supplied with this appliance do
not contain mercury or nickel cadmium.
If you have access to a recycling facility, please do
not discard your used batteries (if in doubt,
consult your dealer).
Switching on
To switch on the set, press the on/off key.
A red indicator means that the television is on
standby mode. Refer to the next page on ‘Remote
Control keys’ for the various keys that you could
use to switch on the set An indicator light will
flash when it is receiving signal from the remote
control.
The keys on the TV set
The television set has 4 keys which are
located at the front.
The VOLUME – or + key is used to adjust the
sound levels. The CHANNEL
^
or v key is
used to select channels.
To access or exit the main menu,
press down the VOLUME – and + keys,
simultaneously.
To select an item in the main menu,
press the CHANNEL
^
or v key.
To select an adjustment, press down the
VOLUME – or + key.
p3-6_21PT2324_71 03/26/04, 2:03 PM3

4 Operating manual-21PT2324/71 Installation
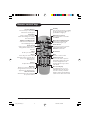
Remote control keys
Standby
Lets you place the TV set on standby.
To turn on the TV, press CH + or –,
2, AV, A/CH or digit keys.
AV channel selection
Press several times to select AV
and FRONT.
Personal Zapping
You can surf up to 10 personal
channels for each key (p. 9)
Delete Personal Zapping list
Deletes stored channels from
Personal Zapping list (p. 9)
Smart Picture
Used to access a series of stored
settings: Rich, Natural, Soft,
DVD/VCD or Personal.
No function
Mute
To mute or restore sound.
Channel selection
To access the next or previous
channel. The number and sound
mode are displayed for a few
moments whenever you select a
new channel.
On screen display
To display/clear the on screen
information. Press the key for 5
seconds to activate permanent
display of channel number. This key
is also used to exit from the menu.
Sleeptimer
Selects a period of time after
which the TV will go into standby
mode automatically.
Add Personal Zapping list
Adds and stores channels into
Personal Zapping list (p. 9)
Smart Sound
Used to access a series of stored
settings: Theatre, Music, Voice or
Personal.
Menu
To call up or exits menus.
Cursor
These 4 keys are used to move
around the menus or provide direct
access to the different picture
formats (p. 7-9)
Volume
To adjust the sound level.
Digit keys
Direct access to the channels. For
a 2-digit channel, enter the second
digit before the dash disappears.
Alternate channel
Switched between the current and
the previous channel.
p3-6_21PT2324_71 04/21/04, 1:54 PM4

Installation Operating manual-21PT2324/71 5
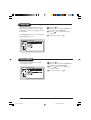
Language
When there is no signal input to the TV, you
may encounter instability of the screen display.
In this instance, please use the key to select
an AV channel.
The Language feature is used to change the
display language for menus.
& Press the
key.
é With the cursor, select the Install menu
and follow by the Language.
“ Use the
key to select a language of
your choice.
‘To quit the menus, press
.
Tuner Mode
You can select t Auto, Antenna or Cable
modes with this menu.
& Press the key.
é With the cursor, select the Install menu
and follow by the Tuner Mode.
“ Use the key to select either Auto,
Antenna or Cable
‘To quit the menus, press .
p3-6_21PT2324_71 03/25/04, 11:56 AM5

6 Operating manual-21PT2324/71 Installation
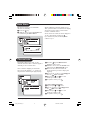
Channel edit
This feature allows you to skip or edit
channels which have bad or weak TV signal or
channels you do not watch often.
Once a channel is skipped, you cannot have
access to it by the Channel + or – key. You can
only access the channels by the digit (0-9) keys.
& Press the key. The Main menu is
displayed on the screen.
é With the cursor, select the Install menu
followed by the Channel Edit menu.
“ Enter into the menu and select the
channel number you wish to skip by the
digit keys.
‘ Then use the key to select Skipped.
Use the
key to select On.
( Repeat steps “ and ‘ for each
channel you wish to skip.
§ To quit the menus, press .
To restore skipped channels
& Repeat steps & to “ above.
é Use the key to select Skipped and
the key to select Off.
“ Repeat steps & and é for each
channel you wish to skip.
‘ To quit the menus, press .
This menu is used to store all available
channels automatically.
& Press the
key.
é With the cursor, select the Install menu
and follow by the Auto Store.
All the available TV channels will be stored.
This operation takes a few minutes. The display
shows the progress of the search and the
number of channels found.
At the end of the search, the menu disappears.
To exit or interrupt the search, press
.
If no channels are found, consult the possible
solutions on p.11.
Auto Store
p3-6_21PT2324_71 04/21/04, 1:54 PM6

Operation Operating manual-21PT2324/71 7
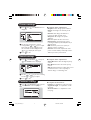
Picture settings
& Press then . The Picture menu is
displayed:
Description of the adjustments:
• Brightness: this changes picture brillance.
• Colour: this changes the intensity of the
colour.
• Contrast: this changes the difference
between the light and dark tones.
• Sharpness: this changes the picture
definition.
• Hue: this adjusts the skin colour tone.
• Colour Temp.: this changes the colour
rendering: Cold(bluer), Normal(balanced) or
Warm(redder).
• NR: attenuates picture noise (snow) in
difficult reception conditions.
• Contrast +: automatic adjustment of the
picture contrast which permanently sets the
darkest part of the picture black.
é Use the
or keys to select a
setting and the or keys to adjust.
Note: during the picture adjustment, only
the selected line remains displayed. Press
or to display the menu again.
“ Press
to exit.
Sound settings
& Press , select Sound ( ) and press
. The Sound menu is displayed.
é Use the
or
key to select a setting
and the or key to adjust.
“ Press to exit.
ge
Description of the adjustments:
• Treble Boost: this alters the high frequency
sounds.
• Bass Boost: this alters the low frequency
sounds.
• AVL (Automatic Volume Leveller): this is used
to limit increases in sound, especially on
channel change or advertising slots.
Features settings
& Press , select Features ( ) and press
. The Features menu is displayed:
Description of the features:
• Format: see explanation on the next page.
• Signal Strength : see explanation on the
next page.
• Active Control : see explanation on the
next page.
p7-9_21PT2324_71 04/21/04, 1:56 PM7

8 Operating manual-21PT2324/71 Operation
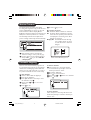
Format
This feature enhances your viewing pleasure
by providing you with a choice of two picture
formats:- 4:3 and Expand 4:3.
& Press , use the or key to select
Features and press the
key.
The Features menu is displayed.
é Use the key to select Format and
press the key to select 4:3 or
Expand 4:3.
“ Press the key to exit.
Description of function:
4:3 – select this format if you want to display
a conventional picture using the full surface of
the screen.
Expand 4:3 – select this format if you want
to expand pictures transmitted in a
‘letterbox’ format (black horizontal bars at
the top and bottom of the screen) to fill up
the entire screen.
4:3
Letterbox
Expand 4:3
Signal Strength
This feature display the signal strength level at
the bottom of the screen. Select the option
ON to activate the display each time you
switch to a new channel.
& Press
, use the or key to select
Features and press the
key.
The Features menu is displayed.
é Use the
or key to select
Signal Strength and press the key
to select On.
“ Press the
key to exit.
p7-9_21PT2324_71 03/25/04, 11:42 AM8

Operation Operating manual-21PT2324/71 9
Active Control
The Active Control monitors and adjusts
incoming video signals to help provide the best
picture quality.When you choose to turn the
Active Control to On or Display On, the
Brightness, Contrast, Sharpness, Contrast+ and
NR (noise reduction) features are controlled
automatically. Active Control adjusts these
picture settings continuously and automatically
& Enter Features menu as described in
“Features settings” on the previous page.
é Use the
key to select Active Control
and press the key to select Off, On
or Display On.
“ Press the key to exit.
Description of option:
Off: the Active Control will not be activated.
On: the Active Control will work to give the
viewer the best possible picture, but will
not display the monitoring screen when
channels are changed.
Display On: an Active Control monitoring
screen will be shown for a few
seconds whenever a channel is
changed.
Active Control Monitoring Screen
To delete channels:
& Select and press a colour key that has
stored channels repeatedly to select the
channel you want to delete.
éPress
to display list.
“Press
to remove channel.
‘Repeat steps &to “delete more channels.
(Press
to exit.
Personal Zapping
A list or series of favourite TV programs can
be selected and stored in the 4 coloured keys
with the Personal Zapping feature. With this
feature you can easily viewed up to a total of
10 preferred channels for each coloured key.
To add channels:
& Select a channel with the digit keys.
é Press
to display list.
“ Press your favourite colour key to store
the channel in step &.
‘ Repeat steps &to “ to store more
channels.
( Press
to exit.
To view channels:
Select and press a colour key that has stored
channels repeatedly to select the channel you
want to view.
p7-9_21PT2324_71 03/26/04, 2:08 PM9

10 Operating manual-21PT2324/71 Peripherals
Connecting peripheral equipment
The television has 2 external sockets situated at the back of the set
& Connect the TV’s yellow and white (AV1 in)
jacks to the co
rresponding Video and Audio
jacks
on the player.
é Connect the TV’s white AUDIO IN jacks to
the
corresponding AUDIO OUT jacks on the
player. Match the cable colour to the jacks’
colou
r. The white jack is the Left (Mono)
audio channel
.
“ Turn on the TV and VCR player. Set the TV to
AV1. You can now play your video cassette
tap
e.
Connection
is also possible via the aerial cable.
You will therefore need to tune in your video
recorder’s test signal and assign a channel
number
0. Select channel 0 to playback.
Video recorder
p10_21PT2324_71 04/21/04, 1:59 PM10

Practical information Operation manual-21PT2324/71 11
Tips
Poor reception
The proximity of mountains or high
buildings may be responsible for ghost
pictures, echoing or shadows. In this case,
try skipping channels with bad or weak
TV signals: see “Channel Edit” (p. 6) or
modify the orientation of the outside
aerial. Does your antenna enable you to
receive broadcasts in this frequency range
(UHF or VHF band)? In the event of
difficult reception (snowy picture) switch
the NR on the Picture menu to ON
(p. 7).
No picture
If the television does not switch on, press
the standby key
(located on the
remote control) twice. Have you
connected the aerial socket properly?
Have you chosen the right tuner mode?
(p. 5).
Poorly connected aerial sockets are often
the cause of picture or sound problems
(sometimes the connectors can become
disconnected if the TV set is moved or
turned).
Check all connections.
Colour patches on screen
Switch off the TV by the mains poer
button and wait for about 20 minutes
before switching on again.
Good picture but no sound
Tr y to increase the volume level. Check
that the sound is not set to “mute”. If it is,
press the
key to restore the sound.
Good sound but poor colour or no
picture
Tr y to increase the contrast and
brightness setting.
Snowish picture and noise
Check antenna connection at the rear of
the TV.
Horizontal dotted lines
Possible electrical interference e.g.
hairdryer, vacuum cleaner, etc. Switch off
the appliances.
Double or “Ghost” images
Possible poor positioning of antenna.
Using a high directional antenna may
improve reception.
Peripheral equipment gives a black and
white picture
You have not selected the socket
connection to the right channel with the
key: for example, AV1 in socket
connection should select channel AV1 to
playback. To play a video cassette, check
that it has been recorded under the same
standard (PAL, SECAM, NTSC) which can
be replayed by the video recorder.
The remote control does not work
Check that the batteries are the right
way round and there is no obstruction
between the remote control and the TV.
If the light indicator on the set no longer
flashes when you use the remote control,
replace the batteries.
p11-14_21PT2324_71 03/25/04, 12:02 PM11

12 Operating manual-21PT2324/71 Practical information
Glossary
4:3
Refers to the ration between the length and
the height of the screen. Wide screen
televisions have a ration of 16:9 while
conventional televisions have a ratio of 4:3.
4:3 Expand
The images recorded in “letterbox” format
are expanded to fill the entire screen and
the black horizontal bars at the top and
bottom are removed.
Active Control
Is a unique, intelligent, and proactive control
system, which measures and analyzes the
incoming analog signal 60 times per second
to automatically adjust settings for optimal
picture quality. It also uses a sensor to adjust
for ambient room light; when the room gets
brighter, so does the picture.
Contrast+
enhances the darker portions of the picture
to improve its picture quality.
Personal Zapping
A Philips trade marked feature which allows
any combination of favourite teletext pages
or TV channels to be stored in the coloured
Favourite Channels/Teletext keys. A total of
10 preferred channels/teletext pages of the
same subject or user can be stored in each
coloured key.
p11-14_21PT2324_71 03/25/04, 12:02 PM12

Practical information Operation manual-21PT2324/71 13
Specification
Product type
21PT2324/71
PICTURE
• Picture screen diameter: 525 mm
• Visible screen size: 510 mm
• Smart Picture Modes
• Brightness Control
• Colour Control
• Contrast Control
• Sharpness Control
• Colour Temperature Control
• Contrast Plus
• Noise Reduction
• Active Control
• Signal Strength Indicator
Sound
• Sound output: 1 x 4 W
• Loudspeakers: Full range
• Smart Sound Modes
• Auto volume Leveller
Reception
• Tuning system: PLL digital tuning
• Tuner: UV, S and Hyperband
• Channel Selection: 125 presets, Full cable
• Aerial input: 75 ohm coaxial
• TV System: NTSC M (3.58-4.5)
• Video playback: NTSC 3.58, NTSC 4.43,
NTSC Pa
lyback, PAL 60
Connectors
• Rear: Stereo Audio/Video input x 2
Ste
reo Audio/Video output x 1
Component
Video Input
S-Video
input
Ease
of use
• Multi language on screen display
• Personal Zapping
• Alternate channel
• Sleeptimer
Si
ze and weight
• Set dimensions: L x D x H mm
(522 x 479 x 461) mm
• Net weight: 23.2 kg
Specification subject to change without notice.
p11-14_21PT2324_71 04/08/04, 2:40 PM13

3141 055 22931
p11-14_21PT2324_71 03/25/04, 12:02 PM14
-
 1
1
-
 2
2
-
 3
3
-
 4
4
-
 5
5
-
 6
6
-
 7
7
-
 8
8
-
 9
9
-
 10
10
-
 11
11
-
 12
12
-
 13
13
-
 14
14
-
 15
15
-
 16
16


Ask a question and I''ll find the answer in the document
Finding information in a document is now easier with AI
Related papers
-
Philips 21PT2324/71R User manual
-
-
-
Philips 34PT8845 User manual
-
-
-
-
-
-
Other documents
-
Beko tr7854070200 User manual
-
Akura APLCD15S User manual
-
Grundig Color Television Elegance 15 Flat MF 40-2501/5 TEXT User manual
-
-
Technicolor - Thomson 72MK89DU User manual
-
-
-
-
-