AT&T EL52109 User manual

Category
Telephones
Type
User manual

This manual is also suitable for

Quick start guide
EL52109
DECT 6.0 cordless telephone/
answering system with
caller ID/call waiting
1
Install the telephone base close to a telephone jack and a power outlet not
controlled by a wall switch. For optimum range and better reception, place
the telephone base in a central and open location.
If you subscribe to high-speed Internet service (digital subscriber line - DSL)
through your telephone lines, you must install a DSL filter between the
telephone line cord and the telephone wall jack (see the following page).
The filter prevents noise and caller ID problems caused by DSL interference.
Please contact your DSL service provider for more information about
DSL filters.
Your product may be shipped with a protective sticker covering the handset
or base display - remove it before use.
For customer service or product information, visit our website at
www.telephones.att.com or call 1 (800) 222-3111. In Canada, dial
1 (866) 288-4268.
Avoid placing the telephone base too close to:
• Communication devices such as: television sets, VCRs, or other cordless
telephones.
• Excessive heat sources.
• Noise sources such as a window with traffic outside, motors, microwave
ovens, refrigerators, or fluorescent lighting.
• Excessive dust sources such as a workshop or garage.
• Excessive moisture.
• Extremely low temperature.
• Mechanical vibration or shock such as on top of the washing machine or
work bench.
Installation
2
Battery installation & charging
Install the battery as shown on the next page. Once you have installed the
battery, the screen indicates the battery status (see table below). If necessary,
place the handset in the telephone base to charge the battery. For best
performance, keep the handset in the telephone base when not in use. The
battery is fully charged after 16 hours of continuous charging. See the table
on the Technical specification page of the user’s manual for battery
operating times.
If the screen is blank, you need to charge the handset without interruption for
at least 10 minutes to give the handset enough charge to use the telephone
for a short time. The screen shows LOW BATTERY and the backlight is off
until you have charged the battery without interruption for at least one hour.
The following table summarizes the battery charge indicators and actions
to take.
Battery indicators Battery status Action
The screen is blank. Battery has no charge
and the handset cannot
be used.
Charge without
interruption until the
screen shows LOW
BATTERY (at least 10
minutes).
The screen shows
PLACE IN CHARGER
and flashes.
Battery has very little
charge and the handset
cannot be used.
Charge without
interruption until the
screen shows LOW
BATTERY (at least four
minutes).
The screen shows LOW
BATTERY and flashes.
Battery has enough
charge to be used for a
short time.
Charge without
interruption until the
screen shows HANDSET
(at least one hour).
The screen shows
HANDSET.
Battery is charged. To keep the battery
charged, place it in the
telephone base when
not in use.
NOTE: If you are on a phone call in low battery mode, you hear four short beeps
every minute.
3
Battery installation & charging
Step 1 Step 2 Step 3
Plug the battery
connector securely
into the socket inside
the handset battery
compartment, matching
the color-coded label.
Insert the supplied
battery with the label
THIS SIDE UP facing up
as indicated.
Align the cover flat
against the battery
compartment
cover, then slide
it upwards until it
clicks into place.
Charge the handset by
placing it face up in the
telephone base. The
CHARGE light will be
on when charging.
CHARGE light
IMPORTANT INFORMATION
Use only the supplied rechargeable battery or replacement battery (model BT8001).
To order a replacement power adapter, visit our website at
www.telephones.att.com, or call 1 (800) 222-3111. In Canada, dial 1
(866) 288-4268.
To replace the battery, press the tab and slide the
battery compartment cover downwards. Lift out
the old battery and disconnect it from the handset.
Follow the instructions above to install and charge
the new battery.
4
IMPORTANT INFORMATION
Use only the power adapter(s) supplied with this product. To order a replacement
power adapter, visit our website at www.telephones.att.com, or call
1 (800) 222-3111. In Canada, dial 1 (866) 288-4268.
The power adapters are intended to be correctly oriented in a vertical or floor
mount position. The prongs are not designed to hold the plug in place if it is
plugged into a ceiling, under-the-table or cabinet outlet.
1.
2.
Telephone base installation
Install the telephone as shown below. The telephone base is ready for
table use.
4. Plug the large
end of the AC
power adapter
into a power
outlet not
controlled by a
wall switch.
2. Plug the small end
of the AC power
adapter into the
power jack at the
bottom of the
telephone base.
1. Plug one end of
the telephone
line cord into the
telephone jack at
the bottom of the
telephone base.
If you have DSL high
speed Internet service, a
DSL filter (not included)
is required.
5. Plug the other
end of the
telephone line
cord into a
telephone jack
or a DSL filter.
3. Route the power
adapter cord
through the slot.
Telephone line cord
5
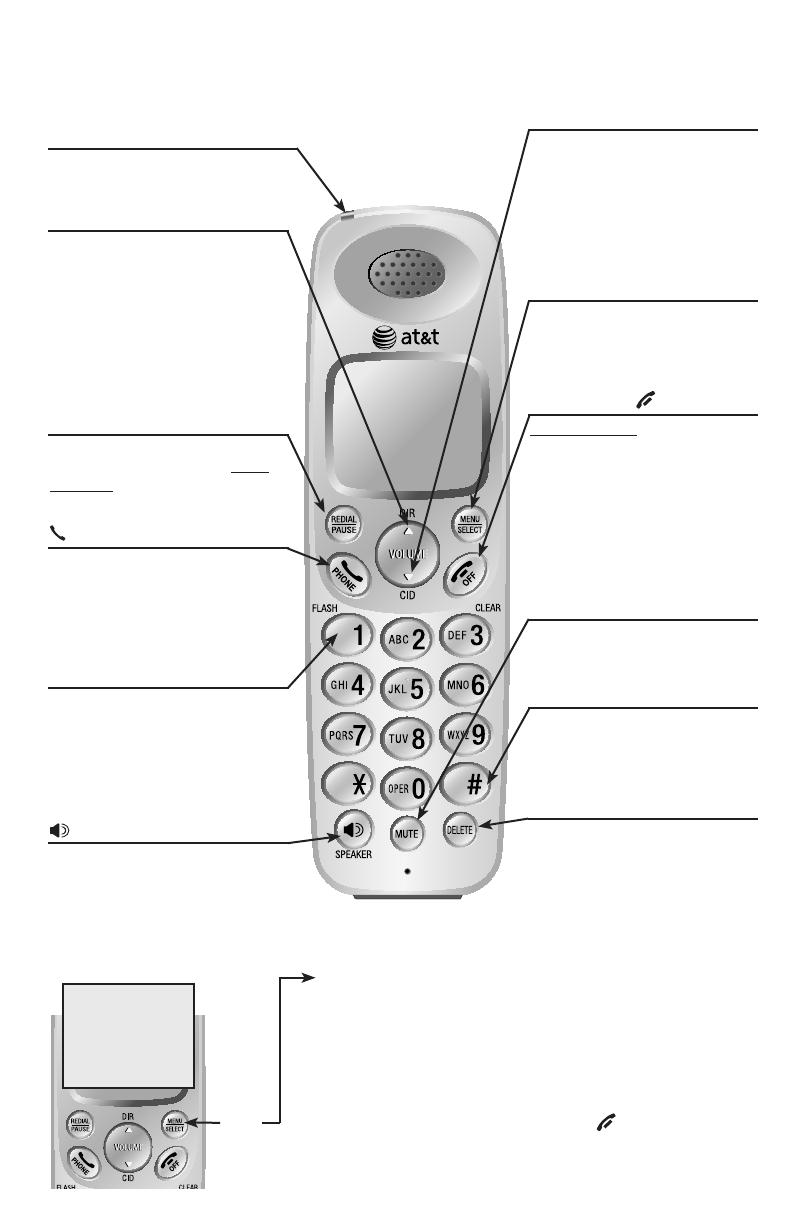
Quick reference guide - handset
Menu
Using menus
Press pDIR or CIDq to
scroll through menu items.
Press MENU/SELECT
to select or modify a
highlighted item.
Press OFF/CLEAR to
cancel an operation, back
up to the previous menu, or
exit the menu display.
Main menu
The > symbol highlights a
menu item.
REDIAL/PAUSE
Press to view redial memory.
While entering numbers, press
and hold to insert a dialing
pause.
SPEAKER
Press to activate handset speak-
erphone. Press again to resume
normal handset use.
PHONE/FLASH
Press to make or answer a call.
During a call, press to answer an
incoming call when you receive a
call waiting alert.
DELETE
While reviewing the caller ID
history or the directory, or the
redial memory, press to delete
an individual entry.
While predialing, press to
delete digits.
pDIR / VOLUME
Press pDIR to show directory
entries when the phone is not
in use.
Press to scroll up while in
menus. Press pVOLUME to
increase the volume level during
a call.
MENU/SELECT
Press to display the menu. Once
in the menu, press to select an
item or save an entry or setting.
OFF/CLEAR
Press and hold while the
telephone is not in use to erase
the missed calls indicator.
During a call, press to hang up.
While using menus, press to
cancel an operation, back up to
the previous menu, or exit the
menu display.
MUTE/DELETE
During a call, press to mute the
microphone.
Main menu
ANS. SYSTEM
DIRECTORY
CALL LOG
RINGER VOLUME
RINGER TONE
KEY TONE
LCD LANGUAGE
SET DATE/TIME
CLR VOICEMAIL
HOME AREA CODE
>ANS. SYSTEM
DIRECTORY
qCID / VOLUME
Press qCID to show caller ID
information when the phone is
not in use.
Press to scroll down while in
menus. Press qVOLUME to
decrease the volume level dur-
ing a call.
CHARGE light
The charge light is on when the
handset is charging (page 3).
1
While reviewing a call log
entry, press repeatedly to add
or remove 1 in front of the
telephone number before dialing
or saving it in the directory.
#
Press repeatedly to display
other dialing options when
reviewing a call log entry.
6
Quick reference guide - telephone base
IN USE indicator
On when the handset is in
use or when the answering
system is answering an
incoming call.
Flashes when another
telephone is in use on the
same line.
Flashes quickly when there
is an incoming call.
VOICEMAIL indicator
Flashes when you have
new voicemail. Voicemail
service is offered by your
local telephone service
provider, and is different
from answering system
messages.
MESSAGE COUNTER
Number of messages (or
during playback, message
number currently playing).
X DELETE
Press to delete the
message currently
playing.
Press twice to delete all
old messages when the
phone is not in use.
REPEAT
Press to repeat a message.
Press twice to play the
previous message.
PLAY/STOP
Press to start or stop
message playback.
pqVOLUME
During message
playback, press to adjust
the listening volume.
While in idle mode,
press to adjust the base
ringer volume.
SKIP
Press to skip a message.
HANDSET LOCATOR
Press to make handset
beep so you can locate it.
ON/OFF
Press to turn the built-it
answering system on
or off.
www.telephones.att.com
© 2009 Advanced American Telephones. All Rights Reserved.
AT&T and the AT&T logo are trademarks of AT&T Intellectual Property licensed to
Advanced American Telephones, San Antonio, TX 78219.
Printed in China. Issue 3 AT&T 09/09.
1 / 1

AT&T EL52109 User manual

Category
Telephones
Type
User manual
This manual is also suitable for

Ask a question and I''ll find the answer in the document

Finding information in a document is now easier with AI

Ask the document