Page is loading ...

OPERATING MANUAL
HandyMan Nail Finder
®
Hand Held
Metal Detector
OPERATING MANUAL
HandyMan Nail Finder
®
Hand Held
Metal Detector

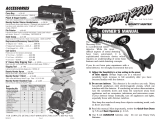
DETECTOR FEATURES
1. Quick-Change Battery Compartment
Use a coin or screwdriver to open compartment.
Insert circular cam lock and twist to secure in closed position.
2. All-Metal Detection
Detects all types of metals.
Will not detect non-metallic objects.
3. Low Detection
While in the “Low" function mode, the detection range will be reduced.
Use this mode if experiencing false signals or if the normal mode is too sensitive. The very
high sensitivity of the normal mode may cause unwanted detection of large nearby
masses of metal.
INTERFERENCE ELIMINATION FEATURES
• 3 Operating frequency selections
• Minimizes electromagnetic interference
from other devices
OPERATING FREQUENCY
7.1 kHz
LED INDICA
TORS
• Target • Low Battery • Power/On
POWER SUPPL
Y
• Requires (1)
9-Volt battery
(not included)
NORMAL & REDUCED
SENSITIVITY
COMFOR
T
GRIP
OPERATOR DETECTION ALERTS
• Audio alert – High pitch sound
• Vibration alert - silent operation
DETECTOR FEATURES
1. Quick-Change Battery Compartment
Use a coin or screwdriver to open compartment.
Insert circular cam lock and twist to secure in closed position.
2. All-Metal Detection
Detects all types of metals.
Will not detect non-metallic objects.
3. Low Detection
While in the “Low" function mode, the detection range will be reduced.
Use this mode if experiencing false signals or if the normal mode is too sensitive. The very
high sensitivity of the normal mode may cause unwanted detection of large nearby
masses of metal.
INTERFERENCE ELIMINATION FEATURES
• 3 Operating frequency selections
• Minimizes electromagnetic interference
from other devices
OPERATING FREQUENCY
7.1 kHz
LED INDICATORS
• Target • Low Battery • Power/On
NORMAL & REDUCED
SENSITIVITY
COMFORT
GRIP
OPERATOR DETECTION ALERTS
• Audio alert – High pitch sound
• Vibration alert - silent operation
POWER SUPPLY
• Requires (1)
9-Volt battery
(not included)

4. Silent Operation
Position the Silent/Audio switch in the "Silent/Vibrate" position and:
a) The detector will NOT emit an audible tone upon the detection of metal objects.
b) The vibrator will activate upon the detection of a metal object, and the "Target"
LED indicator will illuminate.
5. Operating Frequency Selection
Chose from two alternate operating frequencies in the event of electromagnetic
interference from other electronic devices. Choice of frequencies is trail-and-error;
if experiencing interference, try alternate frequencies.
6. Low Battery Indication
When battery needs to be replaced, the yellow Low Battery LED will illuminate.
7. Visual Target Response
Red LED flashes when a metal object is located.
8. Comform Hand Grip

First Time Operation
To Operate the Detector
1) Install the Battery
a. Use a 9-volt ALKALINE battery only (battery not included)
b. Install battery with correct polarity
(align "+" on detector housing with "+" on battery)
c. The battery cover opens and closes with a coin or screwdriver
2) Set the On switch to "ON"
"ON" is the middle position
3) Set the Audio/Vibrate Switch to "AUDIO"
4) Sweep the Detector over the target area.
Detector must be IN MOTION to detect metal

Batteries
Use 9-Volt ALKALINE battery only (battery not included)
Low Battery Alert
The Yellow LED indicator light will illuminate and remain illuminated when the batteries
are discharged to the point at which the detector has lost 10% of its metal detecting range.
The detector will continue to operate, at a lower sensitivity, when the Low Battery
Indicator is illuminated. Replace battery as soon as possible after the indicator illuminates.
If you plan to store the Handy Man Nail Finder™
for several days or more,
remove the battery.
YELLOW LED
Low Battery
Indicator
Battery
Chamber
“
+” Polarity Side for Battery
●
+

Power Switch with Low Mode
The Power switch has 2 "ON" positions and a forward "OFF" position.
The detector is OFF with the switch in the "UP" position
The detector is ON with the switch in the "MIDDLE" position
The detector is in LOW MODE operation with the switch
in the "DOWN" position.
While in the "Low" position, the detection range will be reduced
You may find the normal mode(“ON” position) to be too sensitive.
Unintended detection of nearby large metal masses can be avoided in Low Mode
.
Also, if you experience excessive “false” alerts, you may want to reduce sensitivity
using the low mode
LED Indicators
• The GREEN light indicates that the detector is ON
• The YELLOW light indicates LOW BATTERY
• The RED light indicates the detection of a metal object
Red
Green
Yellow
Low
OFF
ON

Scanning for the Detection of Metal Objects
Always test the detector before operation. Sweep the detector across a known metal object, and
verify detection with audio, vibratory, and visual feedback.
Motion is Required: The metal detector must be IN MOTION, sweeping across the target
area, to detect the presence of metal.
Sweep the detector over the search area, with a smooth, even motion, about 1/2 inch above it.
Do not make physical contact between the search object and the detector.
For maximum sensitivity, sweep the side opposite the control panel closest to the object.
Detection is enabled by magnetic coils which are embedded in the bottom
side of the detector.
This detector will not detect non-metallic objects.

Limited Ninety-Day Warranty
This product is warranted by First Texas against manufacturing defects in material and workmanship under normal
use for ninety (90) days from the date of purchase. EXCEPT AS PROVIDED HEREIN, First Texas MAKES NO
EXPRESS WARRANTIES AND ANY IMPLIED WARRANTIES, INCLUDING THOSE OF MERCHANTABILITY AND
FITNESS FOR A PARTICULAR PURPOSE, ARE LIMITED IN DURATION TO THE DURATION OF THE WRITTEN
LIMITED WARRANTIES CONTAINED HEREIN. EXCEPT AS PROVIDED HEREIN, First Texas SHALL HAVE NO
LIABILITY OR RESPONSIBILITY TO CUSTOMER OR ANY OTHER PERSON OR ENTITY WITH RESPECT TO ANY
LIABILITY, LOSS OR DAMAGE CAUSED DIRECTLY OR INDIRECTLY BY USE OR PERFORMANCE OF THE
PRODUCT OR ARISING OUT OF ANY BREACH OF THIS WARRANTY, INCLUDING, BUT NOT LIMITED TO, ANY
DAMAGES RESULTING FROM INCONVENIENCE, LOSS OF TIME, DATA, PROPERTY REVENUE, OR PROFIT OR
ANY INDIRECT, SPECIAL, INCIDENTAL, OR CONSEQUENTIAL DAMAGES, EVEN IF First Texas HAS BEEN ADVISED
OF THE POSSIBILITY OF SUCH DAMAGES.
Some states do not allow limitations on how long an implied warranty lasts or the exclusion or limitation of incidental
or consequential damages, so the above limitations or exclusions may not apply to you. In the event of a product
defect during the warranty period, take the product and the Dealer sales receipt as proof of purchase date to First
Texas. First Texas will, at its option, unless otherwise provided by law: (a) correct the detect by product repair
without charge for parts and labor; (b) replace the product with one of the same or similar design; or (c) refund the
purchase price. All replaced parts and products, and products on which a refund is made, become the property of
First Texas. New or reconditioned parts and products may be used in the performance of warranty service. Repaired
or replaced parts and products are warranted for the remainder of the original warranty period. You will be charged
for repair or replacement of the product made after the expiration of the warranty period. This warranty does not
cover: (a) damage or failure caused by or attributable to acts of God, abuse, accident, misuse, improper or abnormal
usage, failure to follow instructions, improper installation or maintenance, alteration, lighting or other incidence of
excess voltage or current; (b) any repairs other than those provided by a First Texas Authorized Service Facility; (c)
consumables such as fuses or batteries; (d) cosmetic damage; (e) transportation, shipping or insurance costs; or
(f) costs of product removal, installation, set-up service adjustment or reinstallation.
This warranty gives you specific legal rights, and you may also have other rights, which vary from state to state.
First Texas Customer Relations, 1465-H Henry Brennan, El Paso, TX 79936 - 1-800-413-4131
According to FCC part 15.21 Changes or Modifications made to this device not expressly approved by the party
responsible for compliance could void the users authority to operate this equipment.
Proof of purchase is required to make a claim under this warranty.
NOTE TO FOREIGN COUNTRY CUSTOMERS
This warranty may vary in other countries, check with your distributor for details.
Factory warranty follows the channel of distribution. Warranty does not cover shipping costs.
M3019H 070610
/