Before installation
Öhlins Racing AB can not be held responsible for
any damage whatsoever to shock absorber or
vehicle, or injury to persons, if the instructions for
fitting and maintenance are not followed exactly.
Similarly, the warranty will become null and void
if the instructions are not adhered to.
WARNING!
1. Installing a shock absorber, that is not
approved by the vehicle manufacturer, may
affect the stability of your vehicle. Öhlins
Racing AB cannot be held responsible for
any personal injury or damage whatsoever
that may occur after fitting the shock
absorber. Contact an Öhlins dealer or other
qualified person for advice.
2. Please study and make certain that you
fully understand all the mounting instructions
and the owners manuals before handling this
shock absorber kit. If you have any questions
regarding proper installation procedures,
contact an Öhlins dealer or other qualified
person.
3. The vehicle service manual must be
referred to when installing the Öhlins shock
absorber
Safety signals
Important information concerning safety is
distinguished in this manual by the
following notations:
The Safety alert symbol means:
Caution! Your safety is involved.
WARNING!
Failure to follow warning instructions
could result in severe or fatal injury
to anyone working with, inspecting or
using the suspension, or to bystanders.
CAUTION!
Caution indicates that special pre-
cautions must be taken to avoid dam-
age to the suspension.
NOTE!
This indicates information that is of
importance with regard to procedures.
Öhlins products are subject to continual improve-
ment and development. Consequently, although
these instructions include the most up-to-date
information available at the time of printing, there
may be minor differences between your suspen-
sion and this manual. Please consult your Öhlins
dealer if you have any questions with regard to
the contents of the manual.
NOTE!
During storage and transportation, espe-
cially at high ambient temperature, the oil
and grease used for assembling may run out
inside the packing and damage the
expanded polystyrene packing material. This
is not unusual and is in no way detrimental
to the shock absorber.
Kit contents
Before installing the shock absorber, please
check the contents of the kit, listed on the front
page of this instruction. If anything is missing,
contact your Öhlins dealer.
Description Pcs. Part No.
Shock absorber 1 MG 127
Washer 1 00426-02
Tie rap 2 00231-01
Sticker Öhlins 2 00192-01
Sticker memo notes 1 01180-01
Owners manual 1
WARNING!
1. It´s advisable to have an Öhlins dealer or other
qualified person to fit your shock absorber.
2. Instructions in the vehicle service manual are
to be followed when changing the shock
absorber.
3. When working on a lifted vehicle it must be
securely supported to prevent it from falling.
2
Mounting instruction
1
Put the motorcycle on the centre stand.
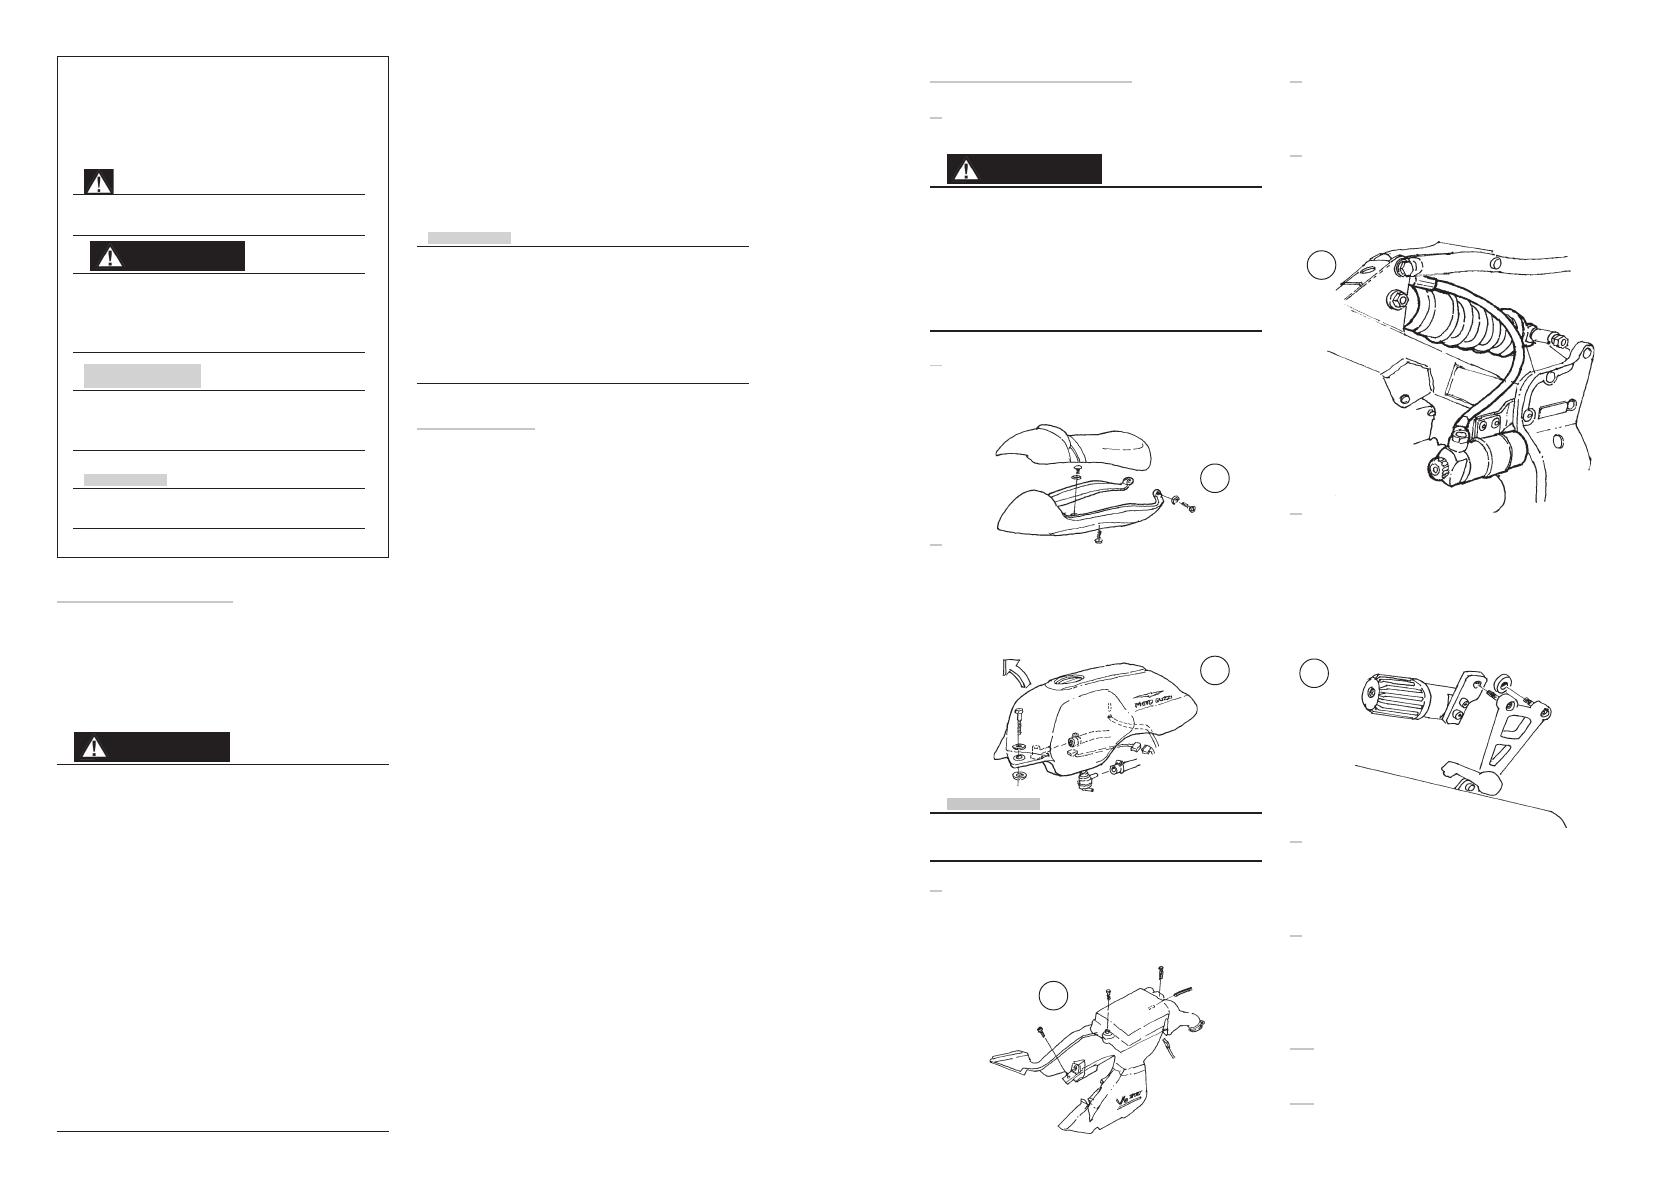
2
Remove the seat, by unlocking it and remove the
rear plastic cover (6 screws).
5
Loosen the original shock absorber from the rear
and forward attachments.
6
Attach the Öhlins shock absorber in reverse order.
Use the standard bolts. The gas reservoir is posi-
tioned in the same bracket as the original reservoir.
3
Loosen and remove the fuel line (left side) and
return line (right side) from the fuel tank. Loosen
the air hose from the underside of the tank.
Loosen the electrical connection and remove the
tank by lifting it rearwards up.
NOTE!
It is advisable to fit a stopping device into the
fuel lines to avoid petrol waste
4
6
7
The hydraulic preload adjuster is to be attached
to the silencer bracket on the right side of the
motorcycle. Use the original bolts and the washer
provided so the bracket will be in line with the
frame. Let the hose go in soft turns on the inside
of the frame and attach it with the tie rap.
4
Remove the air filter unit by loosening the attachment
screws (4), the intake hoses from the injection units
and loosen the hose end the electrical connection
8
Put the air filter unit back and attach it to the
injection units. Remember to refit the hose and
the electrical connection.
9
Refit the cover behind the reservoir and put the
fuel tank back. Connect the fuel lines and the
electrical connection. And fix the fuel tank with
the original bolt.
10
Refit the rear cover and the seat.
11
Continue your work according to the Owners Manual
7
3

