Page is loading ...

Brother Dream Fabric Frame
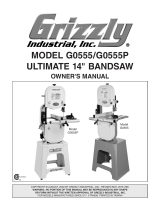
Task 5: Tension the Long Belt
The Grace CompanyCopyright 07/01/2022 V 1.0

2
QuiltMotion
Part One
Belt Tensioner Front Belt ClampBack Belt Clamp
Hex Nut M6 (x2) Open-end Wrench
10 mm & 13 mm
14
17
Hex Bolt
M6 x 55 mm (x4)
T- Handle
Allen Wrench 4 mm
4 mm
Instructions
The long belt allows QuiltMotion to move horizontally across the frame. Take the following steps to
tension the long belt across the frame:
Parts & Tools Needed:
Task 5: Tension the Long Belt
Parts & Tools Needed:

3
QuiltMotion
Part One
Place the tensioner on the right side of the
frame so the curve points down. Attach with
the two M6 x 55 mm hex bolts.
1
Slide the two M6 hex nuts on the ends of
the two M6 x 30 hex bolts. Tighten with the
10 mm open-end wrench.
2
Place the bottom carriage on its right side on
the frame. Do not align with the wheels with
the tracks at this time.
3
Cut the tape that is holding the long belt
coils together.
4
Lay the carriage at with the wheels on the
tracks and nish unrolling the long belt.
5
Curve
Hex Bolt
M6 x 55 mm (x2)
M6 Hex Nuts (x2)
Tape

4
QuiltMotion
Part One
Drape the long belt over the back belt
clamp past the bottom of the clamp. Use
two M6 x 55 mm Hex Bolts to attach the
front belt clamp.
Place the back belt clamp on the left side of
the frame so that the holes align with the
holes in the frame.
7
Fasten the clamp in place using two M6 hex
nuts and the 10 mm open-end wrench.
8
Feed the other end of the long belt into the
top of the belt tensioner on the right side
of the frame.
9
Turn the ratchet knob to pull the extra belt
length through the tensioner until the belt
is tight across the frame. Turn the locking
knob to lock it in place.
10
6
Hex Bolt M6 x 40 (x2)
Front Belt Clamp
Long Belt
Hex Nut M6 (x2)
Belt Tensioner
Locking Knob Ratchet Knob
Back Belt
Clamp

5
QuiltMotion
Part One
Once the belt is tight, slide the bottom carriage across the frame. Watch the belt closely for any
bowing.
12 If the belt is bowing, use the 4 mm Allen wrench to loosen the shoulder screws that attach the
wheel bases to the carriage. Adjust the carriage on the wheel bases until the belt is straight and
then re-tighten the shoulder screws.
Belt is
pulled
towards or
away from
the front
as the
carriage
moves.
Belt is
parallel to
the front
as the
carriage
moves.
Shoulder Screws (x4)
11

6
QuiltMotion
Congratulations! You have completed Part One of this manual.
If you’re setting up QuiltMotion on a quilting machine that is not yet assembled:
• Complete the steps in Part Two of your machine’s instruction manual.
• If your machine manual is not broken into parts, follow the directions to install
and align the machine wheels. Then continue onto Part Two of your QuiltMotion
manual.
If you are installing QuiltMotion with a fully assembled quilting machine or a
domestic sewing machine on a fully assembled top plate, continue to Part Two of
your QuiltMotion manual.
If you will be using a domestic sewing machine and you have not yet assembled
your top plate, do so now. Then continue onto Part Two of your QuiltMotion manual.
Part One
/