KALORIK AFO User guide

Category
Small kitchen appliances
Type
User guide

This manual is also suitable for

AFO 46045 SS 200605
1
www.KALORIK.com
AIR FRYER OVEN
AFO 46045 SS 200605
2
www.KALORIK.com
THANK YOU
Thank you for choosing the Kalorik MAXX Air Fryer Oven.
We hope you’re delighted with your MAXX. If you are, we’d love it if
you’d shout it from the rooftops, tell your friends or leave us a review.
We’d love to hear about what you’ve been cooking, so tag @kalorik
on social media with your culinary masterpieces.
REGISTER YOUR PURCHASE
To register your product, simply complete the included form, visit
Kalorik.com/register or scan the QR code below.
TECHNICAL SPECIFICATIONS
Model
Voltage
Wattage
Capacity
AFO 46045 SS
120V, 60Hz
1700W
26QT
AFO 46045 SS 200605
3
www.KALORIK.com
CONTENTS
PARTS .............................................................................................................................4
PARTS DESCRIPTIONS ....................................................................................................5
IMPORTANT SAFEGUARDS ............................................................................................6
SAFETY TIPS ....................................................................................................................7
3 PRONG PLUG INSTRUCTIONS .....................................................................................8
SHORT CORD INSTRUCTIONS ........................................................................................8
KNOW YOUR AIR FRYER OVEN .....................................................................................8
BEFORE THE FIRST USE ....................................................................................................9
CONTROL PANEL .........................................................................................................10
OPERATION..................................................................................................................11
ACCESSORIES ..............................................................................................................13
Accessory Positioning Diagrams ............................................................................... 13
Using the Rotisserie Spit .............................................................................................. 16
FUNCTIONS ..................................................................................................................17
AIR FRYER..................................................................................................................... 17
OVEN ........................................................................................................................... 19
COOKING GUIDE: .......................................................................................................22
GET MORE OUT OF YOUR PRODUCT...........................................................................27
CLEANING AND MAINTENANCE ................................................................................27
Inside cleaning ........................................................................................................... 28
Housing cleaning ....................................................................................................... 28
Replacing the inner lamp ......................................................................................... 28
TROUBLESHOOTING ....................................................................................................29
WARRANTY ..................................................................................................................30
AFO 46045 SS 200605
4
www.KALORIK.com
PARTS
17
13
15
16
3
6
5
7
2
8
1
18
19
20
21
4
8
9
10
11
12
AFO 46045 SS 200605
5
www.KALORIK.com
PARTS DESCRIPTIONS
1. LED display
2. Air Fry function button
3. Rotisserie function button
4. Inner oven light button
5. Oven function button
6. Selector dial
7. Start/Stop button
8. French door handles
9. Rails / Racks and basket slots
10. Heating elements (top and bottom)
11. Rotisserie spit insert
12. Glass French door
13. Baking / Drip tray
14. Air frying basket
15. Air rack
16. Crumb tray
17. Rotisserie spit and forks
18. Rotisserie handle
19. Rack handle
20. *2-in-1 Dehydrator and steak tray
21. *Bacon tray
*Varies by model
AFO 46045 SS 200605
6
www.KALORIK.com
IMPORTANT SAFEGUARDS
When using electrical appliances, basic safety precautions should always be
followed, including the following:
1. Read all instructions.
2. Check that your mains voltage corresponds to that stated on the
appliance.
3. Do not touch hot surfaces. Use handles or knobs.
4. To protect against electrical shock, fire or personal injury, do not immerse
cord, plugs, or the appliance in water or other liquid.
5. Close supervision is necessary when any appliance is used by or near
children.
6. Unplug from outlet when not in use and before cleaning. Allow to cool
before putting on or taking off parts.
7. Do not operate any appliance with a damaged cord or plug or after the
appliance malfunctions or has been damaged in any manner. Return the
appliance to the nearest authorized service facility for examination, repair,
or adjustment.
8. The use of accessory attachments not recommended by the appliance
manufacturer may cause injuries.
9. Do not use outdoors. This appliance is for HOUSEHOLD USE ONLY.
10. Do not let the cord hang over the edge of a table or counter or touch hot
surfaces.
11. Do not place on or near a hot gas or electric burner, or where it could
touch another heated oven.
12. Extreme caution must be used when moving the appliance. Let the
appliance cool to room temperature before handling or moving.
13. When in operation, hot air is released through the air vents. Keep your
hands and face at a safe distance from the air vents and take extreme
caution when removing the accessories from the appliance. Failure to do
so may lead to burns and/or injury.
14. When operating the oven keep at least four inches of space on all sides of
the oven to allow for adequate air circulation.
15. Always operate on a stable, heat resistant surface. Do not use on a cloth-
covered surface, near curtains or other flammable materials.
16. Do not place the oven near the edge of a bench or table during
operation. Ensure the surface is level, clean and free of water, debris, etc.
17. Extreme caution must be used when moving an appliance or parts
containing hot oil or other hot liquids.
18. Do not use the appliance for other than intended use.
AFO 46045 SS 200605
7
www.KALORIK.com
19. Oversize foods or metal utensils must not be inserted in the Air Fryer Oven as
they may create a fire or risk of electric shock.
20. A fire may occur if the Air Fryer Oven is covered or touching flammable
material, including curtains, draperies, walls, and the like, when in
operation. Do not store any item on top of the appliance when in
operation.
21. Do not clean with metal scouring pads. Pieces can break off the pad and
touch electrical parts involving a risk of electric shock.
22. Extreme caution should be exercised when using containers constructed of
other than metal or glass.
23. Do not store any materials in this oven when not in use.
24. Do not place any of the following materials in the oven: paper, cardboard,
plastic, and the like.
25. Do not cover crumb tray or any part of the oven with metal foil. This causes
overheating of the oven.
26. Do not leave unit unattended, especially when toasting or broiling.
27. Use extreme caution when disposing of hot grease.
28. Always wear protective, insulated oven gloves when inserting or removing
items from the hot oven.
29. To disconnect, press the Start/Stop for 3 seconds to ensure the machine is
off, then remove plug from wall outlet.
30. Never connect this appliance to an external timer switch or separate
remote-control system as this may lead to burns and/or injury.
31. Do not cover or block the air vents while the appliance is in operation.
Doing so will prevent even cooking and may damage the appliance or
cause it to overheat may result in fire or burns.
32. Do not rest cooking utensils or baking dishes on the appliance’s
hot surfaces.
SAVE THESE INSTRUCTIONS
HOUSEHOLD USE ONLY
SAFETY TIPS
1. When in use, always use oven mitts or potholders when touching any outer
or inner surface of the oven, or when handling accessories.
AFO 46045 SS 200605
8
www.KALORIK.com
2. To reduce risk of fire, keep oven interior clean and free of food, oil, grease,
and any other combustible materials.
3. Do not use metal utensils such as knives to remove food residue from the
heating elements as this can damage the appliance as well as lead to
electrocution.
4. Do not store any materials in the oven when not in use.
3 PRONG PLUG INSTRUCTIONS
For your personal safety, this appliance must be grounded. This appliance is
equipped with a power supply cord having a 3-prong grounding plug. To
minimize possible shock hazard, the cord must be plugged into a mating 3
prong, grounding type, wall receptacle, grounded in accordance with the
National Electrical Code ANSI/NFPA 70 latest edition and all local codes and
ordinances. If a mating wall receptacle is not available, it is the personal
responsibility and obligation of the customer to have a properly grounded, 3-
prong, wall receptacle installed by a qualified electrician. Do not attempt to
modify the plug in any way.
SHORT CORD INSTRUCTIONS
A short power supply cord is provided to reduce the hazards resulting from
becoming entangled in or tripping over a longer cord. Extension cords may be
used if care is exercised in their use.
The electrical rating of the extension cord should be at least that of the
appliance. If the electrical rating of the extension cord is too low, it could
overheat and burn.
The resulting extended cord should be arranged so that it will not drape
over the countertop or tabletop where it can be pulled on by children or
tripped over.
KNOW YOUR AIR FRYER OVEN
Discover the new generation of air fryer ovens! The Kalorik 26 Quart Digital Maxx
Air Fryer Oven combines multiple appliances into one. It functions as an air
fryer, roaster, broiler, rotisserie, dehydrator, oven, toaster, pizza oven, and more.
AFO 46045 SS 200605
9
www.KALORIK.com
The Kalorik Digital Maxx Air Fryer Oven uses special Turbo Maxx technology to
cook food faster than ever. Customized upper and lower heating elements
provide even heat distribution for perfectly cooked results. An optimized airflow
system and high-performance turbo fan are engineered for maximum air
circulation, delivering the same crispy texture and rich flavor of deep-fried
food, with little to no oil. This reduces fat and calories for healthier meals.
The rotisserie setting rotates the included spit accessory during cooking,
allowing meat to roast evenly in its own juices and develop maximum flavor.
The Kalorik Digital Maxx Air Fryer Oven reaches up to 500°F, perfect for searing
meat or vegetables to caramelized perfection. The oven can fit a large
chicken, 12” pizza, or up to 9 slices of toast in its cavity.
Modern and multifunctional, the Kalorik Digital Maxx Air Fryer Oven features
glass French doors with single hand automatic opening to prevent dripping or
scalding.
A built-in auto-shutoff safety feature automatically stops operation when the
doors are open.
An easy-to-use digital LED display contains 21 presets for foolproof cooking.
Accessories include an air frying basket, baking tray, air rack, crumb tray,
*bacon tray, *2-in-1 steak and dehydration tray, rotisserie spit, rack handle and
rotisserie handle.
BEFORE THE FIRST USE
Unpack the appliance and accessories and wash and wipe everything
down. Wipe the interior of the oven with a damp cloth or sponge. Dry with
a paper towel. Make sure the oven is dry before operating the unit.
Position the oven on a flat and heat resistant surface so that it is also
positioned at least 4 inches (10cm) away from any surrounding object.
Unwind and plug in the power cord into the wall outlet. Place the crumb
tray inside on the bottom of the unit, underneath the bottom heating
elements. Make sure unit is clean and everything has been taken out of the
oven.
It is normal if some smoke or smell emanates from the appliance when
using it for the first time. This is not harmful.
To eliminate any packing oil that may remain after production, we
recommend operating the appliance for 20 minutes on steak function,
putting the thermostat on its maximum temperature setting (500 °F).
Once you plug in the unit, the Start/Stop button will turn on for one minute
to indicate it is plugged in and then turn off.
AFO 46045 SS 200605
10
www.KALORIK.com
CONTROL PANEL
LED Screen
The LED screen displays the Countdown Timer and Temperature (1), Rotisserie
signal symbol (2), Air fry signal symbol (3), and Presets (4).
Buttons & Selector Dial
1. Rotate: Use when cooking with the rotisserie spit. Press the Rotate button to
turn on the rotisserie mode and make the accessory rotate to achieve an
evenly crispy outcome. Press again to turn off the rotisserie function.
The Rotisserie function can be activated/inactivated at any time during the
cooking process. The rotate button and icon will turn on when activated.
2. Light: Press the Light button to turn the oven light on or off. The light can be
turned on at any time to help monitor your food while cooking if the unit is
on. The light turns off automatically after one minute.
3. Air Fry: Press the Air Fry button to select the air frying function. There are 14
presets are available for use with this mode. Use the selector dial to select
your desired preset.
AFO 46045 SS 200605
11
www.KALORIK.com
4. Oven: Press the Oven button to use the unit as a conventional oven. 7
cooking modes are available when using the Oven function. Use the
selector dial to select your desired cooking mode.
5. Selector dial: Use the dial to select your desired preset. Press the dial to
adjust cooking time and temperature.
6. Start/Stop: Press Start/Stop to turn the unit on, begin, or end the cooking
cycle. Long press 3 seconds to switch off the machine directly.
OPERATION
Press Start/Stop to select Standby mode. From here, select “Air Fry” or “Oven”
and get to cooking in the mode of your choice.
Press “Air Fry” to directly select air frying mode. Use the selector dial to choose
between 14 air frying presets or select “Air Fry” to choose the time and
temperature of your choice.
Press “Oven” to directly select oven mode. Use the selector dial to choose
between 7 oven presets or select “Bake” to choose the time and temperature
of your choice.
Once your Kalorik MAXX Air Fryer oven is on and ready for use, the selector dial
allows you to scroll through the various presets available to you to facilitate your
cooking needs. The preset will blink and show the time and temperature
associated with it as you scroll through it.
To select a preset simply press the knob. The 1st press will cause time setting to
blink, indicating that you are able to change the time settings if you wish.
Turn the selector dial clockwise to add time and counterclockwise to remove
time. Once you have the desired time set, you can press the selector dial once
more. The 2nd press will cause the temperature setting to blink.
If you wish to change the temperature setting, simply turn clockwise to increase
temperature and counterclockwise to decrease temperature, both possible by
increments of 5°F. If you wish to select a different preset, press a 3rd time to go
back to preset selection.
Got your time and temp set? Press Start/Stop to begin the cooking process. The
selected program will blink to indicate the unit is preheating under the chosen
programming. The preset light will blink until the chosen temperature has been
reached, and then remain steady to indicate the unit is ready.
AFO 46045 SS 200605
12
www.KALORIK.com
The fan icon will turn on as well if the program you have selected uses a fan for
its cooking process.
Need to adjust? Change time or temperature settings with ease at any point
during the cooking process. All you need to do is press the selector dial once
(1) for time adjustments and twice (2) for temperature adjustments.
Press again a 3rd time to confirm, or unit will automatically adjust to new time
and/or temperature after 3 seconds.
All done? MAXX is equipped with both an automatic and manual stopping
function.
In automatic stop, once the cooking time has elapsed (0:00), MAXX will beep
three (3) times and enter “Off” mode (display will show “OFF OFF”). The inner
fan will continue to work for 3 minutes to help the unit cool down if the selected
mode used the fan (AIR FRY), and all lights other than “START/STOP” will turn off.
The side cooling fans will turn in all modes to assist with the cooling process.
To turn off MAXX manually, press the Start/Stop button once and the machine
will enter “Off” mode as described above.
If the unit is in the process of entering “Off” mode in either way, you can re-
enter Standby mode during the 3 minutes of cooling process by pressing
Start/Stop. After three minutes, the unit will emit a single beep to tell you the
cooling process is finished.
Notes:
o MAXX will turn off automatically if the French Doors are open for longer
than 10 minutes during a cooking process.
o Unless it is in a cooking mode, the unit will turn off after 2 minutes without
operation.
o The inner light turns on automatically and stays on if the French doors are
opened.
o Pressing the Start/Stop button for three (3) consecutive seconds will turn the
machine off.
AFO 46045 SS 200605
13
www.KALORIK.com
ACCESSORIES
Use the markings on the door for recommended accessory positions.
Accessory Positioning Diagrams
Follow the diagrams below to use your oven to the fullest and to achieve
consistent and professional results.
This function is used to air fry meals as a healthy
alternative to deep-frying in oil.
For best results, use the provided air fryer basket.
Flip or shake food halfway through the cooking
process to cook food evenly.
Air Frying does not require oil. A tablespoon of oil
may be added to enhance flavor.
Cook food even faster by placing the basket on
the top rack.
Reduce your cooking time and shake your food
halfway to ensure even results.
Air Frying does not require oil. A tablespoon of oil
may be added to enhance flavor.
Air Fry
Fast Air Fry
AFO 46045 SS 200605
14
www.KALORIK.com
Use the rotisserie spit and its handle to cook whole
chickens and roast all types of food.
Press the “Rotate” button to allow the rotisserie
spit to rotate during cooking, allowing meat to
roast evenly in its own juices and develop
maximum flavor.
Rotisserie automatically turns on under the
Chicken preset, for all other presets button must
be pressed.
This setting can be turned on and used during the
air fry, bake, and roast cooking functions.
Cook bacon to perfection with the bacon tray.
Important: Place the accessory on the
baking/drip pan.
The wave design keeps bacon up and away from
draining grease.
Accommodates multiple slices at once.
Use the bacon air fry function when cooking
bacon.
Use the steak tray to sear and caramelize your
foods to perfection.
Important: Place the accessory on the
baking/drip pan.
Slotted design allows excess fat to drain into the
drip pan.
Place steak tray on the top slot to obtain perfect
searing.
Use the steak air fry function when cooking steaks,
chops, chicken, seafood and veggies.
Rotisserie
Bacon
Steak Tray
AFO 46045 SS 200605
15
www.KALORIK.com
Dehydrate all types of foods with the dehydration
function. Select the Dehydrate function. Adjust
time and temperature as needed.
Use the 2-in-1 steak and dehydrator tray. Flip the
steak tray upside down and slide it in the
dehydrator slot (top). Place your food in the air
fryer basket and slide it in the fast air fry slot. Press
the Start/Stop button to begin.
The built-in fan and low heat are used to create a
flow of warm air that reduces the water content
found in fresh foods.
Place food in a single layer with no overlap.
Lemon juice can be used to pretreat fruits and
vegetables and prevent browning.
Use to dehydrate fruits and vegetables, or to
make beef jerky, and more.
The baking rack can be used for both air frying
and the oven functions.
This accessory can be used for a variety of foods
including pizza or used when cooking with cake
pans to place on top.
When baking with bakeware for foods like a loaf,
quick bread, cake, and muffin pan, place on the
bottom (BAKE 1) rack.
Anything that needs to be cooked well from the
bottom, like a pie, should also be on the BAKE 1
level. Rule of thumb is, if you’re using a pan or tin
to bake, use the bottom level and the baking
rack.
When using the oven function, we recommend
rotating your rack 180° halfway through the
cooking time to ensure even results.
Dehydration
Air rack
AFO 46045 SS 200605
16
www.KALORIK.com
Used for baking oven function.
Ideal for smaller food bits.
Doubles as a drip tray to catch grease during
cooking when slid into the bottom level.
When using as a baking sheet for foods like
cookies or grilled cheese, or other baking
functions like roasting smaller cuts of food (like
chicken breasts, corn dogs, …), then place on 2nd
(BAKE 2) level.
When using the oven function, we recommend
rotating your pan 180° halfway through the
cooking time to ensure even results.
Tips
When setting up the Maxx Air fryer oven, always make sure the sliding
crumb tray is inserted prior to starting your cooking process. Rinse and
clean the sliding crumb tray after every use.
When cooking foods that may drip crumbs or grease during the
cooking process, make sure to place the baking/drip pan on the
lowest slot. This will help maintain the unit as clean as possible and
protect the lower heating elements.
Using the Rotisserie Spit
Insert the rotisserie spit through the center of the food lengthwise.
Slide the forks onto each side of the spit and secure them in place by
tightening the screws provided. Make sure the forks are securely
inserted and food is centered on the spit.
Use the rotisserie handle to lift the rotisserie rod. The hooks of the
rotisserie handle should be placed under the grooves on both sides of
the rod. Make sure the long end of the rod is on the right side of the
handle, and the short-indented side is on the left side of the handle.
Open the oven doors. Slide the accessory in the cavity. Insert the right
side (long end) of the rod in the rotisserie spit support. Then, place the
left side (short, indented end of the rod) on the left hook inside the
cavity.
CAUTION: Rotisserie accessories are very sharp and will likely get very
hot during the cooking process. Be careful and use oven mitts to avoid
personal injury.
WARNING: Place all ingredients on the racks, rotisserie spit or basket in a way to
prevent any contact with the appliance’s heating elements. Do not overfill.
Baking tray
AFO 46045 SS 200605
17
www.KALORIK.com
FUNCTIONS
AIR FRYER
Air frying can be used as a healthy alternative style of cooking, requiring little to
no oil and using rapid hot air to cook meals faster.
Place your food on or inside the appropriate rack, tray, or basket and
position it inside the oven.
Press start, select the Air Fryer function. and use the selector dial to scroll
through the presets, the presets will flash as you go by each one.
If you wish to change either the temperature or the time from your preset,
press the selector dial once to change the time and once again to
change the temperature. Turn it clockwise to increase and
counterclockwise to lower.
Once you have found the preset you desire to use, press the Start/Stop key
to begin. The appliance will turn on and the unit will start the cooking
process, you will see the timer countdown.
The selected preset will blink until the desired temperature has been
attained, and then remain steady throughout the remainder of the
cooking time.
Tip: Flipping or turning food halfway through the cooking process ensures
that the food is evenly cooked.
When the countdown timer reaches 0:00, the unit will beep 3 times, and
the heating elements will turn off. Please note that after cooking time is
done, the fan will remain on for 3 minutes for cooling purposes. OFF OFF”
will start blinking in the display until cooling process is finished.
Once the cooling process is done the unit will beep and turn off right after.
Carefully take out your food with oven mitts and using the tray handle.
Note: the cooking process can be cancelled at any time by pressing the
Start/Stop button.
Notes:
Although oil is not necessary, a small portion of oil can be sprayed on or
brushed on food before air frying. Make sure to distribute oil evenly on
food.
Some foods release water or oil when cooking. When cooking large
quantities for an extended period, condensation may build up, which
could leave moisture on your countertop.
AFO 46045 SS 200605
18
www.KALORIK.com
Use the baking pan to catch water or oil when dripping.
Air frying presets:
Food
Default
Temperature (°F)
Default Time
Adjustable
Temperature
(°F)
Adjustable
Time
Air Fry
425°F
15 mins
140-450°F
1-90 min
*Chicken
435°F
40 mins
140-450°F
1-90 min
Warm
280°F
6 mins
140-450°F
1-90 min
Ribs
400°F
25 mins
140-450°F
1-90 min
Shrimp
375°F
10 mins
140-450°F
1-90 min
*Steak
500°F
13 mins
140-500°F
1-90 min
Wings
450°F
15 mins
140-450°F
1-90 min
*Bacon
425°F
9 mins
140-450°F
1-90 min
Fish
375°F
10 mins
140-450°F
1-90 min
Corn
440°F
15 mins
140-450°F
1-90 min
Fries
450°F
15 mins
140-450°F
1-90 min
Dehydrate
130°F
3 hours
80-155°F
1 min
9h59 min
Defrost
80°F
40 mins
80-140°F
1-90 min
Veggies
400°F
10 mins
140-450°F
1-90 min
Times and temperature are indicative, and results can vary on food or quantity
*Steak (medium rare)
- Insert steak tray on the baking tray and place inside the oven.
- Preheat for 5 minutes.
- Using oven mitts and the tray handle, carefully pull out the tray and place
your steak on top. Place the steak tray back inside the unit for 4 minutes.
- Flip your steak over and continue to cook for another 4 minutes.
*Bacon
- Place bacon tray right on top of baking pan and place bacon on the bacon
tray.
*Chicken
-Use the Chicken preset when cooking a whole chicken. This preset will
automatically turn on the rotisserie function.
AFO 46045 SS 200605
19
www.KALORIK.com
If cooking chicken breasts, chicken cutlets or single chicken pieces, use the Air
Fry preset and adjust cooking time and temperature as needed. Chicken is
done when internal temperature reaches 165°F.
OVEN
This mode is for use of the bake, broil, pastry, pizza, proof, roast, and toast
functions. Place the baking tray or rack with food inside the oven. Use the
selector dial to scroll through the presets, when desired preset is flashing, press
the Start/Stop button to confirm the preset and start cooking. As with any
traditional oven, the bake functions generate more heat in the back than in
the front, near the doors. To ensure more even results, we suggest rotating your
baked goods 180° halfway through the cooking time when using oven
functions. You can do this by simply rotating the baking pan or rack with the
food inside. Another alternative for certain foods is to use the Air frying functions
which circulates air and allows more even heat distribution and faster results. It
is recommended to adjust for 5-10 minutes faster cooking times and/or a 10-
25°F decrease in cooking temperature when air frying baked foods for the first
time.
Place the baking / drip tray underneath the air rack or basket as there is a
chance food may drip during the cooking process. The baking pan will
help catch any grease or crumbs.
Baking refers to a wide variety of cooking modes, which is why there are 2
baking levels ideal for different types of baking. All bakeware baking
(cakes, loaves, muffins) should preferably be done on the level 1, indicated
by BAKE 1 on the door, placed on the baking rack. Baking free-form loaves,
cookies, sandwiches, and roasting should be done on the baking pan on
the 2nd level, indicated by BAKE 2 on the door, which allows for a gentler
heat distribution on flat baking pans.
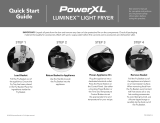
Press start/stop to select the Oven mode and use the selector dial to
choose the desired preset you wish to use.
Press the Start/Stop button for confirmation. Once started, the selected
preset will blink until the desired temperature has been attained, and then
remain steady throughout the remainder of the cooking time. This lets you
know when your oven is ready for use!
Temperature and time can be adjusted by pressing the knob when the
preset is flashing. Press it once to change time and twice to change
temperature. Turn it clockwise to increase and anti-clockwise to lower.
When done, press the Start/Stop button to confirm.
AFO 46045 SS 200605
20
www.KALORIK.com
Time can be adjusted from 1 to 90 minutes and temperature from 140°F to
450°F (can vary depending on the selected preset).
Press the rotisserie function if needed for your cooking operation.
When the cooking time has elapsed, the unit will beep. The heating
elements will turn off and the display panel will show “OFF OFF”. Please
note, although the unit has powered off, the fan will take an additional 3
minutes to cool down before coming to a complete stop and beeping one
last time.
Bake function is best for foods that require rising like cakes, quick breads
and loaves, soufflés, and the like.
CAUTION: Carefully take out your food with oven mitts and using the
tray handle.
Notes:
Cooking process can be cancelled at any time before the timer finishes
counting down by pressing the Start/Stop button.
Food gets cooked quickly during broil, it is best to watch over food to not
overcook.
Function
Description
Info
Bake
Recommended for
foods that would
normally be prepared
in a conventional
oven.
Works with prepacked frozen meals.
For best results, preheat the oven at
least 5 minutes at the desired
temperature.
Recommended accessories: baking
rack and/or backing tray.
Broil
Used for meats such as
beef, chicken, or pork.
Also used for top
browning casseroles
and gratins.
Preheat the oven for 5 minutes.
For best results, use the top slot.
This function usually requires shorter
cooking time.
Food gets cooked quickly during
broil, it is best to watch over food to
not overcook.
Do not use glass oven dishes to broil.
Recommended accessories: air
rack in top slot and baking tray in
lower slot to catch grease drippings.
CAUTION: Aluminum foil is not
recommended for covering the
rack. If covered, the foil prevents
the fat from dripping into the drip
  • Page 1 1
  • Page 2 2
  • Page 3 3
  • Page 4 4
  • Page 5 5
  • Page 6 6
  • Page 7 7
  • Page 8 8
  • Page 9 9
  • Page 10 10
  • Page 11 11
  • Page 12 12
  • Page 13 13
  • Page 14 14
  • Page 15 15
  • Page 16 16
  • Page 17 17
  • Page 18 18
  • Page 19 19
  • Page 20 20
  • Page 21 21
  • Page 22 22
  • Page 23 23
  • Page 24 24
  • Page 25 25
  • Page 26 26
  • Page 27 27
  • Page 28 28
  • Page 29 29
  • Page 30 30
  • Page 31 31
  • Page 32 32

KALORIK AFO User guide

Category
Small kitchen appliances
Type
User guide
This manual is also suitable for

Ask a question and I''ll find the answer in the document

Finding information in a document is now easier with AI