Page is loading ...

OPERATION
Pleasereadandsavethis guidethroughbeforeusingyourrangehood.
Storetheguideaway inasafeplacesothatyouwillknowwhereitis,
whenyouwanttorefertoit.
MODEL :WS-55series
MANUAL

TableofContents
Important Safety Instructions ----------------------------
Safety Notes ------------------------------------------------------
Tools and Materials Required ----------------------------------
Accessory Package --------------------------------------------
Preparing the Range Hood -----------------------------------
Preparing the Installation Location --------------------------
Providing Electrical Power -------------------------------------
Mounting Range Hood to Cabinet ----------------------------
Mounting Range Hood Without Cabinet ---------------------
Use and Care ------------------------------------------------------
Maintenance Instruction -----------------------------------------
Ducting --------------------------------------------------------------
Troubleshootings --------------------------------------------------
PartsLayoutDiagram---------------------------------------------
Size-------------------------------------------------------------------
Making The Electrical Connection -----------------------------
Circuit Diagram ----------------------------------------------------
P.1
P.3
P.4
P.4
P.5
P.6
P.7
P.8
P.8
P.9
P.10
P.11
P.11
P.12
P.12
P.13
P.15
A.
B.
C.
D.
E.
F.
G.
H.
I.
J
K.
L.
M.
N.
P.
Q.
R.
forinstallation,cleaning,lightbulbchangingand
dismantlingtoreducetheriskofanybodilyinjuries.
Duetosharpedge,pleasewear
SafetyWorkmanGloves""
SafetyWorkmanGloves
WARNING

ReadandSaveTheseInstructions
CAUTION-Toreducerisk offireandtoproperly exhaustair,makesure
toproperly exhaustair.Besuretoductairoutside-Donot
ventexhaustairintospaces withinwalls,ceilings,attics,
crawlspaces,orgarages.
WARNING-Toreducetheriskoffireorelectricshock,donotusethisfan
withanysolid-statespeedcontroldevice.
WARNING-
A.Usethisunitonlyinthemannerintendedbythemanufacturer.
Ifyouhavequestions,contactthemanufacturer.
B.Beforeservicingorcleaningtheunit,switchpoweroffatservice
paneltopreventpowerfrombeingswitchedonaccidentally.
C.Whentheservicedisconnectingmeanscannot blocked,securely
fastenprominentwarningdevicesuchasatagtoservicepanel.
TOREDUCETHERISKOFFIRE,ELECTRICSHOCK,ORINJURY,
OBSERVETHEFOLLOWING:
CAUTION-Forgeneralventilatinguseonly.Donotusetoexhaust
hazardousorexplosivematerialsandvapours.
WARNING-
A-Neverleavesurfaceunitsunattendedathighsettings.Boilover
causesmokingandgreasyspilloversthatmayignite.Heatoils
slowlyonlowor mediumsettings.
B-Alwaysturnhoodonwhencookingathighheatorwhencooking
flamingfoods.(ie,Craepessuzetter,charriesjubilee,peppercorn
beefflambe)
C-Cleanventilatingfansfrequently.Greaseshouldnotbeallowed
toaccumulateonfanorfilter.
D-Useproperpansize.Alwaysusecookwareappropriateforthe
sizeofthesurfaceelement.
TOREDUCETHERISKOFARANGETOPGREASEFIRE:
1
A.IMPORTANTSAFETYINSTURCTIONS

WARNING-Toreducetheriskofinjuryintheeventofarangetopgrease
fire,observethefollowing:
A- withaclose-fittinglid,cookiesheet,
ormetaltray,then turnofftheburner.Becarefultoprevent
burns.Iftheflamesdonotgooutimmediately,
SMOTHERFLAMES
EVACUATE
ANDCALLTHEFIREDEPARTMENT.
D-
1.Youknowyouhavea extinguisher,andyou
alreadyknowhowtooperateit.
2.Thefireissmallandcontainedintheareawhereitstarted.
3.Thefiredepartmentisbeingcalled.
4.Youcanfightthefirewithyourbacktoanexit.
USEANEXTINGUISHERONLYIF:
CLASSABC
C- includingwetdishclothsortowels-
aviolentsteamexplosionwillresult.
DONOTUSEWATER
B- -Youmaybeburned.NEVERPICKUPAFLAMINGPAN
WARNING-Sufficientairisneededforpropercombustionand
exhaustingofgasesthroughtheflue(chimney)offuelburning
equipmenttopreventbackdrafting.Followtheheatingequipment
manufacturer'sguidelineandsafetystandardssuchasthese
publishedbytheNationalFireProtection Association(NFPA),and
theAmericanSocietyforHeating.RefrigerationandAir
ConditioningEngineers(ASHRAE),andthelocalcodeauthorities.
Keeptherangehoodclean.
WARNING-Toreducetheriskoffire,useonlymetalductwork.
2

1.Allelectricalworkmustbedoneinaccordancewithlocaland/ornational
electricalcodeasapplicableforsafety.Thisproductmustbegrounded
ifyourareunfamiliarwithmethodsofinstallingelectricalwiring,secure
theservicesofaqualifiedelectrician.
2.Turnoffpoweratserviceentrancebeforeinstallingwiringorservicing
thisproduct.(120voltforrangehood.220voltforelectricrangeifany)
3.Turnoffpowertoavoidriskoffire,electricshock,orinjuryforcleaning
ormaintenancesuchaslubrication.
4.Fireplaces,gasfurnaces,waterheaters,requireproperflowof
combustionairandexhaust.Makesurethisflowisnotalteredwhen
usinganyexhaustfan.
5.Pleasereadspecificationlabelonproductforfurtherinformationand
requirements.
CAUTION-Toreducetheriskoffireandtoproperlyexhaustair,be
suretoductairoutside.Donotventexhaustairintospaces
withinwallsorceilingsorintoattics crawlspacesorgarages.
6.Pleasewear"SafetyGloves"forinstallation,cleaning,lightbulb
changinganddismantlingtoreducetheriskofanyinjuries.
3
B.SAFETYNOTES

Drill,electricofratchetdriver,with3/16"woodbit(fordrillingstarter
holesand1 ” woodbit(todrillanaccessholesinthecabinetor
kitchenwallfortheelectricpowerline)
¼
Plier(foropeningelectricalknockout).
Two1"(thick)x2"(wide)x12"(approximatelength)woodstripsfor
recessedbottomkitchencabinetinstallationonly.(Purchaselocally).
Electricalwireandsuppliestocomplywithlocalcords.
Four1 ” longflatheadwoodscrews(purchaselocally)tomount
woodstrips.
¼
Pencilandrulerformarkinglocations.Sabersaworkeyholesawfor
cuttingthe1"x2"woodstripstolength.
1.Woodscrews3/16" x1"L6pcs.
2.Wireconnectorwithspring3pcs.
3.Washer 6pcs.
Onecommonscrewdriver.
C.ToolsandMaterialsRequired
D. AccessoryPackage
4
4.6” Verticalstartingroundcollar1pc.
C.TOOLSANDMATERIALSREQUIRED
D.ACCESSORYPACKAGE

1.Removethetopelectrical
knockout,youmayplanto
bringpowertotherange
hoodeitherthroughthe
cabinetorthroughthewall
(Fig.1)
2.Insertascrewdriverintotheknockoutslotandbendtheknockout
backandforth.(Fig.2)
3.Youmayhavetouseplierstopulltheloosenedknockoutfree.(Fig.3)
4.Wheninstalled,thebottomedge
ofyourrangehoodshouldbe
28"~32"abovethetopofthe
cookingsurface.(Fig.4)
Fig.2
Fig.3
E.PreparingTheRangeHood
5
Fig.4
28”-32”
Fig.1
E.PREPARINGTHERANGEHOOD
ElectricalKnockout

1.Ifyouwanttomovetheelectricrangetomakeroomforworkingonthecabinet
turnoffthe220voltpowerfortheelectricrangeattheserviceentrance.
2.Beforemovingagasrange,shutoffthegas.
NOTE:1.SKIPFOLLOWINGSTEPS3ATHROUGH3DIFTHEHOODISTOBE
MOUNTEDONACABINETWITH .
2.AFLUSHBOTTOMMUSTCUTANATLEAST6”
AFLUSHBOTTOM
X6” BYSQUARETO
FITFORADUCTINGVENTILATION(REFFIG.11)
3.Forinstallationontoarecessedbottomcabinet:
a.Measurethespace(underthecabinetbetweentheinsidefrontedgeand
insidebackedge(Fig.5).Withasabersaw,cuttwo1"x2"woodfillerstrips
(purchasedlocally)tofillinthebottomofthecabinet.
b.Starta1 "longwoodscrew(purchasedlocally)about3"fromeachend
ofthe1"x2"woodstrips(Fig.6)
c.Positionthestripsonthecabinetbottomandscrewthestripssecurelyto
thecabinet(Fig.7)
d.Foramoresecureinstallation,drillfour3/16"holesfrominsidethecabinet,
downintothewoodfillerstrips.Insertscrewsintothestarterholesin
cabinetandtightenscrewsuntilwoodfillerstripsaresecuredundercabinet.
¼
4.Centerthehoodinplacebeneaththecabinetandflushwiththefrontofthe
cabinet.Markthefollowing:
a.Thesixkeyholemountingslotsforthehood. Marktheseontothebottomof
thecabinet;or,ifthecabinetbottomisrecessed.Ontothewoodstrips(Fig.7)
b.Theelectricalknockouthole.(Fig.1)
Fig.5
Fig.6
6
F.PREPARINGTHEINSTALLATIONLOCATION

4.Screwthefour1"woodscrews(for
mountingthehood)intotheexact
centerofthearrowandofthekeyhole
mountingslotsmarkedonthecabinet
bottom (forflushinstallations),or
markedonthe1”
recessedcabinetinstallation)(Fig.7)
Donotturnthemountingscrewsinall
theway.Allow3/8" ofscrewtoproject,
sothehoodcanbefittedplace.
(Thescrewswillbetightenedlater)
x2” woodstrips(for
Ifdrillingintothewalls,becarefulnottocutexistingelectricalcables,
whichwouldcreateahazard.
Fig.9
Fig.8
1.Afterturningofftheproper120voltcircuitattheserviceentrance,
drillouttheelectricalpowerlineaccessholemarkedonthecabinet
bottom orwall.Usea1 ”woodbit.Tooperatetheelectricdrill,use
anextensioncordconnectedtoanothercircuit.(Fig.8)
¼
Note:PleasealsoreferP.8"I.MakingtheElectricalConnection"
Color:
green/white/black
Connecter
1"bit
Fig.7
G.ProvidingElectricalPower
7
SafetyWarning:
2.Fishtheelectricalpowerlinethroughtheaccessholedrilledinthewallor
bottomofthecabinet.Attachanappropriateconnector(purchasedlocally)
totheendofthepowerlineforthetypeofwiringbeinginstalled.Followall
codes.(Fig.9)
Stripssecured
G.PROVIDINGELECTRICALPOWER

1.Positionthehoodinplacesothat:
a.TheelectricallineisroutedthroughtheappropriateKnockoutopening.
Thisstepwillhavetobeaccomplishedwhilepositioningthehood(Fig.10)
b.Thelargepartofthekeyholemountingslotsonthehoodfitontothehood
mountingscrewsprojectingfromthebottomofthecabinet.(Fig.11)
2. Adjustthehoodsothefrontisflushwiththecabinetfront.
3.Tightenthehoodmountingscrewsallthewayintothecabinetorinto
the1"x2"woodstripssothehoodissecure.
Fig.10
Color:
green/white/black
Knockoutopening
8
Fig.10
H.MOUNTINGRANGEHOODTOCABINET
1.Turnthethreenutsatthefrontofbottomboard.
2.Removescrewsonwiringcase,
fishoutwiresthroughthe
knockout.(Fig.12)
3.Marktheelectricalconnectionby
fasteningallwirestotheexisting
wallwiringaccordingtothetheir
colors.(BlacktoBlack,Whiteto
White,GreentoGround)
4.Afterconnectionisdone,reinstallwiringcasecoverandbottomboard.
5.Slideplasticcollectioncupsontothebackmetalmounting.
6.Turnonpowerandcheckoperationoffanandlight.
Fig.12
wirecase
I.MAKINGTHEELECTRICALCONNECTION
Fig.11
Fig.11

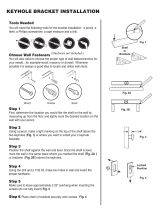
1.Usingmetalbracketsandscrews
(included),centerhoodonto
boardandinstallscrew.
2.Removethehoodfromtheboardand
nailthewoodboardontothewall.
(Besurethenailisinthecenterof
thestud)
3.Placetherangehoodontheboard
andtightenthescrew.
Bracket
Screw
4.Completelyfinished.
windcap(s)arenotincluded.
9
J.MOUNTINGRANGEHOODWITHOUTCABINET

10
K.USEANDCARE
II-highspeed0-off I-lowspeed
CBA
Note
Note
CareInstruction:
Exterior
Interior
:Forstainlesssteeltype,peeloffthePVCfilmsbeforeuse.
Operateswitches(Fig.15)
SwitchA:Lightswitch
SwitchB:Rightfanswitch
SwitchC:Left fanswitch
Afteryouarefinishedcooking,pleasealwaysremembertoturncontrol
switchesBandCoff.(Pressswitchon “ O” position)
:Rangehood shouldbeturnoneitherbeforeorthesametimewhencooking
begins.Aftercooking,rangehoodshouldbekeptonforabout3moreminutes
forcompleteventilationofcookingoders.
Pleasealwayspulltheplugoutoutlet,whencleaningordismantling,
wear “ safetygloves” toreducetheriskofanybodilyinjuries.
:Canbecleanedwithanytypeofnon-abrasivedetergentandaclean
cloth. “ Greenpad” etc.Andanymetaltypecleaningpadisnotrecommended
forexterior.
:1.SwitchONthefanathigh,mixmilddetergentwithwaterin
mist-sprayer,atfine-spraymixtureontothebladesfor60seconds
withthefanrunning.
2.Leavefanonforanadditional4-5minutestodryoilbasin.
3.Repeatonotherturbinevane(canbecleanedsimultaneouslywith
thefirst).
Fig.15

11
2.Afterusingthemachine,wipesthemachinebyneutraldetergentin
ordertokeepitcleanandmaintaintheappearancewithbrightness
andsanitation.
3.Whenthelevelofdirtyoilofthecollectorreached4/5ofheight,ithasto
beremovedinordertoavoidoverflowingandpollution.
L.MaintenanceInstruction
1.Maintenanceshallbeimportantthanrepair.Pleasetakecareofthe
neededmaintenanceinordertosecureandextendtheexcellent
functionsandusinglife.
Note:Beforerepairingtherangehood.Disconnectthepowersource.
L.MAINTENANCEINSTRUCTION
M.Ducting
Thisstyleofrangemustbeventedviaductingtotheoutsideofthehouse.
Followgeneralruleswhenductingthehood:Usecorrectsizeofducting
(6"or7” round),donotreducesizeofducting,makeallturnsgradual,
noshortcorners.Ifductingranwillbelongerthan10feetenlargeductby
atleast1"inchdiameteraftereach10feet.Tapealljointsinductingand
allgasketedopeningsonhoodforatightseal.
Forthegrayplastic(included)overthecircularopeningontopinorderto
provideatightsealforductingtoattachto.TheGRAYringisdesignedtofit
either6“ or7” ducting.
Forroundductingfromthetop:
M.DUCTING

12
Correction
Symptom
Fanarenotoperatable.
Illuminatinglight
doesnotwork
Hoodvibrates.
A.Check powersourcetoseeifitis normal.
B.Checkpowerinletplugtoseeifitis
pluggedfirmlyintoit'ssocket.
A.Disconnectthepowersource.
B.Checklight,replaceitwithanew
oneifitisburnedout.
A.Checkfordamagedvanes.
B.Checkifexhaustductissecured.
N.Troubleshootings
N.TROUBLESHOOTINGS
NOTE:Anyfaultswiththisunitshouldonlybeattendedtobyaqualifiedtechnician.
P.CIRCUITDIAGRAM
(4+4uf350V)
50/60HZ
4u
4u
SWITCH
BLACK
BLUE
RED
BLUE
RED
WHITE
AC
GREEN
EARTHGROUND
BLACK
LAMP
WHITE
WHITEYELLOW
BLUE
YELLOW
RED
BLUE
BLUE
YELLOW
RED
BLUE
MOTOR MOTOR
CAPACITOR

Q.PartsLayoutDiagram
13
Q.PARTSLAYOUTDIAGRAM
1
2
5
7
8
9
10
11
21
4
6
3
22
23
24
25
26
27
28
17
18
19
20
15
16
12
13
14

14
PartsList
PARTSLIST
Description
Hoodcasing
Airchamber
Bottomboard
Wirebox
Motorhousing
Oilcollector(large)
Motor(L/R)
Fan(L/R)
Oiltunnel
Safetymesh(L/R)
Oilcollector(small)
Exhaustpipeconnector
Powercord
Earth
Lightswitch
Speedswitch
Screw
Lampshade
Washer
Screw
Capacitor
Wireconnector(large)
Wireconnector(small)
Lightbulb
Lightbulbsocket
Cordbushing
Wireboxcover(small)
Wireboxcover(large)
No.
1
2
3
4
5
6
7
8
9
10
11
12
13
14
15
16
17
18
19
20
21
22
23
24
25
26
27
28
Perhood
1
1
1
1
2
2
2
2
2
2
2
1
1
1
1
2
3
1
1
2
1
1
1
1
1
1
1
1
Partsno.
55-01
55-02
55-03
55-04
55-05
55-06
55-07
55-08
55-09
55-10
55-11
55-12
55-13
55-14
55-15
55-16
55-17
55-18
55-19
55-20
55-21
55-22
55-23
55-24
55-25
55-26
55-27
55-28
*Specificationssubjecttochangewithoutnotice.

S.Size
15
R.SIZE
20-7/8”
6-1/2”
30” (36”)(42”)

What Is Not Covered By These Warranties:
1) Conditions and damages resulting from any of the following:
? Improper installation, delivery, or maintenance.
? Any repair, modification, alteration or adjustment not authorized by the
manufacturer or an authorized service dealers.
? Misuse, abuse, accidents, or unreasonable use.
? Incorrect electric current, voltage or supply.
? Improper setting of any control.
? Improper chemical cleaning.
2) Light Bulbs
3) Products purchased for commercial or industrial use (such as in a hotel, office,
restaurant, or other business)
4) Damage due to earthquake, flood, storm, etc.
Limited Warranty
Windster Hoods Inc. warrants this product against defects in material or
workmanship as follows:
1) Labor: For a period of one (1) year from the date of purchase, if this product
is determined to be defective, Windster will repair or replace the product, at its
option, at no charge. After the warranty period, you must pay for all labor
charges. During the “labor” warranty period there will be no charge for labor.
2) Parts: In addition, Windster will supply, at no charge, new or rebuilt
replacements in exchange for defective parts for a period of two (2) years.
After the warranty period, you must pay for all parts costs. During the “parts”
warranty period, there will be no charge for parts
You must carry-in or mail-in your product during the warranty period. This warranty
only applies to products purchased and serviced in the United States or Canada.

Defective Products:
All products will be inspected, tested, and carefully packed by the manufacturer
before shipping to customers. Products that are damaged during transit can only be
exchanged for the same product, under the condition that the customer must get a
RMA (Return Merchandise Authorization) from Windster. When products are
received defective, you must notify us within the 3 business days of receiving the
package. Replacement products are only shipped when the RMA is issued. NO
EXCEPTIONS.
Return Policy
Windster offers only the best and highest quality products. If you are not satisfied
with your purchase, please contact us within 3 business days of product arrival to
obtain a Return Merchandise Authorization (RMA). Returns sent without a RMA will
not be accepted. There will be a 25% re-stocking fee for every returned items.
Shipping fee will also be deducted from the original purchase price. When returning a
package, please include a copy of your purchase receipt. Use the original shipping
box and packing materials and completely remove or cover the original shipping label.
Make sure that products are in brand new condition, uninstalled, un-drilled, and
contain everything that came with the package as when you first received it. If any
parts or manuals are missing, we have the right not to accept the return.
We suggest that you use a traceable and reputable carrier of your choice to ship your
return. Your credit or refund will be processed within 10-14 business days from the
date we receive your return.
2102N.SeamanAve.,S.ElMonte,CA91733TEL:626-350-1015626-350-5215FAX:626-350-1254
Website: Email:www.windsterhood.com support@windsterhood.com

2102N.SeamanAve.,
S.ElMonte,CA91733
TEL:(626)350-1015
(626)350-5215
FAX:(626)350-1254
©2006-2008WindsterHoods,Inc.
Specificationssubjecttochangewithoutnotice.
WINDSTER
TM
w w w . w i n d s t e r h o o d . c o m
/