LG 14SA2RB-AJ Owner's manual

Type
Owner's manual
www.lg.com
OWNER'S MANUAL
Colour Television
Chassis : CP-079C
P/No. : MFL61997501 (07)
Make sure to insert the power plug completely. If power
cable is not fixed completely, a fire can break out .
Do not pull out the power cord. Always Pull out by the power
plug. Do not touch the plug with wet hands. Do not damage
the power cord.
Do not unplug the power cord while the product is in use. Do
not use the power plug to turn the product ON/OFF. Electric
shock can damage the product.
Do not overload AC outlets by plugging too many
appliances in the same socket or extension cords. They
may result in a shock or fire hazard.
Never leave the TV set “ON”/“STANDBY” when leaving the
house. Unplug the TV before moving it or if you are not
going to use it for several days or during lightning storms.
For Own safety, Never touch any part of product, the power
cord, and the antenna cable during lightning storms. You
may be electrocuted.
TV sets are provided with ventilation holes to allow the
release of heat generated. Make sure that these holes
are not blocked. Do not install the product in a confined
place, such as book case or built in cabinet .
Do not place any object filled with liquid such as Vases, cup,
glass etc on the TV set. Do not place the lighted candles on
the TV set. This may cause fire or an electric shock hazard.
This unit has been engineered and manufactured to assure your personal safety,
however improper use may result in potential electrical shock or fire hazards. In order to
allow the proper operation of all safeguards incorporated in this TV set, observe the
following basic rules for its installation, use and servicing. Keep it in an accessible place
for future reference. (TV operating voltage is : 110V ~ 240V AC)
If you can smell a smoke or other odors or hear a strange
sound unplug the power cord and contact the service
center. If you continue to use, electric shock can occur.
Do not place the product where it might be exposed to
excessive heat, sunlight, rain or moisture.
Important Precautions
2
Do not attempt to open the product. There are
dangerous High Voltages inside. Refer to Servicing
through Qualified Personnel if the TV is not operating
properly.
To avoid battery leakage and damage to the remote, remove the batteries from
the remote if you are not going to use it for several days. If any liquid leaks from
the batteries and touches your skin, immediately wash it away with water.
Battery Installation: The remote control Handset is powered by two AA/
AAA batteries. To Load the Batteries, turn the remote control handset
over and open the battery compartment. Install two batteries as per the
polarity symbols ( and ) marked inside the battery compartment .
Do Not use the stabilizer, as this set has a In built stabilizer. Use of External Inferior
Quality stabilizer may damage your product .
Do not allow children to climb over it. If the product falls /
collapses, you may be hurt. Do not drop or push objects
(like coins, hair pins etc) into the TV cabinet openings.
Some internal parts carry hazardous voltages.
Avoid personal injury / set damage by Installing the product
on a flat and stable place that can support the weight of the
set and has no risk of dropping the product.
While cleaning the product, Unplug the Power cord and
clean with dry & soft cloth. Do not use thinner, aerosol or
any other chemical to clean .
Important Precautions
3
1. When this crossed out wheeled bin symbol is depicted on the product
and its operator’s manual, it means the product is covered by the e-waste
Management and Handling Rules, 2011 and are meant to be recycled,
dismantled, refurbished or disposed off.
2. Dos
a. The product is required to be handed over only to the authorized recycler for disposal.
b. Keep the product in isolated area, after it becomes non-functional/un-repairable
so as to prevent its accidental breakage.
Don’t
a. The product should not be opened by the user himself/herself, but only by authorized
service personnel.
b. The product is not meant for re-sale to any unauthorized agencies/scrap dealer/
kabariwalah.
c. The product is not meant for mixing into household waste stream.
d. Do not keep any replaced spare part(s) from the product in exposed area.
3. Any disposal through unauthorized agencies/person will attract action under
Environment (Protection) Act 1986 .
4. Hazards of improper handling or accidental breakage :
a. All picture tubes are hazardous due to concentration of lead, cadmium and zinc
in it. The various chemicals and heavy metals contained in picture tubes cause
cancer, birth defects, hormone disruption, and damage body organs when they
leak into the environment. All of this can, and does, leach into the soil, ground
water, air and our own bodies.
To prevent possible injury in case of breakage, wear heavy protective clothing,
including gloves & safety goggles.
b. If batteries are disposed incorrectly, it can greatly harm the environment. The
chemical by-products are hazardous. The metals and chemicals found in
batteries can mix into soil which may be hazardous to humans, plants and animals. If
thrown in fire, they can cause blast and release toxic gases which may be harmful
for health.
5. To locate a nearest collection centre or call for pick-up (limited area only) for disposal of
this appliance, please contact Toll Free No. 1800-180-9999 for details. All collection
centre and pick up facilities are done by third parties with LG Electronics India Pvt. Ltd.
merely as a facilitator. For more detailed information, please visit : http://www.lge.com/in
Disposal of your old appliance (as per e-waste Rules)
Vhoh lVs ij ;k rjy inkFk Zl sHkjh pht astlS s
Qyw nku] di] fxykl vkfn ;k tyh gbq Z
ekes cfÙk;k au j[kAas bll svkx yx ldrh g S;k
fctyh dk >Vdk yx ldrk gAS
cSVjh yhdst vkSj fjeksV dks uqdlku ls cpkus ds fy,] tc vki fjeksV dks dbZ fnuksa rd bLrseky ugha djus okys gksa rks cSVfj;ksa
dks mlesa ls fudky nsaA vxj cSVfj;ksa ls dksbZ rjy inkFkZ fjldj vkidh Ropk ij yx tkrk gS] rks rRdky bls ikuh ls /kks nsaA
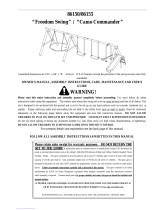
Ñi;k [kqn dks pksV ls vkSj mRikn dks uqdlku ls cpkuk lqfuf'pr djus ds fy, bu funsZ'kksa dk ges'kk ikyu djsaA
fp=k vkids mRikn ls FkksM+k fHkUu gks ldrk gS] D;ksafd ;g flQZ funsZ'kksa dks le>us esa enn ds fy, ,d mnkgj.k gSA
Vhoh dk vkWijsfVax oksYVst gS% 110 - 240 V ,lhA
LVsfcykbt+j dk iz;ksx ugha djsa] D;ksafd bl lsV esa fcYV bu LVsfcykbt+j gSA ?kfV;k DokfyVh ds ckgjh
LVsfcykbt+j ds iz;ksx ls vkids mRikn dks uqdlku igqap ldrk gSA
lqfuf'pr djsa fd ikWoj Iyx vPNh rjg ls
yx x;k gSA ;fn ikWoj Iyx Bhd ls ugha
yxk gS rks vkx yx ldrh gSA
,d gh lkWdsV vFkok ,DlVsa'ku dkWMZ esa dbZ
midj.k yxkdj ,lh vkmVysV dks
vksojyksM u djsaA ugha rks >Vdk yx
ldrk gS ;k vkx yx ldrh gSA
vka/kh&rwQku ds nkSjku viuh lqj{kk ds
fy,] midj.k ds fdlh fgLls dks] ikWoj
dkWMZ dks ;k ,aVhuk ds rkj dks u Nq,aA
vkidks fctyh dk >Vdk yx ldrk gSA
?kj l s fudyr s le; Vhoh dk s dHkh ^^vkuW **
LVMaS ck; u NkMs Aas+ Vhoh dk s f[kldku s l s igy s
vFkok ;fn vki dNq fnuk asrd Vhoh dk bLres ky
ugha djus okys gSa vFkok vka/kh&
rwQku ds nkSjku Vhoh dk Iyx fudky nsaA
mRikn dks ogka u j[ksa tgka ml ij csgn
xehZ] /kwi] o"kkZ ;k ueh dk vlj gks ldrk
gksA
tc mRikn dks bLrseky dj jgs gksa rks ikWoj
Iyx dks u fudkysaaA mRikn dks vkWu@vkWQ
dju s d s fy, ikoW j Iyx dk bLres ky u djAas
fctyh dk >Vdk mRikn dks {kfr igqapk
ldrk gSA
vxj vkidks /kq,a dh ;k dksbZ vkSj xa/k vk,
;k dksbZ vthc vkokt+ lqukbZ nsa] rks ikWoj
dkWMZ dks Iyx ls fudky nsa vkSj lfoZl lsaVj
ls laidZ djsaA vxj vki bLrseky tkjh
j[krs gSa rks fctyh dk >Vdk yx ldrk gSA
mRikn dks [kksyus dh dksf'k'k u djsaA blds
Hkhrj [krjukd gkbZ oksYVst gksrs gSaA vxj
Vhoh Bhd ls dke u dj jgk gks] rks
;ksX;rkizkIr dfeZ;ksa ls lfoZflax djk,Aa
[kqn dks pksV@lsV dks uqdlku ls cpkus ds
fy, mRikn dks ,sls lery vkSj fLFkj LFkku
ij j[ksa tks lsV dk otu laHkky ldrk gks
vkSj mRikn ds fxjus dk [krjk u gksA
mRikn dks lkQ djrs le; ikWoj Iyx dks
fudky nsa vkSj lkQ lw[ks diM+s ls iksaNsaA
lkQ djus ds fy, fFkuj] ,vjkslksy ;k
fdlh vU; dsfedy dk iz;ksx u djsaA
iSnk gksus okyh xehZ ds fudyus ds fy, Vhoh
lsVksa esa osafVys'ku fNnz cus gksrs gSaA ;g
lqfuf'pr djsa fd ;s fNnz can u gksaA mRikn
dks cqd dsl ;k fcYV bu dSfcusV tSlh can
txgksa ij baLVky u djsaA
cPpksa dks blds Åij u p<+us nsaA vxj
mRikn fxjrk@<g tkrk gS] rks vkidks pksV
yx ldrh gSA Vhoh dSfcusV ds Nsnksa esa dksbZ
pht ¼tSls flDds] gs;jfiu vkfn½ u fxjk,a
vkSj u ?kqlk,aA dqN Hkhrjh ikVZ~l esa
[krjukd oksYVst gksrs gSA
ikWoj dkWMZ dks [khapsa ughaA ges'kk ikWoj
Iyx dks idM+dj [khapsA xhys gkFkksa ls
Iyx dks u Nq,aA ikWoj dkWMZ dks {kfr u
igqapk,aA
4
lqj{kk funsZ'k
ƒ- tc ;g dkVs x;s ifg;s okys fcu dk fpg~u fdlh mRikn vkSj blds izpkyd iqfLrdk ds lkFk layXu gksrk gS] rks bldk vFkZ gS] mRikn
bZ&vif’k”V ¼izca/ku vkSj gFkkyu½ fu;e „‚ƒƒ ds vUrxZr] lfEefyr fd;k x;k gSA bl fu;e ds vuqlkj mRikn dks iqu% uohuhdj.k]
/oLr ;k fuiVkuk pkfg,A
„- bls djsa
mRikn dks dsoy vf/k—r iqu% uohuhdj.kdrkZ dks fuiVku gsrq gLrkukUrfjr djsaA
[k½ mRikn dk;kZRed uk jgs rks] mRikn dks i`Fkd {ks= esa j[ksa] ftlls mRikn vkdfLed {kfr ls cp ldsA
bls u djsa
mRikn dks miHkksDrk Lo;a ugha [kksysa] cfYd vf/k—r lsok deZpkjh }kjk [kqyok;saA
[k½ mRikn dks fdlh vuf/k—r ,tsalh@iqjkus lkeku ds Mhyj@dckM+h okys dks fQj ls u csapsaA
mRikn dks ?kjsyq vif’k”V /kkjk ds lkFk u feyk,saA
?k½ mRikn ds cnys gq, ;k vfrfjDr iwtksZa dks [kqyh txg esa u j[ksaA
…- mRikn dks fdlh Hkh vuf/k—r ,tsalh@O;fDr }kjk fuiVku djkus ij] i;kZoj.k ¼laj{k.k½ vf/kfu;e ƒ‹Šˆ] ds rgr dk;Zokgh gks ldrh gSA
†- xyr <ax ls j[kj[kko ;k vdfLed VwV&QwV ds [krjs %
yhM] dSMfe;e o ftad dh ekStwnxh ds dkj.k lHkh fiDpj V;wc [krjukd gksrh gSA fiDpj V;wc esa fofHkUu jlk;uksa rFkk Hkkjh /kkrqvksa dh
ekStwnxh ds dkj.k okrkoj.k essa buds fjlko ls dSalj] tUe nks”k] gkeksZu fo?kVu] vkSj ‘kjhj ds vaxks dks uqdlku gks ldrk gSA ;s lHkh jlk;u
feÍh esa] Hkw&xHkZ ty esa] gok esa ?kwy dj gekjs ‘kjhj esa izos’k dj ldrs gSA
[k½ ;fn cVS fj;k as dk xyr <xa l s fuiVku fd;k tkrk g]S rk s bll s i;koZ j.k dk s dkQh vf/kd udq lku gk s ldrk gAS jklk;fud mi&mRikn
[krjukd gkrs s gAaS cVS fj;k as e as ik, tku s okyh /kkr,q ¡ o jlk;u feÍh e as fey ldr s g aS tkfsd euq;k]as iMs &+ ik/Skk as rFkk tkuojk as d s fy, [krjukd gk s
ldr sgAaS ;fn vkx e assQdas stkr sg]aS rk so sfoLQkVs dj ldr sg aSrFkk tgjhyh xlS k asdk sNkMs +ldr sg aStkfsd LokLF; d sfy, gkfudkjd gk sldrh gAaS
‡- bl mRikn ds fuiVkj.k gssrq ;k fQj utnhdh laxzg dsUæ dk irk yxkus ds fy,] d`i;k Vksy Ýh uEcj ƒŠ‚‚&ƒŠ‚&‹‹‹‹ ¼lhfer {ks= esa
miyCËk½ ij lEid Z djAas lHkh lxa gz dUs n z ,o a fid&vi lfqo/kk, a ckgjh ,tUslh }kjk pyk;h tkrh gAaS LG Electronics India Pvt. Ltd.
flQZ lqfo/kk iznku djkus dk ek/;e gSA vfËkd tkudkjh ds fy, osclkbV ns[ksa% http://www.lge.com/in
bls djsa
bls u djsa
vkids iqjkus ?kjsyw midj.k dk fuiVku ¼bZ&vif’k"V fuiVk.k fu;ekoyh ds vuqlkj½vkids iqjkus ?kjsyw midj.k dk fuiVku ¼bZ&vif’k"V fuiVk.k fu;ekoyh ds vuqlkj½
POWER MUTE
PSM TV/AV
MENU
Q-VIEWARC/* LIST
SLEEP
FAVOURITE
XDP/*
1
3
4
6
7
9
PR
VOL VOL
PR
5
8
0
2
1
9
2
3
7
10
5
6
11
12
14
13
8
OK
EYE/*
MM/*
4
15
Location and function of controls
4. EYE / (option)
switches the eye function On or Off.
5. / (Programme Up/Down)
selects a programme or a menu item.
switches the set On from standby.
(Volume Up/Down)
adjusts the volume.
adjusts menu settings.
OK accepts your selection or displays the current
mode.
All the functions can be controlled with the remote control
handset. Some functions can also be adjusted with the
buttons on the front panel of the set.
Remote control handset
Before you use the remote control handset, please install
the batteries. See the previous page.
1. POWER
switches the set from On to standby or standby to On.
2. NUMBER BUTTONS
switches the set On from standby or directly select a
Programme number.
3. MENU
selects a menu.
6. Q. VIEW
returns to the previously viewed programme.
7. PSM (Picture Status Memory)
recalls your preferred picture setting.
8. XDP/*
Select excellent Digital picture.
9. MUTE
switches the sound On or Off.
10. TV/AV
selects TV or AV mode.
switches the set On from Standby.
11. LIST
displays the programme table. press LIST key again
to clear the LIST table from the screen.
12. SLEEP
sets the sleep timer.
13. ARC/* (option)
change picture format (Normal/Zoom).
14. FAVOURITE
pressing each time this button will select a stored
favourite programme.
COLOURED BUTTONS : When Menu is On some of these
buttons are used for programme edit in programme edit
window
*
Remarks : 1. Some keys in remote can be non-functional,
these keys are used in other models.
# Remote Design / Aesthetic may vary from model
to model.
15. MM / * (option)
select music mode.
5
ON/OFF
MENU
OK /
VOL
PR
1
3
4 5B5A
2
POWER MUTE
PSM TV/AV
MENU
Q-VIEWARC/* LIST
SLEEP
FAVOURITE
XDP/*
1
3
4
6
7
9
PR
VOL VOL
PR
5
8
0
2
OK
EYE/*
MM/*
On and Off
1. Press the main power button to switch the set On.
2. If the set is in standby mode, press the POWER,
TV/AV or NUMBER buttons on the remote control
handset to switch it On fully.
3. Press the POWER button on the remote control handset.
The set reverts to standby mode.
4. Press the main power button again to switch the set Off.
Note : while the set is switched On and mains plug is
disconnected, if mains plugged again then set will switch to
standby or power On.
Programme selection
You can select a programme number with the or
NUMBER Buttons.
Volume adjustment
Press the button to adjust the volume.
Quick view
Press the Q.VIEW button to view the last programme
Mute function
Press the MUTE button. The sound is switched Off and
the display appears.
You can cancel it by pressing the MUTE, button.
On screen language selection (option)
The menu can be displayed on the screen in desired language.
First select your language.
1. Press the MENU button and then button to select the
special menu.
2. Press the button after selecting language by pressing
button.
3. Press the button to selects the desired language.
All the On screen display will appear in the selected
language.
4. Repeatedly press the MENU button to return to normal TV
viewing.
Basic operation
6
Location and function of controls
Shown below is a simplified representation of front panel, here shown may be
somewhat different from your set.
2. REMOTE CONTROL SENSOR
3. POWER/STANDBY INDICATOR
Illuminates brightly when the set is
in standby mode dims when the set
is switched On
1. MAIN POWER (ON/OFF)
switches the set On or Off.
4. MENU
selects a menu.
5A. OK /
It accepts your selection when it is in menu.
Otherwise it selects input (TV or AV)
5B. (Volume Up/Down)
adjusts the volume.
adjusts menu settings.
(Programme Up/Down)
selects a programme or a menu item.
switches On the set from standby.
The dialogue between you and your set takes place on
screen with an operator menu. The buttons required
for the operating steps are also displayed.
Menu selection
1. Press the MENU button and then button to display
each menu.
2. Press the button and then button to select a
menu item.
3. Press the button to display the sub menu or the pull-
down menu.
4 Change the setting of an item in the sub or pull-down
menu with or .
You can move to the higher level menu with OK button
and to move to the lower level menu press the button.
Note :
a. In the AV mode the Programme Menu is not displayed.
b. In sound menu woofer is optional (In some models)
On screen menus
Manual programme
Programme edit
or
CSM
Programme
22
Auto programme
Picture
Time
Special
Sound
POWER MUTE
PSM TV/AV
MENU
Q-VIEWARC/* LIST
SLEEP
FAVOURITE
XDP/*
1
3
4
6
7
9
PR
VOL VOL
PR
5
8
0
2
OK
EYE/*
MM/*
7
Setting up TV stations
Programme
Up to 200 programmes can be stored by programme
numbers (0 to199). Once you have preset the
stations you will be able to use the or NUMBER
buttons to scan the stations you programmed.
Programmes can be tuned using automatic or
manual modes.
Auto programme tuning
All channel that can be received are stored by this
method.It is recommended that you use auto programme
during installation of this set.
1 . Press the MENU button and then button to select
the Programme menu.
2. Press the button and then button to select Auto
programme.
3. Press the button to display the Auto programme
menu.
4. Press the button to select Storage from.
5. Select the beginning programme number with the
button or NUMBER buttons on the Storage
from pull-down menu. Any number under 10 is
entered with a numeric '00' in front of it, i.e. '005' for5.
6. Press the button to select the start.
7. Press the button to begin auto programming. All
receivable stations are stored. To stop auto
programming, press the MENU button.
When auto programming is completed the Programme
edit menu appears on the screen. See the 'Programme
edit' section to edit the stored programme.
8. Press the MENU button to return to normal TV viewing.
Note : In some models up to 100 TV stations can be
stored.
Auto Programme
22
POWER MUTE
PSM TV/AV
MENU
Q-VIEWARC/* LIST
SLEEP
FAVOURITE
XDP/*
1
3
4
6
7
9
PR
VOL VOL
PR
5
8
0
2
OK
EYE/*
MM/*
8
Setting up TV stations
Manual programme tuning
Manual programme offer you to manually tune and
arrange the programme in whatever order you desire.
Also you can assign a programme name with five
characters to each.
1. Press the MENU button and select the Programme
menu.
2. Press the button and then button to select
Manual programme.
3. Press the button to display the Manual programme
menu.
4. Press the button to select Search. Press the
button to commence searching on the Search
pull-down menu. If a programme is found the search
will stop. Press OK button to store the programme. If
programme reception is poor go for fine tunning.
5. If this station is the one required, press the button
to select Storage. Select the desired programme
number (0 to 199) with the button or NUMBER
buttons on the Storage. pull-down menu. Any number
under 10 is entered with a numeric '00' in front of it, i.e.
'005' for 5. Press OK button to store the programme.
6. Press the button to select System. Select a TV
system with the button on the System pull-down
menu;
BG : (India/New Zealand/M.East/Africa/Australia)
I : (Hong Kong/South Africa)
DK : (East Europe/China/Africa/CIS)
M : (USA/Korea/Philippines) (option)
7. Press the button to select Channel. Press the
button to select V/UHF or Cable on the Channel
pull-down menu.
If possible, select the channel number 1 to 69 (V/UHF)
and 1 to 47 (cable) directly with the number buttons,
Any number under 10 is entered with a numeric '0' in
front of it i.e. '05 'for5.
8. Press the OK button to store it. The display Stored will
appear.
9. To store another station, repeat steps 4 & 5.
Manual programme
Programme
POWER MUTE
PSM TV/AV
MENU
Q-VIEWARC/* LIST
SLEEP
FAVOURITE
XDP/*
1
3
4
6
7
9
PR
VOL VOL
PR
5
8
0
2
OK
EYE/*
MM/*
9
Fine tuning
Normally fine tuning is only necessary if reception is poor.
1. Repeat the 'Manual programme tuning' steps 1 to 3.
2. Press the button to select Fine.
3. Press the button to fine tune for the best picture
and sound on the Fine pull-down menu, then press OK
button to store the setting.
4. Repeatedly press the MENU button to return to normal
TV viewing.
5. Change of from Yellow to red indicates tuning
is proper.
Assigning a programme name
1. Repeat the 'Manual programme tuning' steps 1 to 3.
2. Press the button to select Name.
3. Press the button on the Name pull-down menu. You
can use a blank, +, -, the numeric 0 to 9 and the
alphabet A to Z.
With the button you can select in the opposite
direction.
4. Select the next position by pressing the button and
then take your choice of the second character, then
press OK button.
5. Repeat the 'Manual programme tuning' steps 5 to 8.
6. Repeatedly press the MENU to return to normal TV
viewing.
Setting up TV stations
Programme
POWER MUTE
PSM TV/AV
MENU
Q-VIEWARC/* LIST
SLEEP
FAVOURITE
XDP/*
1
3
4
6
7
9
PR
VOL VOL
PR
5
8
0
2
OK
EYE/*
MM/*
10
Programme edit
This function enables you to delete, skip or copy the
stored programmes. Also you can move some stations to
other programme numbers.
1. Press the MENU button and then button to select
the Programme menu.
2. Press the button and then button to select
programme edit.
3. Press the button to display the Programme edit
menu.
Deleting a programme
1. Select a programme to be deleted with the or
button.
2. Press the RED button twice.
The selected programme is deleted, all the following
programmes are shifted up one position.
Copying a programme
1 . Select a programme to be copied with the or
button.
2. Press the GREEN button.
All the following programmes are shifted down one
position.
Moving a programme
1. Select a programme to be moved with the or
button.
2. Press the YELLOW button.
3. Move the programme to the desired programme
number with the or button.
4. Press the YELLOW button again to release this
function.
Skipping a programme number
1. Select a programme number to be skipped with the
or button.
2. Press the BLUE button. The skipped programme turns
to blue.
3. Press the BLUE button again to release the skipped
programme.
When a programme number is skipped it means that
you will be unable to select it using the button
during normal TV viewing. If you want to select the
skipped programme, directly enter the programme
number with the NUMBER buttons or select it in the
programme edit or table menu. Skipped prog. No.
appears BLUE.
Repeatedly press the MENU to return to normal TV
viewing.
Programme edit
Programme edit
Setting up TV stations
Programme
G
POWER MUTE
PSM TV/AV
MENU
Q-VIEWARC/* LIST
SLEEP
FAVOURITE
XDP/*
1
3
4
6
7
9
PR
VOL VOL
PR
5
8
0
2
OK
EYE/*
MM/*
11
Favourite Prog.
This function lets you select your favourite programmes
directly.
1. Press the MENU button and then button to select
the Programme menu
2. Press the button and then button to select
Favourite Prog.
3. Press the OK button to display the Favourite Prog.
menu.
4. Press the button to select Favourite Prog.
5. Select a desired programme with the button
or NUMBER buttons. Any number under 10 is entered
with a numeric '00' in front of it i.e '005' for 5.
6. To store another programme repeat steps 5 to 6.
You can store up to 8 programmes.
7. Repeatedly press the MENU or button to return to
normal TV viewing.
Repeatedly press the FAVOURITE KEY button to select
stored favourite programmes.
Setting up TV stations
Programme
G
POWER MUTE
PSM TV/AV
MENU
Q-VIEWARC/* LIST
SLEEP
FAVOURITE
XDP/*
1
3
4
6
7
9
PR
VOL VOL
PR
5
8
0
2
OK
EYE/*
MM/*
12
list
list
list
list.
list
list
list
list
list
list
CSM.
CSM
PSM (Picture Status Memory)
1. Press the PSM button on the remote to change
for desired PSM setting.
Note: PSM status change to user automatically when
contrast, brightness, colour and sharpness set manually.
You can also recall a desired picture (Dynamic, Standard,
Mild Game, or User) with PSM button on the remote
control. The picture Dynamic, Standard, Mild and Game
are programed for good picture reproduction at the factory
and cannot be changed.
Picture adjustment
You can adjust picture contrast, brightness, colour
intensity, sharpness and Tint (NTSC input only) to the
levels you prefer.
1. Press the MENU button and then button to select
the Picture menu.
2. Press the button and then button to select
Contrast, Brightness, Colour, Sharpness or Tint.
3. Press the button to make appropriateadjustments
on each sub menu.
You can also select User or standard PSM setting by
directly pressing PSM button.
4. Press the OK button to store it for the picture User.
5. Repeatedly press the MENU button to return to normal
TV viewing.
CONTRAST
CSM
Picture
Picture adjustment
CSM (Colour Status Memory)
Reddish
Greenish
Bluish
Excellent digital picture selection (option)
When this function is On, picture quality will be enhanced.
Repeatedly press the XDP/* button to switch On or Off.
Note : If you press the PSM or EYE/ * button with the XDP/*
function, the excellent digital picture function is automatically
switched Off.
POWER MUTE
PSM TV/AV
MENU
Q-VIEWARC/* LIST
SLEEP
FAVOURITE
XDP/*
1
3
4
6
7
9
PR
VOL VOL
PR
5
8
0
2
OK
EYE/*
MM/*
13
Sound adjustment
Sound
AVL (Auto Volume Leveler)
Volume adjustment
If you select AVL On, the set automatically keeps On an
equal volume level even if you change programmes.
You can adjust Volume.
1. Press the MENU button and then button to select
the Sound menu.
1. Press the MENU button and select the Sound menu.
2. Press the button and then button to select AVL.
2. Press the button and then button to select
volume.
3. Press the button to select On or Off on the AVL.
Pull-down menu.
3. Make desired adjustment with the on the volume
OSD.
4. Repeatedly press the MENU button to return to normal
TV viewing.
4. After adjustment the volume OSD will Disappear.
Music Mode (option)
You can hear music while the TV screen is Off using the
function.
1. Press the MM/* button to start the music mode.
2. Press any key to exit from Music Mode except MM/*
key & Vol. keys
3. Volume level can be changed (Vol+/Vol-) in music
mode.
Music Mode On
POWER MUTE
PSM TV/AV
MENU
Q-VIEWARC/* LIST
SLEEP
FAVOURITE
XDP/*
1
3
4
6
7
9
PR
VOL VOL
PR
5
8
0
2
OK
EYE/*
MM/*
14
Time functions
On Time
1. Press the MENU button and then button to select
the Time menu.
2. Press the button and then button to select On Time.
3. Press OK
4. Press the button to select On Time On or Off
5. Press the button.
6. Select and adjust hour and minute by pressing the ,
button.
Auto sleep
If you select Auto Sleep On the set will automatically
switch itself to standby mode approximately ten minutes
after a TV station stops Broadcasting.
1. Press the MENU button and then button. to select
the Time menu.
2. Press the button and then button to select
Auto Sleep.
3. Press the and button to select On.
4. Repeatedly press the MENU or button to return to
normal TV viewing.
Note :
a. ON Time function works only in standby mode.
b. To cancel the set On/Off time, set the On/Off timer to --:--.
c To view the remaining On/Off time select the Time menu.
d. When you switch the main power Off, the Time is reset
and the On/Off time is Off.
e. Timer accuracy is 15 sec.
Time functions
The time uses 24 hrs. system and must be set to the
correct time before operating the set.
1. Press MENU to select Time menu .
2. and key select time function.
3. After selecting ‘Time Function’ press key to enter ‘Time’.
4. Set Time using and keys.
5. Press OK to store.
6. Repeatedly press MENU to return to normal TV
viewing.
Note :
a. In the event of power interruption, time must be reset.
b. Time resets if mains is unplugged.
c. Timer accuracy is 15 sec.
On/Off Time
By using this function in On mode the set automatically
switches On or Off at a preset time. You must set the time
correctly before using On/Off time function.
Off Time
1. Press the MENU button and then , button to
select the Time menu.
2. Press the button and then button to select Off
Time.
3. Press OK
4. Press the button to select Off Time On or Off.
5. Press the button.
6. Select and adjust hour and minute by pressing the
, button.
7. Repeatedly press the MENU or button to return to
normal viewing.
±
Time
--:--
POWER MUTE
PSM TV/AV
MENU
Q-VIEWARC/* LIST
SLEEP
FAVOURITE
XDP/*
1
3
4
6
7
9
PR
VOL VOL
PR
5
8
0
2
OK
EYE/*
MM/*
15
Special functions
On screen language selection (option)
The menu can be displayed on the screen in desired
language. First select your language.
1. Press the MENU button and then button to select
the Special menu.
2. Press the button and then the button to select
language
3. Press OK button.
All the On screen displayed will appear in the selected
language.
4. Repeatedly press the MENU or Button to return
normal TV viewing.
POWER MUTE
PSM TV/AV
MENU
Q-VIEWARC/* LIST
SLEEP
FAVOURITE
XDP/*
1
3
4
6
7
9
PR
VOL VOL
PR
5
8
0
2
OK
EYE/*
MM/*
16
TV and AV modes / Input (option)
Input can be set to TV or AV mode. AV mode is used when a
DVD, or other equipment connected to the set.
Note: When a VCR is connected via the aerial socket; the
set is used in TV mode. See the connection of external
equipment’ section.
1. Press the menu button and then button to select
the special menu.
2. Press the button and then button to select
Input.
3. Press the and button select TV, AV
Note: Avoid giving input at Lout or R out socket on the back
of the set.
To return TV mode, press the or NUMBER button.
Alternatively you can select th TV or AV mode by pressing
the TV/AV button
Special
Child lock
When Child lock is ON, Remote control handset is needed to
control the functions. This feature can be used to prevent
unauthorized viewing.
1. Press the MENU button and the button to select
the special menu.
2. Press the button and then button to select the
child lock.
3. Press the and button on the remote control
handset to select On.
4. Repeatedly press the MENU or button to return to
normal TV viewing.
With the lock On, the display Child Lock On appears on the
screen if any button on the front panel is pressed while
viewing the TV.
Other functions
17
POWER MUTE
PSM TV/AV
MENU
Q-VIEWARC/* LIST
SLEEP
FAVOURITE
XDP/*
1
3
4
6
7
9
PR
VOL VOL
PR
5
8
0
2
OK
EYE/*
MM/*
Picture format (ARC) (option)
You can watch TV in various picture formats; Normal,
Zoom.
Repeatedly press the ARC button to select your desired
picture format.
Normal (4:3)
This picture format is 4 : 3 of general TV.
Zoom (14:9)
You can enjoy the cinema in a vast screen through the
Zoom mode. The screen 4:3 is magnified to the
upper/lower sides so that the screen 16:9 is full. The
bottom and top of the picture may be lost.
Note :
a.When you switch the set to Off, Zoom picture format
is reset to the Normal (4:3).
b.In the 1/2 size sub picture and vertical four sub
picture of PlP mode the picture format is not
available.
c.This menu will appear only in English.
Special
Blue back
If you select On in the Blue back pull-down menu, the blue
background appears on the screen when there is no
signal or poor signal.
1. Press the MENU button and then button to select
the Special menu.
2. Press the button and then button to select
Blueback.
3. Press the button to select On or Off on the Blue
back pull-down menu.
4. Repeatedly press the MENU button to return to
normal TV viewing.
Note : a. The blue background automatically appears on
the screen when there is no signal in TV mode.
b. If any OSD appears on screen, blue back will go Off.
Sleep timer
You don't have to remember to switch the set Off before
you go to sleep. The sleep timer automatically switches
the set to standby after the preset time elapses.
Press the SLEEP button to select the number of minutes.
The display - - - will appear on the screen, followed by
10, 20, 30, 60, 90 120, 180 and 240. The timer begins to
count down from the number of minutes selected.
Note :
a. To view the remaining sleep time, press the SLEEP
button once.
b. To cancel the sleep time repeatedly press the SLEEP
button until the display - - - appears.
c. When you switch the set off, the set releases the
preset sleep time.
Connection of external equipment
You can connect additional equipment, such as VCRs,
camcorders etc. to your set.
Here shown may be somewhat different from your set.
Aerial socket
1. Connect the RF out socket of the VCR to the aerial
socket on the back of the set.
2. Connect the aerial cable to the RF aerial in socket of
the VCR.
3. Store the VCR channel on a desired programme
number using the 'Manual programme tuning' section.
4. Select the programme number where the VCR
channel is stored.
5. Press the PLAY button on the VCR.
Audio Video in/out sockets
1. Connect the audio/video out sockets of the VCR to
audio/video in sockets of the set and in sockets of the
VCR to out sockets of the set.
2. If the VCR is connected to the AV sockets on the set,
press the TV/AV button to select AV.
3. Press the PLAY button on the VCR. The VCR
playback picture appears on the screen.
You can also record programmes received by the TV
on video tape via audio/video out sockets.
18
Troubleshooting check list
NOTE :
i) Colour patch might appear in your TV set if you rotate or shift the position of the set
while it is On or in standby mode. If patch appears in your TV set try the following
before calling your service centre or dealer. Place the TV set in desired position and
switch it Off by the main power switch. Allow the set tocool down for at least 30
minutes and then switch it On. The degaussing circuit (inbuilt) in your set will
remove the patch automatically. Please call service only in case this operation does
not help.
ii) In case of no sound on all channels, check for system. It should be 'BG' for India. In
case of some other system select 'BG' and do Auto Programming.
Remote control does not work
Check Audio/Video sockets (VCR only)
Check the batteries in remote control
Adjust volume
Adjust colour
Adjust brightness
Adjust contrast
Check for local interference
Check aerial
Check aerial (plugged into TV?)
Check aerial (broken lead?)
Try another channel (weak signal)
Is the TV switched On
The mains plug-(plugged in and
switched On)
Check following items and try
to adjust these
Poor colour
No colour
Poor reception on some channels
Lines or streaks in picture
Picture blurred
Picture OK, poor sound
Sound OK, poor picture
No picture, no sound
Symptoms
19
  • Page 1 1
  • Page 2 2
  • Page 3 3
  • Page 4 4
  • Page 5 5
  • Page 6 6
  • Page 7 7
  • Page 8 8
  • Page 9 9
  • Page 10 10
  • Page 11 11
  • Page 12 12
  • Page 13 13
  • Page 14 14
  • Page 15 15
  • Page 16 16
  • Page 17 17
  • Page 18 18
  • Page 19 19
  • Page 20 20

LG 14SA2RB-AJ Owner's manual

Type
Owner's manual

Ask a question and I''ll find the answer in the document

Finding information in a document is now easier with AI