HR40050 SERIES HOSE REEL
PART No. PRODUCT DESCRIPTION PSI/BAR
HR40050 EL Series Water complete with 20m x 12mm ID PVC hose and 1.2m lead in hose 140psi/10bar
Uses Water
Working Pressure 140psi (10bar)
Materials Plastic and PVC hose
Description
The Alemlube EL Series HR40050 water hose reel is a quality hose handling, retrieval and storage system suitable for general garden
and washdown use around the home and in business.
Supplied complete with PVC garden hose, hose quick connector, water nozzle, integral carry handle and mounting bracket allowing
the reel to rotate up to 180º.
Manufactured from high density impact resistant and UV stabilised polypropylene, the HR40050 features a positive latching system
that automatically locks the hose at the desired length and the heavy duty internal spring assembly easily retrieves the hose when
partially or fully extended.
The Alemlube EL Series HR40050 is quick and easy to install and is a truly economical, robust and reliable hose reel for many day
to day watering duties and cleaning operations.
Specifications
Technical Details
NSW
TEL: (02) 9677 1555
FAX: (02) 9675 1155
QLD/PNG
TEL: (07) 3204 9166
FAX: (07) 3204 1224
VIC/TAS
TEL: (03) 8787 8288
FAX: (03) 8787 8266
WA
TEL: (08) 9302 4199
FAX: (08) 9303 2095
SA/NT
TEL: (08) 8241 7111
FAX: (08) 8241 7011
NZ
TEL: (09) 447 1007
FAX: (09) 447 1008
EL SERIES
OWNER’S TECHNICAL MANUAL
HR40050 Water Hose Reel
PAGE 1 OF 4
Item
Max
Pressure
(psi/bar)
Hose Working
Temperature
(C)
Hose Capacity
Material
I.D.
(inch/mm)
Length
(m/ft)
HR40050 140/10 -0~+60 PVC 3/4"BSP(F) / 19 20 / 65

NSW
TEL: (02) 9677 1555
FAX: (02) 9675 1155
QLD/PNG
TEL: (07) 3204 9166
FAX: (07) 3204 1224
VIC/TAS
TEL: (03) 8787 8288
FAX: (03) 8787 8266
WA
TEL: (08) 9302 4199
FAX: (08) 9303 2095
SA/NT
TEL: (08) 8241 7111
FAX: (08) 8241 7011
NZ
TEL: (09) 447 1007
FAX: (09) 447 1008
PAGE 2 OF 4
HR40050 Hose Reel Instruction
Plastic Spring Driven Reel
2766 Series Instruction
Plastic Spring Driven Reel 2766 Series Instruction
Technical Details
Spring driven drum: for automatic retractable.
Locking ratchet: to maintain the desired length of hose in use.
Safety Precautions
GENERAL SAFETY RULES
WARNING: Read and understand all instructions.
WARNING:
The warnings, cautions, and instructions discussed in this instruction manual
cannot cover all possible conditions or situations that could occur. It must be understood by
the operator that common sense and caution are factors which cannot be built into this
product, but must be supplied by the operator.
Hose Reel Safety Precautions
1Use proper eye protection when assembling and using the hose reel.
2 Keep children away from the work area.
3. Personal injury and/or equipment damage may result if proper safety precautions are not
observed.
4Ensure that reel is properly installed before connecting input and output hoses.
5. Bleed fluid/gas pressure from system before servicing reel.
6. Before connecting reel to supply line ensure that pressure does not exceed maximum
working pressure rating of reel.
7. Remember, even low pressure is very dangerous and can cause personal injury or death.
8. If a leak occurs in the hose or reel, remove system pressure immediately.
9. Ensure that reel, hose, and equipment being service are properly grounded.
10. If reel ceases to unwind or rewind, remove system pressure immediately.
11. o not pull or jerk on hose.
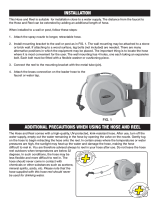
Installation of Hose Reel
You will need to purchase appropriate hardware for mounting your new reel.
1) For mounting: For air series, Install reel on the wall and ceiling at most 9feet / 3m above the
floor. For water series, Install reel on the wall at most 4.5feet / 1.5m above the floor .
2) The reel base has two mounting holes for mounting on a suitable flat surface for air series
(four mounting holes for water series). Below figures is a template showing the correct
location of the mounting holes in the base.
3) Using the mounting holes in the base, mount the reel in the desired location. Be sure to use
appropriate hardware and tighten securely.
1 OF 4
REV 12/03/14
WARNING:
Read carefully and understand all INSTRUCTIONS before operating. Failure to
follow the safety rules and other basic safety precautions may result in serious
personal injury.
Save these instructions in a safe place and on hand so that they can be read
when required.
Item
Medium
27667203-18
27667203-28
27667204-31
27667204-21
27667155-31
27667155-21
300/20
300/20
140/10
140/10
140/10
140/10
Air
Air
Water
Water
Water
Water
-2060
-2060
060
060
060
060
PVC
PVC
PVC
PVC
PVC
PVC
3/8" /10
3/8" /10
1/2" /12
1/2" /12
5/8" /15
5/8" /15
20/65
20/65
20/65
20/65
15/50
15/50
Work Tem.(˚C)
Material
Hose Capacity
I.D.
(inch/mm)
Length
(m/ft)
Max
Pressure
(psi/bar)
For Water
For Air
Safety Precautions
General Safety Rules
HR40050 for water - wall mount
Plastic Spring Driven Reel 2766 Series Instruction
2766 for air wall & ceiling
2766 for water wall
4) The end of incoming hose can be connected to desired supply source.
5) Outlet fittings on reel hose attach to desired tool, or nozzle. Check connection for leakage,
also check hose reel for correct operation. See: Operation section.
6) If hose stopper adjustment is required, pull hose from reel and allow to latch at desired
length. Loosen stopper bolts, and slide stopper to a position close to the hose guide. Tighten
stopper bolts, and unlatch the reel.
2 OF 4
Plastic Spring Driven Reel 2766 Series Instruction
Operation
1. Check reel for correct operation by slowly pulling out the hose.
2. To latch the reel, pull out the hose about 3 feet/1m and allow it to retract until the hose
stops retracting.
3. To unlatch the reel, slowly pull out the hose about 1 foot/0.3m then let the hose retract until
the hose stopper rests against the hose guide opening.
Note: To avoid damage to the reel, always hold on to the hose while it is rewinding.
4. Periodically check the hose condition for wear or damage, and check the swivel fitting for
leakage. Replace any worn, damaged, or leaking parts.
Maintenance
Make sure the hose is in proper working order.
Clean the hose with a cloth dipped in warm water to remove dirt or deposits and ensure correct
rewinding.
Do not use detergents or solvents which could prove incompatible with cable-winder materials.
Dismantling of the unit by unskilled personal could prove hazardous; the risk involved mainly
concern the preloaded springs.
Limited Warranty
1. The manufacturer warrantees this hose reel against defects in material and craftsmanship, for
a period of 24 months from date of purchase, but not including hose and O-ring parts.
2. Manufacturer’s liability is limited to replacement or repair of defective material within the
warranty period, when returned freight prepaid to the distributor or their designated service
depot.
3. The warranty does not cover damage caused by accident, misuse or faulty installation.
4. The reel must be installed and maintained in compliance with the instructions.
3 OF 4

NSW
TEL: (02) 9677 1555
FAX: (02) 9675 1155
QLD/PNG
TEL: (07) 3204 9166
FAX: (07) 3204 1224
VIC/TAS
TEL: (03) 8787 8288
FAX: (03) 8787 8266
WA
TEL: (08) 9302 4199
FAX: (08) 9303 2095
SA/NT
TEL: (08) 8241 7111
FAX: (08) 8241 7011
NZ
TEL: (09) 447 1007
FAX: (09) 447 1008
PAGE 3 OF 4
HR40050 Hose Reel Instruction
Plastic Spring Driven Reel 2766 Series Instruction
2766 for air wall & ceiling
2766 for water wall
4) The end of incoming hose can be connected to desired supply source.
5) Outlet fittings on reel hose attach to desired tool, or nozzle. Check connection for leakage,
also check hose reel for correct operation. See: Operation section.
6) If hose stopper adjustment is required, pull hose from reel and allow to latch at desired
length. Loosen stopper bolts, and slide stopper to a position close to the hose guide. Tighten
stopper bolts, and unlatch the reel.
2 OF 4
Plastic Spring Driven Reel 2766 Series Instruction
Operation
1. Check reel for correct operation by slowly pulling out the hose.
2. To latch the reel, pull out the hose about 3 feet/1m and allow it to retract until the hose
stops retracting.
3. To unlatch the reel, slowly pull out the hose about 1 foot/0.3m then let the hose retract until
the hose stopper rests against the hose guide opening.
Note: To avoid damage to the reel, always hold on to the hose while it is rewinding.
4. Periodically check the hose condition for wear or damage, and check the swivel fitting for
leakage. Replace any worn, damaged, or leaking parts.
Maintenance
Make sure the hose is in proper working order.
Clean the hose with a cloth dipped in warm water to remove dirt or deposits and ensure correct
rewinding.
Do not use detergents or solvents which could prove incompatible with cable-winder materials.
Dismantling of the unit by unskilled personal could prove hazardous; the risk involved mainly
concern the preloaded springs.
Limited Warranty
1. The manufacturer warrantees this hose reel against defects in material and craftsmanship, for
a period of 24 months from date of purchase, but not including hose and O-ring parts.
2. Manufacturer’s liability is limited to replacement or repair of defective material within the
warranty period, when returned freight prepaid to the distributor or their designated service
depot.
3. The warranty does not cover damage caused by accident, misuse or faulty installation.
4. The reel must be installed and maintained in compliance with the instructions.
3 OF 4

NSW
TEL: (02) 9677 1555
FAX: (02) 9675 1155
QLD/PNG
TEL: (07) 3204 9166
FAX: (07) 3204 1224
VIC/TAS
TEL: (03) 8787 8288
FAX: (03) 8787 8266
WA
TEL: (08) 9302 4199
FAX: (08) 9303 2095
SA/NT
TEL: (08) 8241 7111
FAX: (08) 8241 7011
NZ
TEL: (09) 447 1007
FAX: (09) 447 1008
PAGE 4 OF 4
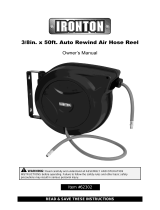
HR40050 Hose Reel
Parts and drawing breakdown
Item No Part No Description Q’ty
1-1 HR40050-1 Hose Compositor 1
1-2 HR40050-2 Right Casing 1
1-3 HR40050-3 Left Casing 1
1-4 HR40050-4 End Cover 2
1-5 HR40050-5 Handle 1
1-6 HR40050-6 Screw 19
2 HR40050-7 Hose Assembly 1
3 HR40050-8 Base 1
4 HR40050-9 Screw 4
5 HR40050-10 Main shaft 1
6 HR40050-11 Bumper Block 1
7 HR40050-12 Hose Assembly 1
8 HR40050-13 Spring 1
9 HR40050-14 Clamp 1
10 HR40050-15 Hose Clamp 2
11 HR40050-16 Swivel Body 1
12 HR40050-17 Plug 1
13 HR40050-18 O-Ring 1
14 HR40050-19 Retainer 1
15 HR40050-20 O-Ring 2
Item No Part No Description Q’ty
21 HR40050-21 Swivel Spool 1
22 HR40050-22 - -
23 HR40050-23 - -
24 HR40050-24 Synchronous Wheel 1
25 HR40050-25 Screw 4
26 HR40050-26 Guard Plant 1
27 HR40050-27 Drum 2
28 HR40050-28 Screw 4
29 HR40050-29 Ring 1
30 HR40050-30 Gear 1
31 HR40050-31 Guard Plant 6
32 HR40050-32 Screw 8
33 HR40050-33 Screw 2
34 HR40050-34 Washer 2
35 HR40050-35 Ratchet Paw 1
36 HR40050-36 Synchronous Belt 1
37 HR40050-37 Screw 1
38 HR40050-38 Washer 1
39 HR40050-39 Guide Path 1
37;)
䓵⹆㔾Ⰵ
ƤƤƱ
㠞⮇㦇
⭝⺍
4
37;):
䓵⹆㔾Ⰵ
+5
⮇㠍
4$
0
㵍⤞⫙
ろ䓇
320
37;)
䓵⹆㔾Ⰵ
⭓㠍
4
㚇⤢
3&
⨆⧾㔷
3$
*%70;
㬏䓷⤼⧢㵘㔾Ⰵ
㝭㳆
33
㵍⤞㔷⭓⟆
$%6
㵍⤞㔷
$%6
37;)
䓵⹆㔾Ⰵ
*%7
⮇㠍
ボ⢎ Ⳉ㾟
320
2㾮㦇
1%5
⮇㦇
4W
2㾮㦇
1%5
Ⱓ㵘
$%6
ボ⢎ Ⳉ㳆
320
ボ⢎ ⭆ⱛ㋉
㋉
3$
ボ⢎ ⭐
6L0Q$
ボ⢎ 䓽⧪
ボ⢎ 䐚Ⱀ㌊䓽⧪
䑘䑂
33/*)
37[)
⧢㵘䓵⹆㔾Ⰵ
ボ⢎ Ⰹ䔚
33
ボ⢎ ⭝㧌䓽⧪
37;)
䓵⹆㔾Ⰵ
㳂㬷
33/*)
㋼㝭
33
䔔〛㋨
33
䇳〛㋨
33
㔾ⶬ
320
⭝㔷䐈ソ$
$%6
⺗㔷
320
㼓㋼
320
⭝㔷䐈ソ%
$%6
ボミ 㾂㵍⤞㔷
320
㿓⼦
㵝⼦⢋䓝⼦
㘜⧧ 㭞㑠 ⤥㑰 䐹㑠 ⡙䓃
,7,(6%
6+((72)
⭻䄔⹓䄔
㦧㡘䓽⧪
⪬㵝⟇㦉⺊㬠㩭᷉㩰⼄᷊〛㾖䇱㻿⹌㯟㰚
䇱᷍㸕㈎㿎㋪᷍㦯⼯㦬⤜㿎ⶕ䐧〓㬚䇤᱄
,QWUDGLQ6KDQJKDL0DFKLQHU\&R/WGUHVHUYHWKH
FRS\ULJKWIRUWKLVGUDZLQJ
,WVKDOOQRWEHFRSLHGRUPDGHDYDLODEOHIRUWKLUG
SDUWLHVZLWKRXWSULRUDSSURYDO
㘜⧧
7,7/(
㵝⼦
'5$:,1*12
⟇⪯
9(56,21
䐹㑠
:(,*+7.J
⡩㏞
6&$/(
⤥㑰
0$7(5,$/
㬠㩭㩰⼄〛㾖䇱㻿⹌㯟
,QWUDGLQ6KDQJKDL0DFKLQHU\&R/WG
标记
MARK
⪇㭞
02',),&$7,216
ⷝⶥ㸥ミ⼦
'2&80(1712
㣊䓷
6,*1('%<
㦶㠻
'$7(
㪉ェ
'(6,*1('%<
㾄ⰵ
&+(&.('%<
㪔⼬
$8',7('%<
⢋䓝⿐
67$1'$5',=('%<
㞛䓝
$33529('%<
⹅䄶
352&(66('%<
⟇⪯ 㦶㠻
/