Page is loading ...

S
u
pp
lied Accessorie
s
AC
outlets
Plug in
4
5
From TV
From DVD/VCR
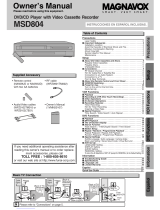
Please refer to “Connections” on page 6.
Cable TV
signal
ANT-OUT
ANT-IN
RF cable (supplied)
(Back of DVD/VCR)
(Back of TV)
or
AntennaAntenna
2
Connect
3
Connect
(Back of TV)
or
Disconnect
Cable TV
signal
1
Bas
i
c
TV
Co
nn
ect
i
on
If
y
ou need additional operating assistance after
readin
g
this owner’s manual, please cal
l
T
O
LL FREE : 1-800-605-861
0
o
r visit our we
b
site at
www.magnavox.com
/
suppor
t
C
ontent
s
Remote contro
l
(
NB179UD
)
wit
h
two AA
(
1.5V
)
b
atterie
s
RF ca
bl
e
(
WPZ0901TM002 /
WPZ0901TM005
)
Audio
/
Video cable
s
(
WPZ0102TM018 /
WPZ0102LTE01
/
WPZ102SCP001
)
Owner’s Manual
(
1VMN28734
)
Owner’s Manual
PLAYDISC IN
DVDVCR
OPEN/CLOSESTANDBY-ON
POWER ON
AUDIO
REC
RECORDF.FWDREW STOP/EJECT
TIMER REC
IR
CHANNEL SOURCE PREV STOP PLAY NEXT
VIDEO
REC
RECORD
TIMER REC
PLAY
DVD PLAYER / VCR CMWD 2206
DVD/CD P
l
a
y
er wit
h
Vi
d
eo Cassette Recor
d
e
r
C
MWD22
06
A
O
wn
e
r’
s
M
a
n
ual
Please read be
f
ore using this unit
.
P
recaut
i
on
s
■
Sa
f
ety Instruction
s
..............................................................................
2
Moisture Con
d
ensation Warnin
g
.......................................................................
4
A
b
out Copyrig
ht
.......................................................................................................
4
S
ym
b
o
l
s Use
d
in T
h
is Manua
l
..............................................................................
4
Ma
i
ntenanc
e
..............................................................................................................
4
■
About
t
h
e
Vi
deo
Cassettes
a
n
d
Di
scs
..................................................
5
Pla
y
able Video Cassette
s
.......................................................................................
5
Pla
y
able Disc
s
............................................................................................................
5
U
npla
y
able Disc
s
......................................................................................................
5
S
etu
p
p
■
Connect
i
on
s
.........................................................................................
6
RF Output C
h
anne
l
..................................................................................................
6
Hint
f
or Cable Box or Satellite Bo
x
.....................................................................
6
C
onnection to an Au
d
io Syste
m
.........................................................................
6
Connection to a TV
..................................................................................................
V
7
■
Pre
p
aration for Us
e
.............................................................................
8
T
u
rn
o
n
t
h
e
U
ni
t
f
o
r
t
h
e
Fir
st
Tim
e
....................................................................
8
T
o
A
dd
o
r D
e
l
ete
C
h
a
nn
e
l
s
...................................................................................
8
C
lock Setu
p
.................................................................................................................
8
■
Function Overview
..............................................................................
w
9
Fr
o
n
t
P
a
n
el
In
d
i
cator
..............................................................................................
9
V
CR / DVD Switc
h
in
g
..............................................................................................
9
Front & Rear Termina
l
s
...........................................................................................
9
R
e
m
ote
Co
n
t
r
ol
........................................................................................................
10
Installing the Batteries
f
or the Remote Contro
l
...........................................
10
V
CR F
u
ncti
o
n
s
■
Playback
.............................................................................................
k
11
■
Ot
h
er O
p
eration
s
...............................................................................
11
In
de
x
Sea
r
ch
..............................................................................................................
11
Time Searc
h
...............................................................................................................
11
Auto
R
epea
t
...............................................................................................................
12
■
R
ecordin
g
............................................................................................
12
Recordin
g
& OTR (One Touch Recordin
g)
......................................................
12
Timer Recordin
g
......................................................................................................
12
Hints for OTR and Timer Recordin
g
..................................................................
1
3
Cop
y
ing a Video Tap
e
...........................................................................................
14
DVD Funct
i
on
s
■
Playback
.............................................................................................
k
15
■
Sea
r
c
h F
u
n
ct
i
o
n
s
................................................................................
1
6
Usin
g
Track Searc
h
..................................................................................................
1
6
Usin
g
Title / Chapter Searc
h
................................................................................
1
6
Usin
g
Time Searc
h
..................................................................................................
1
6
■
On-Screen Display
..............................................................................
y
17
■
Repeat / Random / Programmed Playback
.......................................
k
1
8
Repeat Playback / Repeat A-B Playback
.........................................................
k
1
8
Random Playback / Programmed Playback
..................................................
k
1
8
■
S
pecial Settin
gs
..................................................................................
1
9
Subtitle Lan
g
ua
g
e / Audio Lan
g
ua
g
e
..............................................................
1
9
Camera An
g
les / Black Level Settin
g
...............................................................
1
9
Stereo Sound Mode
/
Virtual Surround
...........................................................
1
9
■
D
VD
S
etu
p
...........................................................................................
20
LANGUAGE
S
ettin
g
.................................................................................................
20
DI
S
PLAY
S
ettin
g
.......................................................................................................
21
AUDI
O
S
ettin
g
..........................................................................................................
21
PARENTAL
S
ettin
g
...................................................................................................
22
O
THER
S
S
ettin
g
........................................................................................................
22
Reset to the De
f
ault Setting (Except
f
or PARENTAL Setting
)
..................
23
Inf
o
rm
a
ti
on
■
T
roubleshootin
g
Guid
e
......................................................................
2
3
■
S
peci
f
ication
s
.....................................................................................
24
■
Language Code List
............................................................................
t
24
■
Limited Warranty
...............................................................................
y
2
4
■
Q
uic
k
Use Gui
de
.................................................................................
25
P
recaut
i
ons
S
etu
p
V
CR Funct
i
onsDVD Funct
i
on
s
In
f
ormatio
n
© 2009 Funai E
l
ectric Co.
,
Lt
d.

–
2
–
EN
Prec
au
t
io
n
s
S
a
f
ety Instruction
s
The model and serial numbers of this unit ma
y
be found on the cabinet
.
Y
ou
s
h
ou
l
d
r
eco
r
d
a
n
d
r
eta
in
t
h
ose
n
u
m
be
r
s
fo
r
futu
r
e
r
efe
r
e
n
ce.
Se
ri
al
N
o.:
Model
N
o.:
WARNING
:
TO REDUCE THE RISK OF FIRE OR ELECTRIC SHOCK
,
DO NOT EXPOSE THIS APPARATUS
T
O
RAIN
O
R M
O
I
S
T
U
RE
.
APPARAT
US
S
HALL N
O
T BE EXP
OS
ED T
O
DRIPPING
O
R
S
PLA
S
HING AND N
O
O
B
J
E
C
T
S
FILLED WITH LIQUIDS
,
SUCH AS VASES
,
SHALL BE PLACED ON THE APPARATUS
.
C
A
U
TI
O
N
:
TO REDUCE THE RISK OF ELECTRIC SHOCK
,
DO NOT REMOVE COVER
(
OR BACK
)
. NO USER SERVICEABLE
PARTS INSIDE. REFER SERVICING TO
Q
UALIFIED SERVICE
PER
SO
NNEL
.
C
A
U
TI
O
N
RISK OF ELECTRIC SHOCK
DO NOT OPEN
T
h
e exc
l
amation point wit
h
in an equi
l
atera
l
triang
l
e is
intended to alert the user to the presence o
f
important
operating an
d
maintenance (servicing) instructions in t
h
e
l
iterature accompanying t
h
e app
l
iance
.
The lightning flash with arrowhead s
y
mbol, within an
equilateral trian
g
le, is intended to alert the user to the
presence of uninsulated “dan
g
erous volta
g
e” within the
product’s enclosure that ma
y
be of sufficient magnitude
to constitute a risk of electric shock to
p
ersons
.
IMP
O
RTANT
S
AFETY IN
S
TRU
C
TI
O
N
S
1.
R
ead
these
in
st
r
uct
i
o
n
s.
2.
Keep t
h
ese instructions.
3.
Heed all warnin
g
s
.
4.
F
ollo
w
all
in
st
r
uct
i
o
n
s.
5.
Do not use t
h
is a
pp
aratus near water.
6.
C
l
ean on
ly
wit
h
d
r
y
c
l
ot
h.
7
.
Do not
bl
oc
k
any venti
l
ation openings. Insta
ll
in
acco
r
da
n
ce
wi
t
h
t
h
e
m
a
n
ufactu
r
e
r’
s
in
st
r
uct
i
o
n
s.
8.
Do not insta
ll
near any
h
eat sources suc
h
as ra
d
iators,
h
eat
r
e
g
isters, stoves, or other apparatus (includin
g
ampli
f
iers)
t
h
at pro
d
uce
h
eat.
9.
Do not de
f
eat the sa
f
ety purpose o
f
the polarized or
g
roun
d
ing-t
y
pe p
l
ug. A po
l
arize
d
p
l
ug
h
as two
bl
a
d
es
w
it
h
one wi
d
er t
h
an t
h
e ot
h
er. A groun
d
ing t
y
pe p
l
ug
h
as two
bl
a
d
es an
d
a t
h
ir
d
groun
d
ing prong. T
h
e wi
d
e
blade or the third prong are provided
f
or your sa
f
ety. I
f
t
he provided plug does not
f
it into
y
our outlet, consult an
e
lectrician for replacement of the obsolete outlet
.
10.
Protect the power cord
f
rom being walked on or
pinc
h
e
d
particu
l
ar
ly
at p
l
ugs, convenience receptac
l
es,
and the point where the
y
exit
f
rom the apparatus.
11.
Only use attachments/accessories speci
f
ied by the
m
a
n
ufactu
r
e
r
.
12.
Use on
ly
wit
h
t
h
e cart, stan
d
, tripo
d
,
bracket, or table speci
f
ied by the
manu
f
acturer, or sold with the a
pp
aratus.
W
h
en a cart is use
d,
use caution w
h
en
movin
g
the cart/apparatus combination
to avoid injury from tip-over
.
13.
Unp
l
ug t
h
is apparatus
d
uring
l
ig
h
tning storms or w
h
en
unused
f
or long periods o
f
time
.
1
4. Re
f
er all servicin
g
to quali
f
ied service personnel.
Servicing is require
d
w
h
en t
h
e apparatus
h
as
b
een
d
amage
d
in any way, suc
h
as power-supp
l
y cor
d
or
plug is damaged, liquid has been spilled or objects
have fallen into the apparatus, the apparatus has been
expose
d
to rain or moisture,
d
oes not operate norma
ll
y,
or
h
as
b
een
d
roppe
d
.
T
his Class B di
g
ital apparatus complies with Canadian ICES-003
.
Disconnect the mains plug to shut o
ff
when
f
ind trouble or not in use. The mains plug shall remain readil
y
operable
.
P
recaut
i
on
s
T
he important note is located on the rear or bottom o
f
t
h
e ca
b
inet
.
T
he symbol
f
or CLASS ll (Double Insulation
)

EN
–
3
–
P
recaut
i
ons
C
A
U
TI
O
N
:
Danger of explosion if batter
y
is incorrectl
y
replaced. Replace onl
y
with the same or equivalent t
y
pe
.
W
ARNING
:
Batteries (Battery pack or battery installed) shall not be exposed to excessive heat such as sunshine, fire, or the like
.
L
A
S
ER
S
AFET
Y
T
his apparatus emplo
y
s a laser. Onl
y
a qualified service person should remove the cover or attempt to service thi
s
a
pparatus,
d
ue to possi
bl
e eye injury
.
C
A
U
TI
O
N
:
Use o
f
controls or adjustments or per
f
ormance o
f
procedures other than those speci
f
ied herein ma
y
result
in
h
azardous radiation ex
p
osure
.
C
A
U
TI
O
N
:
V
isible and invisible laser radiation when o
p
en and interlocks defeated. Do not stare into beam
.
LOC
ATI
O
N
:
Inside
,
near the deck mechanism
.
I
MP
O
RTANT
CO
PYRIGHT INF
O
RMATI
ON
U
nauthorized cop
y
ing, broadcasting, public performance and lending of discs are prohibited. This product
incorporates cop
y
right protection technolog
y
that is protected b
y
U.S. patents and other intellectual propert
y
rights.
U
se of this cop
y
right protection technolog
y
must be authorized b
y
Macrovision, and is intended for home and
o
ther limited viewing uses onl
y
unless otherwise authorized b
y
Macrovision. Reverse engineering or disassembl
y
is
p
rohibited
.
Do not place the unit on the furniture that is capable of being tilted b
y
a child and an adult leaning, pulling, standing
o
r climbing on it. A falling unit can cause serious injur
y
or even death
.
To Avoid the Hazards o
f
Electrical Shock and Fir
e
•
Do not
h
an
dl
e t
h
e
p
ower cor
d
wit
h
wet
h
an
d
s
.
•
Do not pull on the power cord when disconnecting it
f
rom an AC outlet. Grasp it b
y
the plug
.
•
Do not put
y
our fingers or objects into the unit.
Location an
d
Han
dl
in
g
•
Do not install the unit in direct sunlight, near strong magnetic fields, or in a place sub
j
ect to dust or strong vibration
.
•
Avoid a place with drastic temperature chan
g
es
.
•
Install the unit in a horizontal and stable position. Do not place an
y
thing directl
y
on top or bottom of the unit.
Depending on
y
our external devices, noise or disturbance of the picture and/or sound ma
y
be generated if the unit is
placed too close to them. In this case, please ensure enou
g
h space between the external devices and the unit
.
•
Depending on the environment, the temperature of this unit ma
y
increase slightl
y
. This is not a malfunction.
•
Be sure to remove the disc and unplug the AC power cord from the outlet before carr
y
ing the unit.
Dew Condensation Warnin
g
•
Dew condensation may
f
orm inside the unit in the
f
ollowing conditions. I
f
so, do not use this unit at least
f
or a
f
ew
h
ours unti
l
its insi
d
e gets
d
ry.
- The unit is moved
f
rom a cold place to a warm place
.
- Under conditions o
f
high humidity
.
- A
f
ter heating a cold room
.
Note a
b
out Recyc
l
in
g
•
T
his unit’s packaging materials are rec
y
clable and can be reused. Please dispose o
f
an
y
materials in
accor
d
ance wit
h
y
our
l
oca
l
rec
y
c
l
ing regu
l
ations
.
•
Batteries should never be thrown awa
y
or incinerated but disposed o
f
in accordance with
y
our local
re
g
u
l
ations concernin
g
c
h
emica
l
wastes
.
Notice for Pro
g
ressive Scan Output
•
C
onsumers should note that not all high definition television sets are full
y
compatible with this product and ma
y
cause artifacts to be displa
y
ed in the picture. In case of picture problems with 525(480) progressive scan output,
it is recommended that the user switch the connection to the ‘standard de nition’ out
p
ut. If there are
q
uestion
s
regarding
y
our TV set compatibilit
y
with this 525p(480p) DVD pla
y
er, please contact our customer service center
.

–
4
–
EN
Prec
au
t
io
n
s
M
anufactured under license from Dolb
y
Laboratories. “Dolb
y
”
a
n
d
t
h
e
doub
l
e
-
D
s
y
mbol are trademarks of Dolb
y
Laboratories.
©
2009 Funai E
l
ectric Co., Lt
d
.
All rights reserved. No part o
f
this manual may be reproduced,
copie
d
, transmitte
d
,
d
isseminate
d
, transcri
b
e
d
,
d
own
l
oa
d
e
d
or
stored in any storage medium, in any
f
orm or
f
or any purpose
without the express prior written consent o
f
Funai. Furthermore,
any unauthorized commercial distribution o
f
this manual or any
revision
h
ereto is strict
l
y pro
h
i
b
ite
d.
In
f
ormation in this document is subject to change without notice.
Funai reserves t
h
e rig
h
t to c
h
ange t
h
e content
h
erein wit
h
out t
h
e
obligation to noti
f
y any person or organization o
f
such changes
.
wit
h
t
h
e design is a registered trademark o
f
Funai
E
l
ectric Co., Lt
d
. an
d
may not
b
e use
d
in any way wit
h
out t
h
e
express written consent o
f
Funai. All other trademarks used
herein remain the exclusive property o
f
their respective owners.
Not
h
ing containe
d
in t
h
is manua
l
s
h
ou
ld
b
e construe
d
as
granting,
b
y imp
l
ication or ot
h
erwise, any
l
icense or rig
h
t to use
any o
f
the trademarks displayed herein. Misuse o
f
any
tra
d
emar
k
s or any ot
h
er content in t
h
is manua
l
is strict
l
y
prohibited. Funai shall aggressively en
f
orce its intellectual prop
-
erty rights to the
f
ullest extent o
f
the law.
M
oisture Con
d
ensation Warnin
g
M
o
i
sture ma
y
f
orm
i
ns
id
e t
hi
s un
i
t un
d
er t
h
e
f
o
ll
ow
i
ng con
di
t
i
ons
:
M i f i id hi i d h f ll i di i
• Immediatel
y
a
f
ter a heater is turned on
.
• In a steam
y
or humid room.
• When this unit is suddenl
y
moved from a cold to warm
e
nv
i
r
o
nm
e
n
t.
I
f moisture forms inside this unit, it ma
y
not operate properl
y
or
d
amage t
h
e cassette tape. In suc
h
case,
d
o not use t
h
is unit at
least for 2 hours until its inside gets dry.
About Cop
y
righ
t
U
naut
h
or
i
ze
d
copy
i
ng,
b
roa
d
cast
i
ng, pu
bli
c per
f
ormance an
d
U
h
i
d
i
b
d
i
b
li
f
d
lending o
f
discs are prohibited.
T
h
is pro
d
uct incorporates copyrig
h
t protection tec
h
no
l
ogy t
h
at
i
s protecte
d
b
y U.S. patents an
d
ot
h
er inte
ll
ectua
l
property rig
h
ts.
Use o
f
this copyright protection technology must be authorized by
Macrovision, and is intended
f
or home and other limited viewing
uses on
l
y un
l
ess ot
h
erwise aut
h
orize
d
b
y Macrovision. Reverse
e
ngineering or
d
isassem
bl
y is pro
h
i
b
ite
d.
Sy
mbols Used in This Manua
l
Th
e
f
o
ll
ow
i
ng s
y
m
b
o
l
s appear
i
n some
h
ea
di
ngs
i
n t
hi
s manua
l.
Th fll i bl i h di i hi l
: Descri
p
tion refers to video cassette ta
p
es
.
Descri
p
tion refers to DVD-Video
.
: Descri
p
tion refers to Audio CD.
Note to CATV s
y
stem installe
r
T
his reminder is provided to call the CATV s
y
stem install
-
e
r’s attention to Article 820-40 of the NEC that
p
rovides
g
uidelines for proper
g
roundin
g
and, in particular, speci
-
fies that the cable
g
round should be connected to the
g
rounding s
y
stem of the building, as close to the point
o
f cable entr
y
as practical
.
Ma
in
te
n
a
n
ce
Servicin
g
g
• Please refer to relevant topics on the “Troubleshootin
g
Guide”
o
n pa
g
e 23 before returnin
g
the product.
• If this unit becomes inoperative, do not tr
y
to correct the
problem b
y
y
ourself. There are no user-serviceable parts inside.
Turn off, unplu
g
the power plu
g
, and please call our toll free
c
ustomer su
pp
ort line found on the cover of this manual to
l
ocate
a
n
aut
h
o
riz
ed
se
rvi
ce
ce
n
te
r
.
C
l
eanin
g
t
h
e Ca
b
ine
t
g
• Wi
p
e the
f
ront
p
anel and other exterior sur
f
aces o
f
the unit with
a
soft
c
l
ot
h
.
• Never use a solvent
,
thinner
,
benzene or alcohol to clean the
unit. Do not spra
y
insecticide liquid near the unit. Such chemi-
c
als ma
y
discolor the surface or damage the unit.
C
leanin
g
Discs
g
•
W
h
en a
d
isc
b
ecomes
d
irt
y
, c
l
ean it wit
h
a c
l
eaning c
l
ot
h
. Wipe
t
he disc from the center to out. Do not wi
p
e in a circular motion
.
•
Do not use so
l
vents suc
h
as
b
enzine, t
h
inner, commercia
lly
a
vai
l
a
bl
e c
l
eaners,
d
etergent, a
b
rasive c
l
eaning agents or
a
ntistatic spray intended for analog records.
Cl
eanin
g
t
h
e Disc Len
s
g
•
I
f
this unit continues to per
f
orm improperly even a
f
ter you have
r
e
f
erred to the relevant sections and to the “Troubleshooting
G
ui
d
e” in t
h
is manua
l
, t
h
e
l
aser optica
l
pic
k
up unit may
b
e
d
irty.
C
onsult your dealer or an authorized service center
f
or inspection
a
nd cleanin
g
o
f
the laser optical pickup unit.
Disc Handlin
g
g
•
W
h
en you
h
an
dl
e a
d
isc,
h
o
ld
it
b
y its e
d
ge an
d
try not to touc
h
t
he sur
f
ace o
f
the disc
.
•
A
l
ways store t
h
e
d
isc in its protective case w
h
en not in use.
Auto Hea
d
C
l
eanin
g
g
•
Automaticall
y
cleans video heads as
y
ou insert or remove a
c
assette tape, so
y
ou can see a clear picture
.
•
Pla
y
back picture ma
y
become blurred or interrupted while the
T
V pro
g
ram reception is clear. Dirt accumulated on the video
h
eads after a lon
g
period of use, or the usa
g
e of rental or worn
c
assette tapes can cause this problem. If a streak
y
or snow
y
p
icture appears during pla
y
back, the video heads in
y
our unit
m
a
y
need to be cleaned
.
1
. P
l
ease visit your
l
oca
l
au
d
io/vi
d
eo store an
d
purc
h
ase a goo
d
qua
l
ity VHS vi
d
eo
h
ea
d
c
l
eaner
.
2
.
I
f
a Video head cleaner does not solve the problem, please call
our toll
f
ree customer support line
f
ound on the cover o
f
this
m
a
n
ua
l
to
l
ocate
a
n
aut
h
o
riz
ed
se
rvi
ce
ce
n
te
r
.
Hi
n
t
•
Remem
b
er to rea
d
t
h
e instructions a
l
ong wit
h
t
h
e vi
d
eo
h
ea
d
c
l
eaner
b
e
f
ore use
.
•
Clean video heads onl
y
when problems occur.

EN
–
5
–
P
recaut
i
ons
A
bou
t t
h
e Vi
d
e
o
C
a
ssettes
a
n
d
Disc
s
Pl
a
y
a
bl
e Disc
s
U
npla
y
able Disc
s
NEVER pla
y
back the following discs. Otherwise, malfunction ma
y
result
!
DVD-RAM / DVD-Audio / CD-i / Photo CD / Video CD / DVD with region codes other than 1 or ALL / DTS-CD / DVD-ROM
f
or personal
computers / CD-ROM
f
or personal computer
s
O
n the followin
g
disc, the sound MAY NOT be heard.
Su
p
er Audio C
D
N
O
TE
:
Onl
y
the sound recorded on the normal CD la
y
er can be delivered.
The sound recorded on the high densit
y
Super Audio CD la
y
er cannot be delivered
.
A
ny ot
h
er
d
iscs wit
h
out compati
b
i
l
ity in
d
ication
s
Use on
l
y cassettes mar
k
e
d
wi
th
th
i
s
u
ni
t.
P
l
a
y
a
bl
e Vi
d
eo Cassette
s
I
f
you cannot play back a disc which bears one o
f
the marks above, check the
f
ollowing notes
.
*1: This unit conforms to the NTSC color s
y
stem. Discs recorded in other color s
y
stems such as PAL cannot be pla
y
ed back.
*2: Certain DVD-Video discs do not operate as described in this manual due to the intentions o
f
the disc’s producers
.
*3: Discs Recorded in the VR (Video Recording)
f
ormat cannot be played back
.
*4: Scratched or stained discs ma
y
not be pla
y
ed back.
*5: Some discs cannot be pla
y
ed back because o
f
incompatible recording conditions, characteristics o
f
the recorder or special
p
ro
p
erties o
f
discs.
*6: You can play back discs which bear the marks above. I
f
you use non-standardized discs, this unit may not play them back. Even i
f
t
h
ey are p
l
aye
d
b
ac
k
, t
h
e soun
d
or vi
d
eo qua
l
ity wi
ll
b
e compromise
d
.
*7: You ma
y
pla
y
back the unfinalized DVD-R/RW disc recorded in the video format on our brand’s DVD recorder. However,
depending on the recording status of a disc, the disc ma
y
not be pla
y
ed back at all or normall
y
(the picture or sound ma
y
not
be smooth, etc.). In this case,
y
ou need to finalize the disc with the DVD recorder. Refer to the manual accompan
y
ing the DVD
r
eco
r
de
r
.
*8: Onl
y
the discs recorded in the video
f
ormat and
f
inalized can be pla
y
ed back
.
Un
f
inalized discs cannot be pla
y
ed back. Depending on the recording status o
f
a disc, the disc ma
y
not be pla
y
ed back at all. (the
picture or soun
d
may not
b
e smoot
h
, etc.
)
*
9:
I
f
the recorded portion o
f
the disc is too small (less than 2 3/16 inches (55 mm) across), it may not play back properly
.
*10: Do not glue paper or put stickers on to the disc. These ma
y
damage the disc, and the unit ma
y
not read it correctl
y.
Pla
y
abl
e
d
i
scs
M
ark (lo
g
o)
R
e
g
ion cod
e
R
ecorded
s
igna
l
s
Di
sc
s
iz
e
Disc type
s
D
VD-Vi
d
e
o
*
1
,
2
,
4
,
6
,
1
0
or
Digita
l
vi
d
e
o
(
MPEG2
)
1
2
cm
o
r
8
c
m
e.g.)
title 1 title 2
chapter 1 chapter 2 chapter 1
chapter 2
chapter 3 chapter 4
D
V
D
-R
W
D
V
D
-
R
*
1, 3, 4, 5, 6, 7,
8
,
9
, 1
0
D
V
D
+
RW
D
V
D
+
R
*1
,
3
,
4
,
5
,
6
,
8
,
9
,
1
0
A
ud
i
o
C
D
*
4, 6, 10
D
i
g
ital audi
o
12
cm
o
r
8
c
m
e.g.)
track 1 track 2 track 5 track 6track 3 track 4
C
D-R
W
C
D-
R
*4
,
5
,
6
,
9
,
1
0
D
igita
l
au
d
i
o
is a trademark of DVD Format/Logo Licensing Corporation.

–
6
–
EN
S
etu
p
SETUP > AUDIO >
DOLBY DIGITAL
Connecting to a Do
lb
y Digita
l
d
eco
d
er
f
or Dolby Digital audio output.
B
IT
S
TREA
M
Connecting to ot
h
er equipment (an MD
d
ec
k
or DAT
d
ec
k
etc.)
wit
h
out Do
lb
y Digita
l
d
eco
d
er.
P
CM
Connection
Setting
H
in
t
fo
r
Cab
l
e
B
o
x
o
r
Sate
lli
te
B
ox
LR
VCRDVD/VCR
AUDIO OUT
L
R
DIGITAL
AUDIO OUT
or
AUDIO
OUT
DVD
S-VIDEO
OUT
COMPONENT
VIDEO OUT
L
R
S
tereo s
y
ste
m
Met
h
od
1
A
na
l
og au
d
io
i
nput jac
ks
A
UDI
O
O
U
T
(Ana
l
og)
Connection to an Au
d
io Syste
m
Aud
i
o
cab
l
e
pp
(su
ppl
ie
d)
* To complete these settings, re
f
er to pages 20-21
.
Hi
n
t
•
T
h
e au
d
io source on a
d
isc in a Do
lb
y Digita
l
Mu
l
ti c
h
anne
l
surroun
d
f
ormat cannot be recorded as digital sound b
y
an MD or DAT deck
.
•
B
y
hooking this unit up to a Multi channel Dolb
y
Digital decoder,
y
ou
c
an enjo
y
high-qualit
y
Dolb
y
Digital Multi channel surround sound as
hea
r
d
in
t
h
e
m
o
vi
e
t
h
eate
r
s.
•
P
l
a
y
ing a DVD using incorrect settings ma
y
generate noise
d
istortion
a
n
d
ma
y
a
l
so
d
amage t
h
e spea
k
ers
.
(DVD mode onl
y)
Di
g
ital audio
input jac
k
D
I
G
ITAL
AU
DI
O
OUT
A
u
d
io Coaxia
l
Digita
l
ca
bl
e
(commercia
ll
y avai
l
a
bl
e
)
M
et
h
od
2
D
o
lb
y Digita
l
d
eco
d
er,
MD
deck
o
r DAT
deck
Setu
p
I
f channel 3 has been alread
y
occupied for
b
roa
d
castin
g,
1) Set your TV to c
h
anne
l
4.
2) Insert a pre-recor
d
e
d
tape into t
h
is unit.
3)
Press
[
SOURCE
]
on t
h
e unit so t
h
at t
h
e VCR
SOURCE
l
ig
h
t is
l
it
.
•
If
noise appears on the TV screen, press
[
VCR/TV
]
on t
h
e remote contro
l.
4
)
Press
[
PLAY
B
]
on
c
e.
5
) After a few seconds,
p
ress and hold
[
PLAY
B
]
o
n
t
h
e
u
ni
t
fo
r
3
seco
n
ds.
•
T
he RF output channel will chan
g
e to chan
-
nel 4
f
rom channel 3 and you will see a
p
l
a
yb
ac
k
picture
.
•
When a picture does not appear on the TV
screen, repeat step
4
.
6)
Press
[
STOP
C
]
to stop p
l
ay
b
ac
k.
R
F Output C
h
anne
l
Connect
i
on
s
H
in
t
•
T
h
e RF out
p
ut c
h
anne
l
d
oes not
ch
ange w
h
en
y
ou a
d
just trac
k
ing
d
uring p
l
ay
b
ac
k
. In case RF output
ch
anne
l
c
h
anges, you can easi
l
y
s
witch it back. Start the playback
a
gain then press and hold
[
PLAY
B
]
o
n
t
h
e
u
ni
t
f
o
r
3
seco
n
ds.
S
elect this connection when
y
ou want to view or record a
s
crambled channel. With this connection
,
channels cannot be
ch
ange
d
on t
h
e unit. You can view or recor
d
ONLY t
h
e c
h
anne
l
s
y
ou
ha
v
e
se
l
ected
o
n
t
h
e
cab
l
e
bo
x
o
r
t
h
e
sate
lli
te
bo
x
.
•
Wh
i
l
e
y
ou are recor
d
ing, on
ly
t
h
e recor
d
e
d
c
h
anne
l
can
b
e viewe
d.
T
o select channels o
f
the cable box or satellite box
1) Turn on the unit b
y
pressing
[
STANDBY-ON
]
,
then
p
ress
[
VCR/TV
]
.
The STANDBY-ON indicator on the front
p
anel will
l
i
gh
t, t
h
en press
[
SKIP/CH.
G
/
K
,
H
/
L
]
to
select
cha
nn
el
3
o
r 4 (the same channel as the out
p
ut channel of the cable box
o
r satellite box
).
• If
y
ou use the channel 4,
y
ou need to change the unit’s RF
out
p
ut to channel 4. Refer to “RF Out
p
ut Channel”
.
2) At the TV, select channel 3 or 4 (the same channel as
y
ou have
selected at ste
p
1)
.
3) On the cable box or satellite box, select the channel
y
ou want
to
vi
e
w
o
r r
eco
r
d.
ANT-OUT
ANT-IN
RF cable
(supplied)
(Back of DVD/VCR)
IN
OUT
(Back of TV)
Satellite or
Cable TV
signal
(Cable box or
Satellite box)
P
lease re
f
er to “Basic TV Connection” on the
f
ront page be
f
ore you use this unit.
Audio
DVD/VCR
DIGITAL
AUDIO OUT
COAXIAL
AUDIO
OUT
DVD
S-VIDEO
OUT
COMPONENT
VIDEO OUT
COAXIAL

EN
–
7
–
S
etu
p
A
d
mir
al:
A
U
X
Curtis Mat
h
is: LINE1
,
LINE2
,
00
,
90
,
91
,
92
,
93
GE: INPUT
,
TV/VCR
,
00
,
90
,
91
,
92
,
9
3
Hitac
h
i: INPUT
,
AU
X
JVC: VIDEO
,
VIDEO1
,
VIDEO2
,
VIDEO
3
K
e
nw
ood:
A
U
X
LXI-
Se
ri
es:
00
M
agnavox: AUX CHANNE
L
Panasonic: TV
/
VIDE
O
RCA: INPUT
,
TV/VCR
,
00
,
90
,
91
,
92
,
93
S
amsung: TV/VIDE
O
S
an
y
o: VIDE
O
Sh
ar
p
: 0
0
S
on
y
: VIDEO1, VIDEO2, VIDEO
3
T
os
h
i
b
a: TV
/
GAM
E
Ze
ni
th:
00
DIGITAL
AUDIO OUT
COAXIAL
ANT-OUT
ANT-IN
AUDIO
OUT
DVD VCR
DVD/VCR
S-VIDEO
OUT
COMPONENT
VIDEO OUT
AUDIO IN
VIDEO IN
AUDIO OUT
VIDEO OUT
L
LY
C
B
C
R
R
R
AUDIO IN
LR
VCRDVD/VCR
AUDIO OUT
L
R
DIGITAL
AUDIO OUT
AUDIO
OUT
DVD
S-VIDEO
OUT
COMPON
VIDEO O
L
R
or
VIDEO IN
VCRDVD/VCR
VIDEO OUT
S-VIDEO IN
DIGITAL
AUDIO OUT
COAXIAL
AUDIO
OUT
DVD
S-VIDEO
OUT
COMPONENT
VIDEO OUT
DIGITAL
AUDIO OUT
C
B
Y
C
R
COMPONENT
VIDEO IN
COAXIAL
AUDIO
OUT
DVD
S-VIDEO
OUT
COMPONENT
VIDEO OUT
Y
C
B
C
R
AUDI
O
O
UT
(Ana
l
og)
V
IDE
O
OU
T
TV
Method
1
Goo
d
pictur
e
Bas
i
c
A
ud
i
o
M
ethod
2
Method
3
B
etter
pi
ctur
e
Best
pi
ctur
e
S
-VIDE
O
OUT
CO
MP
O
NENT VIDE
O
O
U
T
V
i
d
eo ca
bl
e
(
supp
l
ie
d)
Aud
i
o
cab
l
e
(su
pp
lied)
S
-Vi
d
eo ca
ble
(commercia
ll
y
a
vai
l
a
bl
e
)
Component Vi
d
eo ca
bl
e
(commercia
ll
y avai
l
a
bl
e
)
DVD/VCR
Co
nn
ectio
n
to
a
TV
Hin
t
•
Connect this unit directly to the TV. I
f
the Audio/Video cables are connected to a VCR, pictures may be distorted due to the copy protection
sys
t
em
.
• The COAXIAL, DVD AUDIO OUT, S-VIDEO OUT and COMPONENT VIDEO OUT jacks are only use
f
ul in DVD mode
.
A
f
ter you have completed connections
Press t
h
e input se
l
ector
b
utton (usua
ll
y TV/VIDEO, INPUT or AUX) on your TV to switc
h
an appropriate externa
l
input c
h
anne
l
(usua
ll
y
near channel 0)
f
or viewing the picture
f
rom this unit. I
f
the picture does not appear, also re
f
er to the manual accompanying your TV
.
I
NPUT M
O
DE
S
F
O
R
CO
MM
O
N TV BRAND
S
Listed below are inputs
f
or common brand name TV’s.

–
8
–
EN
S
etu
p
1
Tu
rn
o
n
the
TV
a
n
d
set
i
t
to
cha
nn
el
3.
•
If channel 3 has been alread
y
occupied for broadcasting,
see “RF Output C
h
anne
l
” section on pa
g
e 6.
2
Select your language when turning this unit on
f
or the
f
irst time
.
Th
en press [
B
]
t
o go
t
o nex
t
s
t
ep
.
3
P
ress
[
B
]
to start Auto
S
et Up.
o
r
STANDBY-ON
1
Pr
ess
[
MENU
]
to
select
“
C
HANNEL
S
ET
U
P”
.
Th
en
p
ress
[
B
]
t
o
g
o
t
o nex
t
s
t
ep.
2
Select
“MAN
U
AL
S
ET
U
P”
.
Th
en press
[
B
]
to
g
o to next step.
3
S
e
l
ect t
h
e c
h
anne
l
to
b
e a
dd
e
d
or
d
e
l
ete
d.
4
Select
“ADD”
o
r “DELETE”
.
5
To
e
xi
t
the
m
e
n
u
T
o Preset the Channel A
g
ai
n
g
1
)
Press [MENU] until the main menu appears.
2
)
S
e
l
ect “CHANNEL SET UP”
by
using
[
K
/
L
]
,
t
h
en
p
ress
[
B
]
.
3
)
S
e
l
ect “AUTO SET UP”
b
y using
[
K
/
L
]
, t
h
en
p
ress
[
B
]
. A
f
ter scan-
nin
g
, the tuner stops on the lowest memorized channel.
T
o Chan
g
e the On-Screen Lan
g
ua
ge
ggg
1
)
P
r
ess
[
MENU
]
u
ntil the main menu a
pp
ears
.
2
)
Se
l
ect “LANGUAGE SELECT”
by
using
[
K
/
L
]
,
t
h
e
n
p
ress
[
B
]
.
3
)
Select
“
E
NGLI
S
H
”
,
“
FRAN
C
AI
S
”
o
r
“
E
S
PAÑ
OL
”
b
y
using
[
K
/
L
]
then
p
ress
[
CLEAR/C.RESET
]
.
To Se
l
ect a C
h
anne
l
You can select a channel b
y
using
t
h
e
nu
m
be
r
butto
n
s
o
r
[
SKIP
/
CH.
G
/
K
,
H
/
L
]
.
Notes for usin
g
the number buttons
:
• When selectin
g
cable channels which are hi
g
her than 99, enter
channel numbers as a three-di
g
it number.
(
for exam
p
le: 117,
p
ress
[
1
],
[
1
],
[
7
]
)
• You must precede sin
g
le-di
g
it channel numbers with a zero. (for
example: 02, 03, 04 and so on
)
• I
f
the clock is not set, the CLOCK SET screen appears when you
press
[
MENU
]
. In t
h
is case, go to step 2
.
C
LEA
R
/
C
. RE
SE
T
Pre
p
aration for Us
e
p
H
i
n
t
•
Repeat these steps onl
y
if either there was a power failure or this unit
has been unplu
gg
ed for more than 30 seconds
.
N
o
Please wait
f
or a
f
ew minutes.
After scanning...
•
T
h
e tuner stops on t
h
e
l
owest memorize
d
c
h
anne
l.
•
You can se
l
ect on
l
y t
h
e c
h
anne
l
s memorize
d
in t
h
is unit
b
y using
[
SKIP/CH.
G
/
//
K
,
H
/
L
]
(
or
[
CHANNEL
K
/
/
L
]
)
.
•
I
f
“AUTO SET UP” appears on the TV screen again, check the cable con
-
nections. T
h
en, press
[
B
]
once aga
i
n
.
Y
e
s
P
ress
[
MENU
]
to ex
i
t.
• Re
f
er to “Hint
f
or Cable Box or Satellite Box” section on page 6
.
Do
y
ou connect the cable from the cable box or the satellite box to the
unit’s ANT-IN
j
ack
?
H
in
t
•
To go
b
ac
k
one step, press
[
s
]
(
d
uring steps 2 to 7)
.
•
Your clock settin
g
will be lost if either there is a power failure or this
u
nit has been unplu
gg
ed for more than 30 seconds
.
or
o
r
MENU
or
or
or
or
or
or
MENU
o
r
• I
f
the clock is not set, the “CLOCK SET” screen appears when you
press
[
MENU
]
. In t
h
is case, press
[
MENU
]
aga
i
n.
L
ANG
U
AGE
S
ELE
CT
B
ENGLISH
[
ON
]
FRANCAI
S
E
S
PAÑ
OL
C
H 01
A
UT
O
S
ET UP
- M E N
U
-
TIMER PR
O
GRAMMIN
G
AUTO REPEAT [OFF
]
B
CHANNEL SET UP
C
L
OC
K
S
E
T
LANG
U
AGE
S
ELE
CT
C
HANNEL
S
ET
U
P
AUTO SET U
P
B
MAN
U
AL
S
ET
U
P
M
ANUAL
S
ET UP
CHANNEL 30
(
CATV
)
ADD
M
ANUAL
S
ET UP
CHANNEL 30
(
CATV
)
D
ELET
E
- M E N
U
-
TIMER PR
O
GRAMMING
AUTO REPEAT
[
OFF
]
C
HANNEL
S
ET
U
P
B
C
L
OC
K
S
E
T
LANG
U
AGE
S
ELE
C
T
C
L
OC
K
S
E
T
MONTH DAY YEAR
1 0
/
– – – – – –
HOUR MINUTE AM/PM
– –
:
– – – –
C
L
OC
K
S
E
T
M
O
NTH DAY YEAR
1 0
/
0 5 2 0 0 9
H
O
UR MINUTE AM
/
PM
– –
:
– – – –
C
L
OC
K
S
ET
MONTH DAY YEAR
1 0
/
0 5 M
O
N 2 0 0 9
HOUR MINUTE AM/PM
0
5
:
– – – –
C
L
OC
K
S
E
T
M
O
NTH DAY YEAR
1 0 / 0 5 MON 2 0 0 9
H
O
UR MINUTE AM
/
PM
0
5 : 4
0
– –
1
P
ress
[
MENU
]
an
d
se
l
ect “CLOCK SET”.
Th
en press
[
B
]
t
o go
t
o nex
t
s
t
ep.
2
Se
l
ect
t
h
e
cu
rr
e
n
t
m
o
n
t
h
.
T
hen
p
ress
[
B
]
to
g
o to next step.
3
S
e
l
ect t
h
e current
d
ay.
Th
en press
[
B
]
t
o go
t
o nex
t
s
t
ep.
4
S
elect the current
y
ear.
T
hen
p
ress
[
B
]
to
g
o to next step.
5
Se
l
ect
t
h
e
cu
rr
e
n
t
h
ou
r
.
T
hen
p
ress
[
B
]
to
g
o to next step.
6
Se
l
ect
t
h
e
cu
rr
e
n
t
min
ute.
Th
en
p
ress
[
B
]
t
o
g
o
t
o nex
t
s
t
ep.
7
Se
l
ect
“AM”
o
r “PM”
.
8
T
o exit t
h
e CLOCK SET scree
n
C
L
OC
K
S
ET
M
O
NTH DAY YEAR
1 0
/
0 5 M
O
N 2 0 0 9
H
O
UR MINUTE AM
/
PM
0 5 : 4 0
P
M AM
B
PM
or
or
o
r
o
r
N
O
YE
S
T
u
rn
o
n
t
h
e
U
ni
t
fo
r
t
h
e
Fir
st
Tim
e
VCR
C
l
oc
k
Setu
p
VCR
Op
erat
i
ons
d
escr
ib
e
d
i
n t
hi
s manua
l
are
Oidibdihi l
mainl
y
based on the remote control.
H
in
t
•
I
f
you accidentally select Spanish or French and need English: Press
[
MENU
]
a
n
d
choose
S
ELE
C.
IDI
O
MA
o
r
S
ELE
C
TI
O
N LANG
U
E
.
Pr
ess
[
B
]
a
n
d
se
l
ect ENGLISH. Fina
ll
y, press
[
CLEAR/C.RESET
]
.
•
To add or delete channels in this unit
,
[
SKIP/CH.
G
/
K
,
H
/
L
]
butto
n
w
orks on the channel number memorized in this unit
,
[
K
/
L
]
w
o
rk
s
o
n
a
ll
.
T
o
A
dd
o
r D
e
l
ete
C
h
a
nn
e
l
s
VCR
C
L
OC
K
S
E
T
M
O
NTH DAY YEAR
1 0
/
0 5 – – – –
H
O
UR MINUTE AM
/
PM
– –
:
– – – –

EN
–
9
–
S
etu
p
6: VIDEO IN
j
ac
k
Connect a cable coming
f
rom the video out jack o
f
a camcorder, another
VCR or an au
d
io-visua
l
source (
l
aser
d
isc p
l
ayer, vi
d
eo
d
isc p
l
ayer, etc.)
h
ere
.
7: DVD/VCR VIDEO OUT
j
ack
Connect the supplied video cable here through the video in jack o
f
a
tele
vi
s
i
o
n
.
8: COMPONENT VIDEO OUT
j
ack
s
Connect optiona
l
COMPONENT VIDEO ca
bl
es
h
ere t
h
rou
gh
t
h
e COMPO
-
NENT VIDEO in jacks of a television. (DVD onl
y)
9: S-VIDEO OUT jac
k
Connect an optional S-VIDEO cable here through the S-VIDEO in
j
ack of a
television. (DVD onl
y)
10: DIGITAL AUDIO OUT COAXIAL jac
k
Connect an optiona
l
coaxia
l
d
igita
l
au
d
io ca
bl
e
h
ere t
h
roug
h
t
h
e coaxia
l
digital audio in jack o
f
a decoder or audio receiver. (DVD only
)
Fu
nct
io
n
O
verv
i
e
w
You must
f
irst select which component you wish to operate with
[
SOURCE
]
, as this product is a combination o
f
a VCR and a DVD
pla
y
er
.
DVDVCR
SOURCE
STANDBY-ON
DISPLAY VCR DVD PAUSE
SLOW
VCR/TV
SKIP/CH.
PLAY
STOP
RECORD
MENU
SETUP TOP MENU
MODE ZOOM
SUBTITLE
T-SET
ANGLE
ENTER
RETURN
SEARCH
MODE
REPEAT A-B
OPEN/CLOSE
/EJECT
SPEED AUDIO
C
LEAR
/
C.
RE
S
E
T
123
456
789
0
+10
PLAYDISC IN
DVDVCR
OPEN/CLOSE
CHANNEL SOURCE PREV STOP PLAY NEXT
DVD PLAYER / VCR CMWD 2206
SOURCE button
DVD SOURCE light
VCR SOURCE light
DVD button
VCR button
V
C
R M
O
DE
P
ress
[
VCR
]
on t
h
e remote contro
l.
(Veri
f
y that the VCR SOURCE light is lit.)
DVD M
O
DE
Pr
ess
[
DVD
]
o
n
t
h
e
r
e
m
ote
co
n
t
r
o
l
.
(Verif
y
that the DVD SOURCE light is lit.)
Hi
n
t
•
Pressing onl
y
[
SOURCE
]
on the front
p
anel DOES NOT switch the mode
o
f
t
h
e
r
e
m
ote
co
n
t
r
o
l
.
Y
ou
M
US
T
se
l
ect
t
h
e
co
rr
ect
m
ode
o
n
t
h
e
r
e
m
ote
co
n
t
r
o
l
.
VCR / DVD Switchin
g
F
r
o
n
t
P
a
n
e
l In
d
i
cator
PLAYDISC IN
DVDVCR
OPEN/CLOSESTANDBY-ON
POWER ON
AUDIO
REC
RECORDF.FWDREW STOP/EJECT
TIMER REC
IR
CHANNEL SOURCE PREV STOP PLAY NEXT
VIDEO
REC
RECORD
TIMER REC
PLAY
DVD PLAYER / VCR CMWD 2206
Lights up when the inserted disc
is
b
eing p
l
a
y
e
d
b
ac
k
.
B
l
in
k
s w
h
en an unaccepta
bl
e
d
isc is inserte
d
.
L
i
g
hts up when the Timer Recordin
g
or
a
n OTR recordin
g
has been set
.
L
ights up during a recording
.
Bl
in
k
s w
h
en a recor
d
ing is pause
d.
Li
g
hts up when power is on
.
Li
g
hts up when this unit is in the DVD mode
.
L
i
gh
ts up w
h
en t
h
is unit is in t
h
e VCR mo
d
e.
Front & Rear Termina
l
s
DIGITAL
AUDIO OUT
COAXIAL
ANT-OUT
ANT-IN
AUDIO
OUT
DVD VCR
DVD/VCR
S-VIDEO
OUT
COMPONENT
VIDEO OUT
AUDIO IN
VIDEO IN
AUDIO OUT
VIDEO OUT
L
LY
R
R
C
B
C
R
ANT-OUT
ANT-IN
DIGITAL
AUDIO OUT
COAXIAL
AUDIO
OUT
DVD
DVD/VCR
VCR
S-VIDEO
OUT
COMPONENT
VIDEO OUT
AUDIO OUT
VIDEO OUT
AUDIO IN
VIDEO IN
L
Y
C
B
C
R
L
R
R
AUDIO
REC
RECORDF.FWDREW STOP/EJECT
TIMER REC
VIDEO
REC
RECORD
TIMER REC
PLAY
[
Rear Panel
]
[
Front Panel
]
1: DVD AUDIO OUT (analog)
j
acks
Connect the supplied audio cable here through the audio in
j
acks o
f
a
television or other audio equipment. (DVD onl
y)
2
: DVD/VCR AUDIO OUT jac
ks
Connect the supplied audio cable here through the audio in
j
acks of a
television or other audio e
q
ui
p
ment
.
3
: AUDIO IN jac
k
Connect audio cable coming from the audio out
j
ack of a camcorder,
a
n
ot
h
e
r V
C
R
o
r
a
n
aud
i
o
sou
r
ce
h
e
r
e.
4: ANT-IN
j
ac
k
Connect your antenna or ca
bl
e
b
ox
h
ere
.
5
: ANT-OUT
j
ac
k
Connect the supplied RF cable to the antenna input jack o
f
a
te
l
evision
.
3
2
10
9
1
8
7
6
3
4
5
Li
g
hts up when the disc is inserted
.
6

–
1
0
–
EN
S
etu
p
STANDBY-ON
DISPLAY VCR DVD PAUSE
SLOW
VCR/TV
SKIP/CH.
PLAY
STOP
RECORD
MENU
SETUP TOP MENU
MODE ZOOM
SUBTITLE
T-SET
ANGLE
ENTER
RETURN
SEARCH
MODE
REPEAT A-B
OPEN/CLOSE
/EJECT
SPEED AUDIO
C
LEAR
/
C.
RE
S
E
T
123
456
789
0
+10
Installin
g
the Batteries for the
R
e
m
ote
Co
n
t
r
ol
Insta
ll
two AA (1.5V)
b
atteries (su
ppl
ie
d
)
matching the polarit
y
indicated inside
batter
y
compartment of the remote
co
n
t
r
o
l
.
PLAYDISC IN
DVDVCR
OPEN/CLOSESTANDBY-ON
POWER ON
AUDIO
REC
RECORDF.FWDREW STOP/EJECT
TIMER REC
IR
CHANNEL SOURCE PREV STOP PLAY NEXT
VIDEO
REC
RECORD
TIMER REC
PLAY
DVD PLAYER / VCR CMWD 2206
K
eep in mind the
f
ollowing when using the
r
emote contro
l
:
•
Make
su
r
e
that
the
r
e
i
s
n
o
obstacle
bet
w
ee
n
th
e remote contro
l
an
d
t
h
e remote sensor
o
n t
h
e unit
.
• The maximum operable ranges
f
rom the
u
ni
t
a
r
e
as
fo
ll
o
w
s.
-
Line o
f
si
g
ht: approx. 23
f
eet (7m)
-
Either side o
f
center
:
a
pprox. 16
f
eet (5m) within 30
°
-
Abo
v
e
:
a
pprox. 16
f
eet (5m) within 15
°
-
Be
l
o
w
:
appro
x.
1
0
f
eet (3m) within 30
°
Re
m
ote
Co
n
t
r
ol
2
2
3
1
Hin
t
•
Do not mix alkaline
,
standard (carbon-
zinc), or rec
h
ar
g
ea
bl
e (ni-ca
d
, ni-m
h
, etc)
batte
ri
es.
•
Do not mix o
ld
an
d
new
b
atteries
.
•
Alwa
y
s remove batteries from remote
c
ontrol if the
y
are dead or if the remote
co
n
t
r
o
l i
s
n
ot
to
be
used
f
o
r
a
n
e
x
te
n
ded
period of time. This will prevent batter
y
a
cid from leaking into the batter
y
com-
p
ar
t
men
t.
D
VD m
ode
V
C
R m
ode
123
456
789
0
+10
•
To select chapter or title
directly
.
• To se
l
ect trac
k
d
irect
ly.
•
T
o
select
cha
nn
el.
•
The +10 button has no e
ff
ect
in VCR mo
d
e.
•
To search
f
orward
/
backward
through a disc
.
•
To be
g
in slow forward
p
l
a
yb
ac
k
in t
h
e pause mo
d
e
.
• To search forward
/
backward
t
hrou
g
h a disc.
•
To
f
orward/backward a ta
p
e.
A-B
•
To repeat
b
etween your c
h
o
-
sen point o
f
A and B
.
•
To repeat
b
etween your
c
hosen point o
f
A and B.
ANGLE
•
To select camera an
g
les on a
d
i
sc.
AUDIO
•
To se
l
ect au
d
io
l
anguages on
a
d
isc
.
• To se
l
ect STEREO, L-c
h
or R-c
h
.
C
LEAR
/
C.
RE
S
ET
•
T
o
r
e
m
o
v
e
status
n
u
m
be
r in
pro
g
ram input
.
•
T
o
c
l
ea
r
t
h
e
n
u
m
be
r
s
e
n
te
r
ed
incorrectl
y.
•
To cancel the
p
oint for A-B re
p
eat
.
• T
o
r
e
m
o
v
e
status
n
u
m
be
r in
p
ro
g
ram input.
• T
o
c
l
ea
r
t
h
e
n
u
m
be
r
s
e
n
te
r
ed
i
ncorrectl
y
.
•
T
o cancel the
p
oint for A-B re
p
eat.
•
T
o
e
xi
t
t
h
e
V
C
R M
e
n
u.
•
To reset the ta
p
e counter.
DISPLAY
•
To
d
isp
l
a
y
t
h
e current
d
isc
m
ode.
• To
d
isp
l
a
y
t
h
e current
d
isc
mode.
•
To
d
isp
l
a
y
t
h
e current time,
tape counter, an
d
c
h
anne
l.
DVD
•
To select the DVD out
p
ut mode.
•
T
o
act
iv
ate
t
h
e
r
e
m
ote
co
n
t
r
o
l in DVD m
ode.
•
T
o select the DVD out
p
ut mode
.
• T
o
act
iv
ate
t
h
e
r
e
m
ote
co
n
t
r
o
l in DVD m
ode.
ENTER
•
T
o
m
o
v
e
the
cu
r
so
r
a
n
d
dete
r
-
m
i
ne
i
ts pos
i
t
i
on
.
• T
o
m
o
v
e
the
cu
r
so
r
a
n
d
dete
r
-
mi
ne
i
ts pos
i
t
i
on.
•
To se
l
ect an item
o
n t
h
e VCR Menu.
•
To a
d
vance to t
h
e
n
ext V
C
R Menu
.
•
To go
b
ac
k
one
s
tep
d
uring c
l
oc
k
a
n
d
timer setting
.
MENU
•
To ca
ll
up t
h
e Menu on a
d
isc
.
•
To ca
ll
up t
h
e VCR Menu.
MODE
•
To arrange the pla
y
ing order
or pla
y
randoml
y.
•
To set black level on
/
off
.
•
To set virtual surround on
/
off.
• To arrange the pla
y
ing order
o
r pla
y
randoml
y
.
•
T
o set virtual surround on
/
off
.
OPEN/CLOSE
/EJECT
•
To open or close the disc tra
y
. • To open or close the disc tra
y.
•
To e
j
ect the video
cassette
fr
o
m
t
h
e
V
C
R
.
PAUSE
•
To pause disc pla
y
back
.
•
To advance pla
y
back one
fr
a
m
e
at
a
t
im
e.
• To pause disc pla
y
back
.
•
To pause tape pla
y
back or
recordin
g.
•
To advance pla
y
back one
fr
a
m
e
at
a
t
im
e.
PLAY
•
To
b
egin
d
isc p
l
ay
b
ac
k.
• To
b
egin
d
isc p
l
ay
b
ac
k.
•
To
b
egin tape p
l
ay
b
ac
k
.
RECORD
•
To start a recor
d
ing or One
T
ouc
h
Recor
d
ing
.
REPEAT
•
To p
l
a
y
a c
h
apter or tit
l
e
repeate
dly.
• To p
l
a
y
a trac
k
or
d
isc repeat
-
edly
.
RETURN
•
To return to t
h
e previous
operat
i
on
i
n menu.
• To return to t
h
e previous
o
perat
i
on
i
n menu.
SEARCH
MODE
•
To search cha
p
ter, title or
t
im
e.
•
T
o
set
o
r
sea
r
c
h
t
h
e
m
a
rk
e
r
s.
• T
o
sea
r
c
h
t
r
ac
k
.
• T
o
sea
r
c
h
t
im
e.
• T
o
set
o
r
sea
r
c
h
t
h
e
m
a
rk
e
r
s.
•
To ca
ll
u
p
t
h
e in
d
ex or time
sea
r
c
h m
e
n
u.
SETUP
•
To ca
ll
up t
h
e DVD setup
men
u
.
• To ca
ll
up t
h
e DVD setup
men
u.
SKIP/CH.
SKIP/CH.
•
To s
k
ip c
h
apters or tit
l
es. • To s
k
ip trac
k
s
.
•
To c
h
ange c
h
anne
l
s.
•
To a
d
just t
h
e trac
k
ing manu-
a
ll
y
d
uring p
l
ay
b
ac
k.
SLOW
•
To view t
h
e tape in s
l
ow
mot
i
on
.
SPEED
•
To se
l
ect t
h
e recor
d
ing spee
d
.
STANDBY-ON
•
To turn t
h
e unit on or to turn
t
h
e unit into t
h
e stan
db
y
mode. (To completely turn o
ff
the unit, you must unplug the
AC power cor
d
.
)
• To turn t
h
e unit on or to turn
th
e unit into t
h
e stan
db
y
m
ode. (To completely turn o
ff
t
he unit, you must unplug the
A
C power cor
d
.)
•
To turn t
h
e unit on or to turn
t
h
e unit into t
h
e stan
db
y
mode. (To completely turn o
ff
the unit, you must unplug the
AC power cor
d
.)
STOP
•
To stop pla
y
back. • To stop pla
y
back
.
•
To stop pla
y
back or
recordin
g.
SUBTITLE
T-SET
•
To se
l
ect su
b
tit
l
es on a
d
isc.
•
To put t
h
e VCR into stan
db
y
mode
f
or a Timer Recording
.
TOP MENU
•
To call u
p
the To
p
Menu on a
d
i
sc.
VCR
•
T
o se
l
ect t
h
e VCR output mo
d
e
.
•
To activate t
h
e remote
c
ontro
l
in VCR mo
d
e
.
VCR/TV
•
To se
l
ect DVD position or T
V
pos
i
t
i
on
.
• To se
l
ect CD position or T
V
p
os
i
t
i
on.
•
To se
l
ect VCR position or TV
pos
i
t
i
on
.
ZOOM
•
To magnif
y
part of a picture.
(
x2 / x4
)
Button
(A
l
p
h
a
b
etica
l
or
d
er
)
D
isc/Tap
e

EN
–
11
–
V
CR Funct
i
ons
1
P
ress
[
SEARCH MODE
]
on
c
e.
2
To
se
l
ect
In
de
x M
a
r
k
3
4
A
f
ter searching, it automaticall
y
starts p
l
ay
b
ac
k.
1
P
ress
[
SEARCH MODE
]
tw
i
ce
.
2
S
elect the desired len
g
th o
f
time
f
or
f
ast
f
orwardin
g
or
r
ewin
d
in
g.
3
4
Af
ter searching, it automaticall
y
starts pla
y
back.
1
In
se
r
t
a
vi
deo
cassette
in
to
th
i
s
u
ni
t.
2
T
o start p
l
a
yb
ac
k
3
T
o stop p
l
a
yb
ac
k
4
T
o eject t
h
e cassette
H
i
n
t
•
When a ta
p
e without
record tab is inserted
,
t
h
e
u
ni
t
will
sta
r
t
pla
y
back automaticall
y.
•
Trac
k
ing wi
ll
b
e
automatica
ll
y a
d
juste
d
upon p
l
ay
b
ac
k
.
To a
d
just t
h
e trac
k
ing
manua
ll
y, press
[
SKIP
/
C
H.
G
/
K
,
H
/
L
]
(
o
r
[
C
HANNEL
K
/
L
]
)
d
ur
-
ing p
l
ay
b
ac
k.
Playback
y
STANDBY-ON
POWER ON
AUDIO
REC
RECORDF.FWDREW STOP/EJECT
TIMER REC
IR
VIDEO
REC
RECORD
TIMER REC
PLAY
B
efo
r
e:
T
urn on t
h
e TV an
d
set it to c
h
anne
l
3
.
• If channel 3 has been alread
y
occupied for broadcasting, see “RF Output Channel” section on page 6.
PLAY
STOP
OPEN/CLOSE
/EJECT
Ot
h
er O
p
eration
s
p
Hin
t
• Still/Slow mode will be automatically canceled a
f
ter 5 minutes to prevent damage to the tape and the video head.
• To return to pla
y
back from the Picture Search/Still/Slow mode, press
[
PLAY
B
]
.
VCR F
u
nct
io
n
s
Y
ou
ca
n skip the program backward and
f
orward b
y
the Index
M
a
rk
.
f
I
n
d
ex Searc
h
SEARCH
MODE
Pro.1 Pro.2 Pro.3 Pro.4 Pro.5
02 01 01 02 03
Beginning
of the tape
End of
the tape
CURRENT PROGRAM
INDEX MARK
P
LAY
B
H
i
n
t
•
The Index Mark will be made automaticall
y
at the beginning of each recording
.
•
The time gap between Index Marks should be greater than 1 minute for
SP mode
,
2 minutes for LP mode and 3 minutes for SLP mode
.
To
r
e
win
d
T
o
f
ast
f
orwar
d
Hin
t
f
o
r In
de
x
Sea
r
c
h
&
Tim
e
Sea
r
c
h
•
These
f
unctions are not available during recording
.
•
Pr
ess
[
STOP
C
]
to sto
p
the search.
•
If a tape ends during a search,
y
our search will be canceled and the tape
will rewind to the be
g
innin
g.
T
ime Searc
h
You
can search backward and
f
orward a speci
f
ic length o
f
time
on
a
t
ape
.
INDEX
S
EAR
C
H
0
3
INDEX SEARCH
EX SEA
– –
ss
BB
or
SEARCH
MODE
TIME SEARCH
A
–
–
:
–
–
PLAY
B
or
(
1 minute~9
h
ours an
d
59 minutes
)
To rewin
d
To
f
ast
f
orwar
d
ss
BB
Cou
nter Rese
t
P
ress
[
CLEAR/C.RESET
]
.
To
p
la
y
back in slow motion (Slow mode
)
py
P
r
ess
[
SLOW
]
d
uring p
l
ay
b
ac
k
or t
h
e sti
ll
mo
d
e
.
• I
f
the noise bars appear on the TV screen, you can reduce it by
us
i
ng
[
S
KIP
/C
H.
G
/
K
,
H
/
L
]
(
o
r
[
CHANNEL
K
/
L
]
).
A
u
t
o
Rewin
d
When a tape reaches its end during playback,
f
ast-
f
orward or record
-
ing (except Timer Recor
d
ing an
d
One Touc
h
Recor
d
ing), t
h
e tape
will automatically rewind to the beginning. A
f
ter rewinding
f
inishes,
t
h
e unit wi
ll
eject t
h
e tape
.
VCR
VCR
• Insert a ta
p
e into t
h
is unit
.
VCR
• Insert a ta
p
e into t
h
is unit
.
01 ~ 20
TIME
S
EAR
CH
2
: 5
0
0:0
1~ 9
:59
1
3
STANDBY-ON
DISPLAY VCR DVD PAUSE
SLOW
VCR/TV
SKIP/CH.
PLAY
STOP
OPEN/CLOSE
/EJECT
SPEED AUDIO
123
456
789
0
+10
2
4
3
4
2
To cue or review
p
icture durin
g
p
la
y
back (Picture Search
)
pgpy
Use
[
g
]
or
[
h
]
(
[
F
.
FW
D
g
]
or
[
REW
h
]
).
• Press it a
g
ain an
d
t
h
e unit wi
ll
searc
h
in super
h
i
gh
spee
d
. (in t
h
e
SLP mode onl
y)
To freeze the
p
icture on TV screen durin
g
p
la
y
back (Still mode
)
pgpy
Pr
ess
[
PAUSE
F
]
. Eac
h
time
y
ou press t
h
e
b
utton, t
h
e picture wi
ll
be forwarded b
y
one frame
.
• If the picture begins to vibrate verticall
y
in the still mode,
stabilize the picture b
y
using
[
SKIP/CH.
G
/
K
,
H
/
L
]
(
or
[
CHANNEL
K
/
L
]
).
• If the picture is distorted or rolling verticall
y
, adjust the vertical
hold control on
y
our TV if equipped.

–
1
2
–
EN
V
CR F
u
nct
io
ns
1
P
r
ess
[
MENU
]
,
then select “TIMER PROGRAMMING”
.
2
S
elect an empt
y
program number
.
Then
p
ress
[
B
]
to
g
o to next step.
3
S
e
l
ect “ONCE”, “DAILY” (Mon-Fri), or “WEEKLY”
.
T
h
en press
[
B
]
t
o go
t
o nex
t
s
t
ep.
2
P
ress
[
B
]
fo
r
“
AUTO REPEAT
”,
“
ON
”
or
“
OFF
”.
4
Select
the
des
ir
ed
date.
Th
en
p
ress
[
B
]
t
o
g
o
t
o nex
t
s
t
ep
.
5
Se
l
ect t
h
e
d
esire
d
start time
(h
our
)
.
Th
en
p
ress
[
B
]
t
o
g
o
t
o nex
t
s
t
ep
.
1
I
n
se
r
t
a
cassette
wi
t
h
tab
in
to
t
hi
s
u
ni
t.
2
Se
l
ect
t
h
e
c
h
a
nn
e
l
to
r
eco
r
d.
3
P
r
ess
[
SPEED
]
to select the desired tape speed
.
4
P
ress
[
RECORD
]
repeate
dl
y to se
l
ect t
h
e
d
esire
d
recor
d
ing
l
engt
h.
5
To stop recor
d
in
g
6
To eject t
h
e recor
d-
ed
cassette
• You can set a program one year in a
d
vance
.
Recor
d
in
g
g
Accidental erasure
p
reventio
n
To prevent accidental recordin
g
on a recorded
cassette, remove its recor
d
ta
b
. To recor
d
on it
l
ater, cover t
h
e
h
o
l
e wit
h
a
dh
esive ta
p
e.
SP
RE
C
Type of tape
T60 T120 T160
SP mode 1hour 2hours 2-2/3hours
SLP mode 3hours 6hours 8hours
Recording/Playback TimeTape Speed
123
456
789
0
REC OTR(0:30) OTR(1:00).....
(Normal recording)
OTR(8:00) OTR(7:30)
STOP
OPEN/CLOSE
/EJECT
DISC IN
DVDVCR
OPEN/CLOSESTANDBY-ON
POWER ON
AUDI O
REC
RECORDF.FWDREW STOP/EJECT
TIMER REC
IR
CHANNEL SOURCE PREV STOP P
VIDEO
REC
RECORD
TIMER REC
PLAY
STANDBY-ON
DISPLAY VCR DVD PAUSE
SLOW
VCR/TV
SKIP/CH.
PLAY
STOP
RECORD
MENU
SETUP TOP MENU
ENTER
RETURN
OPEN/CLOSE
/EJECT
SPEED AUDIO
123
456
789
0
+10
5
4
SKIP/CH.
Y
ou
C
ANN
O
T
d
u
b
a DVD to a vi
d
eotape
.
T
o sto
p
recor
d
in
g
tem
p
orari
ly
(
Pause mo
d
e
)
pgpy
P
r
ess
[
PAUSE
F
]
.
•
Durin
g
the rec-pause mode, five
C
marks a
pp
ear on the TV screen. Each
C
mark re
p
-
rese
n
ts
o
n
e
min
ute.
•
Press it a
g
ain to resume recordin
g
.
•
Pause mode will be automaticall
y
canceled after 5 minutes to prevent damage to
th
e tape an
d
t
h
e vi
d
eo
h
ea
d
.
R
ecordin
g
& OTR (One Touch Recordin
g)
-
M
E
N
U
-
TIMER PROGRAMMING
B
AUTO REPEAT [ON
]
CHANNEL SET UP
C
L
OC
K
S
ET
LANG
U
AGE
S
ELE
C
T
Auto
R
e
p
ea
t
H
i
n
t
•
To cancel Auto Re
p
eat, follow ste
p
1 above. Then,
p
ress
[
B
]
so that “OFF” a
pp
ears beside “AUTO REPEAT”. Press
[
CLEAR/C.RESET
]
to
e
xi
t.
•
I
f
menu remains on the TV screen a
f
ter ste
p
2,
p
res
s
[
CLEAR/C.RESET
]
to
e
x
it.
•
The Auto Repeat playback will start automatically i
f
you select “AUTO REPEAT” to “ON” in the stop mode.
or
PR
O
GRAM NUMBER
1
DATE – –
/
–
–
S
TART TIME – – : – – –
–
EN
D
TIME – – : – – –
–
C
HANNEL –
–
RE
C
S
PEED –
–
T
imer Recor
d
in
g
Hi
nt
• I
f
you want to watch one channel while recording another..
.
1) If noise a
pp
ears on the TV screen,
p
ress
[
VCR/TV
]
to
p
ut the unit in TV
p
osition.
2) You cannot record one channel while watching another i
f
y
ou have a cable box or satellite
rece
i
ver
.
SPEED
RECORD
MENU
or
or
TIMER PR
O
GRAMMING
PR
O
G 12
3
4
56
7
8
D
AT
E
S
TART TIME
EN
D
TIME
C
HANNE
L
RE
C
S
PEED
1
Press
[
MENU
]
, an
d
c
h
oose
“AUTO REPEAT” during pla
y
back
.
- M E N
U
-
TIMER PR
O
GRAMMIN
G
B
AUTO REPEAT [OFF
]
CHANNEL SET U
P
C
L
OC
K
S
E
T
LANG
U
AGE
S
ELE
CT
MENU
o
r
O
NE TIME PR
O
GRA
M
PR
O
GRAM NUMBER 1
DATE 1 0
/
0 5 M
O
N
S
TART TIME 0 7 : 3 0 – –
EN
D
TIME – – : – – – –
C
HANNEL – –
RE
C
S
PEED – –
or
or
ONE TIME PROGRA
M
PROGRAM NUMBER
1
DATE 1 0
/
0 5 MO
N
S
TART TIME – –
:
– – –
–
EN
D
TIME – –
:
– – –
–
C
HANNEL –
–
RE
C
S
PEED –
–
Be
f
o
r
e:
T
u
rn
o
n
t
h
e
TV
a
n
d
set
i
t
to
c
h
a
nn
e
l
3.
•
If channel 3 has been alread
y
occupied for broadcasting,
see “RF Output Channel” section on pa
g
e 6.
- M E N
U
-
B
TIMER PR
O
GRAMMIN
G
AUTO REPEAT
[
OFF
]
C
HANNEL
S
ET
UP
C
L
OC
K
S
E
T
LANG
U
AGE
S
ELE
CT
PR
O
GRAM N
U
MBER
1
B
O
N
C
E
D
AIL
Y
WEEKLY
VCR
VCR
VCR
•
Insert a tape wit
h
its recor
d
ta
b
into t
h
e unit.
1
5
6
2
4
2
or
or
A
vailable program number flashes
.
This function will playback a tape repeatedly from the beginning when the tape reaches the end.
Record tab
3
6

EN
–
1
3
–
V
CR Funct
i
ons
1
0
P
ress
[
SUBTITLE/T-SET
]
to set timer stan
db
y mo
d
e.
•
TIMER indicator on the
f
ront panel lights up. The unit will
ch
ange to t
h
e DVD mo
d
e
.
6
Select
“AM”
o
r “PM”
.
Th
en
p
ress
[
B
]
to
g
o to next step
.
7
Repeat t
h
e proce
d
ure in steps 5 an
d
6 to set t
h
e en
d
time.
8
Select
the
des
ir
ed
cha
nn
el.
Th
en press
[
B
]
to
g
o to next step
.
•
I
f
y
ou have connected the unit to a cable box or satellite box
a
s the connection on pa
g
e 6, select the VCR to channel 3 or
4 (the RF out
p
ut channel of the VCR)
.
Then
,
select the desired
c
h
a
nn
e
l
at
t
h
e
cab
l
e
bo
x
o
r
sate
lli
te
bo
x
.
L
ea
v
e
t
h
e
cab
l
e
bo
x
o
r
satellite box on for Timer Recordin
g.
9
Select the desired recordin
g
speed, then press
[
CLEAR/C.RESET
]
.
• To set another pro
g
ram after step 9, press
[
B
]
.
Then, continue with ste
p
2.
Hi
n
t
•
To go back one step, press
[
s
]
d
uring steps 3 to 9
.
To C
h
ec
k
, Correct or Cance
l
a Timer Pro
g
ram
g
1
)
Press
[
SUBTITLE/T-SET
]
then
,
[
VCR
]
o
n
t
h
e
r
e
m
ote
co
n
t
r
o
l
.
2) Select main menu b
y
pressin
g
[
MENU
]
.
3
) Se
l
ect “TIMER PROGRAMMING”
b
y using
[
K
/
L
]
, t
h
en press
[
B
]
.
4
) Se
l
ect t
h
e program num
b
er w
h
ic
h
you want to c
h
ec
k
b
y
u
s
i
ng
[
K
/
L
]
.
The details o
f
the program you selected will
a
ppear on t
h
e TV screen
.
• Go to t
h
e
d
igit you want to c
h
ange
b
y using
[
s
/
B
]
. T
h
en,
e
nter correct num
b
ers
b
y using
[
K
/
L
]
.
• You may cance
l
t
h
e entire program
b
y pressing
[
s
]
w
h
i
l
e
th
e program num
b
er
bl
in
k
s
.
5)
Press
[
CLEAR/C.RESET
]
to ex
i
t
.
6
)
Press
[
SUBTITLE/T-SET
]
to return to timer stan
db
y mo
d
e
.
To cancel a Timer Recordin
g
in
p
ro
g
res
s
gpg
Pr
ess
[
STOP/EJECT
C
A
]
o
n
t
h
e
u
ni
t.
O
NE TIME PR
O
GRAM
PR
O
GRAM N
U
MBER 1
DATE 1 0 / 0 5 MON
MON
START TIME 0 7 : 3 0 PM
PM
END TIME – – : – – – –
CHANNEL – –
RE
C
S
PEED – –
AM
B
PM
O
NE TIME PR
O
GRAM
PR
O
GRAM N
U
MBER 1
DATE 1 0
/
0 5 MON
S
TART TIME
0
7
:
3
0
PM
END TIME
0
8
:
3
0
PM
C
HANNEL 1
6
RE
C
S
PEED
S
P
B
S
P
S
LP
SUBTITLE
T-SET
H
ints for OTR and Timer Recordin
g
o
r
or
O
NE TIME PR
O
GRAM
PR
O
GRAM NUMBER 1
DATE 1 0
/
0
5
M
ON
S
TART TIME 0 7 : 3 0 PM
EN
D
TIME 0 8 : 3 0
P
M
C
HANNEL 1 6
RE
C
S
PEED – –
or
C
LEA
R
/
C.
RE
SE
T
•
Press [VCR] on the remote control be
f
ore you set Timer Recording. Make sure the remote control is in the VCR mode, then
press
[
SUBTITLE/T-SET
].
• I
f
a tape is not in the unit or does not have the record tab, TIMER indicator on the
f
ront panel blinks and Timer Recording cannot be
per
f
ormed. Please insert a recordable tape
.
• When Timer Recordings are set, TIMER indicator on the
f
ront panel lights up. To use the VCR as usual until the time
f
or the recording,
press
[
SUBTITLE/T-SET
]
so t
h
a
t
TIMER indicator light turns o
ff
.
P
ress
[
VCR/TV
]
to c
h
oose t
h
e VCR position. Se
l
ect eit
h
er VCR or DVD
mode
,
then continue with the other
f
eatures as described in this manual.
Af
ter an OTR or a Timer Recordin
g
has been set, this unit o
p
erates as
f
ollows:
gp
• I
f
a tape runs out be
f
ore an OTR or a Timer Recording is
f
inished, the unit ejects the tape. Press
[
SUBTITLE/T-SET
]
o
n
the
r
e
m
ote
contro
l
or
[
STOP/EJECT
C
A
]
on t
h
e unit, t
h
en press
[
VCR
]
to activate the VCR
f
unction again.
• Once the unit turns to the timer standby mode, no VCR
f
unctions are available until
[
SUBTITLE/T-SET
]
is presse
d
.
• To cance
l
t
h
e timer stan
dby
mo
d
e, press
[
SUBTITLE/T-SET
]
o
n
the
r
e
m
ote
co
n
t
r
ol
o
r
[
STOP/EJECT
C
A
]
on t
h
e unit, t
h
en
p
ress
[VCR
]
to activate the VCR
f
unction again
.
• The mode o
f
the unit and the remote control ma
y
di
ff
er (VCR mode or DVD mode) when
y
ou set Timer Recording or a
f
ter
y
ou can-
celed Timer Recordin
g
. Press
[
VCR
]
or
[
DVD
]
on the remote control to select
y
our desired mode before
y
ou operate
.
W
h
en an OTR or a Timer Recor
d
in
g
is com
pl
ete
d
..
.
gp
• If Auto Power Off for DVD has been activated and there are Timer Recordings on standb
y
, the unit turns off automaticall
y
, and TIMER
indicator on the front panel lights to indicate the unit is in the timer standb
y
mode.
• TIMER indicator on the front panel flashes if there are no more Timer Recordings on standb
y
.
• If A
uto
P
o
w
e
r
O
ff f
o
r DVD h
as
N
OT
been activated, the unit switches to the DVD mode and all the VCR functions will be unavailable.
T
A
ll the DVD functions are available during OTR, timer standb
y
mode and Timer Recording
.
• Pr
ess
[
STOP/EJECT
C
A
]
on the front
p
anel or
[
SUBTITLE/T-SET
]
o
n
t
h
e
r
e
m
ote
co
n
t
r
o
l
to
use
t
h
e
V
C
R wh
e
n
t
h
e
u
ni
t
i
s
o
ff
.
• Pr
ess
[
SOURCE
]
on the front
p
anel or
[
VCR
]
on the remote control to use the VCR when the unit is on. In case Timer Recordin
g
is in
standb
y
mode, press
[
STOP/EJECT
C
A
]
on the front
p
anel or
[
SUBTITLE/T-SET
]
on the remote control, and then
p
ress
[
SOURCE
]
on the front
p
anel or
[
VCR
]
o
n
t
h
e
r
e
m
ote
co
n
t
r
o
l
.
If
y
ou want to use the DVD
p
la
y
er durin
g
a Timer Recordin
g
or while TIMER indicator on the front
p
anel is on or blinkin
g
.
ypygg pg
• Pr
ess
[
STANDBY-ON
]
to
tu
rn
o
n
t
h
e
u
ni
t.
Pr
ess
[
DVD
]
on the remote control to choose DVD mode
,
then continue with the other
DVD f
eatu
r
es
as
desc
ri
bed
in
t
hi
s
m
a
n
ua
l
.
N
OTE (for Timer Recordin
g
)
:
• If there is a power failure or the unit is unplu
gg
ed for more than 30 seconds, clock and all timer settin
g
s will be lost
.

–
14
–
EN
V
CR F
u
nct
io
ns
W
arnin
g
: Unauthorized recordings of cop
y
righted video tapes ma
y
be an infringement of cop
y
right laws.
DIGITAL
AUDIO OUT
COAXIAL
ANT-OUT
ANT-IN
AUDI O
OUT
DVD DVD/VCR VCR
S-VIDEO
OUT
COMPONENT
VIDEO OUT
AUDIO OUT
VIDEO OUT
AUDIO IN
VIDEO IN
L
Y
C
B
C
R
L
R
ANT-OUT
ANT-IN
VCRDVD/VCR
COMPONENT
VIDEO OUT
AUDIO IN
VIDEO IN
AUDIO OUT
VIDEO OUT
Y
C
B
C
R
L
R
R
AUDIO OUT
VIDEO OUT
Connect
1
Audio/Video cables
(commercially available)
RF cable
(supplied)
(Back of TV)
(Back of DVD/VCR*)
(Back of another source)
or
2
Connect
*Front input jacks are also available
1) Insert a pre-recorded tape into another VCR
f
or playing
.
2
) Insert a tape with its record tab into this unit
f
or recordin
g.
3
)
Press
[
SPEED
]
on the remote control o
f
the recording unit to
se
l
ect t
h
e
d
esire
d
recor
d
ing spee
d
(SP/SLP)
.
4) Se
l
ect t
h
e “L1” or “L2” position on t
h
e recor
d
ing unit
.
• To use the input
j
acks on the back of this unit, select “L1”
position b
y
pressing [0]
,
[0]
,
[1
]
o
n
t
h
e
r
e
m
ote
co
n
t
r
o
l
o
r
[
CHANNEL
K
/
L
]
o
n
t
hi
s
u
ni
t.
• To use the input
j
acks on the front of this unit, select “L2”
position b
y
pressing [0]
,
[0]
,
[2]
o
n
t
h
e
r
e
m
ote
co
n
t
r
ol
o
r
[
CHANNEL
K
/
L
]
o
n
th
i
s
u
ni
t.
5
)
Press
[
RECORD
]
on t
h
e recor
d
ing unit.
6) Begin playback o
f
the tape in another source.
7) To stop recor
d
ing, press
[
STOP/EJECT
C
A
]
on t
h
e recor
d-
ing unit, then stop playback o
f
the tape in another source.
H
i
n
t
• For best results during dubbing, use the
f
ront panel controls whenever
possible. The remote control might a
ff
ect another source’s operation
.
• Alwa
y
s use video-qualit
y
shielded cables with RCA-t
y
pe connectors.
Sta
n
da
r
d
aud
i
o
cab
l
es
a
r
e
n
ot
r
eco
mm
e
n
ded.
• You can use a vi
d
eo
d
isc p
l
ayer, sate
ll
ite receiver or ot
h
er au
d
io/vi
d
eo
component wit
h
Au
d
io / Vi
d
eo outputs.
• “L1”
o
r “L2” i
s
f
ou
n
d
be
l
o
w
t
h
e
l
o
w
est
m
e
m
o
riz
ed
c
h
a
nn
e
l
.
(
Exam
p
le: CH02
)
• “L2” input
j
acks are on the front of this unit.
Cop
y
ing a Vi
d
eo Tap
e

EN
–
1
5
–
DVD Funct
i
on
s
STANDBY-ON
DISPLAY VCR DVD PAUSE
SLOW
VCR/TV
SKIP/CH.
PLAY
STOP
OPEN/CLOSE
/EJECT
SPEED AUDIO
123
456
789
0
+10
DVD F
u
nct
io
n
s
Operations
d
escri
b
e
d
in t
h
is section are main
l
y
b
ase
d
on t
h
e remote contro
l
use. Some operations can
b
e carrie
d
out on main unit
.
Playback
y
Before: Turn on the TV, amplifier and an
y
ot
h
er equipment w
h
ic
h
are connecte
d
to t
h
is
unit. Ma
k
e sure t
h
e TV an
d
au
d
io receiver
(commercia
ll
y avai
l
a
bl
e) are set to t
h
e correct
c
h
anne
l
.
DVD
H
in
t
• A “prohibited icon” ma
y
appear at the top-right on the T
V
screen when the operation is prohibited b
y
the disc or this
u
ni
t.
• Some DVDs ma
y
start pla
y
back from title 2 or 3 due to specific programs
.
• During the pla
y
back of a two-la
y
ered disc, pictures ma
y
stop for a
moment. This happens while the 1st la
y
er is being switched to the
2nd la
y
er. This is not a malfunction
.
4
3
1
PLAYDISC IN
DVDVCR
OPEN/CLOSESTANDBY-ON
POWER ON
AUDIO
REC
RECORDF.FWDREW STOP/EJECT
TIMER REC
IR
CHANNEL SOURCE PREV STOP PLAY NEXT
VIDEO
REC
RECORD
TIMER REC
PLAY
TIP
:
You can c
h
an
g
e t
h
e On-Screen
l
an
g
ua
g
e in “PLAYER MENU” settin
g
.
(Re
f
er to pa
g
e 20.
)
1
Press
[
STANDBY-ON
]
to
tu
rn
o
n
t
h
e
D
VD/CD Pla
y
er.
2
Pr
ess
[
OPEN/CLOSE
A
]
a
n
d
in
se
r
t
a
disc with label facin
g
up.
3
Pr
ess
[
PLAY
B
]
to start pla
y
back
.
4
Pr
ess
[
STOP
C
]
to stop pla
y
back
.
2
L
ig
h
ts up w
h
en power is on
.
R
esum
e
DVD
P
ress
[
STOP
C
]
d
uring p
l
ay
b
ac
k
.
Resume message wi
ll
appear on t
h
e
T
V
sc
r
ee
n
.
P
r
ess
[
PLAY
B
]
, p
l
ay
b
ac
k
will resume
f
rom the point at which
p
l
ay
b
ac
k
was stoppe
d
.
S
l
ow Forwar
d
Revers
e
DVD
[
g
]
or
[
h
]
repeate
dl
y in t
h
e pause
mode to select the required
f
orward speed.
To continue p
l
ay
b
ac
k
, press
[
PLAY
B
]
.
P
ause
d
an
d
Ste
p
-
by
-Ste
p
P
l
a
yb
ac
k
py p y
DVD
P
ress
[
PAUSE
F
]
d
uring p
l
a
yb
ac
k.
T
o continue p
l
ay
b
ac
k
, press
[
PLAY
B
]
.
DVD
[
PAUSE
F
]
i
s
p
ressed in the
p
ause mode.
T
o continue pla
y
back, press
[
PLAY
B
]
.
H
i
n
t
•
Slow
f
orward speed is di
ff
erent depending on the disc.
Approximate spee
d
is 1(1/16), 2(1/8) an
d
3(1/2)
.
•
Set “STILL MODE” to “FIELD” in the DISPLAY menu i
f
pictures in the slow
playback mode are blurred. (Re
f
er to pages 20-21.
)
Fast Forward
/
Reverse Search
DVD
Use
[
g
]
o
r
[
h
]
repeatedl
y
during pla
y
bac
k
to select the re
q
uired forward or reverse s
p
eed
.
To continue pla
y
back, press
[
PLAY
B
]
.
1
E
1
•
Set “STILL MODE” to “FIELD” in the DISPLAY menu if pictures in the
pause mode are blurred. (Re
f
er to pages 20-21.
)
H
i
n
t
•
Menu operations may vary depending on the disc. Re
f
er to the manual
accompanying the disc
f
or more details
.
Press 'PLAY' to play from here.
To play the beginning,
press 'STOP' first and then 'PLAY'.
Resume ON
Hin
t
•
To cancel resume,
p
ress
[
STOP
C
]
one more time in the sto
p
mode
.
•
The resume information will be kept even when unit is in standb
y
mode
.
Hin
t
•
For DVDs, fast forward or reverse search speed is different dependin
g
o
n the disc. A
pp
roximate s
p
eed is 1(x2), 2(x8), 3(x20), 4(x50), 5(x100)
.
•
For Au
d
io CDs, approximate spee
d
is 1(x2), 2(x8), 3(x30)
.
Hin
t
•
Zooming function does not work while the disc menu is displa
y
ed.
•
x4 z
oo
m i
s
n
ot
a
v
a
il
ab
l
e
o
n
so
m
e
d
i
scs.
•
The picture ma
y
be distorted when
y
ou press
[
PAUSE
F
]
o
r
[
h
]
repeatedl
y
in the zoom mode.
•
In the zoom mode, it automaticall
y
changes x2
(
x4
)
to the zoomed
position
g
uide.
Z
oom
DVD
[
ZOOM
]
repeatedl
y
during pla
y
back to select the
re
q
uired zoom factor: x2, x4 or OFF.
x2 x4
2
)
Use
[
K
/
L
/
s
/
B
]
to slide the zoomed
p
icture across the screen
.
3) To exit zoom function,
p
ress
[
ZOOM
]
repeatedl
y
to select O
F
F
.
D
V
D
men
u
DVD
p
l
a
yb
ac
k
. Use
[
K
/
L
/
s
/
B
]
to se
l
ect an item, t
h
en
p
ress
[
ENTER
]
(
or
[
PLAY
B
]
).
Ca
ll
in
g
U
p
a Menu Screen
d
urin
g
P
l
a
yb
ac
k
gp g y
DVD
[
MENU
]
to ca
ll
up t
h
e DVD menu
.
•
P
ress
[
TOP MENU
]
to ca
ll
up t
h
e tit
l
e menu
.
2
T
o use
[
PREV
H
/
E
]
,
[
NEXT
D
/
G
]
on t
h
is uni
t
DVD
Press once to s
k
ip c
h
apters or trac
k
s to a
d
esire
d
point
.
Press and hold to change
f
orward or reverse playback speed
.
3
4
1
2

–
1
6
–
EN
D
VD F
u
nct
io
ns
Se
a
rc
h
F
u
ncti
o
n
s
H
in
t
•
When there is no need to enter a number, “0” appears automaticall
y
.
F
or example, “0: 0_: _ _” appears in the Time Search displa
y
if the total
t
im
e
o
f
t
h
e
t
i
t
l
e
o
r
t
r
ac
k i
s
l
ess
t
h
a
n 1
0
min
utes.
•
P
ress
[
CLEAR/C.RESET
]
to erase t
h
e incorrect input at step 2
.
SEARCH MODE does not work during Programmed or Random Playback.
U
sing Track Searc
h
DVD
Using Time Searc
h
DVD
Op
erat
i
ons
d
escr
ib
e
d
i
n t
hi
s manua
l
are
Oidibdihi l
main
ly
b
ase
d
on t
h
e remote contro
l
.
U
sin
g
Title / Chapter Search
DVD
1
/29
SEARCH
MODE
2
wi
t
hin
30
seco
n
ds
/29
123
456
789
0
+10
• For t
h
e
d
isc wit
h
l
ess t
h
an 10 trac
k
s, press t
h
e trac
k
num
b
er
d
irect
l
y
.
• For
d
iscs wit
h
more t
h
an 10
b
ut
l
ess t
h
an 99 trac
k
s, to p
l
a
y
sing
l
e
d
igit trac
k
, press
[
0
]
f
irst, then the track number (e.g.
f
or
trac
k
3,
p
ress
[
0
]
,
[
3
]
). To p
l
ay a
d
ou
bl
e-
d
igit trac
k
, press t
h
e
t
r
ack
n
u
m
be
r
.
• For
d
iscs wit
h
more t
h
an 100 trac
k
s, to p
l
ay a sing
l
e or a
d
ou
bl
e
-
d
igit trac
k
, press
[
0
]
f
irst, then the track number (e.g.
f
or track
3
,
p
ress
[
0
]
,
[
0
]
,
[
3
]
, and
f
or track 26,
p
ress
[
0
]
,
[
2
]
,
[
6
]
). To p
l
ay a
trip
l
e-
d
igit trac
k
, press t
h
e trac
k
num
b
er
.
1
PLAY
TR 1 TR 2 TR 3 TR 4
Current Track
SKIP
SKIP
Us
i
n
g
[SKIP/CH.
G
/
/
K
//
,
H
/
L
]
H
i
n
t
•
[
+10
]
can also bring the Track search display, except
f
or the disc with
l
ess t
h
an 10 trac
k
s. For suc
h
a
d
isc, trac
k
searc
h
can
b
e
d
one
b
y just
pressing t
h
e trac
k
num
b
er
.
SKIP/CH.
SKIP/CH.
1
/12
Pr
ess
[
SEARCH MODE
]
once for the cha
p
ter search
.
P
r
ess
[
SEARCH MODE
]
t
wi
ce
f
o
r
t
h
e
t
i
t
l
e
sea
r
c
h
.
SEARCH
MODE
PLAY
2
wi
t
hin
30
seco
n
ds
/12
123
456
789
0
+10
1
Usin
g
[SKIP/CH.
G
/
/
K
//
,
H
/
L
]
H
i
n
t
•
Depending on the disc being played, this
f
unction can also be
per
f
ormed by directly entering the desired chapter number with t
h
e
num
b
er
b
utton
s
. Re
f
er to the manual accompanying the disc
.
PLAY
CH 1 CH 2 CH 3 CH 4
Current Chapter
SKIP
SKIP
or
TT 1 TT2 TT3 TT4
Current Title
(TT)
SKIP
SKIP
SKIP/CH.SKIP/CH.
1
1:29:00
TOTAL
PLAY
SEARCH
MODE
w
i
t
hin
30
seco
n
ds
1:29:00
TOTAL
123
456
789
0
Mar
k
er Setu
p
DVD
T
his
f
eature allows you to assign a speci
f
ic point on a disc to b
e
ca
ll
e
d
b
ac
k
l
ater
.
To set a mar
k
er
1
PLAY
SEARCH
MODE
[
SEARCH MODE
]
repeate
dl
y unti
l
t
h
e Time Searc
h
d
isp
l
ay appears.
P
ress
[
SEARCH MODE
]
repeate
dl
y unti
l
t
h
e mar
k
er
d
isp
l
ay
appears
.
2
ENTER
3
ENTER
ENTER
ENTER
To return to t
h
e mar
k
er
l
ate
r
1
SEARCH
MODE
[
SEARCH MODE
]
repeatedl
y
until the marker displa
y
appears
.
2
ENTER
3
ENTER
ENTER
ENTER
P
ress
[
ENTER
]
at t
h
e
d
esire
d
mar
k
er
.
T
o
e
xi
t
t
h
e
m
a
rk
e
r
sc
r
een
1
RETURN
Pr
ess
[
RETURN
]
.
H
in
t
•
T
h
e Mar
k
er
d
isp
l
ay wi
ll
d
isappear in a
b
out 30 secon
d
s w
h
en t
h
ere is no output.
•
To clear a marker, select the marker to be cleared at ste
p
2 in the
sect
i
o
n “T
o
set
a
m
a
rk
e
r”
o
r “T
o
r
etu
rn
to
t
h
e
m
a
rk
e
r l
ate
r”
a
n
d
t
h
e
n
p
ress
[
CLEAR/C.RESET
]
.
•
Opening the disc tra
y
or turning off the power will erase all markers.
•
Se
l
ecting “AC” at step 2 in t
h
e section “To set a mar
k
er” or “To return to
th
e mar
k
er
l
ater” wi
ll
a
l
so erase a
ll
mar
k
ers
.

EN
–
17
–
DVD Funct
i
on
s
On-Screen Display
py
You can check the in
f
ormation about the current disc b
y
pressing
[
DISPLAY
]
o
n
the
r
e
m
ote
co
n
t
r
ol.
DISPLAY
DISPLAY
DISPLAY
DISPLAY
DISPLAY
DVD
DVD
11/16 0:00:00 - 0:03:30
1/3 0:00:00 - 1:23:45
TL1
1
2
4
3
T
R
(
Track
)
:
C
urrent trac
k
num
b
er / Tota
l
trac
k
s
4/12 0:13:45 - 0:45:40
4/12 0:03:21 - 0:02:15
T
T
E
la
p
sed time of the entire dis
c
Current pla
y
back statu
s
R
emainin
g
time of the current
t
r
ack
R
emaining time o
f
the entire disc
1
2
3
C
urrent repeat settin
g
appears
onl
y
when the repeat setting
is
acti
v
e.
T: Track re
p
ea
t
A: A
ll
Trac
k
s re
p
ea
t
A
B
: A-
B
re
p
ea
t
ALL
:
Current track number
/
Total track
s
Ang
l
e icon appears on
l
y in a case
mu
l
ti-ange
l
is avai
l
a
bl
e on t
h
e DVD
.
E
la
p
sed time of the current cha
p
te
r
R
emainin
g
time of the current chapter
R
emaining time o
f
the current titl
e
E
la
p
sed time of the current titl
e
T
T(Tit
l
e)
:
C
urrent tit
l
e num
b
er / Tota
l
tit
l
es
B
IT RATE
:
T
h
e
a
m
ou
n
t
o
f
aud
i
o
a
n
d
vi
deo
d
ata currentl
y
being read
L
ayer num
b
ers appears on
l
y w
h
en
pl
aying a two-
l
ayere
d
d
isc.
L
0: Layer 0 is p
l
aying
L
1: Layer 1 is p
l
aying
C
urrent repeat setting appears on
l
y
wh
en t
h
e repeat setting is active
.
C
: C
h
apter repea
t
T
: Tit
l
e repea
t
A
B
: A-
B
repea
t
CH(Cha
p
ter)
:
Current cha
p
ter number / Total cha
p
ter
s
H
in
t
• When you are playing a disc in PROGRAM or RANDOM mode,
PROGRAM (or RANDOM) will be displayed instead o
f
2
.
C
urrent pla
y
back statu
s
Elapsed time of the current
t
r
ack

–
1
8
–
EN
D
VD F
u
nct
io
ns
2
1
at
y
our desired starting point (A)
2
1
Pr
ess
[MODE]
t
wice durin
g
stop
m
ode.
1
P
r
ess
[
MODE
]
o
nce durin
g
stop mode
.
Repeat / Random / Programmed Playback
pgy
O
FF
C
HAPTE
R
TITLE
(
re
p
eat
o
ff
)
(
c
urrent cha
p
ter
r
e
p
eat
)
(
cu
rr
e
n
t
t
i
t
l
e
re
p
eat
)
Each time
y
ou press
[
REPEAT
]
, re
p
eat
function chan
g
es as example below
.
R
epeat Pla
y
bac
k
DVD
R
epeat function is available onl
y
during
p
l
a
yb
ac
k.
R
epeat A-B Pla
y
bac
k
DVD
Programmed Pla
y
bac
k
DVD
Y
ou ma
y
d
etermine t
h
e or
d
er in w
h
ic
h
c
h
apters or trac
k
s wi
ll
p
l
a
y
.
1
REPEAT
O
FF
TRA
C
K
ALL
(re
p
eat
o
f
f
)
(
current track repeat
)
(
e
n
t
ir
e
d
i
sc
r
e
p
eat)
A-B
A-B
CHAPTER
A-
A-B
2
U
se
[
K
/
L
]
to se
l
ect
d
esire
d
trac
k
. Press
[
ENTER
]
.
3
PLAY
CD-DA TOTAL 0:45:55
RANDOM PROGRAM
--no indication--
RANDOM
R
andom Pla
y
bac
k
DVD
This
f
unction shu
ff
les the playing order
o
f
chapters or tracks instead o
f
play-
b
ac
k
in sequence.
MODE
CD-DA TOTAL 0:00:00
at
y
our desired ending point (B)
• P
o
in
t
B
s
h
ou
l
d
be
in
t
h
e
sa
m
e
t
i
t
l
e
o
r
t
rack as
p
oint A.
Hin
t
•
Repeat setting (except “ALL”) wi
ll
b
e c
l
eare
d
wh
en moving to anot
h
er tit
l
e, c
h
apter or
t
rac
k.
•
Repeat playback may not
f
unction with
some
d
iscs or
d
uring repeat A-B p
l
ay
b
ac
k.
Hi
n
t
• To re
p
eat the current track in the random
selections,
p
ress
[
REPEAT
]
repeatedl
y
until
“
T
RACK” appears during pla
y
back
.
• To repeat t
h
e entire ran
d
om se
l
ections,
press
[
REPEAT
]
repeate
dl
y unti
l
“ ALL
”
appears
d
uring p
l
ay
b
ac
k.
• During random pla
y
back,
y
ou cannot go
back to the
p
revious track
.
H
in
t
•
Pr
ess
[
CLEAR/C.RESET
]
at ste
p
2 to erase
t
he most recentl
y
entered track
.
•
To erase a
ll
programs at once, se
l
ect
“
ALL CLEAR’’ an
d
press
[
ENTER
]
at step
2
.
•
While a program is being pla
y
ed back,
[
STOP
C
]
works as follows
;
Pr
ess
[
STOP
C
]
a
n
d
[
PLAY
B
]
next
,
so
t
hat the programmed pla
y
back restarts.
(CD pla
y
back restarts from the current
p
oint.
)
Pr
ess
[
STOP
C
]
t
wi
ce
a
n
d
[PLAY
B
] nex
t
,
s
o that playback restarts from the first
t
rack in the original order. However,
y
our
programmed pla
y
back can be restarted
w
hen
y
ou follow the above steps. (Your
pro
g
rams are sti
ll
store
d
unti
l
eit
h
er t
h
e
d
isc is removed or the
p
ower is turned o
ff
.)
•
To repeat t
h
e current trac
k
in t
h
e program,
press
[
REPEAT
]
repeate
dl
y unti
l
“ TRACK
’’
a
ppears
d
uring p
l
ay
b
ac
k.
•
To repeat t
h
e entire pro
g
ram,
p
ress
[
REPEAT
]
repeatedl
y
until “ ALL’’
a
ppears
d
uring p
l
a
yb
ac
k.
H
in
t
• To exit t
h
e sequence, press
[
A-B
]
so t
h
at OFF
appears.
• To cancel Point A,
p
ress
[
CLEAR/C.RESET
]
at
ste
p
1
.
• Thi
s
fu
n
ct
i
o
n
does
n
ot
w
o
rk in
t
h
e
ot
h
e
r
re
p
eat modes
.
PLAY
PLAY
MODE
• U
p
to 99 tracks can be ordered
.
• I
f
ei
g
ht or more tracks were in a
p
ro
g
ram, use
[
SKIP/CH.
G
/
K
/
/
,
H
/
L
]
to
see
all
the
t
r
acks.
CD-DA TOTAL 1:03:30
2/3
1 3:30
5 5:10
10 4:20
11 3:00
12 3:20
17 4:10
22 2:50
<Exam
p
le : DVD
>
ENTER
ENTER
ENTER
PLAY
PLAY
or

EN
–
1
9
–
DVD Funct
i
on
s
1
1
1
S
p
ecia
l
Settin
gs
pg
A
u
d
io Languag
e
DVD
l
an
g
ua
g
e (i
f
multiple lan
g
ua
g
es are avail
-
a
bl
e on
d
isc
)
d
uring DVD p
l
ay
b
ac
k.
1
1. ENG Dolby D 5.1ch 48k/3
Eac
h
time you press
[
AUDIO
]
,
t
h
e au
d
io
l
anguage c
h
anges as examp
l
e
b
e
l
ow.
Ste
r
eo
Sou
n
d
M
ode
DVD
This unit allows
y
ou to select a sound
mo
d
e
d
uring CD p
l
a
yb
ac
k.
1
STEREO
E
ac
h
time you press
[
AUDIO
]
,
soun
d
m
o
d
e c
h
anges as examp
l
e
b
e
l
ow.
Su
b
tit
l
e Languag
e
DVD
Th
is unit a
ll
ows you to se
l
ect a su
b
ti
-
t
le language (i
f
available) during DVD
p
la
y
back
.
1. ENG/6
O
FF
(
no subtitles
)
EN
G
(
En
g
lish subtitles)
FRE
(
French subtitles
)
...
Each time
y
ou press
[
SUBTITLE/T-SET
]
,
subtitle lan
g
ua
g
e chan
g
es as example
belo
w
.
OFF
Virtua
l
Surroun
d
DVD
You can enjoy stereop
h
onic virtua
l
wor
ld
on
y
our existing 2 c
h
anne
l
stereo s
y
stem.
2
P
ress
[
ENTER
]
f
or the desired e
ff
ect
.
1
1
: Natural e
ff
ec
t
2
: Emphasized e
ff
ec
t
O
FF: No effects (ori
g
inal sound
)
3
MODE
To set su
b
tit
l
e ON/OF
F
2
OFF
ENTER
Hin
t
•
If
y
our language is not shown after pressing
[
SUBTITLE/T-SET
]
several times
,
the disc
ma
y
not have that language. However, some
discs have the subtitle language setting on
the disc menu. (Operation varies depending
o
n the disc, so refer to the manual along
with the disc.
)
•
W
h
en “ NOT AVAILABLE ” appears on t
h
e TV screen,
it means no su
b
tit
l
e is recor
d
e
d
on t
h
e scene
.
•
If
y
ou choose a language that has a three
-
l
etter-lan
g
ua
g
e code, the code will be
displa
y
ed ever
y
time
y
ou change the subtitle
l
anguage setting. If
y
ou choose an
y
other
l
anguages, ‘---’ will be displa
y
ed instead.
(Refer to pa
g
e 24.
)
•
Some
d
iscs wi
ll
on
l
y a
ll
ow you to c
h
ange
the subtitle
f
rom the disc menu. Re
f
er to the
manual accompanying the discs
f
or details
.
P
r
ess
t
wi
ce.
(
once for CD
)
H
i
n
t
For CD p
l
ay
b
ac
k
on
ly
• Vir
tua
l
Su
rr
ou
n
d
will n
ot
be
e
ff
ect
iv
e
if
t
h
e
sound mode is set to somethin
g
other than
S
TERE
O.
R
e
f
e
r
to
“
Ste
r
eo
Sou
n
d
M
ode
”
.
• W
h
en p
l
aying
b
ac
k
96
k
Hz wit
h
Virtua
l
Surround
f
unction
,
the sound will be down
samp
l
ing at 48
k
Hz an
d
output as
d
igita
l
au
d
io
.
PLAY
PLAY
PLAY
PLAY
RETURN
PLAY
Hin
t
• Some
d
iscs wi
ll
on
ly
a
ll
ow
y
ou to c
h
ange
the audio settin
g
from the disc menu. Refer
to the manual accompan
y
ing the discs for
deta
i
ls.
• W
h
en “OFF” appears on t
h
e TV screen, it
means au
d
io
l
anguage is not avai
l
a
bl
e
.
• If
y
our language is not shown after pressing
[
AUDIO
]
several times, the disc ma
y
not have
that lan
g
ua
g
e. However, some disc allow
audio lan
g
ua
g
e settin
g
on the disc menu.
(
Operation varies dependin
g
on the disc, so
refer to the manual alon
g
with the disc.
)
E
NG
(
Eng
l
is
h
au
d
io)
S
PA
(
S
p
anish audio)
FRE
(
French audio
)
...
S
TERE
O
(
ri
g
ht and left channels
a
re active
)
L
-
c
h
(
left channel is active
)
R
-
c
h
(
ri
g
ht channel is active
)
ENTER
ENTER
ENTER
1. ENG/6
SUBTITLE
T-SET
SUBTITLE
T-SET
AUDIO
AUDIO
1
C
amera An
gl
e
s
DVD
Some DVD discs ma
y
co
n
ta
in
sce
n
es
whi
c
h h
a
v
e
been shot simultaneousl
y
from various an
g
les.
Y
ou
ca
n
chan
g
e the camera an
g
le if the i
co
n
a
pp
ears on the screen. If the “AN
G
LE
ICON” settin
g
is “OFF” in the OTHERS
menu
,
the icon will not a
pp
ear. (Refer
to pa
g
es 20-22.
)
1
1/8
ANGLE
ON
Bl
ac
k
Leve
l
Settin
g
DVD
Ad
j
ust the Black Level Setting to make the
dark areas of the TV picture bri
g
hter
.
2
OFF
ON: Makes the dark areas bri
g
hter
.
OFF: Shows the ori
g
inal picture as recorded
.
3
RETURN
PLAY
PLAY
MODE
ENTER
ENTER
ENTER

–
20
–
EN
D
VD F
u
nct
io
ns
2
Se
l
ect “CUSTOM”
.
DVD Setu
p
p
DVD
ENTER
ENTER
ENTER
Hin
t
*
1
•
Lan
g
ua
g
e options are not available
w
i
t
h
so
m
e
d
i
scs.
•
I
f
OTHER is selected on the AUDIO,
S
UBTITLE or DISC MENU screen, press
f
our-digit number to enter the code
f
or the desired language. (Re
f
er to the
l
anguage code list on page 24.)
•
On
l
y t
h
e
l
anguages supporte
d
b
y t
h
e
d
isc can
b
e se
l
ecte
d.
*
2
•
L
anguage Setting
f
or Audio and Subtitle
a
re not avai
l
a
bl
e wit
h
some
d
iscs. T
h
en
use
[
AUDIO
]
an
d
[
SUBTITLE/T-SET
]
.
D
etai
l
s are on page 19.
L
ANGUAGE Sett
i
n
g
Follow steps 1 to 3 in the “CUSTOM Menu” section on above.
h“ ” b
4
Select
the
des
ir
ed
i
te
m
.
6
To
e
xi
t
the
m
e
n
u
5
Select the desired lan
g
ua
g
e.
AUDI
O
:
*
1
*2
(
Default: ORIGINAL
)
Sets t
h
e au
d
io
l
anguage
.
SU
BTITLE
:
*
1
*
2
(De
f
ault: OFF
)
Sets t
h
e su
b
tit
l
e
l
anguage
.
DI
SC
MEN
U:
*
1
(
Default: ENGLISH
)
Sets the language
f
or DVD
me
n
u.
P
LAYE
R
MENU:
QUICK
(
Default: ENGLISH
)
Sets the language
f
or the
O
n-screen displa
y.
ENTER
ENTER
ENTER
SETUP
2
Select
the
des
ir
ed
i
te
m
.
1
P
r
ess
[
SETUP
]
in t
h
e sto
p
mo
d
e
.
SETUP
QUICK
CUSTOM
INITIALIZE
SETUP
STOP
SETUP QUICK
PLAYER MENU
TV ASPECT
DOLBY DIGITAL
ENGLISH
4:3 LETTER BOX
BITSTREAM
Q
UI
C
K
S
ETUP Men
u
• Re
f
er to the sections “PLAYER MENU”, “TV ASPECT”
o
r
“
DOLBY DIGITAL
”
section on page 20 or 21.
You can select the “PLAYER MENU”, “TV ASPECT” or “DOLBY DIGITAL”
f
rom the QUICK SETUP menu quickl
y.
ENTER
ENTER
ENTER
AUDIO
ORIGINAL
ENGLISH
FRENCH
SUBTITLE
OFF
ENGLISH
FRENCH
DISC MENU
ENGLISH
FRENCH
SPANISH
PLAYER MENU
ENGLISH
FRANÇAIS
ESPAÑOL
LANG
U
AGE m
e
n
u
P
20
A
S
tep 5
P
21
B
S
tep 5
P
21
C
S
tep 5
SETUP LANGUAGE
AUDIO
SUBTITLE
DISC MENU
PLAYER MENU
ORIGINAL
OFF
ENGLISH
ENGLISH
ENTER
ENTER
ENTER
3
Se
l
ect
t
h
e
des
ir
ed
i
te
m
.
1
P
ress
[
SETUP
]
in t
h
e stop mo
d
e
.
SETUP CUSTOM
LANGUAGE
DISPLAY
AUDIO
PARENTAL
OTHERS
ENTER
ENTER
ENTER
CUS
T
O
M M
e
n
u
SETUP
STOP
SETUP OTHERS
ANGLE ICON
AUTO POWER OFF
ON
ON
SETUP AUDIO
DRC
DOWN SAMPLING
DOLBY DIGITAL
ON
ON
BITSTREAM
SETUP DISPLAY
TV ASPECT
STILL MODE
4:3 LETTER BOX
AUTO
You can change the settings o
f
the unit
.
•
QUICK
on pages 20-21 indicates DVD Setup menus also accessible
f
rom the QUICK SETUP menu
.
<
S
ET
U
P MEN
U>
AUDI
O
men
u
DI
S
PLAY menu
O
THER
S
men
u
SETUP LANGUAGE
AUDIO
SUBTITLE
DISC MENU
PLAYER MENU
ORIGINAL
OFF
ENGLISH
ENGLISH
LANG
U
AGE m
e
n
u
p
a
g
e 2
0
A
pa
g
e 21
B
pa
g
e 2
1
C
pa
g
e 2
2
SETUP PARENTAL
PASSWORD
Please enter a 4-digit password.
P
ARENTAL m
e
n
u
p
a
g
e 2
2
D
SETUP
QUICK
CUSTOM
INITIALIZE
SETUP
QUICK
CUSTOM
INITIALIZE
E
A
o
r
o
r
ENTER
ENTER
ENTER
o
r
or
or
<S
ETUP MENU
>
C
on
f
irm that “QUICK” is selected
.
/