
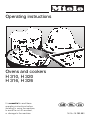
Operating instructions
Ovens and cookers
H 310, H 320
H 316, H 326
It is essential to read these
operating instructions before
Q\}
installing or using the machine,
to avoid the risk of accident,
or damage to the machine. M.-Nr. 05 389 880

Contents
Description of the appliance . . . . . . . . . . . . . . . . . . . . . . . . . . . . . . . . . . . . . . . . . 5
Accessories . . . . . . . . . . . . . . . . . . . . . . . . . . . . . . . . . . . . . . . . . . . . . . . . . . . . . . . 7
Hob . . . . . . . . . . . . . . . . . . . . . . . . . . . . . . . . . . . . . . . . . . . . . . . . . . . . . . . . . . . . . 7
Caring for the environment . . . . . . . . . . . . . . . . . . . . . . . . . . . . . . . . . . . . . . . . . 10
Warning and Safety instructions . . . . . . . . . . . . . . . . . . . . . . . . . . . . . . . . . . . . 11
Before using for the first time. . . . . . . . . . . . . . . . . . . . . . . . . . . . . . . . . . . . . . . 16
Hobs . . . . . . . . . . . . . . . . . . . . . . . . . . . . . . . . . . . . . . . . . . . . . . . . . . . . . . . . . . . 18
Ceramic hobs. . . . . . . . . . . . . . . . . . . . . . . . . . . . . . . . . . . . . . . . . . . . . . . . . . . . . 18
Cooking zones . . . . . . . . . . . . . . . . . . . . . . . . . . . . . . . . . . . . . . . . . . . . . . . . . 18
Residual heat indicator . . . . . . . . . . . . . . . . . . . . . . . . . . . . . . . . . . . . . . . . . . . 18
Extended area. . . . . . . . . . . . . . . . . . . . . . . . . . . . . . . . . . . . . . . . . . . . . . . . . . 18
Enclosed hotplates. . . . . . . . . . . . . . . . . . . . . . . . . . . . . . . . . . . . . . . . . . . . . . . . . 18
Hobs - use. . . . . . . . . . . . . . . . . . . . . . . . . . . . . . . . . . . . . . . . . . . . . . . . . . . . . . . 19
Hob controls. . . . . . . . . . . . . . . . . . . . . . . . . . . . . . . . . . . . . . . . . . . . . . . . . . . . . . 19
Using the hob. . . . . . . . . . . . . . . . . . . . . . . . . . . . . . . . . . . . . . . . . . . . . . . . . . . . . 19
Suggested hob settings . . . . . . . . . . . . . . . . . . . . . . . . . . . . . . . . . . . . . . . . . . 19
Choice of suitable pans . . . . . . . . . . . . . . . . . . . . . . . . . . . . . . . . . . . . . . . . . . . . . 20
Notes on the use on hobs . . . . . . . . . . . . . . . . . . . . . . . . . . . . . . . . . . . . . . . . . . . 21
Description of the systems . . . . . . . . . . . . . . . . . . . . . . . . . . . . . . . . . . . . . . . . . 22
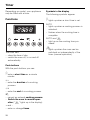
Ovens - use. . . . . . . . . . . . . . . . . . . . . . . . . . . . . . . . . . . . . . . . . . . . . . . . . . . . . . 23
Controls . . . . . . . . . . . . . . . . . . . . . . . . . . . . . . . . . . . . . . . . . . . . . . . . . . . . . . . . . 23
Function selector. . . . . . . . . . . . . . . . . . . . . . . . . . . . . . . . . . . . . . . . . . . . . . . . 23
Temperature selector . . . . . . . . . . . . . . . . . . . . . . . . . . . . . . . . . . . . . . . . . . . . 24
Using the oven . . . . . . . . . . . . . . . . . . . . . . . . . . . . . . . . . . . . . . . . . . . . . . . . . . . . 24
Pre-heating the oven . . . . . . . . . . . . . . . . . . . . . . . . . . . . . . . . . . . . . . . . . . . . . . . 25
Accessories . . . . . . . . . . . . . . . . . . . . . . . . . . . . . . . . . . . . . . . . . . . . . . . . . . . . . 26
Baking tray, grill pan / oven tray and rack . . . . . . . . . . . . . . . . . . . . . . . . . . . . . . . 26
Roasting (grease) filter. . . . . . . . . . . . . . . . . . . . . . . . . . . . . . . . . . . . . . . . . . . . . . 26
Handle . . . . . . . . . . . . . . . . . . . . . . . . . . . . . . . . . . . . . . . . . . . . . . . . . . . . . . . . . . 27
Anti-splash tray . . . . . . . . . . . . . . . . . . . . . . . . . . . . . . . . . . . . . . . . . . . . . . . . . . . 27
Contents

Timer . . . . . . . . . . . . . . . . . . . . . . . . . . . . . . . . . . . . . . . . . . . . . . . . . . . . . . . . . . . 28
Functions . . . . . . . . . . . . . . . . . . . . . . . . . . . . . . . . . . . . . . . . . . . . . . . . . . . . . . . . 28
Push buttons . . . . . . . . . . . . . . . . . . . . . . . . . . . . . . . . . . . . . . . . . . . . . . . . . . . 28
Symbols in the display . . . . . . . . . . . . . . . . . . . . . . . . . . . . . . . . . . . . . . . . . . . 28
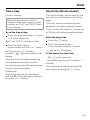
Time of day . . . . . . . . . . . . . . . . . . . . . . . . . . . . . . . . . . . . . . . . . . . . . . . . . . . . . . 29
Short time (Minute minder). . . . . . . . . . . . . . . . . . . . . . . . . . . . . . . . . . . . . . . . . . . 29
Programming cooking time automatically . . . . . . . . . . . . . . . . . . . . . . . . . . . . . . . 30
Switch off automatically . . . . . . . . . . . . . . . . . . . . . . . . . . . . . . . . . . . . . . . . . . 30
Delaying the start of cooking time . . . . . . . . . . . . . . . . . . . . . . . . . . . . . . . . . . 30
To check and change an
entered time . . . . . . . . . . . . . . . . . . . . . . . . . . . . . . . . . . . . . . . . . . . . . . . . . . . . . . 31
Cancelling an automatic
process . . . . . . . . . . . . . . . . . . . . . . . . . . . . . . . . . . . . . . . . . . . . . . . . . . . . . . . . . 31
Changing the audible tone. . . . . . . . . . . . . . . . . . . . . . . . . . . . . . . . . . . . . . . . . . . 31
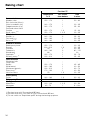
Baking . . . . . . . . . . . . . . . . . . . . . . . . . . . . . . . . . . . . . . . . . . . . . . . . . . . . . . . . . . 32
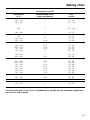
Baking chart . . . . . . . . . . . . . . . . . . . . . . . . . . . . . . . . . . . . . . . . . . . . . . . . . . . . . 34
Roasting . . . . . . . . . . . . . . . . . . . . . . . . . . . . . . . . . . . . . . . . . . . . . . . . . . . . . . . . 36
Oven roasting chart . . . . . . . . . . . . . . . . . . . . . . . . . . . . . . . . . . . . . . . . . . . . . . . 38
Defrosting . . . . . . . . . . . . . . . . . . . . . . . . . . . . . . . . . . . . . . . . . . . . . . . . . . . . . . . 39
Cooking. . . . . . . . . . . . . . . . . . . . . . . . . . . . . . . . . . . . . . . . . . . . . . . . . . . . . . . . . 40
Casseroles . . . . . . . . . . . . . . . . . . . . . . . . . . . . . . . . . . . . . . . . . . . . . . . . . . . . . . . 40
Cooking ready made meals. . . . . . . . . . . . . . . . . . . . . . . . . . . . . . . . . . . . . . . . . . 41
Grilling. . . . . . . . . . . . . . . . . . . . . . . . . . . . . . . . . . . . . . . . . . . . . . . . . . . . . . . . . . 42
Grill chart . . . . . . . . . . . . . . . . . . . . . . . . . . . . . . . . . . . . . . . . . . . . . . . . . . . . . . . 44
Cleaning and care . . . . . . . . . . . . . . . . . . . . . . . . . . . . . . . . . . . . . . . . . . . . . . . . 45
Ceramic hob surface . . . . . . . . . . . . . . . . . . . . . . . . . . . . . . . . . . . . . . . . . . . . . . . 45
Enclosed hotplates. . . . . . . . . . . . . . . . . . . . . . . . . . . . . . . . . . . . . . . . . . . . . . . . . 47
Appliance front and control panel . . . . . . . . . . . . . . . . . . . . . . . . . . . . . . . . . . . . . 48
Accessories . . . . . . . . . . . . . . . . . . . . . . . . . . . . . . . . . . . . . . . . . . . . . . . . . . . . . . 48
Contents

PerfectClean . . . . . . . . . . . . . . . . . . . . . . . . . . . . . . . . . . . . . . . . . . . . . . . . . . . . . 49
Catalytic enamel surfaces . . . . . . . . . . . . . . . . . . . . . . . . . . . . . . . . . . . . . . . . . . . 51
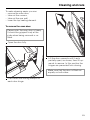
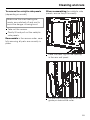
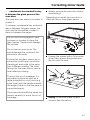
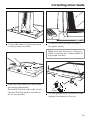
To remove the oven door . . . . . . . . . . . . . . . . . . . . . . . . . . . . . . . . . . . . . . . . . 53
To re-fit the oven door . . . . . . . . . . . . . . . . . . . . . . . . . . . . . . . . . . . . . . . . . . . . 54
To remove the runners . . . . . . . . . . . . . . . . . . . . . . . . . . . . . . . . . . . . . . . . . . . 54
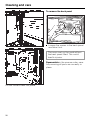
To remove the back panel. . . . . . . . . . . . . . . . . . . . . . . . . . . . . . . . . . . . . . . . . 56
To lower the upper heating element . . . . . . . . . . . . . . . . . . . . . . . . . . . . . . . . . 57
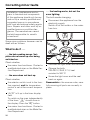
Correcting minor faults . . . . . . . . . . . . . . . . . . . . . . . . . . . . . . . . . . . . . . . . . . . . 58
After sales service . . . . . . . . . . . . . . . . . . . . . . . . . . . . . . . . . . . . . . . . . . . . . . . . 64
Extra accessories. . . . . . . . . . . . . . . . . . . . . . . . . . . . . . . . . . . . . . . . . . . . . . . . . 65
Electrical connection UK, IRL, ZA . . . . . . . . . . . . . . . . . . . . . . . . . . . . . . . . . . . 66
Installation - Ceramic hobs . . . . . . . . . . . . . . . . . . . . . . . . . . . . . . . . . . . . . . . . . 69
KM 213, KM 215 . . . . . . . . . . . . . . . . . . . . . . . . . . . . . . . . . . . . . . . . . . . . . . . . 70
KM 227, KM 228 . . . . . . . . . . . . . . . . . . . . . . . . . . . . . . . . . . . . . . . . . . . . . . . . 71
Installation - Hobs with enclosed hotplates . . . . . . . . . . . . . . . . . . . . . . . . . . . 73
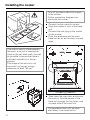
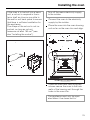
Installing the cooker . . . . . . . . . . . . . . . . . . . . . . . . . . . . . . . . . . . . . . . . . . . . . . 74
Installing the oven . . . . . . . . . . . . . . . . . . . . . . . . . . . . . . . . . . . . . . . . . . . . . . . . 75
Contents

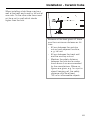
Description of the appliance
General view
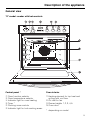
"E"-model: cooker with hob controls
Control panel *
b Oven function selector
c Oven temperature selector
d Indicator light for oven heating
e Timer *
f Cooking zone controls
g Indicator light for hob cooking areas
Oven interior
h Heating element for top heat and
grilling with roof liner
i Air inlet for fan
j Runner heights 1, 2, 3, 4, 5
k Oven door
* depending on model
Description of the appliance
5

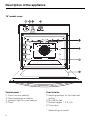
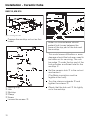
"B"-model: oven
Control panel *
b Oven function selector
c Oven temperature selector
d Indicator light for oven heating
e Timer*
Oven interior
f Heating element for top heat and
grilling
g Air inlet for fan
h Runner heights 1, 2, 3, 4, 5
i Oven door
* depending on model
Description of the appliance
6

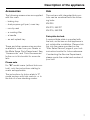
Accessories
The following accessories are supplied
with this oven:
– baking tray
– dual purpose grill pan / oven tray
– non-tip rack
– a roasting filter
– a handle
– an anti-splash tray
These and other accessories are also
available to order from your Dealer or
the Miele Spare Parts Department. See
“Accessories” and “Extra Accessories”
further on in this booklet for more de-
tails.
Please note
For "B" model ovens (without hob con-
trols), only the instructions relating to
ovens are applicable.
The instructions for hobs relate to "E"
model cookers with hob controls, or to
the hob of a free-standing cooker.
Hob
The cookers with integrated hob con-
trols can be combined with the follow-
ing hobs:
KM 200
KM 213, KM 227
KM 215, KM 228
Data plate for hob
A second data plate is supplied with
the hob, as the one on the appliance is
not visible after installation. Please stick
this into the space provided on the
"After Sales Service" page of your hob
instruction booklet for future reference.
If contacting the Service Department,
please quote the model and number of
your hob.
Description of the appliance
7

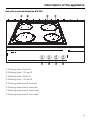
Ceramic hob KM 215, KM 228
b Vario cooking zone: 14.5 cm / 21 cm Ø
c Cooking zone: 14.5 cm Ø
d Cooking zone / Extended cooking zone: 17 cm Ø / 17 cm x 26 cm *
e Cooking zone: 14.5 cm Ø
f Hob display field, residual heat indicator
Ceramic hob KM 213, KM 227
As above except:
* Cooking zone: 18 cm Ø
Description of the appliance
8

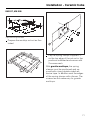
Hob with enclosed hotplates KM 200
b Cooking zone: 18 cm Ø
c Cooking zone: 14.5 cm Ø
d Cooking zone: 18 cm Ø
e Cooking zone: 14.5 cm Ø
f Cooking zone control: front left
g Cooking zone control: back left
h Cooking zone control: back right
i Cooking zone control: front right
Description of the appliance
9

Caring for the environment
Disposal of the packing
material
The transport and protective packing
has been selected from materials
which are environmentally friendly for
disposal and can normally be recycled.
Ensure that any plastic wrappings,
bags etc. are disposed of safely and
kept out of the reach of babies and
young children. Danger of suffocation!
Rather than just throwing these ma-
terials away, please ensure they are of-
fered for recycling.
Disposal of your old machine
Old machines contain materials which
can be reclaimed or recycled. Please
contact your dealer, your local waste
collection centre or scrap merchant
about potential recycling schemes,
before disposing of the appliance.
Ensure that the machine presents no
danger to children while being stored
for disposal. See the appropriate ad-
vice in the "Warning and Safety instruc-
tions".
Caring for the environment
10

Warning and Safety instructions
This appliance complies with all rele-
vant legal safety requirements. Im-
proper use of the appliance can,
however, present a risk of both per-
sonal injury and material damage.
Before installation and before using
the appliance for the first time, read
the operating instructions carefully.
They contain important notes on
safety, on the installation, operation
and care of the appliance. This way
you will avoid the risk of accidents
and damage to the appliance.
The appliance is not intended for
use by young children or infirm per-
sons without supervision.
Young children should be super-
wised to ensure that they do not
play with the appliance.
Keep these instructions in a safe
place and pass them on to any fu-
ture user.
Correct usage
The appliance is intended for do-
mestic use to cook food, and in
particular to bake, roast, defrost, cook,
dry fruit etc, and to grill.
Any other usage is at the owner’s risk
and could be dangerous. The manufac-
turer cannot be held responsible for
damage caused by improper use of the
appliance.
Technical safety
Before connecting the appliance to
the mains supply make sure that
the voltage and frequency correspond
to the rating on the data plate, other-
wise the appliance could be damaged.
Consult a competent person if in doubt.
The electrical safety of this ap-
pliance can only be guaranteed
when continuity is complete between
the appliance and an effective earthing
system, which complies with local and
national regulations. It is most import-
ant that this basic safety requirement is
tested by a qualified electrician. The
manufacturer cannot be held respon-
sible for the consequences of an inade-
quate earthing system (e.g. electric
shock).
This appliance must only be oper-
ated as a built-in appliance. This is
necessary to ensure that all electrical
components are shielded.
Never open the casing of the ap-
pliance.
Tampering with electrical connections
or components and mechanical parts
is highly dangerous to the user and can
cause operational faults.
Installation work and repairs may
only be carried out by a suitably
qualified and competent person in
accordance with national and local
safety regulations.
Repairs and other work by unqualified
persons could be dangerous. The
manufacturer cannot be held respon-
sible for unauthorised work.
Warning and Safety instructions
11

The appliance is only completely
isolated from the electricity supply
when:
– it is switched off at the wall socket
– or the mains fuse is withdrawn
– or the screw-out fuse is removed (in
countries where this is applicable).
Ensure that current is not supplied to
the appliance while maintenance or
repair work is being carried out.
Do not connect the appliance to
the mains electricity supply by an
extension lead.
Extension leads do not guarantee the
required safety of the appliance, (e.g
danger of overheating).
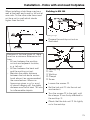
The oven is designed to be built
into a tall unit. If you wish to install
it in a base unit, the stainless steel rail
above the control panel must be re-
placed by a sealing strip. The sealing
strip offers additional protection from
any liquids that might spill down from
the worktop, and can be purchased
from the Miele Spare Parts dept.
This equipment is not designed for
maritime use or for use in mobile in-
stallations such as caravans, aircraft
etc. However, it may be suitable for
such usage subject to a risk assess-
ment of the installation being carried
out by a suitably qualified engineer.
Use
Caution, danger of burning.
High temperatures are produced by
the oven and the hob cooking areas.
Great care should be taken to en-
sure that small children do not
touch the appliance when it is being
used. The hob and also external parts
of the oven such as the door glass,
handle vent and control panel can
become quite hot. For cookers with a
hob turn pan handles inwards to pre-
vent children from pulling pans over.
Children should not be left alone or
unattended in an area where an
oven is in use. They should never be
allowed to sit or stand on any part of
the oven or play with it.
Do not store items of interest to child-
ren in cabinets above an oven. Child-
ren climbing on the oven to reach these
items could be seriously injured.
Oven
Use of heat-resistant oven gloves
is recommended when placing
food in the oven, turning or removing it.
When working with "Conventional" heat-
ing or when grilling, the element in the
roof of the oven and the guard plate
become very hot, and there is a danger
of being burnt.
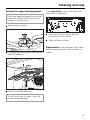
Wait until the grill element has
cooled down before lowering it for
cleaning, to avoid the danger of burning.
Do not use force to pull it down as
this can cause the element to break.
Warning and Safety instructions
12

Do not use plastic containers.
These melt at high temperatures
and could damage the oven.
Do not heat up unopened tins or jars
of food in the oven, as pressure can
build up and they may explode. This
could result in injury or damage.
Do not push pots and pans around
on the oven floor as this could
damage the surface.
Do not lean or sit on the open oven
door, or place heavy items on it.
This could damage the appliance. Take
care in the region of the hinges. The
oven door can support a maximum
load of 10 kg.
When closing the oven door to pre-
vent the risk of damage hold the
handle firmly and do not let go of it until
it is shut. Make sure that nothing gets
trapped between the door and the
oven.
Cover any food which is left in the
oven to be kept hot. This avoids
the food drying out. It also prevents
steam condensing and possibly lead-
ing to moisture damage in the oven.
Bake any deep-frozen items such
as pizzas on baking paper on the
rack itself. Do not place them on the
baking tray or in the grill pan/oven tray.
This could cause the metal to distort to
such an extent that it might be im-
possible to remove the pan from the
oven whilst it is still hot. This distortion
would increase with subsequent use.
Deep frozen foods such as oven chips
or potato croquettes can be cooked on
the baking tray or grill pan/oven.
Never add water to food on a hot
baking tray or grill pan/oven tray or
directly onto food in a hot oven. The
steam created could cause serious
burns or scalding and the sudden
change in temperature can damage
the enamel.
Never line the floor of the oven with
aluminium foil when using Conven-
tional top and bottom heat A. Do not
place a dish, tin, baking tray or grill
pan/oven tray on the floor of the oven.
If using a grill pan/oven tray made by a
different manufacturer make sure that
there is a gap of at least 6 cm between
the bottom of the pan and the floor of
the oven.
If these instructions are not observed
the bottom heat will be blocked. This
can cause permanent damage to the
floor of the oven.
Protective aluminium foil panels
are available in retail outlets which
are supposed to protect the oven cav-
ity from soiling and reduce the need for
cleaning. If used, cooking and baking
times will increase considerably.
They can also cause damage to the ap-
pliance (e.g. by blocking the heat).
Ceramic hobs
When switched on the cooking
areas heat up. A residual heat indi-
cator shows whether a cooking zone is
hot.
Do not cover the hob display field
by a hot pan. This could cause
damage to the residual heat indicators.
Warning and Safety instructions
13

In the event of any breakages or
cracks occurring in the ceramic
hob it must be switched off immediately
and disconnected from the electricity
supply.
Contact the Service Department.
Do not use the hob until the damaged
ceramic plate has been replaced. Con-
tinued use would be dangerous as
liquids etc. boiling over could penetrate
to the electrical components through
any crack and cause a short circuit.
Do not use the hob as a resting
place for any other objects. This
could lead to a danger of the article
catching fire or melting if there is any re-
sidual heat or the hob is switched on in-
advertently.
Do not use plastic or aluminium foil
containers. These melt at high tem-
peratures. Additionally, they could dam-
age a ceramic hob as they melt.
Do not allow either solid or liquid
sugar or pieces of plastic or alu-
mium foil to get on to the cooking
zones when they are hot. If this is
allowed to cool before the hob has
been cleaned, the ceramic surface will
be susceptible to pitting or even crack-
ing.
Switch the cooking zones off and while
the hob is still warm, scrape all the
sugar, plastic or aluminium remains
from the hob with a shielded blade
scraper taking care not to burn yourself.
Do not drop anything on the ce-
ramic hob.
Even a light object such as an egg
cup, could cause damage in certain cir-
cumstances.
Do not use any pots or pans on the
ceramic hob with bases with pro-
nounced edges or ridges, or which are
poorly enamelled.
These could scratch or scour the hob
surface permanently.
There is a seal between the hob
frame and worktop and between
the frame and the ceramic plate. Do
not use any sharp pointed object, such
as a knife, to clean these seals as they
could become damaged.
Hobs with enclosed hotplates
When switched on the cooking
areas become hot. Danger of burn-
ing.
Avoid allowing liquids or foods con-
taining salt to spill onto a stainless
steel hob or trim. Should this happen
wipe up any spillages containing salt
immediately, to avoid corrosion.
Do not use covers on the enclosed
hotplates. Turning on the hotplate
with the cover still in place could dam-
age the hotplate. Putting a cover on a
damp hotplate could lead to damage
of the hotplate. Condensation trapped
under the cover could cause corrosion.
Do not use the hob as a resting
place for any other objects. This
could lead to a danger of the article
catching fire or melting if there is any re-
sidual heat or the hob is switched on in-
advertently
Do not use plastic or aluminium foil
containers. These melt at high tem-
peratures. Additionally they could dam-
age the hob as they melt.
Warning and Safety instructions
14

General notes
Do not leave the appliance unat-
tended when cooking with oils and
fats as these can be a fire hazard if
allowed to overheat.
Do not use the oven to heat up the
room. Due to the high tempera-
tures radiated, objects left near the
oven or hob could catch fire.
Always ensure that food is suffi-
ciently cooked or reheated. Many
factors will affect the overall cooking
time, including the size and amount of
food, its temperature, changes to the
recipe and the shape and size of cook-
ing container. Some foods may contain
micro organisms which are only de-
stroyed by thorough cooking at tem-
peratures over 70º C for a minimum of
10 minutes. Therefore when cooking or
reheating foods, e.g. poultry, it is par-
ticularly important that food is fully
cooked through. If in doubt select a
longer cooking or reheating time.
It is important that the heat is allowed
to spread evenly throughout the food
being cooked. This can be achieved
by stirring and/or turning the food, and
by observing a sufficiently long stand-
ing time which should be added to the
time needed for cooking, reheating or
defrosting.
When using kitchen appliances
connected to sockets near the
oven, ensure that the cable cannot
come into contact with hot cooking
zones or get trapped in a hot oven
door, which could melt the cable insula-
tion and be dangerous. Danger of elec-
tric shock.
Under no circumstances use a
steam cleaner to clean this ap-
pliance. The steam could attack the
electrical components and cause a
short circuit.
Using alcohol in your recipes:
Often alcoholic drinks such as
rum, cognac, wine, etc are used when
preparing dishes and oven-cooking
them.
The high temperatures can cause the
alcohol to vaporise.
Please take note that under adverse cir-
cumstances the alcohol can catch light
on the hot heating elements.
In countries which may be subject
to infestation by cockroaches or
other vermin, pay particular attention to
keeping the appliance and its surround-
ings in a clean condition at all times.
Any damage which might be caused
by cockroaches or other vermin will not
be covered by the appliance guarantee.
Disposal of your old machine
Before discarding an old machine
switch off and disconnect it from
the power supply. This should be done
by a competent person. Cut off and ren-
der any plug useless.
Cut off the cable directly behind the
machine to prevent misuse.
The manufacturer cannot be held
liable for damage caused by non-
compliance with these Warning and
Safety instructions.
Warning and Safety instructions
15

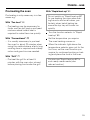
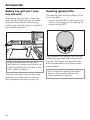
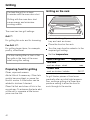
Before using for the first time
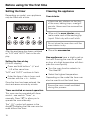
Setting the timer
Depending on model, your appliance
may be fitted with a timer.
After the appliance has been switched
on "0.00" and "AUTO" flash in the dis-
play.
Setting the time of day
(24 hour display)
Press and hold buttons "g" and
")" at the same time.
"0
·
00" and "AUTO" continue to flash.
Enter the time of day in hours
and
minutes with the + or – button.
Once the time has been entered, the
clock advances minute by minute.
Timer-controlled or manual operation
This oven can be operated with timer
control - see section "Timer", or
manually. Press "i" to allow you to
operate the oven manually.
The "@" symbol will appear in the
display, indicating that the oven can be
used without the timer.
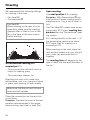
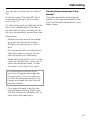
Cleaning the appliance
Oven interior
If there are any stickers on the floor
of the oven, baking trays, oven/grill
pan etc. these must be removed be-
fore use.
Wipe out the oven interior using
warm water and a little washing-up
liquid. Polish dry with a soft cloth.
Do not close the oven door until the
oven interior is dry.
Rinse the accessories.
New appliances have a slight smell on
first use. Running the oven for at least
an hour at a high temperature will dissi-
pate this more quickly.
Turn the oven function selector to
"Fan Heat D".
Select the highest temperature.
Depending on the model the timer can
also be used to set the finish time.
Ensure the room is well ventilated
during this process.
Before using for the first time
16

Ceramic hob
Thoroughly clean the ceramic hob be-
fore first use, then clean regularly after
use when just warm to the touch, or
cold (see the section on "Cleaning and
care").
On first use the hob may give off a
slight smell as moisture in the insulation
evaporates.
Enclosed hotplates
For the first few times of using a smell
will occur.
Heat the hotplates for about
5 minutes at the highest setting.
Do not place a pan on them.
The protective coating which prevents
the build-up of rust will smoke slightly
as it hardens.
Ensure the room is well ventilated
during this process.
Before using for the first time
17

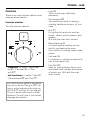
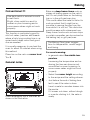
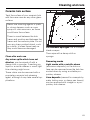
Hobs
Ceramic hobs
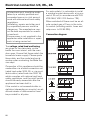
Cooking zones
The cooking zones are clearly marked
on the hob. Only the zone that is
switched on heats up. The surround
remains relatively cool.
Residual heat indicator
There is a display field with a residual
heat indicator for each zone.
Once the zone is switched on, the indi-
cator light comes on when a certain
temperature is reached.
Do not cover the hob display field by a
hot pan. This could cause damage to
the residual heat indicators.
After switching off, the residual heat in-
dicator light stays on as long as the
cooking zone remains hot.
Do not touch these cooking zones
or place any heat sensitive objects
on them. Danger of burning.
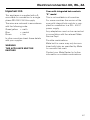
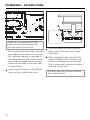
Extended area
Only applicable to hobs with vario or
extended cooking zones.
The relevant cooking zone control is
also used to switch on the vario /
extended area.
Turn the control in a clockwise direc-
tion until a resistance is felt. Other-
wise the control can be damaged.
Turn the control in a clockwise direc-
tion only to the symbol "n".
Then select the setting required.
Turning the zone control back to "0"
switches off:
– the cooking zone, and
– the extended area.
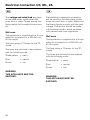
Enclosed hotplates
On hobs with enclosed hotplates, there
are two different sizes and perfor-
mance levels of hotplate.
Hobs
18

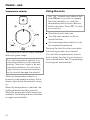
Hobs - use
Hob controls
The controls for the cooking zones / hot-
plates regulate the heat output.
Only turn the controls in a clockwise
direction until a resistance is felt,
and back again.
Turning them in the other direction
will damage them.
When a control is turned to a setting,
the hob indicator light comes on. It
goes out when all hob zone controls
are turned off.
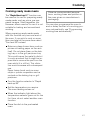
Using the hob
Choose a high setting number for
boiling/frying.
Switch to a lower setting to continue
cooking, when steam is visible at the
rim of the lid.
Switching to a lower setting at the right
time:
– avoids pans boiling over,
– food sticking,
– and saves electricity.
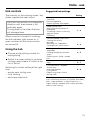
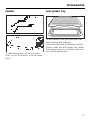
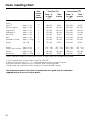
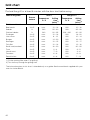
Suggested hob settings
Setting
Melting butter,
Chocolate
Dissolving gelatine
Preparing junket and yoghurt
1
Keeping food warm
Warming small quantitites of
food/liquid
Thickening sauces containing
egg yolk, butter
Omelettes
1 – 2
Defrosting deep frozen items
Cooking rice, pasta,
porridge,
Steaming fruit, vegetables,
Cooking broths, pulse soups
2 – 3
Braising meat, fish,
vegetables
Cooking dumplings, potatoes,
soups
Preparing jams, jellies, stewed
fruit
3 – 5
Frying chops, liver, sausage, fish,
eggs
5 – 7
Frying pancakes, dropped
scones and
other liquid batters
Frying steaks
Deep frying (chips, fritters)
Boiling water
6 – 9
These figures, which envisage approx. 4 help-
ings, should only be taken as a guide. With deep
pans, large quantities, or without the lid on, a
higher setting is needed. With smaller quantities
select a lower setting.
Hobs - use
19

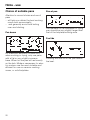
Choice of suitable pans
Attention to correct choice and use of
pans
– will help you obtain the best cooking
result most economically,
– and generally avoid food boiling
over and sticking.
Pan bases
For maximum economy of electricity
when cooking or frying, only use pans
with a flat or very slightly concave
base. When hot the pan will rest evenly
on the hob. Modern saucepans for elec-
tric cookers are the most suitable and
efficient for use on ceramic cooking
zones, or solid hotplates.
Size of pan
The diameter of the saucepan or frying
pan should be very slightly larger than
that of the hotplate/cooking area.
Pan lids
Cooking with the lid on the pan retains
the heat.
Hobs - use
20
Page is loading ...
Page is loading ...
Page is loading ...
Page is loading ...
Page is loading ...
Page is loading ...
Page is loading ...
Page is loading ...
Page is loading ...
Page is loading ...
Page is loading ...
Page is loading ...
Page is loading ...
Page is loading ...
Page is loading ...
Page is loading ...
Page is loading ...
Page is loading ...
Page is loading ...
Page is loading ...
Page is loading ...
Page is loading ...
Page is loading ...
Page is loading ...
Page is loading ...
Page is loading ...
Page is loading ...
Page is loading ...
Page is loading ...
Page is loading ...
Page is loading ...
Page is loading ...
Page is loading ...
Page is loading ...
Page is loading ...
Page is loading ...
Page is loading ...
Page is loading ...
Page is loading ...
Page is loading ...
Page is loading ...
Page is loading ...
Page is loading ...
Page is loading ...
Page is loading ...
Page is loading ...
Page is loading ...
Page is loading ...
Page is loading ...
Page is loading ...
Page is loading ...
Page is loading ...
Page is loading ...
Page is loading ...
Page is loading ...
Page is loading ...
-
 1
1
-
 2
2
-
 3
3
-
 4
4
-
 5
5
-
 6
6
-
 7
7
-
 8
8
-
 9
9
-
 10
10
-
 11
11
-
 12
12
-
 13
13
-
 14
14
-
 15
15
-
 16
16
-
 17
17
-
 18
18
-
 19
19
-
 20
20
-
 21
21
-
 22
22
-
 23
23
-
 24
24
-
 25
25
-
 26
26
-
 27
27
-
 28
28
-
 29
29
-
 30
30
-
 31
31
-
 32
32
-
 33
33
-
 34
34
-
 35
35
-
 36
36
-
 37
37
-
 38
38
-
 39
39
-
 40
40
-
 41
41
-
 42
42
-
 43
43
-
 44
44
-
 45
45
-
 46
46
-
 47
47
-
 48
48
-
 49
49
-
 50
50
-
 51
51
-
 52
52
-
 53
53
-
 54
54
-
 55
55
-
 56
56
-
 57
57
-
 58
58
-
 59
59
-
 60
60
-
 61
61
-
 62
62
-
 63
63
-
 64
64
-
 65
65
-
 66
66
-
 67
67
-
 68
68
-
 69
69
-
 70
70
-
 71
71
-
 72
72
-
 73
73
-
 74
74
-
 75
75
-
 76
76


Ask a question and I''ll find the answer in the document
Finding information in a document is now easier with AI
Related papers
Other documents
-
Indesit I6EVAW/ Freestanding Cooker User manual
-
-
Beko BDVC 667 Owner's manual
-
-
-
-
Progress PBN1220X User manual
-
Whirlpool IS60E(W) S User guide
-
 Tricity SE545PBK M.PYRO VIT User manual
-
