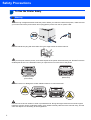
Brother HL-2140 Installation guide

Category
Print & Scan
Type
Installation guide

Brother HL-2140 laser printer delivers crisp, professional prints with a print speed of up to 20 pages per minute. Ideal for home or small office use, it features a compact design and easy-to-use control panel. Quickly print sharp documents, reports, and images with a resolution of up to 2400 x 600 dpi.

Brother HL-2140 laser printer delivers crisp, professional prints with a print speed of up to 20 pages per minute. Ideal for home or small office use, it features a compact design and easy-to-use control panel. Quickly print sharp documents, reports, and images with a resolution of up to 2400 x 600 dpi.

STEP 1
STEP 2
Setup is Complete!
Quick Setup Guide
How to use the printer, see the User’s Guide on the CD-ROM.
Setting Up the Machine
Installing the Printer Driver
Laser Printer
HL-2140
Before you can use the printer, you must set up the hardware and install the driver. Please
read this ‘Quick Setup Guide’ for proper set up and installation instructions.
Keep this ‘Quick Setup Guide’ and the supplied CD-ROM in a convenient place for quick and
easy reference at all times.
To view the Quick Setup Guide in other languages, please visit http://solutions.brother.com
.
Version 1
1
Symbols used in this guide
Warning
Electrical Hazard
Hot Surface
Caution
Warnings tell you what to do
to prevent possible personal
injury.
Electrical Hazard icons alert
you to a possible electrical
shock.
Hot Surface icons warn you
not to touch machine parts
that are hot.
Cautions specify procedures
you must follow or avoid to
prevent possible damage to
the printer or other objects.
Improper Setup
Note
User's Guide
Improper Setup icons alert
you to devices and
operations that are not
compatible with the printer.
Notes tell you how you should
respond to a situation that
may arise or give tips about
how the current operation
works with other features.
Indicates reference to the
User's Guide which is on the
CD-ROM we have supplied.
Table of Contents
1
Safety Precautions
To Use the Printer Safely........................................................................................................................ 2
Regulations ............................................................................................................................................. 4
Getting Started
Carton Components ..................................................................................................................................... 7
Control panel................................................................................................................................................ 8
Printer LED Indications ................................................................................................................................ 8
Supplied CD-ROM ....................................................................................................................................... 9
Setting Up the Machine
Installing the drum unit and toner cartridge assembly................................................................................ 10
Loading paper in the paper tray ................................................................................................................. 11
Printing a test page .................................................................................................................................... 12
Installing the Printer Driver
For USB interface cable users .................................................................................................................. 14
For USB interface cable users .................................................................................................................. 16
Consumables
Consumables ............................................................................................................................................. 18
Repacking Information
Shipment of the printer............................................................................................................................... 19
Troubleshooting
Chapter 6 of the User’s Guide on the CD-ROM
Safety Precautions
2
To Use the Printer Safely
Warning
There are high voltage electrodes inside the printer. Before you clean the inside of the printer, make sure that
you have turned off the power switch and unplugged the printer from the AC power outlet.
DO NOT handle the plug with wet hands. Doing this might cause an electrical shock.
After you have just used the printer, some internal parts of the printer will be extremely hot. DO NOT touch the
shaded parts shown in the illustration when you open the front or back cover of the printer.
DO NOT remove or damage the caution labels located on or around the fuser.
DO NOT use a vacuum cleaner to clean up scattered toner. Doing this might cause the toner dust to ignite
inside the vacuum cleaner, potentially starting a fire. Please carefully clean the toner dust with a dry, lint-free
cloth and dispose of it according to local regulations.
Inside the printer
(Front View)
Inside the printer
(Back View)
Safety Precautions
3
DO NOT use flammable substances or any type of spray to clean the inside or outside of the machine. Doing
this may cause a fire or electrical shock. Refer to the User's Guide for how to clean the machine.
Safety Precautions
4
Regulations
Federal Communications Commission (FCC)
Declaration of Conformity (For USA)
declares, that the products
comply with Part 15 of the FCC Rules. Operation is
subject to the following two conditions: (1) This device
may not cause harmful interference, and (2) this
device must accept any interference received,
including interference that may cause undesired
operation.
This equipment has been tested and found to comply
with the limits for a Class B digital device, pursuant to
Part 15 of the FCC Rules. These limits are designed
to provide reasonable protection against harmful
interference in a residential installation. This
equipment generates, uses, and can radiate radio
frequency energy and, if not installed and used in
accordance with the instructions, may cause harmful
interference to radio communications. However, there
is no guarantee that interference will not occur in a
particular installation. If this equipment does cause
harmful interference to radio or television reception,
which can be determined by turning the equipment off
and on, the user is encouraged to try to correct the
interference by one or more of the following
measures:
Reorient or relocate the receiving antenna.
Increase the separation between the equipment
and receiver.
Connect the equipment into an outlet on a circuit
different from that to which the receiver is
connected.
Consult the dealer or an experienced radio/TV
technician for help.
Important
A shielded interface cable should be used in order to
ensure compliance with the limits for a Class B digital
device.
Changes or modifications not expressly approved by
Brother Industries, Ltd. could void the user's authority
to operate the equipment.
Industry Canada Compliance Statement (For
Canada
This Class B digital apparatus complies with
Canadian ICES-003.
Cet appareil numérique de la classe B est conforme à
la norme NMB-003 du Canada.
Radio interference (220-240 volt model only)
This printer follows EN55022 (CISPR Publication
22)/Class B.
Responsible
Party:
Brother International Corporation
100 Somerset Corporate Boulevard
P.O. Box 6911
Bridgewater, NJ 08807-0911
USA
Telephone: (908) 704-1700
Product name: Laser Printer HL-2140
Model number: HL-21
Safety Precautions
5
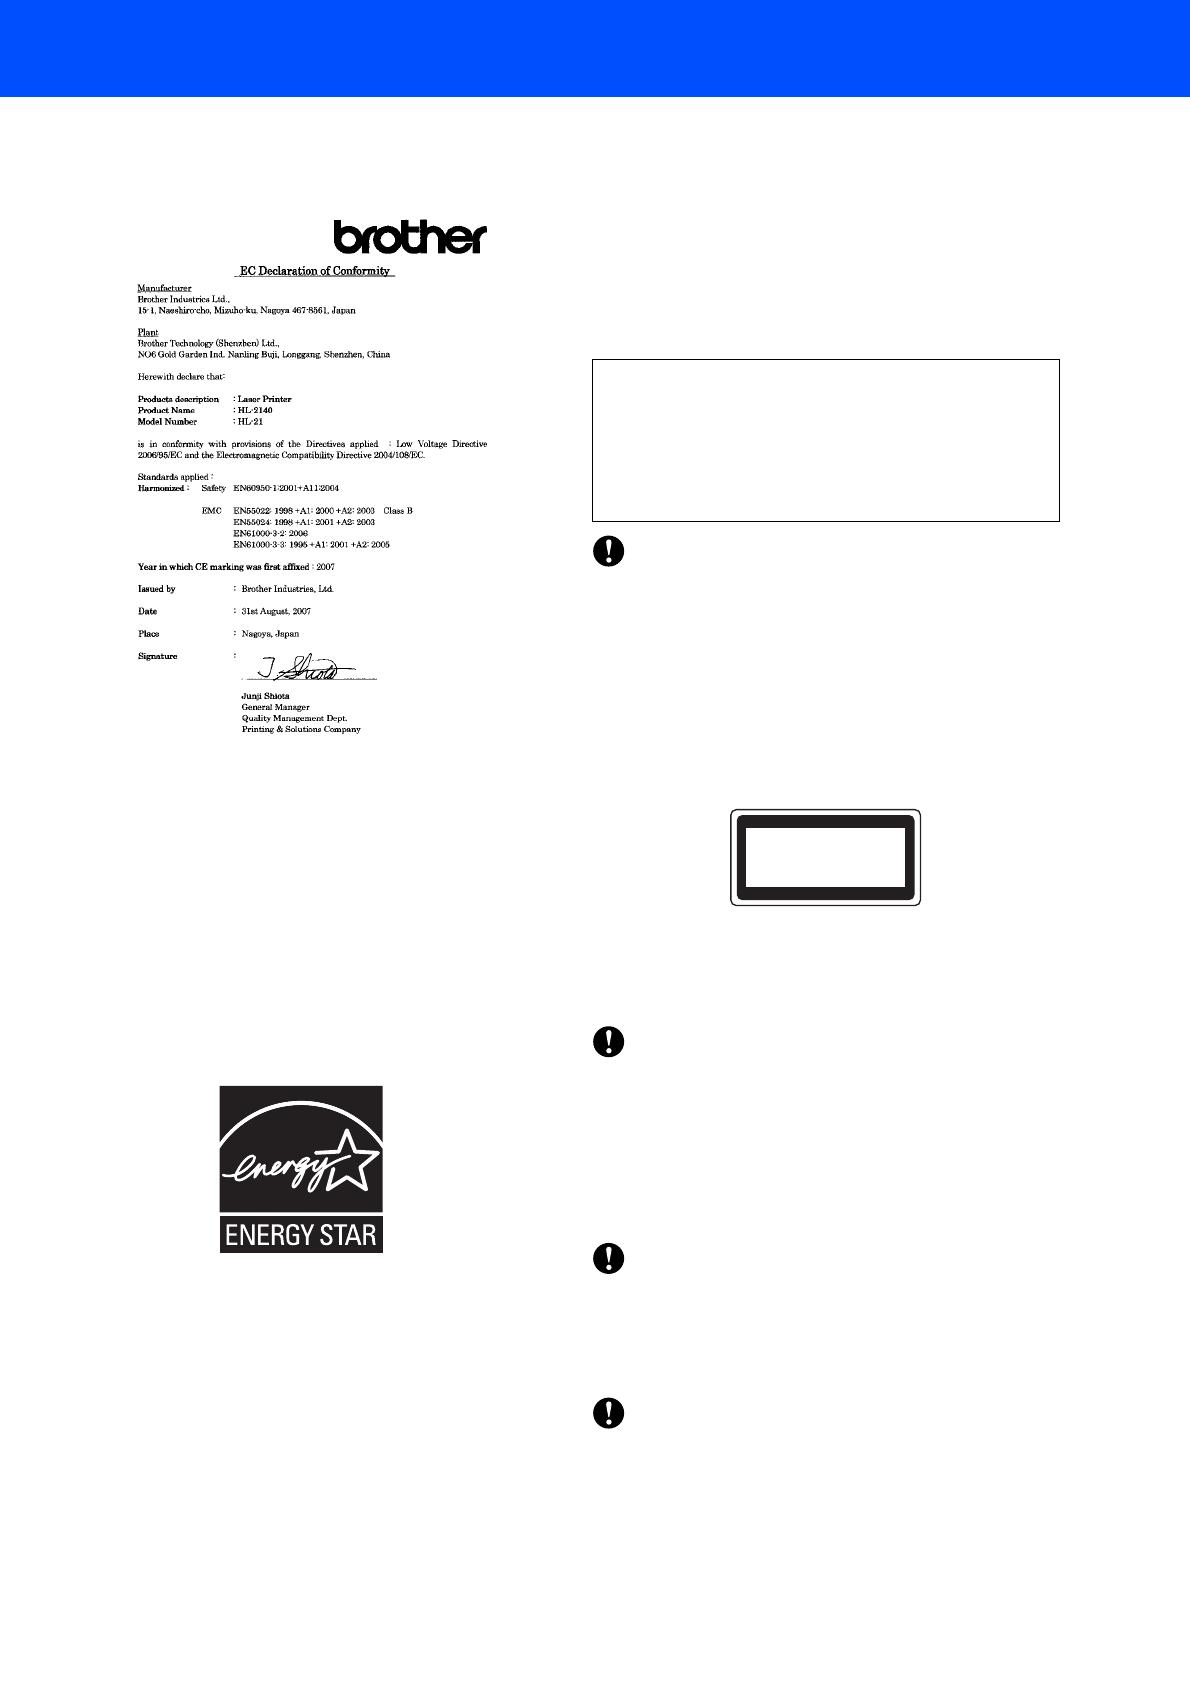
EC Declaration of Conformity
International ENERGY STAR
®
Compliance
Statement
The purpose of the International
ENERGY STAR
®
Program is to promote the development and
popularization of energy-efficient office equipment.
As an
ENERGY STAR
®
Partner, Brother Industries,
Ltd. has determined that this product meets the
ENERGY STAR
®
guidelines for energy efficiency.
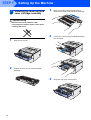
Laser Safety (110 to 120 volt Model Only)
This printer is certified as a Class 1 laser product as
defined in IEC 60825-1+A2: 2001 specifications
under the U.S. Department of Health and Human
Services (DHHS) Radiation Performance Standard
according to the Radiation Control for Health and
Safety Act of 1968. This means that the printer does
not produce hazardous laser radiation.
Since radiation emitted inside the printer is
completely confined within protective housings and
external covers, the laser beam cannot escape from
the machine during any phase of user operation.
FDA Regulations (110 to 120 volt Model Only)
The U.S. Food and Drug Administration (FDA) has
implemented regulations for laser products
manufactured on and after August 2, 1976.
Compliance is mandatory for products marketed in
the United States. The following label on the back of
the printer indicates compliance with the FDA
regulations and must be attached to laser products
marketed in the United States.
Caution
Use of controls, adjustments or performance of
procedures other than those specified in this manual
may result in hazardous invisible radiation exposure.
IEC 60825-1 specification (220 to 240 volt model
only)
This printer is a Class 1 laser product as defined in
IEC 60825-1+A2: 2001 specifications. The label
shown below is attached in countries where it is
needed.
This printer has a Class 3B laser diode which
produces invisible laser radiation in the laser unit. You
should not open the laser unit under any
circumstances.
Caution
Use of controls or adjustments or performance of
procedures other than those specified herein may
result in hazardous radiation exposure.
For Finland and Sweden
LUOKAN 1 LASERLAITE
KLASS 1 LASER APPARAT
Varoitus!
Laitteen käyttäminen muulla kuin tässä
käyttöohjeessa mainitulla tavalla saattaa altistaa
käyttäjän turvallisuusluokan 1 ylittävälle
näkymättömälle lasersäteilylle.
Varning
Om apparaten används på annat sätt än i denna
Bruksanvisning specificerats, kan användaren
utsättas för osynlig laserstrålning, som överskrider
gränsen för laserklass 1.
MANUFACTURED:
Brother Technology (Shenzhen) Ltd.
NO6 Gold Garden Ind., Nanling Buji, Longgang,
Shenzhen, China
This product complies with FDA performance standards
for laser products except for deviations pursuant to Laser
Notice No.50, dated June 24, 2007.
CLASS 1 LASER PRODUCT
APPAREIL À LASER DE CLASSE 1
LASER KLASSE 1 PRODUKT
Safety Precautions
6
Internal laser radiation
IMPORTANT - For Your Safety
To ensure safe operation, the supplied three-pin plug
must be inserted only into a standard three-pin power
outlet that is properly grounded through the normal
household wiring.
Extension cords used with this printer must be three-
pin plug type and correctly wired to provide proper
grounding. Incorrectly wired extension cords may
cause personal injury and equipment damage.
The fact that the equipment operates satisfactorily
does not imply that the power is grounded and that
the installation is completely safe. For your safety, if
in any doubt about the effective grounding of the
power, call a qualified electrician.
This product should be connected to an AC power
source within the range indicated on the rating label.
DO NOT connect it to a DC power source. If you are
not sure, contact a qualified electrician.
Maschinenlärminformations- Verordnung 3.
GPSGV (For Germany only)
Der höchste Schalldruckpegel beträgt 70 dB(A) oder
weniger gemäß EN ISO 7779.
Disconnect device
You must install this printer near a power outlet that is
easily accessible. In case of an emergency, you must
disconnect the power cord from the power outlet to
shut off the power completely.
IT power system (For Norway only)
This product is also designed for an IT power system
with phase-to-phase voltage 230V.
Wiring information (for UK)
Important
If you need to replace the plug fuse, fit a fuse that is
approved by ASTA to BS1362 with the same rating as
the original fuse.
Always replace the fuse cover. Never use a plug that
does not have a cover.
Warning - This printer must be earthed.
The wires in the mains lead are coloured in line with
the following code:
If in any doubt, call a qualified electrician.
Maximum radiation power: 10 mW
Wave length: 780 - 800 nm
Laser class: Class 3B
Green and Yellow: Earth
Blue: Neutral
Brown: Live
Getting Started
7
1
1
Carton Components
Carton components may vary from one country to another.
Save all packing materials and the printer carton in case for any reason you must ship your printer.
1 Face-down output tray support flap 1 (Support flap 1)
2 Control panel
3 Manual feed paper guide
4 Manual feed slot
5 Manual feed slot cover
6 Paper tray
7 Front cover
8 Power switch
9 Ventilation hole
10 Face-down output tray
The interface cable is not a standard accessory. Buy the appropriate cable for the interface you are going to use.
USB cable
Please make sure you use a USB 2.0 interface cable that is no longer than 6 feet (2 meters).
Your printer has a USB interface that is compatible with the USB 2.0 specification. This interface is also
compatible with Hi-Speed USB 2.0; however, maximum data transfer rate will be 12 Mbits/s. The printer can
also be connected to a computer that has a USB 1.1 interface.
DO NOT connect the interface cable at this time. Connecting the interface cable is done during the printer
driver installation process.
When you use a USB cable, make sure you connect it to the USB port of your computer and not to a USB
port on a keyboard or non-powered USB hub.
5
6
7
2
3
4
1
8
9
10
CD-ROM
(including User’s Guide)
Quick Setup Guide
Drum unit and toner
cartridge assembly
AC power cord
Getting Started
8
2
Control panel
For the details of the control panel, see Chapter 4 of the User’s Guide on the CD-ROM.
3
Printer LED Indications
1
The LED will blink in a pattern of ON for 1 second and then OFF for 1 second.
2
The LED will blink in a pattern of ON for 0.5 seconds and then OFF for 0.5 seconds.
3
The LED will blink in a pattern of ON for 2 seconds and then OFF for 3 seconds.
1 Toner LED
The Toner LED indicates when the toner is low or at the end of its life.
2 Drum LED
The Drum LED indicates when the drum is nearing the end of its life.
3 Error LED
The Error LED indicates when the printer is in one of the following
states:
No paper / Paper jam / Cover open
4 Ready LED
The Ready LED will flash depending on the printer status.
Go button
Wake-up / Error recovery / Form feed / Job Cancel / Reprint
: Blinking
: ON
: OFF
Printer LED OFF Sleep Warming up
Cooling down
1
Ready Receiving
data
2
Print Data
remaining
2
Toner
Drum
Error
Ready
(Blue)
Dimmed
Printer LED
Toner low
3
Toner life
end
Drum near
end of life
3
Cover open
Paper jam
2
No paper
Drum Error
2
Service
call
2
Toner
(Yellow)
Drum
(Yellow)
Error
(Red)
Ready
(Blue)
User's Guide
Chapter 5 Chapter 5 Chapter 5 Chapter 6 Chapter 6 Chapter 4 Chapter 4
1
2
3
4
Getting Started
9
4
Supplied CD-ROM
You can find a variety of information on the CD-ROM.
Windows
®
Install Printer Driver
Install the printer driver.
Install Other Drivers or Utilities
Install optional driver.
Documentation
View the Printer User’s Guide and Network User's
Guide in HTML format.
You can also view the manuals in PDF format by
accessing the Brother Solutions Center.
The User’s Guide in HTML format will be installed
automatically when you install the driver. Click the
Start button, All Programs
1
, your printer, and then
User’s Guide in HTML format. If you do not want to
install the User’s Guide, choose Custom setup from
Install Printer Driver, and uncheck User’s Guides
in HTML format when you install the driver.
1
Programs for Windows
®
2000 users
On-Line Registration
Register your product on-line.
Brother Solutions Center
The Brother Solutions Center
(http://solutions.brother.com
) is a one-stop resource
for all your printer support needs. Download the latest
drivers and utilities for your printers, read FAQs and
troubleshooting tips, or learn about printer solutions.
Supplies Information
Visit our web site for original/genuine Brother supplies
at http://www.brother.com/original/
Macintosh
®
Install Printer Driver
Install the printer driver.
Documentation
View the Printer User’s Guide in HTML format.
You can also view the User’s Guide in PDF format by
accessing the Brother Solutions Center.
On-Line Registration
Register your product on-line.
Brother Solutions Center
The Brother Solutions Center
(http://solutions.brother.com
) is a one-stop resource
for all your printer support needs. Download the latest
drivers and utilities for your printers, read FAQs and
troubleshooting tips, or learn about printer solutions.
Supplies Information
Visit our web site for original/genuine Brother supplies
at http://www.brother.com/original/
Note
For visually impaired users, we have prepared an HTML file on the
supplied CD-ROM: readme.html. This file can be read by Screen
Reader ‘text-to-speech’ software.
Setting Up the Machine
10
STEP 1
1
1 Installing the drum unit and
toner cartridge assembly
Improper Setup
DO NOT connect the interface cable.
Connecting the interface cable is done when
installing the driver.
1 Open the front cover.
2 Unpack the drum unit and toner cartridge
assembly.
3 Rock it from side to side several times to
distribute the toner evenly inside the assembly.
4 Put the drum unit and toner cartridge assembly
into the printer.
5 Close the front cover of the printer.
Setting Up the Machine
11
2 Loading paper in the paper
tray
1 Pull the paper tray completely out of the printer.
2 While pressing the green paper-guide release
lever, slide the paper guides to fit the paper
size you are using. Make sure that the guides
are firmly in the slots.
Note
For Legal size paper, press the release button in
the bottom of the paper tray and then pull out the
back of the paper tray.
3 Fan the stack of paper well to avoid paper jams
and misfeeds.
4 Put paper in the paper tray. Make sure that the
paper is flat in the tray and below the maximum
paper mark (1).
5 Put the paper tray firmly back into the printer.
Make sure that it is completely inserted into the
printer.
1
Setting Up the Machine
12
STEP 1
3 Printing a test page
Improper Setup
DO NOT connect the interface cable yet.
1 Make sure that the printer power switch is off.
Connect the AC power cord to the printer.
2 Plug the AC power cord into an AC power
outlet. Turn on the printer power switch.
3 Unfold support flap 1.
4 After the printer has finished warming up, the
Ready LED / Go button (1) stops blinking and
stays blue.
5 Press the Go button. The printer prints a test
page. Check that the test page has printed
correctly.
Note
This function will not be available after the first
print job you send from your computer.
1
Windows
®
Macintosh
®
Installing the Printer Driver
13
STEP 2
Follow the instructions on this page for your operating system.
For the latest drivers, documentation, and to find the best solution for your problem, access the Brother Solution Center
directly from the CD-ROM / Driver or visit http://solutions.brother.com.
The screens for Windows
®
in this Quick Setup Guide are based on Windows
®
XP.
The screens for Mac OS
®
X in this Quick Setup Guide are based on Mac OS
®
X 10.4.
For USB interface cable users....................................................................................... 14
For USB interface cable users....................................................................................... 16
Installing the Printer Driver
14
STEP 2
Windows
®
USB
Windows
®
1
1
For USB interface cable users
Improper Setup
DO NOT connect the interface cable yet.
Note
If the Found New Hardware Wizard appears on
your computer, click Cancel.
Installing the driver and connecting the printer to
your computer
1 Turn off the printer power switch.
2 Make sure the USB interface cable is NOT
connected to the printer, and then begin
installing the driver. If you have already
connected the cable, remove it.
3 Turn on your computer. (You must be logged
on with Administrator rights.)
4 Put the supplied CD-ROM into your CD-ROM
drive. The opening screen will appear
automatically.
Choose your printer model and the language.
Note
If the opening screen does not appear, use
Windows
®
Explorer to run the start.exe program
from the root folder of the Brother CD-ROM.
5 Click Install Printer Driver on the menu
screen.
Note
Choose the Install Printer Driver icon for your
region.
6 Click USB cable users.
Installing the Printer Driver
15
Windows
®
USB
Windows
®
Note
For Windows Vista™, when the User Account
Control screen appears, click Continue.
7 When the License Agreement window
appears, click Yes if you agree to the License
Agreement.
8 When this screen appears, make sure the
printer power switch is on.
Connect the USB interface cable to your
computer, and then connect it to the printer.
Click Next.
9 Click Finish.
Note
If you want to register your product on-line, check
On-Line Registration.
If you do not want to set your printer as Default
printer, uncheck Set as Default Printer.
Setup is now complete.
Note
XML Paper Specification Printer Driver
The XML Paper Specification Printer Driver is the
most suitable driver when printing from the
applications that use the XML Paper Specification
documents.
Please download the latest driver by accessing the
Brother Solutions Center at
http://solutions.brother.com
.
Installing the Printer Driver
16
STEP 2
Macintosh
®
Macintosh
®
USB
2
For USB interface cable users
Connecting the printer to your Macintosh
®
and
installing the driver
1 Connect the USB interface cable to your
Macintosh
®
, and then connect it to the printer.
Improper Setup
DO NOT connect the printer to a USB port on a
keyboard or a non-powered USB hub.
2 Make sure the printer power switch is on.
3 Turn on your Macintosh
®
. Put the supplied CD-
ROM into your CD-ROM drive.
4 Double-click the HL2100 icon on your desktop.
Double-click the Start Here icon. Follow the
on-screen instructions.
5 Click Install Printer Driver on the menu
screen.
6 Click USB cable users and follow the
on-screen instructions. Then, restart your
Macintosh
®
.
For Mac OS
®
X 10.2.4 to 10.2.8 users:
Go to step 9.
For Mac OS
®
X 10.3 or greater users:
Go to step 7.
7 The Brother software will search for the Brother
printer. During this time the following screen
will appear.
8 When this screen appears, click OK.
For Mac OS
®
X 10.3 or greater users:
Setup is now complete.
Installing the Printer Driver
17
Macintosh
®
Macintosh
®
USB
9 When this screen appears, click Add.
10 Choose USB.
11 Choose your printer, and then click Add.
12 Click Print Center, then Quit Print Center.
For Mac OS
®
X 10.2.4 to 10.2.8 users:
Setup is now complete.
Consumables
18
1
1
Consumables
When the time comes to replace consumable items, an error will be indicated by the LED’s on the control panel.
For more information about the consumables for your printer, visit us at http://solutions.brother.com
or contact your
local Brother reseller.
See Chapter 5 of the User's Guide on the CD-ROM.
Toner cartridge Drum unit
  • Page 1 1
  • Page 2 2
  • Page 3 3
  • Page 4 4
  • Page 5 5
  • Page 6 6
  • Page 7 7
  • Page 8 8
  • Page 9 9
  • Page 10 10
  • Page 11 11
  • Page 12 12
  • Page 13 13
  • Page 14 14
  • Page 15 15
  • Page 16 16
  • Page 17 17
  • Page 18 18
  • Page 19 19
  • Page 20 20
  • Page 21 21
  • Page 22 22
  • Page 23 23

Brother HL-2140 Installation guide

Category
Print & Scan
Type
Installation guide

Brother HL-2140 laser printer delivers crisp, professional prints with a print speed of up to 20 pages per minute. Ideal for home or small office use, it features a compact design and easy-to-use control panel. Quickly print sharp documents, reports, and images with a resolution of up to 2400 x 600 dpi.

Ask a question and I''ll find the answer in the document

Finding information in a document is now easier with AI