
All Rights Reserved. Copyright © 2009: Clarion Co., Ltd.
Printed in Malaysia / Imprimé en Malaisie / Gedruckt in Malaysia / Stampato in Malaysia
Gedrukt in Maleisi / Impreso en Malasia / Tryckt i Malaysia / Impresso na Malásia
PE-8501E
Clarion Co., Ltd.
Bluetooth
®
USB/MP3/WMA/AAC RECEIVER
RÉCEPTEUR
Bluetooth
®
USB/MP3/WMA/AAC
Bluetooth
®
USB/MP3/WMA/AAC EMPFÄNGER
RICEVITORE
Bluetooth
®
USB/MP3/WMA/AAC
Bluetooth
®
USB/MP3/WMA/AAC RECEIVER
RECEPTOR DE
Bluetooth
®
USB/MP3/WMA/AAC
Bluetooth
®
USB/MP3/WMA/AAC-RECEIVER
RECEPTOR DE
Bluetooth
®
USB/MP3/WMA/AAC
Owner’s manual
Mode d’emploi
Bedienungsanleitung
Istruzioni per l’uso
Gebruiksaanwijzing
Manual de instrucciones
Bruksanvisning
Manual de instruções
280-8841-00

2
FZ709E
Français
Nous vous remercions pour l’achat de ce produit
Clarion.
∗
Veuillez lire ce mode d’emploi dans son intégralité
avant d’utiliser cet équipement.
∗
Après l’avoir lu, veillez à conserver ce mode
d’emploi dans un endroit pratique
(
par ex. boîte à
gants
)
.
∗
Vérifiez le contenu de la carte de garantie jointe
et conservez-la soigneusement avec ce mode
d’emploi.
Deutsch
Wir möchten Ihnen für den Kauf dieses Clarion
Produkts danken.
∗
Für optimale Leistung und Sicherheit lesen Sie bitte
diese Bedienungsanleitung aufmerksam durch.
∗
Heben Sie diese Anleitung auf, um sie später zum
Nach-schlagen griffbereit zu haben,
(
z.B. im Hand
-
schuhfach
)
.
∗
Überprüfen Sie den Inhalt mit der beiliegenden
Garantiekarte. Legen Sie diese Karte zum Handbu-
ch.
Italiano
Grazie per aver acquistato questo prodotto Clarion.
∗
Si prega di leggere questo manuale utente prima di
utilizzare l’impianto.
∗
Una volta letto, conservare il manuale in un luogo
a portata di mano
(
ad es. il vano portaoggetti
)
.
∗
Verificare il contenuto della garanzia acclusa e
conser-varla insieme a questo manuale.
English
Thank you for purchasing this Clarion product.
∗
Please read this owner’s manual in its entirety before
operating this equipment.
∗
After reading this manual, be sure to keep it in a
handy place
(
e.g., glove compartment
)
.
∗
Check the contents of the enclosed warranty card
and keep it carefully with this manual.
Nederlands
Hartelijk bedankt voor de aankoop van dit Clarion-
product.
∗
Lees a.u.b. deze gebruiksaanwijzing compleet door,
alvorens dit apparaat in gebruik te nemen.
∗
Bewaar deze gebruiksaanwijzing, nadat u ze
gelezen hebt, op een gemakkelijke plaats
(
bv. in
het dashboardkastje
)
.
∗
Lees wat in de bijgesloten garantiekaart staat en
bewaar ze samen met deze gebruiksaanwijzing.
Español
Gracias por haber adquirido este producto Clarion.
∗
Lea este manual de instrucciones por entero antes
de utilizar este equipo.
∗
Después de leer el manual, guárdelo a mano
(
por
ejemplo, en la guantera
)
.
∗
Compruebe el contenido de la tarjeta de garantía
adjunta y guárdela cuidadosamente con este
manual.
Svenska
Tack för ditt val av denna Clarion-produkt.
∗
Var god läs denna manual i sin helhet innan du
använ-der denna utrustning.
∗
Efter att du läst denna manual, se till att förvara den
på ett praktiskt ställe
(
t.ex. handskfacket
)
.
∗
Kontrollera innehållet på det medföljande garantikor-
tet och förvara det aktsamt tillsammans med denna
manual.
Português:
Obrigado por comprar este produto Clarion.
∗
Por favor leia este manual do utilizador na sua totali-
dade antes de colocar o equipamento a funcionar.
∗
Após ler este manual, assegure-se que o tem à mão
(
e.x., porta-luvas
)
.
∗
Verifique os conteúdos do cartão de garantia
incluído e mantenha-o cuidadosamente com este
manual.
English Français Deutsch Italiano
Nederlands
Español Svenska Português
Dichiarazione di conformità:
Io mandatario nell’ UE: Clarion Europe S.A.S. Z.I. du Pré à Varois,
Route de Pompey, 54670 Custines, FRANCE
Dichiaro che il prodotto FZ709E è conforme al DM 28-08-1995 ottemperando
alle prescrizioni dei DM 25-06-1985 e DM 27-08-1987.

1. PRECAUTIONS .............................................................................................................................. 4
2. CONTROLS ....................................................................................................................................
5
MAIN UNIT ...................................................................................................................................... 5
3. NOMENCLATURE .......................................................................................................................... 6
Names of the Keys and Their Functions ......................................................................................... 6
Slider's Key Operation .................................................................................................................... 7
Display Items ................................................................................................................................... 8
OEL Display ..................................................................................................................................... 8
4. REMOTE CONTROL ......................................................................................................................
9
Inserting the Battery ......................................................................................................................... 9
Functions of Remote Control Unit Buttons .................................................................................... 10
5. OPERATIONS ................................................................................................................................11
Basic Operations ............................................................................................................................11
Radio Mode Operations ................................................................................................................ 16
Radio Data System Operations ..................................................................................................... 19
USB Operations ............................................................................................................................ 23
iPod
®
Operations ............................................................................................................................ 27
Bluetooth
®
Operations ................................................................................................................... 31
Common Operations ..................................................................................................................... 35
6. TROUBLESHOOTING
.................................................................................................................. 39
7. ERROR DISPLAYS
...................................................................................................................... 42
8. SPECIFICATIONS
........................................................................................................................ 43
4
FZ709E
Contents
CHANGES OR MODIFICATIONS TO THIS PRODUCT NOT APPROVED BY THE MANU-
FACTURER WILL VOID THE WARRANTY.
INFORMATION FOR USERS:
Be sure to unfold and read the next page. / Veuillez déplier et vous référer à la page suivante.
Bitte ausbreiten und die nächste Seite lesen. / Assicurarsi di aprire e leggere la pagina successiva.
Volgende pagina uitvouwen en doorlezen a.u.b. / Cerciórese de desplegar y de leer la página siguiente.
Glöm inte att vika ut och läsa nästa sida. / Não deixe de abrir e ler a próxima página.
English
3
FZ709EFZ709E
8
English
1. This unit is applicable for on-road 4 wheel
vehicle purpose only. Use for tractor, fork
truck, bulldozer, off road vehicle, 2 or 3 wheel
motor bicycle, marine boat or other special
purpose vehicle is not appropriate.
2. In extreme cold, the screen movement may
slow down and the screen may darken, but
this is normal.The screen will recover when
it returns to normal temperature.
1. PRECAUTIONS
3. This unit is a Capacitive Touch-Sensing
product. The keys can be activated by finger
capacitance.
Using a thick glove may reduce the finger
capacitance and cannot operate the unit.
4. User is advised to have minimum operation
on the unit while driving. Drive safely.
The use of apparatus in moderate climates.
The organic electro-luminescence display
(
OEL Display
)
of this product is made by high technology
basis.
However, it is possible that there might be part of the pixels which is always lighting or not lightning.
Sometimes unevenness of color and brightness might be occurred depend on the point of view to watch
in a characteristic.
A descending line across the screen will be displayed regularly to prevent OEL Display burn-in.
Please note that these are not hardware/software failures as it happens to be the structure of the organic
electro-luminescence display.
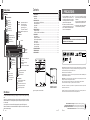
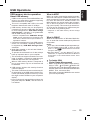
Display Items
OEL Screen
Manufactured under license from BBE Sound, Inc.
Licensed by BBE Sound, Inc. under one or more of the following US patents: 5510752, 5736897. BBE and BBE symbol
are registered trademarks of BBE Sound, Inc.
“Made for iPod” means that an electronic accessory has been designed to connect specifically to iPod and has been
certified by the developer to meet Apple performance standards.
Apple is not responsible for the operation of this device or its compliance with safety and regulatory standards.
iPod and iTunes are trademarks of Apple Inc., registered in the U.S. and other countries.
BBE MP
(
Minimized Polynomial Non-Linear Saturation
)
Process improves digitally compressed sound, such as MP3, by
restoring and enhancing the harmonics lost through compression. BBE MP works by regenerating harmonics from the
source material, effectively recovering warmth, details and nuance.
Windows Media™, and the Windows
®
logo are trademarks, or registered trademarks of Microsoft Corporation in the
United States and/or other countries.
Title display
Trick Play indication
USB
Scan play
Repeat play
Random play
All scan play
All repeat play
All random play
iPod
Repeat/Random play
Repeat/All Random play
Random play
All Random play
Band/Frequency/Preset no.
Mode name/Folder no./
Track no./Playback time
Mode name/Track no./
Playback time
(
iPod mode
)
Previous layer/Current item
Radio mode
USB mode
Adjust mode
BT Audio mode
Telephone mode
AUX mode
Clock time
Operation
status
indication
Mobile phone’s network signal
indication
Mobile phone’s battery
indication
Bluetooth
®
connection indication
Sound mode
MAGNA BASS EX indication
Beat EQ indication
MUTE indication
Alternative frequency indication
Regional indication
Traffic announcement indication
Traffic programme indication
Programme type indication
Radio mode
Stereo indication
Manual indication
Auto store indication
Scan indication
Function display
MP3 indication
WMA indication
AAC indication
Source icon
Radio Data System
The
Bluetooth
®
word mark and logos are owned by the
Bluetooth
®
SIG, Inc. and any use of such marks by Clarion Co.,Ltd.
is under license. Other trademarks and trade names are those of their respective owners.

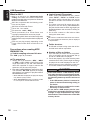
Touch & hold
[ ]
will to
scroll down items continu-
ously.
[
]
slider
Select a station while in the Radio mode.
Select the folder while in the USB mode.
End a call or reject an incoming call.
This key is used to make various settings.
[
]
key
Switch Title display.
Touch and hold the key for 1 second or longer
to switch the display layout
(
Title mode
Indicator mode Clock
)
.
[
]
key
Touch the key to set the TA
(
Traffic
Announcement
)
standby mode.
FZ709E
5
6
FZ709E
English
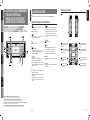
MAIN UNIT / APPAREIL PRINCIPAL / HAUPTGERÄT
/ APPARECCHIO PRINCIPALE / HOOFDTOESTEL
/ UNIDAD PRINCIPAL / HUVUDENHET / UNIDADE PRINCIPAL
Note: Be sure to unfold this page and refer to the front diagrams as you read each chapter.
Remarque: Veuillez déplier cette page et vous référer aux schémas quand vous lisez chaque chapitre.
Hinweis: Bitte diese Seite ausfalten und beim Lesen der einzelnen Kapital die Frontdiagramme beachten.
Nota: Assicurarsi di aprire questa pagina e fare riferimento a questi diagrammi quando si legge ciascun capitolo.
Opmerking: Vouw deze pagina uit en zie tevens de afbeeldingen van het voorpaneel tijdens het doorlezen van de volgende hoofdstukken.
Nota: Cuando lea los capítulos, despliegue esta página y consulte los diagramas.
Observera: Vik ut denna sida för att kunna se figurerna över bilstereons framsida medan du läser de olika kapitlen.
Nota: Certifique-se de abrir esta página e consulte os diagramas frontais conforme realiza a leitura de cada capítulo.
CONTROLS/ LES COMMANDES/
REGLER/ CONTROLLI/
REGELAARS/ CONTROLES/
KONTROLLER/ CONTROLOS
English Français Deutsch Italiano
Nederlands
Español Svenska Português
2.
7
FZ709E
English
3. NOMENCLATURE
[
]
key
Touch and hold the key for 1 second or longer
to turn off the power.
Switch to Source menu.
Note:
Be sure to read this chapter referring to the front diagrams of chapter “
2. CONTROLS” on page 5.
Names of the Keys and Their Functions
[
]
key
Switch to ADJ menu.
[
]
/
[
]
key
Seek a station while in the Radio mode.
Select a track while in the USB mode.
Touch and hold the key for 1 second or longer to
enter the Fast-forward or Fast backward mode
while in USB mode.
[
]
key
Play or pause a track while in the USB mode.
Toggle Mute on/off while in the Radio mode.
Touch and hold the key for 2 seconds or longer
to memory new value during setting mode.
Dial the selected phone number thorugh call
method.
[
]
slider
Adjust the volume.
[
]
key
Switch the band, or seek tuning or manual tuning
while in the Radio mode.
Switch to List Search, or Top folder while in the
USB mode.
Switch between last menu level and Play
display, or Top iPod menu while in the iPod
mode.
USB PORT
USB memory device insertion port
(
at rear
panel
)
.
AUX input
The input jack for connecting an external device
(
at rear panel
)
.
Slider’s Key Operation
Touch & hold slider
[ ]
will increase volume con-
tinuously.
Touch & hold slider
[ ]
will decrease volume con-
tinuously.
Touch & hold
[ ]
will to
scroll up items continu-
ously.
Slide
Touch and release
[ ]
once will increase the
volume 1 step.
Touch and release
[ ]
once will decrease the
volume 1 step.
Touch and release
[ ]
once will scroll up items
1 step.
Touch and release
[ ]
once will scroll down items
1 step.

9
English
FZ709E
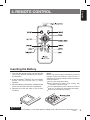
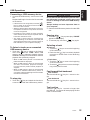
4. REMOTE CONTROL
1. Turn over the remote control unit and slide the
cover in the direction indicated by the arrow in
the illustration.
2. Insert the battery
(
CR2025
)
into the insertion
guides, with the printed side
(+)
facing
upwards.
3. Press the battery in the direction indicated by the
arrow so that it slides into the compartment.
4. Replace the cover and slide in until it clicks
into place.
Notes:
Misuse may result in rupture of the battery, producing
leakage of fluid and resulting in personal injury or
damage to surrounding materials. Always follow these
safety precautions:
Use only the designated battery.
When replacing the battery, insert properly, with
+
/- polarities oriented correctly.
Do not subject battery to heat, or dispose of in fire or
water. Do not attempt to disassemble the battery.
Dispose of used batteries properly.
Inserting the Battery
CAUTION
Danger of explosion if battery is incorrectly replaced. Replace only with the same or equivalent type.

10
English
FZ709E
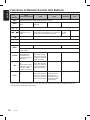
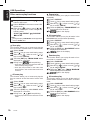
Functions of Remote Control Unit Buttons
Radio
(
Radio Data System
)
Mode
Button
USB iPod
Switch among radio, USB, BT Audio, AUX and iPod.
[
SRC
]
Switch reception
band.
Play the first track.
Top play.
[
BND
]
Move preset
channels up and
down.
Move tracks up and down.
Press and hold the button for 1 second or
longer: Fast-forward/fast-backward.
No function. Switch between playback and pause.
Turn mute on and off.
TA on and off.
Preset scan.
Press and hold
the button for 2
seconds or longer:
Auto store.
Scan play.
Press and hold the
button for 1 second
or longer to perform
folder scan play.
AF function on and
off.
Press and hold the
button for 1 second
or longer: REG
function on and off.
Repeat play.
Press and hold the
button for 1 second
or longer to perform
folder repeat play.
PTY mode on and
off.
Random play.
Press and hold the
button for 1 second
or longer to perform
folder random play.
[ ]
,
[ ]
[
]
[
MUTE
]
[
TA
]
[
PS/AS
]
[
AF
]
[
PTY
]
∗
Some of the corresponding buttons on the main unit and remote control unit have different functions.
∗
TV/VTR is not supported in this model.
Increase and decrease volume
(
in all modes
)
.
[
]
,
[
]
iPod menu
No function.
Toggle repeat on/off.
Random play.
Press and hold
the button for 1
second or longer
to perform folder
random play.
No function.
No function.
AUXBT Audio
Move tracks
up and
down.
No function.
No function.
No function.
No function.
No function.
[
DISP
]
No function.Switch among title display.
Press and hold for 1 second or longer: Switch among title display, indicator display and
clock display.

11
English
FZ709E
Note: Be sure to read this chapter referring to the
front diagrams of chapter “2. CONTROLS” on
page 5.
5. OPERATIONS
CAUTION
!
Basic Operations
Be sure to lower the volume before switching
off the unit power or the ignition key. The
unit remembers its last volume setting. If
you switch the power off with the volume
up, when you switch the power back on, the
sudden loud volume may hurt your hearing
and damage the unit.
Please operate this unit by the finger. It is not
possible to operate it normally with gloves
worn.
Turning on/off the power
Note:
Be careful about using this unit for a long time
without running the engine. If you drain the car’s
battery too far, you may not be able to start the
engine and this can reduce the service life of the
battery.
1. Touch and hold any key for 2 seconds or longer
to power on the unit.
2. The unit automatically remembers its last
Operation mode and will automatically switch
to display that mode.
3. Touch and hold the
[ ]
key for 1 second or
longer to turn off the power for the unit.
Note:
System check
The first time this unit is turned on after the wire
connections are completed, it must be checked
what equipment is connected. When the power is
turned on, the “SYSTEM CHECK” appears in the
display. This unit will switch to Radio mode after
system check.
Selecting a mode
1. Touch the
[ ]
key to switch to Source menu.
2. Touch the corresponding key beside the Source
mode name to enter into desired mode.
Adjusting the volume
1. Slide up along the
[
]
or touch the
[ ]
key
to increases the volume.
2. Slide down along the
[
]
or touch the
[ ]
key to decreases the volume.
∗
The volume level is from 0
(
minimum
)
to 33
(
maximum
)
.
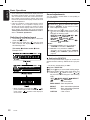
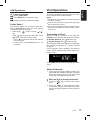
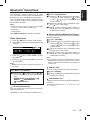
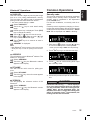
Switching the title display
1. Touch the
[ ]
key to switch the title display.
2. Each time you touch the
[ ]
key, the display
switches in the following order:
Tuner/AUX/BT mode
No Title display.
iPod mode
TRACK
(
ALBUM
)
ALBUM
(
ARTIST
)
ARTIST
(
TRACK
)
TRACK
(
ALBUM
)
USB mode
ALBUM
(
TRACK
)
ARTIST
(
TITLE
)
ARTIST
(
TRACK
)
FOLDER
(
TRACK
)
FOLDER
(
TITLE
)
ALBUM
(
TRACK
)
∗
iPod can connect to this unit via USB SLOT.
3. There are 4 selections in the Source menu:

12
English
FZ709E
Basic Operations
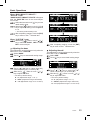
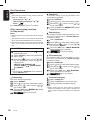
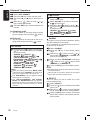
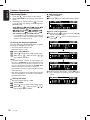
Title mode Indicator mode Clock
Example: iPod
Sound adjustments
You can adjust a sound effect or tone quality to
your preference.
∗
When CT data is not received, “ ” ap
-
pears in the display for Title mode and Indicator
mode, while “ ” appears in the display for
Clock mode.
Setting the BEAT EQ
This unit is provided with 4 types of sound tone
effects stored in memory. Select the one you pre-
fer.
∗
The factory default setting is “OFF”.
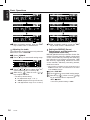
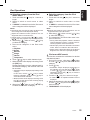
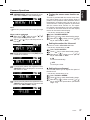
3 - 1 .
Select “BEAT EQ”.
3 - 2 .
Touch
[ ]
key to enter detail setting stage.
3 - 3 .
During detail setting stage, each time your
slide along
[
]
slider or touch
[
]
/
[
]
key, the tone effect changes in the following
order:
“
OFF” “BASS BOOST” “IMPACT”
“EXCITE” “CUSTOM”
OFF : No sound effect
BASS BOOST
: Bass emphasized
IMPACT : Bass and treble emphasized
EXCITE : Bass and treble emphasized
mid emphasized
CUSTOM
: User custom
1 . Touch the
[ ]
key to switch to ADJ menu.
2 . Select “SOUND” in the menu to enter
Sound Adjustment mode.
3 . Slide along the
[ ]
slider or touch
[ ]
/
[ ]
key, the Sound Adjustment mode
changed as following order:
“BEAT EQ
”
(
“BASS” “MID”
“TREBLE”
)
∗1
“BBE MP”
∗2
“BALANCE” “FADER”
“M-BEX” “HPF” “S-W LPF”
“S-W VOL” “BEAT EQ”...
Notes:
∗1
: BASS/MID/TREBLE are only available if
“CUSTOM
” is selected in “BEAT EQ”.
∗2
: BBE MP is only available if “
USB” is
selected in source mode and the “OUTPUT
FORM
” is set to “DIGITAL”.
(
Please refer to
page 30
)
To change sound setting
Switching the display layout
1. Touch the
[
]
key for more than 1 second to
switch display layout.
2. Each time you touch the
[
]
key for more
than 1 second, the display layout switches in
the following order:
∗
Once selected, the preferred title display becomes
the display default. When a function adjustment
such as volume is made, the screen will momen
-
tarily switch to that function’s display, then revert
back to the preferred title display several seconds
after the adjustment.
∗
If the key operation is performed with the screen
saver function on, the operation display corre
-
sponding to the key operation is shown for about
30 seconds and the display returns to the screen
saver display. For details, refer to the subsection
“Turning the screen saver function on or off” in
section “Common Operations”.

13
English
FZ709E
Basic Operations
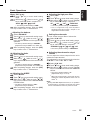
When “BASS BOOST”/“IMPACT”/
“EXCITE” is set:
“BASS BOOST”/“IMPACT”/“EXCITE” will appear
after the “BEAT EQ” item in the sound Adjust-
ment mode.
3 - 3 - 1 .
Select the item and touch
[
]
key to enter
detail setting stage.
3 - 3 - 2 .
Slide along
[
]
slider or touch
[
]
/
[
]
key to adjust the setting in the range of
-
3
to
+
3.
∗
The factory default setting is “0”.
3 - 3 - 3
. After completing settings, touch the
[
ENT
]
key to return to the 1
st
selected item.
When “CUSTOM” is set:
3 - 3 - 1 .
Slide along
[
]
slider or touch
[
]
/
[
]
key to select the “BASS”, “MID” or “TRE-
BLE” mode to adjust.
3 - 3 .
Touch
[
]
/
[
]
key to select Gain
(
“G”
)
,
center frequency
(
“F”
)
or Q factor
(
“Q”
)
.
3 - 4 .
Slide along
[
]
slider or touch
[
]
/
[
]
key to adjust the value.
∗
The factory default setting:
G
: “0”
(
Adjustment range:
+
7 to
-
7
)
F
: “50Hz”
(
Adjustment range: 50/100/200
)
Q
: “1.0”
(
Adjustment range: 0.7/1.0/1.4/2.0
)
Adjusting the bass
This adjustment can be performed only when the
BEAT EQ is set to “CUSTOM”.
3 - 1 .
Select “BASS”.
3 - 2 .
Touch
[ ]
key to enter detail setting stage.
3 - 5 .
After completing settings, touch the
[
ENT
]
key to return to the 1
st
selected item.
3 - 3 .
Touch
[
]
/
[
]
key to select Gain
(
“G”
)
,
center frequency
(
“F”
)
or Q factor
(
“Q”
)
.
3 - 4 .
Slide along
[
]
slider or touch
[
]
/
[
]
key to adjust the value.
∗
The factory default setting:
G
: “0”
(
Adjustment range:
+
7 to
-
7
)
F
: “500Hz”
(
Adjustment range: 500/1k/2k
)
Q
: “1.0”
(
Adjustment range: 0.7/1.0/1.4/2.0
)
Adjusting the mid
This adjustment can be performed only when the
BEAT EQ is set to “CUSTOM”.
3 - 1 .
Select “MID”.
3 - 2 .
Touch
[ ]
key to enter detail setting stage.

14
English
FZ709E
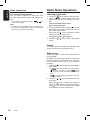
Setting the BBE MP
(
Sound
Enhancement and Restoration for
compressed audio files
)
BBE MP
(
Minimized Polynomial Non-Linear Sat
-
uration
)
Process improves digitally compressed
sound, such as MP3, by restoring and enhancing
the harmonics lost through compression. BBE
MP works by regenerating harmonics from the
source material, effectively recovering warmth,
detail and nuance.
∗
This function is effective for the audio files in the
USB/iPod mode, but it is ineffective for the video
in the USB/iPod mode.
3 - 1 .
Select “BBE MP”.
3 - 2 .
Touch
[ ]
key to enter detail setting stage.
3 - 3 .
Slide along
[
]
slider or touch
[
]
/
[
]
key to select the value in sequence of
“
OFF” “ON”
∗
The factory default setting is “OFF”.
Basic Operations
3 - 3 .
Touch
[
]
/
[
]
key to select Gain
(
“G”
)
,
center frequency
(
“F”
)
or Q factor
(
“Q”
)
.
3 - 4 .
Slide along
[
]
slider or touch
[
]
/
[
]
key to adjust the value.
∗
The factory default setting:
G
: “0”
(
Adjustment range:
+
7 to
-
7
)
F
: “10kHz”
(
Adjustment range: 5k/10k/15k
)
Q
: “1.0”
(
Adjustment range: 0.7/1.0/1.4/2.0
)
3 - 5 .
After completing settings, touch the
[
ENT
]
key to return to the 1
st
selected item.
Adjusting the treble
This adjustment can be performed only when the
BEAT EQ is set to “CUSTOM”.
3 - 1 .
Select “TREBLE”.
3 - 2 .
Touch
[ ]
key to enter detail setting stage.
3 - 5 .
After completing settings, touch the
[
ENT
]
key to return to the 1
st
selected item.

15
English
FZ709E
Basic Operations
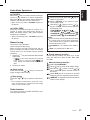
Adjusting the M-BEX
3 - 1 .
Select “M-BEX”.
3 - 2 .
Touch
[ ]
key to enter detail setting stage.
3 - 3 .
Slide along
[
]
slider or touch
[
]
/
[
]
key to turn on or turn off the MAGNA BASS
EXTEND effect.
∗
The factory default setting is “OFF”.
(
Adjustment range: ON/OFF
)
3 - 4 .
After completing settings, touch the
[
ENT
]
key to return to the 1
st
selected item.
Adjusting the fader
3 - 1 .
Select “FADER”.
3 - 2 .
Touch
[ ]
key to enter detail setting stage.
3 - 3 .
Slide along
[
]
slider or touch
[
]
/
[
]
key to adjust the balance of the rear and front
speakers.
∗
The factory default setting is “CENTER”.
(
Adjustment range: FRONT
12 to REAR 12
)
3 - 4 .
After completing settings, touch the
[
ENT
]
key to return to the 1
st
selected item.
Adjusting the balance
3 - 1 .
Select “BALANCE”.
3 - 2 .
Touch
[ ]
k
ey to enter detail setting stage.
3 - 3 .
Slide along
[
]
slider or touch
[
]
/
[
]
key to adjust the balance of the right and left
speakers.
∗
The factory default setting is “CENTER”.
(
Adjustment range: RIGHT
12 to LEFT 12
)
3 - 4 .
After completing settings, touch the
[
ENT
]
key to return to the 1
st
selected item.
When “ON” is set:
3 - 3 - 1 .
Touch
[ ]
key to enter detail setting
stage.
3 - 3 - 2 .
Slide along
[
]
slider or touch
[
]
/
[
]
key to select the value in sequence of
“HIGH” “MID” “LOW”
∗
The factory default setting is “MID”.
3 - 4 .
After completing settings, touch the
[
ENT
]
key to return to the 1
st
selected item.
Adjusting the high pass filter
3 - 1 .
Select “HPF”.
3 - 2 .
Touch
[ ]
key to enter detail setting stage.
3 - 3 .
Slide along
[
]
slider or touch
[
]
/
[
]
key to select the setting in sequence
“60” “90” “120” “THROUGH”
∗
The factory default setting is “THROUGH”.
∗
T
his is supported only with amplifiers
equipped with this function. Output is not
supported from RCA cables.
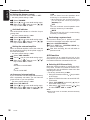
Adjusting the subwoofer output
volume
You can adjust the volume output from the unit’s
subwoofer output terminal.
This
adjustment can be performed only when the
“S-W LPF” is set to “60”, “90” or “120”.
3 - 1 .
Select “S-W VOL”.
3 - 2 .
Touch
[ ]
key to enter detail setting stage.
3 - 3 .
Slide along
[
]
slider or touch
[
]
/
[
]
key to increases or decreases the subwoofer
volume.
∗
The factory default setting is “0”.
(
Adjustment range:
+
6 to
-
6
)
Note:
During SOUND adjustment mode, if no operation
is performed for more than 10 seconds, this mode
can be cancelled and return to previous mode.
Setting the subwoofer
You can set the low pass filter of subwoofer.
3 - 1 .
Select “S-W LPF”.
3 - 2 .
Touch
[ ]
key to enter detail setting stage.
3 - 3 .
Slide along
[
]
slider or touch
[
]
/
[
]
key to select the setting in sequence
“THROUGH” “60” “90” “120”
∗
The factory default setting is “THROUGH”.
∗
When the volume level is more than 30, the
subwoofer volume adjustment value can not
reach
+
6.

16
English
FZ709E
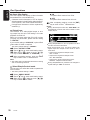
Radio Mode Operations
Listening to the radio
1. Touch the
[ ]
key to switch to Source menu.
2. Select “TUNER” to enter Radio mode. The
frequency or PS and PTY appears in the dis-
play.
PS: Programme service name
PTY: Programme type
3. To select a preset band, touch the
[ ]
key and
then select one of the preset bands such as
FM1, FM2, FM3 or AM1.
Every time the
[ ]
key is touched, the band
switches in the following order:
FM1 FM2 FM3 AM1 FM1...
4. Touch the
[
]
/
[
]
key to tune in the desired
station.
Seek tuning
There are 2 types of seek tuning: DX SEEK and
LOCAL SEEK.
DX SEEK can automatically tune in to receivable
broadcast stations; LOCAL SEEK can tune in to
only broadcast stations with a good reception
sensitivity.
1. Touch the
[ ]
key and select the desired band
(
FM or AM
)
.
∗
If is lit in the display, touch and hold the
[ ]
key for 1 second or longer.
in the
display goes off and seek tuning is now avail
-
able.
∗
If is lit in the display, TP stations are auto-
matically sought.
2. Touch the
[
]
/
[
]
key to start automatic sta
-
tion tuning.
When the
[ ]
key is touched, the station is
sought in the direction of higher frequencies;
if the
[ ]
key is touched, the station is sought
in the direction of lower frequencies.
Tuning
There are 3 types of tuning mode available, seek
tuning, manual tuning and preset tuning.
CT
(
Clock Time
)
function
The CT function receives CT data sent from
an Radio Data System station and displays the
time.
∗
If a CT data is not being received, “ ” ap-
pears in the display.
Note:
CT data is not transmitted in some countries and
by some broadcast stations. Also, in some areas,
the CT may not display accurately.
Basic Operations

17
English
FZ709E
DX SEEK
When the
[ ]
key is touched, search will be per-
forming in the direction of higher frequencies.
When the
[ ]
key is touched, search will be per-
formed in the direction of lower frequencies.
∗
When seek tuning starts, “DX SEEK” appears in
the display.
Step tuning
Touch the
[
]
/
[
]
key to perform manual tun
-
ing.
∗
If no operation is performed for more than 7 sec
-
onds, manual tuning is cancelled and the display
returns to the previous mode.
Quick tuning
Touch and hold the
[
]
/
[
]
key for 1 second or
longer to begin station tuning.
Radio function
You need to enter the TUNER OPTION to per-
form the Radio function.
Manual tuning
There are 2 ways available:
Quick tuning and step tuning.
When you are in the step Tuning mode, the fre
-
quency changes one step at a time. In the Quick
Tuning mode, you can quickly tune the desired
frequency.
1. Touch the
[ ]
key and select the desired band
(
FM or AM
)
.
∗
If is not lit in the display, touch and hold
the
[ ]
key for 1 second or longer.
is lit
in the display and manual tuning is now avail
-
able.
2. Tune into a station.
LOCAL SEEK
If the key is touched and held in position for 1
second or longer, local seek tuning will be en-
abled. Broadcast stations with good reception
sensitivity are selected.
∗
When local seeking starts, “LO SEEK” appears in
the display.
Radio Mode Operations
Preset memory function
Preset memory function can store up to 24 sta-
tions: Six stations for each of FM1, FM2, FM3,
and AM1.
TUNER OPTION
1 . During Tuner mode, touch the
[ ]
key to
switch to ADJ menu.
2 . Select “OPTION” in the menu to enter
Tuner Option mode.
3 . Slide along
[
]
slider or touch
[
]
/
[
]
key, the TUNER OPTION mode changed
as following order:
“P.CH MEMORY
”
(
“PTY”
“PTY SELECT
” “AF” “REG”
)
“LANGUAGE” “PRESET SCAN”
“AUTO STORE” “P.CH MEMORY”...
Notes:
Items in bracket
(
PTY, PTY SELECT, AF, REG
)
are called Radio Data System Adjustment
mode. Please refer to page 20 for Radio Data
System Adjustment mode.
“PTY SELECT” only available when “
PTY” is
on.
“
REG” only available when “AF” is on.
Manual memory function
3 - 1 .
Select “P.CH MEMORY”.
3 - 2 .
Touch
[ ]
key to enter detail setting stage.
3 - 3 .
Slide along
[
]
slider or touch
[
]
/
[
]
key to select the preset channel number to
be stored.
3 - 4 .
Touch
[
ENT
]
key for 2 seconds to store the
frequency into the selected preset channel.
3 - 5 .
“MEMORY” is displayed for 2 seconds before
revert to main display.

18
English
FZ709E
Radio Mode Operations
Auto store
Auto store is a function for storing up to 6 stations
that are automatically tuned in sequentially. If 6
receivable stations cannot be received, a previ-
ously stored station remains un-overwritten at
the memory position.
3 - 1 .
Select “AUTO STORE”.
3 - 2 .
Touch
[
ENT
]
key to start performing auto
store function.
3 - 3 .
The stations with good reception are stored
automatically to the preset channels.
∗
If auto store is performed in the FM bands,
the stations are stored in FM3 even if FM1 or
FM2 was chosen for storing stations.
∗
“AUTO STORE” will appears in the display.
Preset scan
Preset scan receives the stations stored in pre-
set memory in order. This function is useful when
searching for a desired station in memory.
3 - 1 .
Select “PRESET SCAN”.
3 - 2 .
Touch
[
ENT
]
key to start scan preset chan
-
nel.
3 - 3 .
When a desired station is tuned in, touch
the
[
]
/
[
]
key to continue receiving that
station.
Recalling a preset station
A total of 24 preset positions
(
6-FM1, 6-FM2, 6-
FM3, 6-AM1
)
exists to store individual radio sta
-
tions in memory.
1. Touch the
[ ]
key to select the desired band.
2. Slide along
[
]
slider or touch
[
]
/
[
]
key
to select the desired preset station.
3. Touch
[
ENT
]
key to recall the stored radio
frequency.

19
English
FZ709E
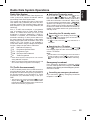
Radio Data System Operations
Radio Data System
This unit has a built-in Radio Data System de-
coder system that supports broadcast stations
transmitting Radio Data System data.
This system can display the name of the broad
-
cast station being received
(
PS
)
and can auto
-
matically switch to the broadcast station with the
best reception as you move long distances
(
AF
switching
)
.
Also, if a traffic announcement or programme
type is broadcast from an Radio Data System
station, no matter what mode you are in, this
broadcast is received. Additionally, if EON in
-
formation is received, this information enables
automatic switching of other preset stations on
the same network and interruption of the station
being received with traffic information from other
stations
(
TP
)
. This function is not available in
some areas. When using the Radio Data System
function, always set the radio to FM mode.
AF : Alternative Frequency
PS : Programme Service Name
PTY : Programme Type
EON : Enhanced Other Network
TP : Traffic Programme
∗
Radio Data System interrupt does not function
during AM radio reception.
∗
When set receives Radio Data System signal, and
can read PS data, PS appears in the display.
TA
(
Traffic Announcement
)
In the TA standby mode, when a traffic announce-
ment broadcast starts, the traffic announcement
broadcast is received as top priority regardless of
the Function mode so you can listen to it. Traffic
programme
(
TP
)
automatic tuning is also pos
-
sible.
∗
This function can only be used when
is lit in the
display. When is lit, this means that the Radio
Data System broadcast station being received has
traffic announcement programmes.
Setting the TA standby mode
If you touch the
[
]
key when only
is lit in
the display, and light in the display and
the unit is set into the TA standby mode until a
traffic announcement is broadcast. When a traf-
fic announcement broadcast starts, “TRA INFO”
appears in the display. If you touch the
[
]
key
while a traffic announcement broadcast is being
received, the traffic announcement broadcast re
-
ception is cancelled and the unit goes into the TA
standby mode.
Searching for a TP station
When is not lit, if you touch the
[
]
key,
in the display lights and the unit automatically re-
ceives a TP station.
Note:
If a TP station is not received, the unit continues the
search operation. Touch
[
]
key again goes off
in the display and stops TP station searching.
Cancelling an emergency broadcast
If you touch the
[ ]
key, emergency broadcast
reception is cancelled.
Cancelling the TA standby mode
As and lit in the display, touch the
[
]
key. The in the display goes off and the TA
standby mode is cancelled.
∗
If
is not lit, touch the
[
]
key searches for a
TP station.
Emergency broadcast
If an emergency broadcast is received, all the
Function mode operations are stopped. “ALARM”
appears in the display and the emergency broad-
cast can be heard.

20
English
FZ709E
TUNER OPTION
Radio Data System Operations
Radio Data System Adjustment
mode
Radio Data System function
You need to enter the TUNER OPTION to per-
form the Radio Data System function.
1 . During Tuner mode, touch the
[ ]
key to
switch to ADJ menu.
2 . Select “OPTION” in the menu to enter
TUNER OPTION mode.
3 . Slide along
[
]
slider or touch
[
]
/
[
]
key, the TUNER OPTION mode changed
as following order:
“P.CH MEMORY
”
(
“PTY”
“PTY SELECT
” “AF” “REG”
)
“LANGUAGE” “PRESET SCAN”
“AUTO STORE” “P.CH MEMORY”...
Notes:
Item in bracket
(
PTY, PTY SELECT, AF, REG
)
are called Radio Data System Adjustment
mode.
“PTY SELECT” only available when “
PTY” is
on.
“
REG” only available when “AF” is on.
ON
“PTY” in the display lights and PTY standby
mode is turned on. When the selected
PTY broadcast starts, the PTY item name
appears in the display.
PTY
This function enables you to listen to a broadcast
of the selected programme type even if the unit is
on a Function mode other than radio.
∗
Some countries do not yet have PTY broadcast.
∗
In the TA standby mode, a TP station has priority
over a PTY broadcast station.
∗
The factory default setting is “
OFF”.
3 - 1 .
Select “PTY”.
3 - 2 .
Touch
[ ]
key to enter detail setting stage.
3 - 3 .
Slide along
[
]
slider or touch
[
]
/
[
]
key to select “ON” or “OFF”.
3 - 4 .
After completing settings, touch the
[
ENT
]
key to return to the 1
st
selected item.
OFF
“PTY” in the display goes off and PTY
standby mode is cancelled.
Cancelling a PTY interrupt broadcast
Touch the
[
]
key during the PTY interrupt
broadcast, the PTY interrupt is cancelled
and the unit returns to PTY standby mode.
Selecting PTY
3 - 1 .
Select “PTY SELECT”.
3 - 2 .
Touch
[ ]
key to enter detail setting stage.
3 - 3 .
Slide along
[
]
slider or touch
[
]
/
[
]
key to select the desired PTY.
Volume setting of TA, emergency
broadcast
(
ALARM
)
and PTY
The volume for TA, ALARM and PTY interrupts
can be set during TA, ALARM or PTY interrupt.
∗
The factory default setting for this volume is “VOL
15”.
During a TA, ALARM or PTY interrupt, slide the
[
]
slider to set the volume to the desired level
(
0 to 33
)
.
∗
When the TA, ALARM or PTY interrupt ends, the
volume returns to the level it had before the inter
-
rupt.

21
English
FZ709E
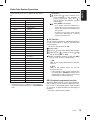
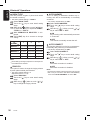
There are 29 types of PTY below can be select-
ed.
PTY item
ENGLISH
News
Affairs
Info
Sport
Educate
Drama
Culture
Science
Varied
Pop M
Rock M
Easy M
Light M
Classics
Other M
Weather
Finance
Children
Social
Religion
Phone In
Travel
Leisure
Jazz
Country
Nation M
Oldies
Folk M
Document
CONTENTS
News
Today’s events
Information
Sports
Education
Drama
Culture
Science
Variety
Pop music
Rock music
Easy music
Light music
Classics
Other music
Weather
Finance
For children
Social
Religion
Phone in
Travel
Leisure
Jazz
Country
Nation music
Oldies
Folk music
Documentaries
∗
During PTY list, if no operation is performed for 7
seconds, the display will return to 1
st
“PTY SELECT”
item.
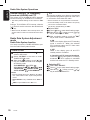
Radio Data System Operations
AF function
The AF function switches to a different frequency
on the same network in order to maintain opti-
mum reception.
∗
The factory default setting is “ON”.
3 - 1 .
Select “AF”.
3 - 2 .
Touch
[ ]
key to enter detail setting stage.
3 - 3 .
Slide along
[
]
slider or touch
[
]
/
[
]
key to select “ON” or “OFF”.
3 - 4 .
After completing settings, touch the
[
ENT
]
key to return to the 1
st
selected item.
ON
“AF” in the display lights and AF function
turns on.
OFF
“AF” in the display goes off and AF
function turns off.
∗
If the reception of the current broadcast sta
-
tion deteriorates, “
SEARCH” appears in the
display and the radio searches for the same
programme on another frequency.
REG
(
Regional programme
)
function
When the REG function is ON, the optimum re-
gional station can be received. When this func-
tion is OFF, if the regional station area switches
as you drive, a regional station for that region is
received.
∗
The factory default setting is “OFF”.
PTY seek
3 - 4 .
Touch the
[ ]
key to search for a
PTY broadcast in the direction of
higher frequencies; touch the
[
]
key to search in the direction of lower
frequencies.
3 - 5 .
“PTY SEEK” is displayed.
∗
If no station with the selected PTY
broadcast can be received, the unit
returns to the previous selected PTY in
the PTY list.
∗
If station is found, PTY name and PS
name will be displayed for 7 seconds
before back to PTY list.

22
English
FZ709E
Auto store function for TP stations
You can automatically store up to 6 TP stations
into preset memory. If the number of TP can be
received less than 6, broadcast stations already
stored in memory and left without being overwrit-
ten.
3 - 1 .
As lit in the display, select “AUTO
STORE”.
3 - 2 .
Touch
[
ENT
]
key to start performing auto
store function.
3 - 3 .
The stations with good reception are stored
automatically to the preset channels.
∗
Even if you select FM1 or FM2, a TP station
is stored into memory for FM3.
Switching the PTY display language
You can select one of 4 languages
(
English,
Deutsch, Svenska, Francais
)
for the PTY dis
-
played in the display.
∗
The factory default setting is “English”.
3 - 1 .
Select “LANGUAGE”.
3 - 2 .
Touch
[ ]
key to enter detail setting stage.
3 - 3 .
Slide along
[
]
slider or touch
[
]
/
[
]
key to select desired language.
3 - 4 .
After completing settings, touch the
[
ENT
]
key to return to the 1
st
selected item.
Radio Data System Operations
Notes:
This function is disabled when a national station
such as BBC R2 is being received.
The REG function ON/OFF setting is valid when
the AF function is ON.
3 - 1 .
Select “REG”.
3 - 2 .
Touch
[ ]
key to enter detail setting stage.
3 - 3 .
Slide along
[
]
slider or touch
[
]
/
[
]
key to select “ON” or “OFF”.
3 - 4 .
After completing settings, touch the
[
ENT
]
key to return to the 1
st
selected item.
OFF
“REG” in the display goes off and REG
function turns off.
Manually tuning a regional station in
the same network
1. This function is valid when the AF func-
tion is ON and the REG function is OFF.
Note:
This function can be used when a regional
broadcast of the same network is received.
2. Slide along
[
]
slider or touch
[
]
/
[
]
key to call out the regional station.
3. If the reception condition of the called out
station is bad, slide along
[
]
slider or
touch
[
]
/
[
]
key to select the same
number. The unit receives a local station
on the same network.
ON
“REG” in the display lights and REG function
turns on.

23
English
FZ709E
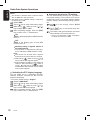
USB Operations
USB memory device operation
About USB memory
USB is an acronym for Universal Serial Bus, and
refers to an external bus standard supporting
data transfer rates of 12 Mbps.
This unit is compatible with USB 1.1/2.0 with
maximum data transfer rates of 12 Mbps.
USB memory devices that can be played by
connecting to the unit’s USB cable are limited
to those recognized as “USB mass storage
class devices”; operation is not guaranteed
with all USB memory devices.
∗
Devices compatible with “USB Mass Storage
Class” can be used merely by connecting to the
host device, without need for special drivers or
application software.
Consult the manufacturer of your USB memory
device for information regarding whether it
is supported by “USB Mass Storage Class”
standards.
Audio files playable on this unit are limited to
MP3/WMA/AAC files.
To prevent the accidental loss of data, always
back up important data on your computer.
This unit does not support connections to a com
-
puter. In addition, connections made through a
USB hub device are also not supported.
When a USB memory device is composed of
two or more drives, only one of the drives will
be detected.
USB memory devices with security functions
cannot be played.
The order in which tracks are recorded may dif
-
fer depending on the USB memory device con-
nected
(
the actual playback order may not be
the same as that indicated on your computer’s
display
)
.
If you continuously operate folder up/down, the
play time keeps as “
00:00”, and the sound is
not emitted.
What is MP3?
MP3 is an audio compression method and clas-
sified into audio layer 3 of MPEG standards. This
audio compression method has penetrated into
PC users and become a standard format. This
MP3 features the original audio data compres-
sion to about 10 percent of its initial size with a
high sound quality. This means that several mu-
sic CDs can be recorded on a USB memory de-
vice to allow a long listening time
∗
.
∗
Depends on the USB memory device storage
capacity.
To disable DRM
(
Digital Rights Management
)
1. When using Windows Media Player 9/10/11,
click on TOOL OPTIONS MUSIC RE-
CORD tab, then under Recording settings, un-
click the check box for RECORD PROTECTED
MUSIC. Then, reconstruct files.
Personally constructed WMA files are used at
your own responsibility.
What is WMA?
WMA is the abbreviation of Windows Media Au-
dio, an audio file format developed by Microsoft
Corporation.
Notes:
If you play a file with DRM
(
Digital Rights Manage
-
ment
)
for WMA remaining ON, no audio is output
(
The “--:--” and indicator blinks for 5 seconds
and go to next track
)
.
Windows Media
TM
, and the Windows
®
logo are
trademarks, or registered trademarks of Microsoft
Corporation in the United States and/or other
countries.

24
English
FZ709E
USB Operations
Number of files or folders
1. Up to 255 files per folder can be recognized.
Up to 512 folders can be recognized and up
to total of 130560 files can played.
2. Tracks are played in the order that they were
recorded onto a USB.
(
Tracks might not always
be played in the order displayed on the PC.
)
3. Some noise may occur depending on the type
of encoder software used while recording.
CAUTION
!
Insert and remove a USB memory device
only when the device is not being accessed.
Connecting or disconnecting the device at
the following times may result in the loss of
data:
- If the USB memory device is removed or
power is disconnected during writing to
the device.
- When the device is subjected to static
electricity or electric noise.
Do not leave a USB memory device unat
-
tended in an automobile. Exposure to direct
sunlight or high temperatures may cause
deformation or other malfunction of the USB
memory device.
Folder structure
1. A USB with a folder having more than 8 hier-
archical levels will be impossible.
File extensions
1. Always add a file extension “.MP3”, “.WMA”
or “.M4A” to MP3, WMA or AAC file by using
single byte letters. If you add a file extension
other than specified or forget to add the file
extension, the file cannot be played.
2. Files without MP3/WMA/AAC data will not play.
The indication “NO FILE” appears in the play
time display if you attempt to play files without
MP3/WMA/AAC data.
∗
When VBR files are played, the play time display
may differ the play location.
∗
When MP3/WMA/AAC files are played, a little
no sound part is caused between tunes.
Precautions when creating MP3/
WMA/AAC file
Usable sampling rates and bit rates
See “USB”
(
page 43
)
for details.
What is AAC?
AAC is an acronym for “Advanced Audio
Coding” and refers to the audio compression
method used with video compression standards
MPEG-2 and MPEG-4.
AAC files composed with the following condi
-
tions can be played:
AAC files encoded with iTunes.
iTunes Ver. 7.0 or earlier.
File extension “
.m4a”
(
“.M4A”
)
Tracks purchased at an iTunes Store, and
copyright-protected files cannot be played.
When playing AAC files that include image data,
additional time may be required before playback
begins.
Files may not play properly, depending on the
iTunes version under which an AAC file is en
-
coded.
Logical format
(
File system
)
1. When writing MP3/WMA/AAC file, please
select “FAT12”, “FAT16” or “FAT32” as the
file system format. Normal play may not be
possible if the files are recorded on another
format.
2. The folder name and file name can be dis
-
played as the title during MP3/WMA/AAC
play but the title must be within 64 single byte
alphabetical letters and numerals
(
including an
extension
)
.
3. Do not affix a name to a file inside a folder
having the same name.
Note:
File names in small letters with less than 8 charac
-
ters
(
not including file extension
)
will be displayed
in capital letters.
Page is loading ...
Page is loading ...
Page is loading ...
Page is loading ...
Page is loading ...
Page is loading ...
Page is loading ...
Page is loading ...
Page is loading ...
Page is loading ...
Page is loading ...
Page is loading ...
Page is loading ...
Page is loading ...
Page is loading ...
Page is loading ...
Page is loading ...
Page is loading ...
Page is loading ...
Page is loading ...
-
 1
1
-
 2
2
-
 3
3
-
 4
4
-
 5
5
-
 6
6
-
 7
7
-
 8
8
-
 9
9
-
 10
10
-
 11
11
-
 12
12
-
 13
13
-
 14
14
-
 15
15
-
 16
16
-
 17
17
-
 18
18
-
 19
19
-
 20
20
-
 21
21
-
 22
22
-
 23
23
-
 24
24
-
 25
25
-
 26
26
-
 27
27
-
 28
28
-
 29
29
-
 30
30
-
 31
31
-
 32
32
-
 33
33
-
 34
34
-
 35
35
-
 36
36
-
 37
37
-
 38
38
-
 39
39
-
 40
40


Ask a question and I''ll find the answer in the document
Finding information in a document is now easier with AI
Related papers
Other documents
-
Nissan i1121e-s AM-FM Radio User manual
-
Grundig UMS 4700 SPCD User manual
-
Sentry Industries PR199 User manual
-
Poly Planar MRR5 Owner's manual
-
Blaupunkt Hamburg MP68 Owner's manual
-
NGS TP-SPEAK-0025 Datasheet
-
BBE BMAX Bass Preamp Owner's manual
-
KIA T9JM User manual
-
-
SMSL A50 User manual