AEG BE7314401 User manual

Category
Cookers
Type
User manual

This manual is also suitable for

Aeg-Electrolux BE7314401 is a user-friendly oven with various functions to make cooking easier and more enjoyable. It features an electronic programmer with a display that shows the time, temperature, and cooking functions. The oven also has a core temperature sensor to accurately measure the internal temperature of food. Additionally, it comes with a range of accessories, including a wire shelf, baking tray, combi pan, and telescopic runners, providing versatility for different cooking needs.

Aeg-Electrolux BE7314401 is a user-friendly oven with various functions to make cooking easier and more enjoyable. It features an electronic programmer with a display that shows the time, temperature, and cooking functions. The oven also has a core temperature sensor to accurately measure the internal temperature of food. Additionally, it comes with a range of accessories, including a wire shelf, baking tray, combi pan, and telescopic runners, providing versatility for different cooking needs.

BE7314401
EN
OVEN USER MANUAL
FOR PERFECT RESULTS
Thank you for choosing this AEG product. We have created it to give you
impeccable performance for many years, with innovative technologies that help
make life simpler – features you might not find on ordinary appliances. Please
spend a few minutes reading to get the very best from it.
ACCESSORIES AND CONSUMABLES
In the AEG webshop, you’ll find everything you need to keep all your AEG
appliances looking spotless and working perfectly. Along with a wide range of
accessories designed and built to the high quality standards you would expect,
from specialist cookware to cutlery baskets, from bottle holders to delicate
laundry bags…
Visit the webshop at:
www.aeg.com/shop
2
CONTENTS
4 Safety information
5 Safety instructions
8 Product description
10 Before first use
11 Control panel
13 Daily use
15 Clock functions
17 Automatic programmes
18 Using the accessories
21 Additional functions
24 Care and cleaning
27 What to do if…
28 Technical data
29 Environment concerns
The following symbols are used in this user
manual:
Important information concerning your
personal safety and information on how to
avoid damaging the appliance.
General information and tips
Environmental information
Subject to change without notice.
Contents
3
SAFETY INFORMATION
Before the installation and use of the appliance, carefully read the
supplied instructions. The manufacturer is not responsible if an incor-
rect installation and use causes injuries and damages. Always keep the
instructions with the appliance for future reference.
Children and vulnerable people safety
WARNING!
Risk of suffocation, injury or permanent disability.
This appliance can be used by children aged from 8 years and above
and persons with reduced physical, sensory or mental capabilities or
lack of experience and knowledge if they are supervised by an adult
or a person who is responsible for their safety.
Do not let children play with the appliance.
Keep all packaging away from children.
Keep children and pets away from the appliance when it operates
or when it cools down. Accessible parts are hot.
If the appliance has a child safety device, we recommend that you
activate it.
Cleaning and user maintenance shall not be made by children with-
out supervision.
General Safety
Internally the appliance becomes hot when in operation. Do not
touch the heating elements that are in the appliance. Always use
oven gloves to remove or put in accessories or ovenware.
Do not use a steam cleaner to clean the appliance.
Before maintenance cut the power supply.
Do not use harsh abrasive cleaners or sharp metal scrapers to clean
the glass door since they can scratch the surface, which may result
in shattering of the glass.
Only use the core temperature sensor recommended for this appli-
ance.
4 Safety information
To remove the shelf supports first pull the front of the shelf support
and then the rear end away from the side walls. Install the shelf
supports in the opposite sequence.
SAFETY INSTRUCTIONS
Installation
WARNING!
Only a qualified person must install this appliance.
Remove all the packaging.
Do not install or use a damaged appliance.
Obey the installation instruction supplied with the appliance.
Always be careful when you move the appliance because it is heavy. Always wear safety
gloves.
Do not pull the appliance by the handle.
Keep the minimum distance from the other appliances and units.
Make sure that the appliance is installed below and adjacent safe structures.
The sides of the appliance must stay adjacent to appliances or to units with the same
height.
Electrical connection
WARNING!
Risk of fire and electrical shock.
All electrical connections should be made by a qualified electrician.
The appliance must be earthed.
Make sure that the electrical information on the rating plate agrees with the power sup-
ply. If not, contact an electrician.
Always use a correctly installed shockproof socket.
Do not use multi-plug adapters and extension cables.
Make sure not to cause damage to the mains plug and to the mains cable. Contact the
Service or an electrician to change a damaged mains cable.
Do not let mains cables to come in touch with the appliance door, specially when the
door is hot.
The shock protection of live and insulated parts must be fastened in such a way that it
cannot be removed without tools.
Connect the mains plug to the mains socket only at the end of the installation. Make
sure that there is access to the mains plug after the installation.
If the mains socket is loose, do not connect the mains plug.
Do not pull the mains cable to disconnect the appliance. Always pull the mains plug.
Safety instructions
5
Use only correct isolation devices: line protecting cut-outs, fuses (screw type fuses re-
moved from the holder), earth leakage trips and contactors.
The electrical installation must have an isolation device which lets you disconnect the
appliance from the mains at all poles. The isolation device must have a contact opening
width of minimum 3 mm.
Use
WARNING!
Risk of injury, burns or electric shock or explosion.
Use this appliance in a household environment.
Do not change the specification of this appliance.
Make sure that the ventilation openings are not blocked.
Do not let the appliance stay unattended during operation.
Deactivate the appliance after each use.
Internally the appliance becomes hot when in operation. Do not touch the heating ele-
ments that are in the appliance. Always use oven gloves to remove or put in accessories
or ovenware.
Be careful, when you open the appliance door while the appliance is in operation. Hot air
can release.
Do not operate the appliance with wet hands or when it has contact with water.
Do not apply pressure on the open door.
Do not use the appliance as a work surface or as a storage surface.
Always keep the appliance door closed when the appliance is in operation.
Open the appliance door carefully. The use of ingredients with alcohol can cause a mix-
ture of alcohol and air.
Do not let sparks or open flames to come in contact with the appliance when you open
the door.
Do not put flammable products or items that are wet with flammable products in, near
or on the appliance.
WARNING!
Risk of damage to the appliance.
To prevent damage or discoloration to the enamel:
– Do not put ovenware or other objects in the appliance directly on the bottom.
– Do not put aluminium foil directly on the bottom of the appliance.
– do not put water directly into the hot appliance.
– do not keep moist dishes and food in the appliance after you finish the cooking.
– be careful when you remove or install the accessories.
Discoloration of the enamel has no effect on the performance of the appliance. It is not
a defect in the sense of the warranty law.
Use a deep pan for moist cakes. Fruit juices cause stains that can be permanent.
6 Safety instructions
Care and Cleaning
WARNING!
Risk of injury, fire or damage to the appliance.
Before maintenance, deactivate the appliance and disconnect the mains plug from the
mains socket.
Make sure the appliance is cold. There is the risk that the glass panels can break.
Replace immediately the door glass panels when they are damaged. Contact the Service.
Be careful when you remove the door from the appliance. The door is heavy!
Clean regularly the appliance to prevent the deterioration of the surface material.
Remaining fat or food in the appliance can cause fire.
Clean the appliance with a moist soft cloth. Only use neutral detergents. Do not use
abrasive products, abrasive cleaning pads, solvents or metal objects.
If you use an oven spray, obey the safety instructions on the packaging.
Do not clean the catalytic enamel (if applicable) with any kind of detergent.
Internal light
The type of light bulb or halogen lamp used for this appliance, is only for household ap-
pliances. Do not use it for house lighting.
WARNING!
Risk of electrical shock.
Before replacing the lamp, disconnect the appliance from the power supply.
Only use lamps with the same specifications.
Disposal
WARNING!
Risk of injury or suffocation.
Disconnect the appliance from the mains supply.
Cut off the mains cable and discard it.
Remove the door catch to prevent children and pets to get closed in the appliance.
Safety instructions
7
PRODUCT DESCRIPTION
General overview
2
1
10
4
3
5
6
7
8
9
5
4
3
2
1
1
Control panel
2
Electronic programmer
3
Socket for the core temperature sensor
4
Heating element
5
Oven lamp
6
Fan
7
Rear wall heating element
8
Bottom heat
9
Shelf support, removable
10
Shelf positions
8 Product description
Accessories
Wire shelf
For cookware, cake tins, roasts.
Baking tray
For cakes and biscuits.
Combi pan
For cake and biscuits. To bake and roast or as
pan to collect fat.
Core Temperature Sensor
To measure how far the food is cooked.
Product description 9
Telescopic runners
For shelves and trays.
BEFORE FIRST USE
WARNING!
Refer to "Safety information" chapter.
Initial Cleaning
Remove all parts from the appliance.
Clean the appliance before first use.
Refer to chapter "Care and Cleaning".
First connection to the mains
After first connection to the mains all symbols in the display are on for some seconds. For
the subsequent few seconds the display shows software version.
First setting the time of day
After the software version goes off, the display shows "h" and "12:00".
Setting the time of day:
1. Touch
or to set hours.
2. Touch
or .
3. Touch
or to set minutes.
4. Touch
or .
The Temperature/Time display shows new time.
Changing the time of day
You can change the time of day only if the appliance is off.
Touch
. flashes in the display. To set new time of day use the above procedure.
10 Before first use
CONTROL PANEL
Electronic programmer
1
2 3 4 5 6 7 8 9 10
Use the sensor fields to operate the appliance.
Sensor Field Function Description
1
- DISPLAY Shows the current settings of the appliance.
2
ON / OFF To activate and deactivate the appliance.
3
OPTIONS To set an oven function or programme.
Straight access to the oven function when the
appliance is off.
4
MY FAVOURITE PRO-
GRAMME
You can store your favourite programme. Use it
to access your favourite programme directly, also
when the appliance is off.
5
TEMPERATURE / FAST
HEAT UP
To set and examine cavity temperature or core
temperature sensor temperature. If you press it
and hold for three seconds, it turns Fast heat up
function ON and OFF.
Straight access to the temperature setting of
the first oven function when the appliance is
off.
6
UP, DOWN To choose an oven function, clock function and
to set the minute minder, temperature or time of
day.
7
OK To confirms the selection or setting.
8
OVEN LIGHT To set the oven lamp on or off.
9
CLOCK To set the clock function.
10
MINUTE MINDER To set the minute minder.
Control panel 11
Display
6
1 2 3
5 47
1
Oven function symbol
2
Temperature / Time display
3
Clock / Residual heat display (also Minute minder and Time of day)
4
Residual heat indicator
5
Indicators for the clock functions (refer to the table "Clock functions")
6
Heat up indicator
7
Number of oven function / programme
Other indicators of display
Symbols Name Description
Options You can choose an oven function.
Automatic programme You can choose an oven programme.
My favourite programme The favourite programme operates.
/
kgr / gr An oven programme with weight input operates.
/
h / min A clock function operates.
Temperature / fast heat up The function operates.
Temperature You can examine or change the temperature.
Core temperature sensor The core temperature sensor is in the core temperature
sensor socket.
Oven light The light is off.
Minute minder The minute minder function operates.
Heat up indicator
If you set an oven function, the bars in the display come on one by one. The bars show
that the temperature in the appliance increases or decreases.
When the appliance is at the set temperature Heat up indicator goes off the display.
12 Control panel
DAILY USE
WARNING!
Refer to "Safety information" chapter.
To operate the appliance you can use:
The manual mode - to set an oven function, the temperature and the cooking time
manually.
automatic programmes - to prepare a dish when you do not have knowledge or experi-
ence in cooking.
Setting the oven function
1. Touch .
The display shows a preset temperature, symbol and number of the oven function.
flashes in the display.
2. Touch
or to set an oven function.
3. Touch
or the appliance starts automatically after five seconds.
If you activate the appliance with or and do not set any oven function or programme
the appliance will deactivate automatically after 20 seconds.
Oven function Application
1 True Fan Cooking To bake maximum on three shelf positions at the same time.
Decrease the oven temperatures (20 - 40 °C) compared with
Conventional Cooking. Also to dry food.
2 Pizza Setting To bake on one shelf position food with a more intensive
browning and a crispy base. Decrease the oven temperatures
(20 - 40 °C) compared with Conventional Cooking.
3 Slow Cook To prepare very lean, tender roasted food.
4 Conventional
Cooking
To bake and roast food on one shelf position.
5 Frozen Foods To make your convenience food like e.g. French Fries, Wedg-
es, spring rolls crispy.
6 Turbo Grilling To roast larger meat joints or poultry with bones on one
shelf position. Also to brown food, for example gratin.
7 Fast Grilling To grill flat food in large quantities. To toast bread.
8 Grilling To grill flat food in the middle of the grill. To toast bread.
9 Keep Warm To keep food warm.
Daily use 13
Oven function Application
10 Defrost To defrost frozen food.
11 Bottom Heat To bake cakes with a crispy base, and for the food preserva-
tion.
12 ECO Roasting The ECO functions let you optimize the energy consumption
during cooking. It is necessary to set the cooking time first.
To get more information about the recommended settings,
refer to the cooking tables with the equivalent oven func-
tion.
Changing the oven temperature
Touch / to change the temperature in steps of 5 °C.
When the appliance is at the set temperature, an acoustic signal operates three times and
the Heat up indicator goes off.
Examining the oven temperature
You can examine the temperature in the appliance when the function or programme oper-
ates.
1. Touch
.
The Temperature / Time display shows the temperature in the appliance.
If you want to change the oven temperature, touch one more time and use or .
2. Touch
to go back to the set temperature or the display will show it automatically
after five seconds.
Fast heat up function
The fast heat up function decreases the heat up time.
Do not put food in the oven when the fast heat up function operates.
Activating the fast heat up function: Touch and hold
for more then three seconds.
If you activate the fast heat up function, the bars on the display
flash one by one to
show that the function operates.
The fast heat up is not available with every oven function. An acoustic signal operates if the
fast heat up is not available for set function.
Energy saving
The appliance has some features that help you save energy during everyday cooking:
Residual heat:
the oven function or programme operates: the heating elements are deactivated 10%
time earlier (the lamp and fan continue to operate). The condition: the cooking time is
longer then 30 minutes or you use the clock functions (Duration, End, Time delay).
14 Daily use
the oven is off: you can use the heat to keep the food warm. The indication: the clock/
Residual heat display shows the remaining temperature, the bars show the decreasing
temperature.
Oven lamp off - touch
to deactivate the oven lamp during cooking;
Display off - if necessary, deactivate the appliance. Touch
and at the same time
until the display goes out (or on).
Eco functions - refer to "Oven function".
CLOCK FUNCTIONS
SYMBOL FUNCTION DESCRIPTION
COUNT UP TIMER To set count up. It shows how long the appliance operates.
This function has no effect on the operation of the appliance.
TIME OF DAY To examine the time of day. For changing the time of day re-
fer to 'Setting the time of day'.
DURATION To set how long the appliance operates.
END To set when the appliance deactivates. You can use Duration
and End at the same time (Time delay), if the appliance is to
be activate and deactivate automatically later.
SET+GO To start the appliance with necessary settings with only one
touch of the sensor field, any time later.
Count Up Timer
Use the Count Up Timer to monitor how long the appliance operates. It is on immediately
when the appliance starts to heat.
Reset the Count Up Timer: touch
again and again until flashes in the display. Touch
until the display shows "00:00" and the Count Up Timer starts to count up again.
You can not use Count Up Timer when Duration or End is set.
Setting the DURATION
1. Activate the appliance and set an oven function and temperature.
2. Touch
again and again until the dis-
play shows
.
flashes in the display.
3. Use
or to set minutes for DURA-
TION.
4. Touch
to confirm
5. Use
or to set hours for DURATION.
If you touch or during setting hours for DURATION, the appliance goes to setting of
the END function.
Clock functions 15
6. When the set time ends, an acoustic signal operates for two minutes.
symbol and time setting flash in the display. The appliance deactivates.
Touch any sensor field or open the oven door to stop an acoustic signal.
7. Deactivate the appliance.
Setting the END
1. Activate the appliance and set an oven function and temperature.
2. Touch
again and again until the display shows .
flashes in the display.
3. Use
or to set END (first you set minutes and then hours) and or to
confirm.
4. When the set time ends, an acoustic signal operates for two minutes.
symbol and time setting flash in the display. The appliance deactivates.
5. Touch any sensor field or open the oven door to stop an acoustic signal.
6. Deactivate the appliance.
Setting the SET+GO
To start of the appliance with necessary settings with only one touch of the sensor field,
any time later.
1. Set an oven function (or programme) and temperature (refer to "Setting the oven
function" and "Changing the oven temperature").
2. Set DURATION (refer to "Setting the DURATION").
3. Touch
again and again until will flash in the display.
4. Touch
to set the SET+GO function.
The display shows
and with a dot. This dot shows which clock function is activa-
ted.
5. Touch any sensor field (apart from ON/OFF) to start the SET+GO function.
You can use SET+GO function only if DURATION is set.
Check result (selected models only)
If you set END or DURATION function, 2 minutes before end of cooking an acoustic signal
sounds and lamp activates. The appliance goes to the setting of the END or DURATION
function. During these two minutes you can examine the cooking results and, if necessary,
add END or DURATION time.
Setting the MINUTE MINDER
Use the MINUTE MINDER to set a countdown (maximum 23 h 59 min). This function has no
effect on the operation of the oven. You can set the MINUTE MINDER any time, also if the
appliance is off.
1. Touch
.
and "00" flash in the display.
16 Clock functions
2. Use or to set MINUTE MINDER.
First you set seconds and then minutes
and hours.
3. Touch
or the MINUTE MINDER starts
automatically after five seconds.
4. When set time ends, an acoustic signal
operates for two minutes and "00:00"
and
flash in the display.
5. Touch any sensor field or open the oven door to stop an acoustic signal.
Setting the Time delay function
DURATION and END can be used at the same time, if the oven is to be switched on
and off automatically later. In this case first set DURATION
and then END function
(refer to "Setting the DURATION" and "Setting the END ").
When the Time delay function is activated the display shows static symbol of the oven
function,
with a dot and . The dot shows which clock function is on in the Clock/
Residual heat display.
AUTOMATIC PROGRAMMES
WARNING!
Refer to "Safety information" chapter.
There are 20 automatic programmes and recipes. Use an automatic programme or recipe
when you do not have a knowledge or experience how to prepare a dish. You can find the
recipes for the automatic programmes in the "Recipe book".
There are three types of automatic programmes:
Automatic recipes;
Automatic programmes with weight input;
Automatic programmes with core temperature sensor;
Automatic recipes
Setting an automatic recipe:
1. Touch
two times until the display shows .
The display shows symbol and number of the automatic programme.
2. Touch
or to choose the automatic recipes.
3. Touch
or the automatic recipe activates automatically after five seconds.
4. When set time ends, an acoustic signal operates for two minutes. Symbol
flashes.
The appliance deactivates.
5. Touch any sensor field or open the oven door to stop an acoustic signal.
Automatic programmes with weight input
If you set the weight of the meat, the appliance calculates the roasting time.
Automatic programmes 17
1. Touch again and again until the display shows .
2. Touch
or to set the weight programme (refer to "Recipe book").
The display shows: cooking time, duration symbol
, a default weight, a unit of
measurement (kg, g).
3. Touch
or the settings save automatically after five seconds.
4. The appliance starts. A symbol of the weight unit flashes in the display. During this
time you can change the default weight value with
or . Touch .
5. When set time ends, an acoustic signal operates for two minutes.
flashes.
The appliance deactivates.
6. Touch any sensor field or open the oven door to stop an acoustic signal.
Automatic programmes with core temperature sensor
The core temperature of the food is default and fixed in programmes with core temperature
sensor. The programme ends when the appliance is at the set core temperature.
1. Touch
again and again until the display shows .
2. Install the core temperature sensor (refer to "The core temperature sensor").
3. Touch
or to set the core temperature sensor programme.
When a core temperature sensor programme is set, the display shows the cooking
time,
and .
4. Touch
or the settings save automatically after five seconds.
5. When set time ends, an acoustic signal operates for two minutes.
flashes.
The appliance deactivates.
6. Touch any sensor field or open the oven door to stop an acoustic signal.
My Favourite Programme function
Use this function to save your favourite settings of temperature and time for an oven func-
tion or programme.
1. Set the temperature and time for an oven function or programme.
2. Touch and hold
for more than three seconds.
An acoustic signal sounds.
3. Deactivate the appliance.
Using My Favourite Programme function:
To activate the function touch
. The appliance activates your favourite programme.
To deactivate the function touch
. The appliance deactivates your favourite pro-
gramme.
When the function operates, you can change the time and temperature.
USING THE ACCESSORIES
WARNING!
Refer to "Safety information" chapter.
18 Using the accessories
The core temperature sensor
The core temperature sensor measures the core temperature of the meat. When the meat is
at the set temperature, the appliance deactivates.
There are two temperatures to set:
The oven temperature: refer to the table for roasting in the recipe book.
The core temperature: refer to the table for the core temperature sensor in the recipe
book.
Only use the core temperature sensor supplied or original replacement parts.
1. Activate the appliance.
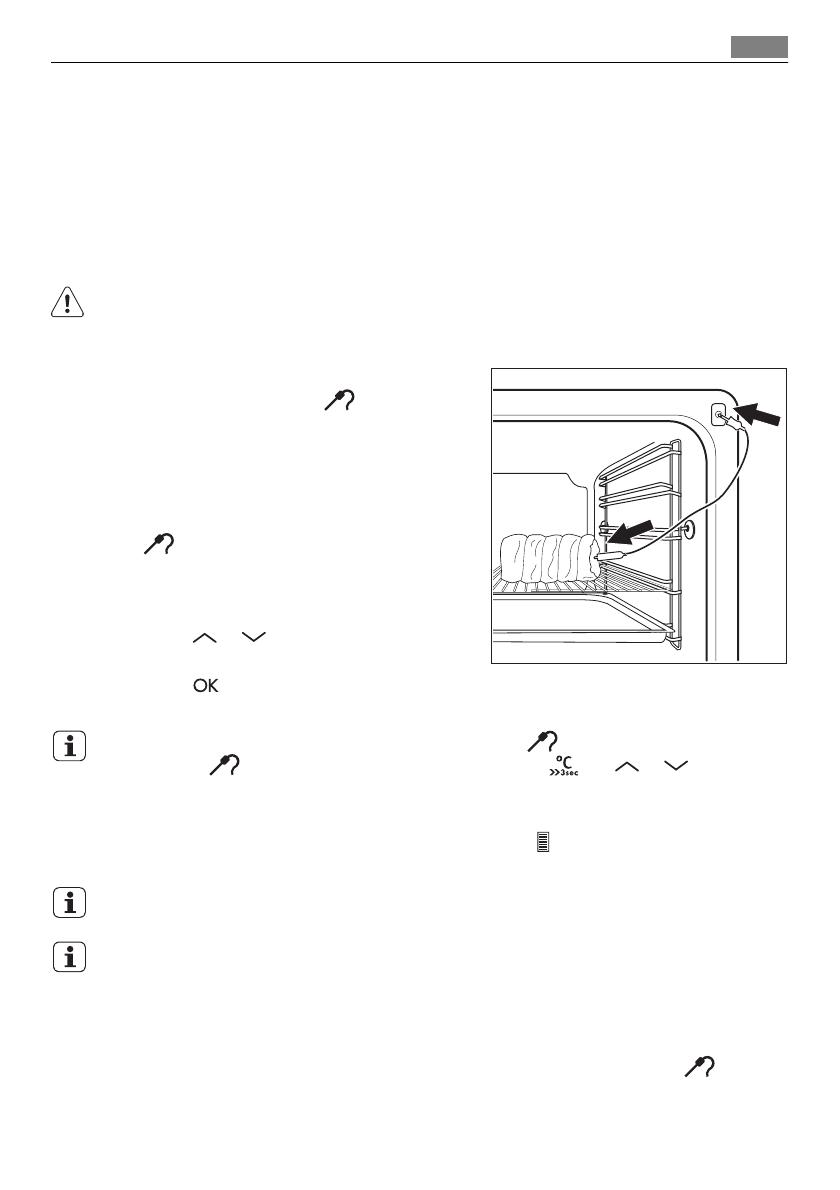
2. Put the point of the core temperature
sensor (with the symbol
on the
handle) into the centre of the meat.
3. Put the plug of the core temperature
sensor into the socket at the front of
the appliance.
The display shows a flashing symbol
and the default set core tempera-
ture. The temperature is 60 °C during
the first use, and the last set value dur-
ing each subsequent use.
4. Touch
or to set the core temper-
ature.
5. Touch
or the settings save auto-
matically after 5 seconds.
You can set the core temperature only when the symbol flashes. If the display shows a
static symbol
before you set the core temperature, use and or to set a new
value.
6. Set the oven function and, if necessary, the oven temperature.
The display shows the current core temperature and
(which shows the relation be-
tween the set oven temperature and the current oven temperature).
The core temperature sensor must stay in the meat and in the socket during the cooking.
While the appliance calculates the approximate duration time, the value of the Count Up
Timer function shows in the Timer/Residual heat display. When the first calculation ends,
the Timer/Residual heat display shows -, and then the approximate duration of the cooking.
The appliance continues to calculate the duration during the cooking. The display updates
at intervals with the new duration value.
7.
When the meat is at the set core temperature, the core temperature and
flash. An
acoustic signal sounds for two minutes.
Touch a sensor field to deactivate the acoustic signal.
Using the accessories 19
8. Remove the core temperature sensor from the socket and remove the meat from the
appliance.
WARNING!
Be careful when you remove the core temperature sensor. It is hot. There is a risk of burns.
9. Deactivate the appliance.
When you put the core temperature sensor into the socket, you cancel the settings for the
clock functions.
When you cook with the core temperature sensor, you can change the temperature shown
in the Temperature/Time display. After you put the core temperature sensor in the socket
and set an oven function and temperature, the display shows the current core temperature.
Touch
again and again to see three other temperatures:
The current core temperature
The oven set temperature
The current oven temperature.
The set core temperature changes into current core temperature and current oven temper-
ature changes into set oven temperature.
Installing the Oven Accessories
The deep pan and the wire shelf have side edges.
These edges and the shape of the guide-bars cau-
ses the anti-tilt safety for the oven accessories.
Installing the wire shelf and the deep pan to-
gether
Put the wire shelf on the deep pan. Push the deep
pan between the guide-bars of one of the oven
levels.
20 Using the accessories
  • Page 1 1
  • Page 2 2
  • Page 3 3
  • Page 4 4
  • Page 5 5
  • Page 6 6
  • Page 7 7
  • Page 8 8
  • Page 9 9
  • Page 10 10
  • Page 11 11
  • Page 12 12
  • Page 13 13
  • Page 14 14
  • Page 15 15
  • Page 16 16
  • Page 17 17
  • Page 18 18
  • Page 19 19
  • Page 20 20
  • Page 21 21
  • Page 22 22
  • Page 23 23
  • Page 24 24
  • Page 25 25
  • Page 26 26
  • Page 27 27
  • Page 28 28
  • Page 29 29
  • Page 30 30
  • Page 31 31
  • Page 32 32

AEG BE7314401 User manual

Category
Cookers
Type
User manual
This manual is also suitable for

Aeg-Electrolux BE7314401 is a user-friendly oven with various functions to make cooking easier and more enjoyable. It features an electronic programmer with a display that shows the time, temperature, and cooking functions. The oven also has a core temperature sensor to accurately measure the internal temperature of food. Additionally, it comes with a range of accessories, including a wire shelf, baking tray, combi pan, and telescopic runners, providing versatility for different cooking needs.

Ask a question and I''ll find the answer in the document

Finding information in a document is now easier with AI