Page is loading ...

820 41 72 24
USER
USER
s MANU
s MANU
AL -
AL -
NO
NO
TICE DUTILIS
TICE DUTILIS
A
A
TION -
TION -
MANU
MANU
AL DEL USU
AL DEL USU
ARIO
ARIO
TCW 1152
ICE LINING REFRIGERATOR FREEZER
GB
REFRIGERATEUR / CONGELATEUR
A PAROI REFRIGERANTE - ILR
FRIGORIFICO/CONGELADOR
REVESTIDO DE HIELO
F
E

USER MANUAL
2
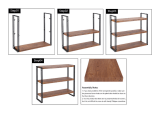
ICE LINING REFRIGERATOR FREEZER
Handle
Rubber gasket
Ice lining,
plastic tubes
Data label
Thermometer
850
1050
1465
Compressor
compartment
Pilot lamp ON
Thermostat for
refrigerator function
Pilot lamp for
freezer function
Drain plug
Locking device
Interior wall

1. GENERAL INFORMATION......................................................page 4
2. INSTALLATION .....................................................................page 5-9
3. PREPARATIONS....................................................................page 10-12
4. TO USE AS `REFRIGERATOR'................................................page 12-16
5. TO USE AS `FREEZER' .........................................................page 16-20
6. DEFROSTING & CLEANING ..................................................page 21-23
7. PERIODIC OBSERVATIONS/CHECKS/ACTIONS .....................page 24
8. TROUBLE SHOOTING...........................................................page 25-26
(A) ILR not working
(B) Compressor is working,
but cabinet temperature is higher than normal
(C) Cabinet temperature is lower than normal
or below 0°C when functioning as `Refrigerator'
(D) Abnormal noise in the ILR
9. SHUTTING DOWN ................................................................page 27
10. STORAGE OF VACCINES IN THE ILR .....................................page 27
INDEX
3

THE ILR
One of the most important links in the cold-chain is Ice
Lining Refrigerator (ILR). This is a unit which operates
on the principle of vapour compression system,
similar to any conventional compressor type
refrigerator operating on 1 15 or 230 volts, A.C. mains
supply. However, the ILR has top opening door to
prevent loss of cold air during door opening.
ICE LINING
As its name suggests, the ILR has a bank of frozen ice
on all the four sides, inside the cabinet. The ice-lining
consists of plastic tubes with water frozen during its
operation. During periods of power failure and load-
shading, the ice bank acts as cold storage to protect
the vaccines stored in the ILR. The ice-lining keep the
temperature of the vaccine below +8°C even if
electricity is available only for 8 hours a day. It has also
been tested that, at constant ambient temperature of
43°C, the ice-lining ensures that the cabinet
temperature is not above +8°C for 40 hours.
POWER SUPPLY
The ILR is fitted with heavy duty compressor which
requires low starting current and can also operate
within a range of voltage variations.
E.g. if the normal operating voltage is 230 volts, 50
Hz., A.C., it can work even when the supply voltage
occasionally go as low as 150 volts or as high as
280 volts.
THERMOMETER
To enable to measure the temperature inside the
cabinet without opening the lid, a thermometer is
provided with its dial on the front side. This makes
monitoring of the vaccine temperature easy.
LOCKING SYSTEM
The ILR is equipped with a lock, operated with a
key.
POWER-SUPPLY ARRANGEMENT
For smooth functioning of the ILR it is advisable to
connect the same to a 15 Amps power plug socket
outlet, wired from the mains with PVC insulated
cables of minimum 2.5 mm2 section of Aluminium
(see also page 5 under `Installation'). The larger
size of the plug and socket decreases the contact
resistance which in turn reduces voltage drop and
provides an easy path for the current.
Safety of the personnel and the equipments can not
be guaranteed unless the earth wire (green/yellow)
of the cord is really earthed. It is advisable to have
the earth connections to the socket checked by a
competent electrician.
VOLTAGE STABILIZER
Though the ILR is capable of operating within a
wide range of voltage variations, for extra safety one
separate Automatic Voltage Stabilizer should be
used with it.
1. GENERAL INFORMATION
4

Check the manufacturer's plate, at the back of the ILR
and make sure that the ILR has correct voltage for
local supply, i.e. 1 15 or 230 volts (fig. 1).
CAUTION
Connecting the equipment to wrong supply
voltage may damage it.
If you have received equipments of wrong voltage
ratings, notify concerned authorities and keep the
equipments repacked.
The ILR is to be installed in a well ventilated room,
avoiding direct sunshine or any other source of heat.
Power supply socket (15 amps socket with switch,
fuse and mains indicator lamp is advisable) should be
available nearest to the place of installation of the ILR.
1.
Unscrew and remove the screws holding the side
cover of the compressor compartment on the right
hand side of the ILR and remove carefully the side
cover (fig. 2)
2. INSTALLATION
5
Fig. 2.
Fig. 1.

3.
EXAMINE the compressor compartment (fig. 3;
Check carefully for any damage, dislocation or
looseness etc. of the components, specially at
locations A, B. C, and D as below and rectify if
necessary.
LOCATION A (fig. 4)
Check that all 4 mounting brackets of the compressor
are in place and secured.
2. INSTALLATION
6
zFig. 4.
Fig. 3.

LOCATION B (fig 5)
Check that the incoming electrical connections of the
power supply cord to the terminal strip are tight.
LOCATION C (fig. 6)
Check that the outgoing electrical connections from
the terminal strip are tight.
LOCATION D (fig. 7)
Check that the mounting brackets of the fan are tight
and also that the fan blades are free to rotate.
2. INSTALLATION
7
Fig. 5.
Fig. 6.
Fig. 7.

8
4.
Refit side cover of the compressor compartment into
position refixing the screws holding the side cover (fig.
8)
6.
INSTALL firmly the ILR on a level
floor, preferably on wooden
blocks or on a wooden platform to
protect it from damp and dirt.
(fig. 5)
Leave sufficient space on all sides
of the ILR, keep it away from the
walls for good circulation of air
around it, see below:
Back and left side should be
minimum 3 cm away from the
walls (fig. 9a)
Hinges can be pushed against the
wall
Right side should be minimum 10
cm away from the wall (fig. 9b)
7.
The ILR has 4 supporting
legs. If the ILR is not in
a level and stable position, adjust
this by adding wooden blocks or
similar under the legs.
2. INSTALLATION
Fig. 8.
Fig. 9.
Fig. 9a
Fig. 9b

9
8.
Connect the leads of the power supply cord to a
suitable 3-pin plug as shown below (fig. 10)
Lead of cord Pin of plug
Green/yellow Earth
Blue Neutral
Brown Phase
CAUTION:
DO NOT CONNECT THE ILR TO POVER SUPPLY
NOW
1.
Open the lid of the ILR. Pull up and take out a plastic
liner tube (fig. 1 1 )
2.
Remove the plug (cap) from its top and pour clean
water into the tube (fig. 12)
2. INSTALLATION
Fig. 10.
Fig. 11.
Fig. 12.

10
Fill the tube with water leaving a space of about 10 cm
UNFILLED at the top (fig. 13). Replace the plug.
(Examine for any leakage of water. Leaking tubes must
be repaired or replaced).
Wipe out any water on outside of the tube.
3.
Put back the tube into its position, slowly and carefully
(fig. 14).
4.
Fill all the tubes, one by one, with water, in the same
manner and put them back into their places (i.e.
repeat for all the tubes the above actions 2 and 3).
3. PREPARATIONS
Fig. 14.
Fig. 13.

11
5.
Lift up and take out the plastic floors of the ILR (fig.
15).
The floors can be lifted by using the holes of the
floors.
6.
Fill the ice-packs with clean water to their marked level
and arrange them neatly and properly to cover the
bottom of the ILR (fig. 16)
7.
Replace the floors on the layer of ice packs (fig. 17).
3. PREPARATIONS
Fig. 15.
Fig. 16.
Fig. 17.

12
8.
Make sure that the above actions 5, 6, and 7 has
been done for the smaller chamber, too. NOW THE
ILR IS READY TO START
Check the required function of your !LR -whether it is
to be used as REFRIGERATOR or FREEZER.
FOLLOW THE RELEVANT INSTRUCTIONS AS GIVEN
ON THE FOLLOWING PAGES.
3. PREPARATIONS
1.
The Refrigerator/Freezer function selector switch is
located at left on the upper part of the compressor
compartment. This switch is accessible from outside
(fig. 18)
Normally the ILR is delivered with this switch set for
Refrigerator function.
Examine this switch, and if required, shift it to the LE f
FOR REFRIGERATOR function.
2.
Examine the display plate on the lid if it displays
`Refrigerator' function.
If not, slide it out from its frame, reverse and put it
back to display `Refrigerator' function (fig. 19)
4. TO USE A REFRIGERATOR
Fig. 18.
Fig. 19.

13
3.
Connect the plug of the power supply cord to the wall
socket and put ON the switch, if any. The `yellow'
indicator light on the right hand side of the front panel
will glow, indicating availability of power supply to the
ILR and the unit will start functioning (fig. 20)
4.
Keep a separate dial thermometer at the bottom of the
ILR to measure the actual temperature at the bottom.
The temperature near the bottom is normally lower
than that of the other parts.
5.
Close the lid and allow the ILR to run. The temperature
inside the cabinet is indicated on the thermometer on
the front side. Observe the temperature from time to
time (fig. 21 )
6.
Initially the temperature inside the ILR will be observed
to be similar to or slightly below the room temperature.
It will decrease slowly and remain steady within a small
range after a day or two.
4. TO USE A REFRIGERATOR
Fig. 20.
Fig. 21.

14
7.
The control thermostat for adjustment of the LR to the
recommended temperature is located between 2
indicator lamps on the front panel. This has settings
from 1 to MAX (maximum). To change the thermostat
setting, its knob can be turned by means of a coin
inserted in its groove. Higher the setting, colder will be
the cabinet temperature.
A)
The thermostat knob is set at position 1 at works. The
inside space temperature depends on the
surrounding temperature. Please check the inside
temperature whether its value is between +4 °C and
+8 °C.
If it is observed that the cabinet temperature remains
steady at a higher temperature than the required
range of +4° to +8°C, turn the thermostat knob
clockwise to a higher setting (fig. 22). Observe for
several hours. Select a higher setting, if required, until
the required temperature is obtained and it remains
steady.
B)
If it is observed that the cabinet temperature has gone
lower than the required range, turn the thermostat
knob anti-clockwise to a lower setting (fig. 23).
Observe for several hours. Select a lower setting, if
required, until the required temperature range is
obtained and it remains steady.
8.
Water in the tubes will be frozen, within 1-3 days,
depending upon different conditions. When the ILR is
functioning as a Refrigerator, it may not be fully frozen,
but partially on the bottom side (fig. 24)
4. TO USE A REFRIGERATOR
Fig. 24.
Fig. 22.
Fig. 23.

15
9.
When the temperature inside the ILR is observed to
be steady for several hours within +4° to +8°C only
then the vaccines to be preserved should be
transferred to the ILR.
The vaccines like DPT, which get damaged if frozen,
are adviced to be kept in the baskets provided, so that
they will not touch any of the colder surfaces on the
sides and the bottom. (fig. 25)
10.
After storing the vaccines keep the lid properly closed
and locked (fig. 26)
11.
The temperature of the bottom part of the ILR may be
observed on the separate dial thermometer placed on
it. If by any chance the temperature goes below 0°C
take out the bottom floor
remove the layer of frozen ice packs at the bottom
put a frest layer of not-frozen ice packs and replace
the floor
Now, the fresh ice packs will protect the vaccines from
freezing.
Adjust thermostat to a lower setting to obtain the
recommended temperature.
4. TO USE A REFRIGERATOR
Fig. 26.
Fig. 25.

16
12.
When fresh vaccines are stored in the ILR, the cabinet
temperature may go up initially but should fall and
come to the required range after few hours.
If it is seen that the temperature does not come down
to the required level and remains steady at a higher
degree, the thermostat may have to be adjusted to a
higher setting.
After adjustment always observe till the cabinet
temperature comes down to the required level and
remain steady there.
13.
The cabinet temperature may vary depending upon
various factors, such as,
the ambient temperature
amount of vaccine preserved in the ILR ·
frequency of lid opening
circulation of air around the ILR, etc.etc.
If such variations are observed to be continued for
longer time, the ILR temperature may be brought to
the required range, by adjusting the thermostat as
described earlier.
TO USE ILR PRESENTLY RUNNING AS
`REFRIGERATOR' TO WORK AS `FREEZER'
(Change-over from REFRIGERATOR to FREEZER
function)
1) Take out the stored vaccines, which are not to be
preserved at freezer temperature, from the ILR
and preserve them in alternative storage.
2) Follow actions detailed in Chapter "To use as
FREEZER".
4. TO USE A REFRIGERATOR
1.
Install and prepare the ILR as detailed under
`Installation' and `Preparation' in the previous
chapter.
2.
The Refrigerator/Freezer function selector switch is
located at left upper portion in the compressor
compartment. This switch is accessible from outside
(fig. 27)
Normally the ILR is delivered with this switch set for
Refrigerator function.
Examine this switch and shift it to the RIGHT for
FREEZER function.
5. TO USE A FREEZER
Fig. 27.

17
3.
Examine the display plate on the lid. If it displays
`Refrigerator' function, slide it out from its frame,
reverse and put it back to display `Freezer' function
(fig. 28)
4.
Keep a separate dial thermometer at the bottom of the
ILR to measure the actual temperature at the bottom.
The temperature near the bottom is observed to be
lower than that at the other portions.
Close the lid.
5.
Connect the plug of the power supply cord to the wall
socket and put ON the switch, if any. The `yellow'
indicator lamp on the right will glow indicating that
power is available to the ILR and also the `red'
indicator lamp on the left will glow indicating that the
ILR is functioning as `Freezer' (fig. 29)
5. TO USE A FREEZER
Fig. 29.
Fig. 28.

18
5. TO USE A FREEZER
Fig. 30.
6.
Allow the ILR to run. The temperature inside the
cabinet will be indicated on the thermometer on the
front side. Observe the temperature from time to time
(fig.30)
7.
Initially the temperature inside the ILR will be similar to,
or slightly below, the room temperature. It should
decrease slowly and should remain steady within a
smal! range, after 1-3 days, depending upon different
conditions.
8.
When the ILR is functioning as `Freezer', the
thermostat on the front panel has no function and no
control over the cabinet temperature. The control is
now shifted to another thermostat (freezer-thermostat)
which is located behind the function selector switch in
the compressor compartment. This thermostat has
been factory preset on =18°C. However, if the cabinet
temperature does not reach the required low level of
2-3 days, the freezer-thermostat setting can be
increased to a higher setting by turning its knob
clockwise.
To get access to the freezer-thermostat, the side
cover of the compressor compartment is to be
removed as described earlier on page 12 (actions 1
and 2).
CAUTIONS:
Power supply must be disconnected before
removing of the compressor compartment cover as
there are live parts within.
Touching these parts may be fatal if power is not
disconnected.

19
9.
Water in the tubes will be frozen fully within 1-3 days,
depending on different conditions (fig. 31 )
10.
Put one layer of ice-packs (filled with water to their
marked level) and arrange them neatly and properly to
cover the bottom of the ILR (fig. 32)
11.
When all the water in the tubes have frozen (fig. 31)
and the ILR is maintaining a constant temperature
around =18° to =20°C, for several hours, transfer the
vaccines to be preserved in frozen condition, to the
ILR for preservation.
Ice packs for freezing may also be stored inside in a
systematic way. The ILR can freeze about 15 ice
packs in a day. It is advisable not to put fresh ice packs
of more than the above number, at a time, - else,
cabinet temperature may be higher than required.
5. TO USE A FREEZER
Fig. 31.
Fig. 32.

20
12.
After storing the vaccines, keep the lid properly closed
and locked (fig. 33)
`T0 USE ILR PRESENTLY RUNNING
AS `FREEZER' TO WORK AS
`REFRIGERATOR'
(Change-over from FREEZER to REFRIGERATOR
function)
1) Take out the vaccines and preserve them in
alternative storage.
2) Defrost and clean the ILR as detailed on pages 20-
23.
3) Follow actions detailed in chapter `To use as
REFRIGERATOR' (page 12-16)
Adjust thermostat setting if required, to main lain a
steady temperature between +4° to 8°C.
4) Preserve vaccine in the ILR, only after the above
recommended is attained in the ILR.
5. TO USE A FREEZER
DEFROSTING & CLEANING
The moisture in the air, which enters the ILR due to lid
opening (and also may be due to defective lid-gasket
or door alignment) is attracted by the cold surfaces
inside the ILR. So, formation of frost and ice occurs
on the walls around the tubes inside the lining
compartment. When the frost layer is 1 /4" to 1 /2"
(6-12 mm) thick, it is time for `defrosting' the ILR.
MOST IMPORTANT:
Before defrosting the ILR, the vaccines preserved
in it will have to be removed and stored temporarily
in other working ILR or Refrigerator.
If a second ILR or Refrigerator is not available, the
vaccines will have to be preserved in Cold-Box or
Vaccine carrier, properly lining the same with frozen
ice packs, such that the vaccine temperature
remains within the recommended storage
temperature during the defrosting of the ILR.
6. DEFROSTING & CLEANING
Fig. 33.
/