Page is loading ...
Operating Instructions
High Definition Video Camera
Model No. HDC-SD100
Before use, please read these instructions completely.
VQT1T81
until
2008/9/1
HDCSD100EB-VQT1T81_mst.book 1 ページ 2008年7月11日 金曜日 午後6時57分

2
VQT1T81
Information for Your Safety
Dear Customer,
We would like to take this opportunity to thank
you for purchasing this Panasonic High Definition
Video Camera. Please read these Operating
Instructions carefully and keep them handy for
future reference. Please note that the actual
controls and components, menu items, etc. of
your High Definition Video Camera may look
somewhat different from those shown in the
illustrations in these Operating Instructions.
∫ Caution for AC mains lead
For your safety, please read the following text
carefully.
This appliance is supplied with a moulded three
pin mains plug for your safety and convenience.
A 5-ampere fuse is fitted in this plug.
Should the fuse need to be replaced please
ensure that the replacement fuse has a rating of
5-ampere and that it is approved by ASTA or BSI
to BS1362.
Check for the ASTA mark Ï or the BSI mark Ì
on the body of the fuse.
If the plug contains a removable fuse cover you
must ensure that it is refitted when the fuse is
replaced.
If you lose the fuse cover the plug must not be
used until a replacement cover is obtained.
A replacement fuse cover can be purchased
from your local dealer.
If a new plug is to be fitted please observe the
wiring code as stated below.
If in any doubt please consult a qualified
electrician.
IMPORTANT
The wires in this mains lead are coloured in
accordance with the following code:
Blue: Neutral, Brown: Live.
As these colours may not correspond with the
coloured markings identifying the terminals in
your plug, proceed as follows:
The wire which is coloured Blue must be
connected to the terminal which is marked with
the letter N or coloured Black or Blue.
The wire which is coloured Brown must be
connected to the terminal which is marked with
the letter L or coloured Brown or Red.
WARNING: DO NOT CONNECT EITHER WIRE
TO THE EARTH TERMINAL WHICH IS
MARKED WITH THE LETTER E, BY THE
EARTH SYMBOL Ó OR COLOURED GREEN
OR GREEN/YELLOW.
THIS PLUG IS NOT WATERPROOF—KEEP
DRY.
Before use
Remove the connector cover.
How to replace the fuse
The location of the fuse differ according to the
type of AC mains plug (figures A and B).
Confirm the AC mains plug fitted and follow the
instructions below.
Illustrations may differ from actual AC mains
plug.
1. Open the fuse cover with a screwdriver.
2. Replace the fuse and close or attach the fuse
cover.
CAUTION!
IF THE FITTED MOULDED PLUG IS
UNSUITABLE FOR THE SOCKET OUTLET
IN YOUR HOME THEN THE FUSE SHOULD
BE REMOVED AND THE PLUG CUT OFF
AND DISPOSED OF SAFELY.
THERE IS A DANGER OF SEVERE
ELECTRICAL SHOCK IF THE CUT OFF
PLUG IS INSERTED INTO ANY 13-AMPERE
SOCKET.
HDCSD100EB-VQT1T81_mst.book 2 ページ 2008年7月11日 金曜日 午後6時57分

3
VQT1T81
∫ EMC Electric and magnetic
compatibility
This symbol (CE) is located on the rating plate.
Use only the recommended accessories.
≥ Do not use any other AV cables, Component
cable and USB cables except the supplied
one.
≥ When you use the cable which are sold
separately, please make sure to use the one
whose length is less than 3 metres.
≥ Keep the Memory Card out of reach of children
to prevent swallowing.
WARNING:
TO REDUCE THE RISK OF FIRE,
ELECTRIC SHOCK OR PRODUCT
DAMAGE,
≥ DO NOT EXPOSE THIS APPARATUS TO
RAIN, MOISTURE, DRIPPING OR
SPLASHING AND THAT NO OBJECTS
FILLED WITH LIQUIDS, SUCH AS VASES,
SHALL BE PLACED ON THE
APPARATUS.
≥ USE ONLY THE RECOMMENDED
ACCESSORIES.
≥ DO NOT REMOVE THE COVER (OR
BACK); THERE ARE NO USER
SERVICEABLE PARTS INSIDE. REFER
SERVICING TO QUALIFIED SERVICE
PERSONNEL.
CAUTION!
≥ DO NOT INSTALL OR PLACE THIS UNIT
IN A BOOKCASE, BUILT-IN CABINET OR
IN ANOTHER CONFINED SPACE.
ENSURE THE UNIT IS WELL
VENTILATED. TO PREVENT RISK OF
ELECTRIC SHOCK OR FIRE HAZARD
DUE TO OVERHEATING, ENSURE THAT
CURTAINS AND ANY OTHER
MATERIALS DO NOT OBSTRUCT THE
VENTILATION VENTS.
≥ DO NOT OBSTRUCT THE UNIT’S
VENTILATION OPENINGS WITH
NEWSPAPERS, TABLECLOTHS,
CURTAINS, AND SIMILAR ITEMS.
≥ DO NOT PLACE SOURCES OF NAKED
FLAMES, SUCH AS LIGHTED CANDLES,
ON THE UNIT.
≥ DISPOSE OF BATTERIES IN AN
ENVIRONMENTALLY FRIENDLY
MANNER.
The socket outlet shall be installed near the
equipment and easily accessible.
The mains plug of the power supply cord shall
remain readily operable.
To completely disconnect this apparatus from
the AC Mains, disconnect the power supply
cord plug from AC receptacle.
Warning
Risk of fire, explosion and burns. Do not
disassemble.
Do not heat the batteries above the following
temperatures or incinerate.
Button-type battery 60 oC
Battery pack 60 oC
Product Identification Marking is located
on the bottom of units.
HDCSD100EB-VQT1T81_mst.book 3 ページ 2008年7月11日 金曜日 午後6時57分

4
VQT1T81
∫ Information for Users on
Collection and Disposal of Old
Equipment and used Batteries
These symbols on the products,
packaging, and/or accompanying
documents mean that used
electrical and electronic products
and batteries should not be mixed
with general household waste.
For proper treatment, recovery
and recycling of old products and
used batteries, please take them to applicable
collection points, in accordance with your
national legislation and the Directives 2002/96/
EC and 2006/66/EC.
By disposing of these products and batteries
correctly, you will help to save valuable
resources and prevent any potential negative
effects on human health and the environment
which could otherwise arise from inappropriate
waste handling.
For more information about collection and
recycling of old products and batteries, please
contact your local municipality, your waste
disposal service or the point of sale where you
purchased the items.
Penalties may be applicable for incorrect
disposal of this waste, in accordance with
national legislation.
For business users in the
European Union
If you wish to discard electrical
and electronic equipment, please
contact your dealer or supplier for
further information.
[Information on Disposal in other Countries
outside the European Union]
These symbols are only valid in the European
Union. If you wish to discard these items, please
contact your local authorities or dealer and ask
for the correct method of disposal.
Note for the battery symbol
(bottom two symbol examples):
This symbol might be used in
combination with a chemical
symbol. In this case it complies
with the requirement set by the
Directive for the chemical
involved.
∫ Indemnity concerning recording
content
The manufacturer shall in no event be liable for
the loss of recordings due to malfunction or
defect of this unit, its accessories or recordable
media.
∫ Carefully observe copyright laws
Recording of pre-recorded tapes or discs or
other published or broadcast material for
purposes other than your own private use
may infringe copyright laws. Even for the
purpose of private use, recording of certain
material may be restricted.
∫ Cards that you can use with this
unit
SD Memory Card and SDHC Memory Card
≥ 4 GB or more Memory Cards that do not have
the SDHC logo are not based on SD Memory
Card Specifications.
≥ Refer to page 21 for more details on SD cards.
∫ For the purposes of these
operating instructions
≥ SD Memory Card and SDHC Memory Card are
referred to as the “SD card”.
≥ Functions that can be used for motion picture
recording/motion picture playback are
indicated by in these operating
instructions.
≥ Functions that can be used for still picture
recording/still picture playback are indicated by
in these operating instructions.
≥ “HD Writer 2.6E for HDC” is referred to as the
“HD Writer 2.6E”.
≥ Pages for reference are indicated by an arrow,
for example: l 00
Cd
HDCSD100EB-VQT1T81_mst.book 4 ページ 2008年7月11日 金曜日 午後6時57分

5
VQT1T81
∫ Licenses
≥ SDHC Logo is a trademark.
≥ “AVCHD” and the “AVCHD” Logo are
trademarks of Matsushita Electric Industrial
Co., Ltd. and Sony Corporation.
≥ Manufactured under license from Dolby
Laboratories.
Dolby and the double-D symbol are
trademarks of Dolby Laboratories.
≥ HDMI, the HDMI Logo and the High-Definition
Multimedia Interface are the registered
trademarks or trademarks of HDMI Licensing
LLC.
≥ HDAVI Control
™
is a trademark of Matsushita
Electric Industrial Co., Ltd.
≥ “x.v.Colour” is trademark.
≥ LEICA is a registered trademark of Leica
Microsystems IR GmbH and DICOMAR is a
registered trademark of Leica Camera AG.
≥ Microsoft
®
, Windows
®
,
Windows Vista
®
and
DirectX
®
are either registered trademarks or
trademarks of the Microsoft Corporation in the
United States and/or other countries.
≥ Microsoft product screen shot(s) reprinted with
permission from Microsoft Corporation.
≥ IBM and PC/AT are registered trademarks of
International Business Machines Corporation
of the U.S.
≥ Intel
®
, Core
™
, Pentium
®
and Celeron
®
are the
registered trademarks or trademarks of the
Intel Corporation in the United States and other
countries.
≥ AMD Athlon
™
is a trademark of the Advanced
Micro Devices, Inc.
≥ Apple, Mac OS is either registered trademarks
or trademarks of Apple Inc. in the United
States and/or other countries.
≥ PowerPC is a trademark of International
Business Machines Corporation.
≥ Other names of systems and products
mentioned in these instructions are usually the
registered trademarks or trademarks of the
manufacturers who developed the system or
product concerned.
This product is licensed under the AVC patent
portfolio license for the personal and
non-commercial use of a consumer to (i) encode
video in compliance with the AVC Standard
(“AVC Video”) and/or (ii) decode AVC Video that
was encoded by a consumer engaged in a
personal and non-commercial activity and/or was
obtained from a video provider licensed to
provide AVC Video. No license is granted or shall
be implied for any other use. Additional
information may be obtained from MPEG LA,
LLC. See http://www.mpegla.com
.
HDCSD100EB-VQT1T81_mst.book 5 ページ 2008年7月11日 金曜日 午後6時57分

6
VQT1T81
Information for Your Safety .................2
Accessories .......................................... 9
Features ..............................................10
Preparation
Before using
[1] Parts identification and
handling.......................................... 12
Remote control ................................ 16
Setup
[1] Power supply ................................. 17
Charging the battery........................ 17
Inserting/removing the battery ......... 18
Charging and recording time ........... 19
Connecting to the AC outlet............. 20
[2] Preparation of SD cards................ 21
Cards that you can use
with this unit..................................... 21
Inserting/removing an SD card ........ 22
[3] Selecting a mode
(Turning the unit on/off)................ 23
Turning the power on and off
with the LCD monitor ....................... 23
[4] Using the menu screen ................. 24
Language selection ......................... 25
Menu list .......................................... 25
[5] Setting date and time .................... 28
World time setting (Displaying
the time of the travel destination) .... 30
[6] Adjusting LCD monitor/
viewfinder....................................... 31
LCD/EVF select switch .................... 31
Increasing the brightness of
the LCD monitor .............................. 31
Adjusting the brightness and
the colour level ................................ 31
Changing the picture quality
on the LCD monitor ......................... 32
Adjusting the viewfinder field
of view ............................................. 32
Recording showing the contents
to a partner ...................................... 32
Recording
Recording (Basic)
[1] Before recording ........................... 34
Anti-Ground-Shooting (AGS) .......... 35
Quick start....................................... 36
Quick power on ............................... 36
[2] Recording motion pictures .......... 37
Recording modes/approximate
recordable time ............................... 39
PRE-REC........................................ 40
Shooting guide ................................ 40
[3] Recording still pictures ................ 41
Number of recordable pictures........ 43
[4] Zoom in/out function .................... 44
Digital zoom function....................... 44
[5] Optical image stabilizer
function.......................................... 45
[6] Intelligent auto mode .................... 46
Recording (Advanced)
[1] Recording functions of
operation icons ............................. 47
Operation icons............................... 47
[2] Recording functions of menus .... 53
[3] Recording manually by
setting the menu ........................... 59
Scene mode.................................... 59
Wind noise reduction....................... 60
Microphone level ............................. 61
Picture adjustment .......................... 62
Zebra............................................... 62
Luminance....................................... 63
Histogram........................................ 64
[4] Recording manually using
the multi manual ring.................... 65
Zoom operation............................... 66
Manual focus adjustment ................ 66
White balance ................................. 67
Manual shutter speed/iris
adjustment....................................... 68
Contents
HDCSD100EB-VQT1T81_mst.book 6 ページ 2008年7月11日 金曜日 午後6時57分

7
VQT1T81
Playback
Playback
[1] Motion picture playback ............... 70
Creating still picture from
motion picture .................................. 73
Playing back motion pictures
by date............................................. 73
Intelligent scene selection ............... 73
Repeat playback.............................. 74
Resuming the previous playback..... 74
[2] Still picture playback..................... 75
Playing back still pictures by date.... 77
Editing
[1] Deleting scenes/still pictures ....... 78
[2] Dividing a scene to delete ............ 80
[3] Protecting scenes/still pictures ... 81
[4] DPOF setting.................................. 82
[5] SD card management.................... 83
Formatting ....................................... 83
SD card information display............. 83
With a TV
[1] Watching Video/Pictures
on your TV...................................... 84
Connecting with a HDMI mini
cable................................................ 87
Listening in 5.1 channel sound ........ 88
Connecting with the component
cable................................................ 88
Connecting with the AV cable.......... 88
[2] Playback using VIERA Link
(HDAVI Control
™
)........................... 89
Backup
With other products
[1] Connecting a DVD burner to
copy to/play back a disc............... 92
Preparing for copying/
playing back .................................... 92
Copying to discs.............................. 93
Playing back the copied disc........... 96
Managing the copied disc
(Formatting, Auto protect,
Displaying disc information) ............ 97
[2] Dubbing images onto
other video device......................... 98
[3] With a printer (PictBridge)............ 99
With a PC
Before using
[1] What you can do with a PC ........ 102
End User License Agreement ....... 104
[2] Operating environment............... 105
Setup
[1] Installation ................................... 107
[2] Connection and recognition ...... 109
About the PC display...................... 110
Using with a PC
[1] Starting HD Writer 2.6E................ 111
Reading the operating instructions
of the software applications............ 111
[2] If using Macintosh........................ 112
Others
Indications
[1] Indications .................................... 114
[2] Messages ...................................... 117
About recovery ............................... 118
Helpful hints
[1] Functions that cannot be used
simultaneously ............................. 119
[2] Troubleshooting.......................... 121
Cautions for use............................... 130
Explanation of terms ....................... 133
Specifications................................... 135
Index.................................................. 138
HDCSD100EB-VQT1T81_mst.book 7 ページ 2008年7月11日 金曜日 午後6時57分

8
VQT1T81
∫ Sales and Support Information
Customer Care Centre
≥ For customers within the UK: 0844 844 3852
≥ For customers within the Republic of
lreland: 01 289 8333
≥ Visit our website for product information
≥ E-mail: customer[email protected]
Technical Support for AV Software
≥ For customers within the UK: 0844 844 3869
≥ For customers within the Republic of Ireland:
01 289 8333
Direct Sales at Panasonic UK
≥ For customers: 0844 844 3856
≥ Order accessory and consumable items for
your product with ease and confidence by
phoning our Customer Care Centre Monday–
Thursday 9.00 a.m.–5.30 p.m., Friday 9.30
a.m.– 5.30 p.m. (Excluding public holidays)
≥ Or go on line through our Internet Accessory
ordering application at www.panasonic.co.uk
.
≥ Most major credit and debit cards accepted.
≥ All enquiries transactions and distribution
facilities are provided directly by Panasonic UK
Ltd.
≥ It couldn’t be simpler!
≥ Also available through our Internet is direct
shopping for a wide range of finished products,
take a browse on our website for further
details.
Interested in purchasing an extended
guarantee?
Please call 0870 240 6284 or visit our website
www.panasonic.co.uk/guarantee
.
HDCSD100EB-VQT1T81_mst.book 8 ページ 2008年7月11日 金曜日 午後6時57分

9
VQT1T81
Accessories
Check the accessories before using this unit.
Some optional accessories may not be available
in some countries.
*1 The supplied DC cables cannot be used on
this unit.
*2 The battery pack holder kit VW-VH04
(optional) is necessary.
*3 Available from Sep. 2008
Battery pack
VW-VBG130
AC adaptor
VSK0698
AC cable
K2CT3CA00004
DC cable
K2GJYDC00002
Remote control
N2QAEC000023
Button-type battery
CR2025
AV cable
K2KC4CB00027
Component cable
K2KZ9DB00004
USB cable
K2KYYYY00050
CD-ROM
Optional accessories
AC adaptor (VW-AD21EB-K)
*1
Battery pack (lithium/VW-VBG130)
Battery pack (lithium/VW-VBG260)
Battery pack (lithium/VW-VBG6)
*2
Battery pack holder kit (VW-VH04)
HDMI mini cable (RP-CDHM15, RP-CDHM30)
Tele conversion lens (VW-T3714H)
Wide conversion lens (VW-W3707H)
Filter kit (VW-LF37WE)
Video DC light (VW-LDC103E)
*3
Light bulb for video DC light (VZ-LL10E)
Stereo microphone (VW-VMS2E)
Shoe adaptor (VW-SK12E)
Tripod (VW-CT45E)
DVD burner (VW-BN1)
HDCSD100EB-VQT1T81_mst.book 9 ページ 2008年7月11日 金曜日 午後6時57分

10
VQT1T81
Features
∫ Very clear high definition pictures
This unit can record detailed high definition images to an SD card.
High definition images (1920k1080)
*
A Number of available scan lines 1080
Standard images (720k576)
B Number of available scan lines 576
High definition images
≥ The still pictures above are images for explanation purposes.
* If the recording mode is HA/HG/HX.
What is the AVCHD?
This is a format for recording and playing back highly detailed high definition images.
Images are recorded based on the MPEG-4 AVC/H.264 codec for compressing images and audio is
recorded with the Dolby Digital 5.1 Creator.
≥ Since the recording method is different from an ordinary DVD video etc., the data are not compatible.
∫ Compatibility with other products
With other products Available function Picture quality
Watching Video/
Pictures on your TV
(l 84 to 90)
Playback with the HDMI mini cable
jPlayback using VIERA Link (HDAVI Control
™
)
(l 89)
High definition
images
Playback with the component cable [1080i]
Playback with the component cable [576i] Standard images
Playback with the AV cable
Using a DVD burner
(l 92 to 97)
Connecting a DVD burner to copy to/play back a
disc
jPlaying back the copied disc (l 96)
High definition
images
What you can do with a
PC
(l 102 to 103)
Copying data to a PC and easy editing
Writing data to DVD discs and SD cards
Converting the motion picture data to MPEG2 Standard images
Creating a DVD Video disc
Dubbing images onto
other video device
(l 98)
Dubbing images when connecting with the AV cable
HDCSD100EB-VQT1T81_mst.book 10 ページ 2008年7月11日 金曜日 午後6時57分

11
VQT1T81
Preparation
Recording
Playback
Backup
With a PC
Others
12 Before using
17 Setup
HDCSD100EB-VQT1T81_mst.book 11 ページ 2008年7月11日 金曜日 午後6時57分
12
VQT1T81
Before using
1
Parts identification and
handling
1 LCD monitor open part
2 LCD monitor (l 31)
Pull the LCD monitor out in the direction of the
arrow with your fingers.
≥ It can open up to 90o.
≥ It can rotate up to 180o A towards the lens or
90o B towards the viewfinder.
3 Speaker
4 Optical image stabilizer button [ ,
O.I.S.] (l 45)
5 Delete button [ ] (l 78)
6 Cursor button
Use the cursor button to select the recording
functions and playback operations, and to
operate the menu screen.
1 Select by moving up, down, left, right.
2 Set by pressing the centre.
≥ Menu screen operations (l 24)
≥ To select the recording functions (l 47, 53)
≥ Playback operations (l 70)
AV/
2
3
4
5
6
7
8
9
10
11
1
12
13
14
16
17
18
19
20
15
Due to limitations in LCD production
technology, there may be some tiny bright or
dark spots on the LCD monitor screen.
However, this is not a malfunction and does not
affect the recorded picture.
HDCSD100EB-VQT1T81_mst.book 12 ページ 2008年7月11日 金曜日 午後6時57分

13
VQT1T81
7 Intelligent auto button [iA] (l 46)
8 PRE-REC button [PRE-REC] (l 40)
9 Menu button [MENU] (l 24)
10 Battery holder (l 18)
11 DC input terminal [DC IN] (l 20)
12 USB terminal [ ] (l 92, 99, 109)
13 HDMI mini connector [HDMI] (l 84, 89)
14 Audio-video/headphone output terminal
[AV/ ] (l 26, 51, 84, 98)
≥ Use the AV cable (only the supplied cable) or
headphones.
≥ Setup the [AV JACK] in the menu when the
headphones are used. (l 26)
≥ Excessive sound pressure from earphones
and headphones can cause hearing loss.
15 Component terminal [COMPONENT]
(l 84)
16 Card access lamp [ACCESS] (l 22)
17 Card slot (l 22)
18 SD card cover (l 22)
19 SD card open lever [OPEN] (l 22)
20 Disc copy button [DISC COPY] (l 93, 96)
21 Lens cover
≥ The lens cover opens in recording mode.
(l 23)
22 Multi manual ring (l 65)
23 Mode select switch [AUTO, MANUAL,
FOCUS/ZOOM] (l 35, 59, 65)
24 Camera function button [CAM FUNC]
(l 65)
25 Remote control sensor (l 16)
26 Recording lamp (l 25)
27 Built-in flash (l 56)
28 Lens (LEICA DICOMAR)
29 Lens hood
Rotate the lens hood counter-clockwise A to
remove it. In order to attach it, place into slot B,
and then rotate it clockwise C.
≥ Attach the MC protector or the ND filter of the
Filter Kit (VW-LF37WE; optional) in front of the
lens hood.
≥ When fitting the tele conversion lens
(VW-T3714H; optional) or the wide conversion
lens (VW-W3707H; optional), first remove the
lens hood.
21
22
23
24
25
26
Be careful about the following.
When 2 lens accessories, such as the ND filter
and tele conversion lens, are fitted and the
zoom lever is pressed toward the W side, the 4
corners of an image will be darkened.
(Vignetting)
(When fitting 2 lens accessories, first remove
the lens hood and then fit them.)
27
28
29
MIC
30
HDCSD100EB-VQT1T81_mst.book 13 ページ 2008年7月11日 金曜日 午後6時57分
14
VQT1T81
30 Microphone terminal [MIC]
≥ A compatible plug-in powered microphone can
be used as an external microphone.
≥ Audio will be stereo (2 ch) with the external
microphone input.
≥ Make sure that the microphone cable is out of
the way from the lens so it will not be recorded
in the images.
≥ When the unit is connected with the AC
adaptor, sometimes noise may be heard
depending on the microphone type. In this
case, please switch to the battery for the power
supply and the noise will stop.
31 Mode dial (l 23)
32 Recording start/stop button (l 37)
33 Status indicator (l 23)
34 LCD/EVF select switch [EVF/LCD] (l 31)
35 Viewfiner (l 31)
36 Eyepiece corrector dial (l 32)
37 Photoshot button [ ] (l 41)
38 Zoom lever [W/T] (In recording mode)
(l 44)
Volume lever [sVOLr] (In playback
mode) (l 71)
Attaching the lens cap
(Included in the Filter Kit
(VW-LF37WE; optional))
≥ When the filter kit (VW-LF37WE; optional) is
used, protect the lens surface while the unit
is not used with the lens cap supplied with
the filter kit.
≥ To attach or remove the lens cap, hold both
sides of the lens cap with the tips of your
finger and thumb.
31
32
33
34
35
36
37
38
39
40
41
42
Due to limitations in LCD production
technology, there may be some tiny bright or
dark spots on the viewfinder screen. However,
this is not a malfunction and does not affect
the recorded picture.
HDCSD100EB-VQT1T81_mst.book 14 ページ 2008年7月11日 金曜日 午後6時57分
15
VQT1T81
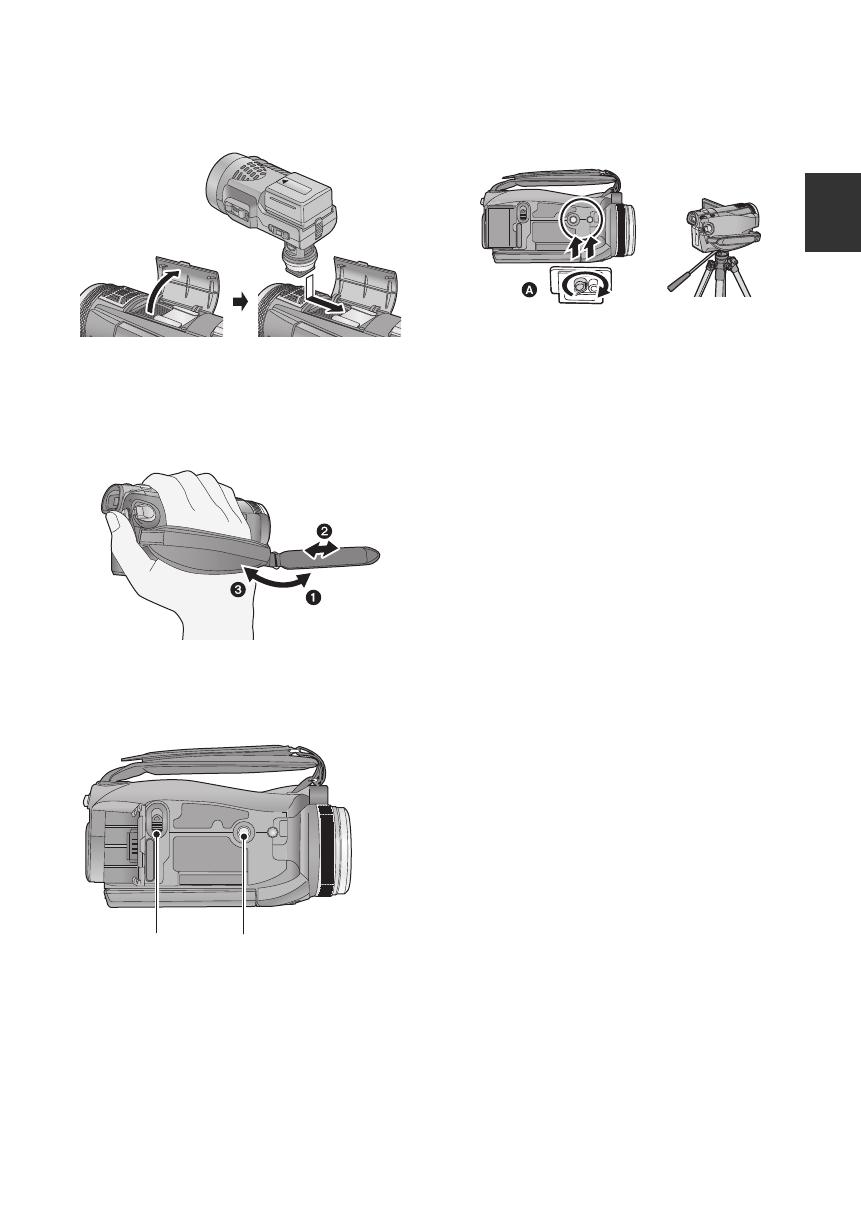
39 Accessory shoe
≥ The video DC light/VW-LDC103E (optional)
should be mounted here.
40 Internal microphones (5.1 channel
support)
41 Grip belt
Adjust the length of the grip belt so that it fits your
hand.
1 Flip the belt.
2 Adjust the length.
3 Replace the belt.
42 Shoulder strap fixture
43 Battery release lever [BATTERY] (l 18)
44 Tripod receptacle
This is a hole for attaching the unit to the optional
tripod. (For details on mounting the tripod, refer
to the operating instructions for the tripod.)
A Camera base
43 44
HDCSD100EB-VQT1T81_mst.book 15 ページ 2008年7月11日 金曜日 午後6時57分
16
VQT1T81
1 Photoshot button [ , PHOTO SHOT]
*
2 On-screen display button [EXT DISPLAY]
(l 86)
3 Date/time button [DATE/TIME] (l 28)
4 Playback operation buttons (l 71)
5 Delete button [ ]
*
6 Direction buttons [3,4,2,1]
These buttons operate similar to how the cursor
button moves up/down/right/left on the unit.
7 Recording start/stop button [START/
STOP]
*
8 Zoom/volume buttons [ZOOM, VOL]
*
9 Menu button [MENU]
*
10 Enter button [ENTER]
This button operates similar to pressing the
cursor button on the unit.
* means that these buttons function in the same
manner as the corresponding buttons on the
unit.
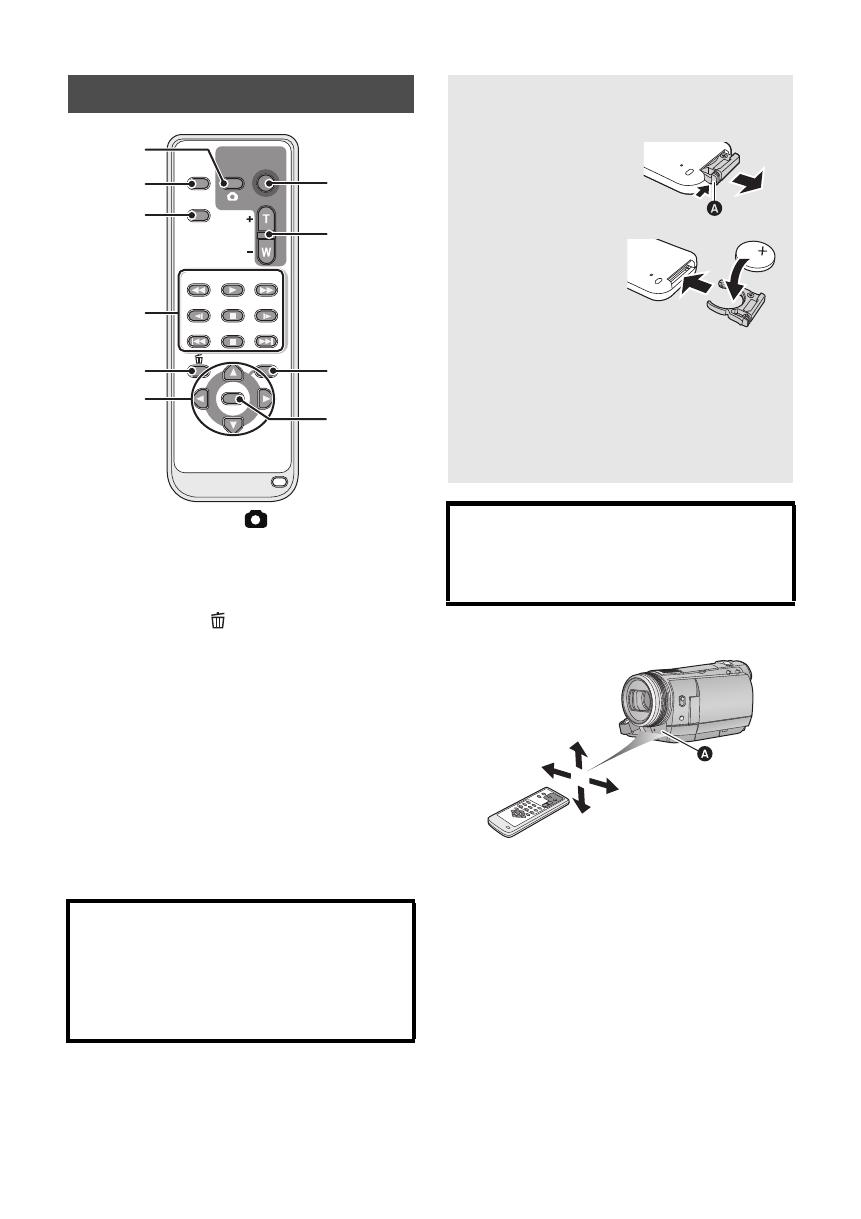
∫ Remote control usable range
A Remote control sensor
Distance: Within approx. 5 m
Angle: Approx. 10o up and 15o down, left, and
right
≥ The remote control is intended for indoor
operation. Outdoors or under strong light, the
unit may not operate properly even within the
usable ranges.
Remote control
CAUTION
Danger of explosion if battery is incorrectly
replaced. Replace only with the same or
equivalent type recommended by the
manufacturer. Dispose of used batteries
according to the manufacturer’s instructions.
ZOOM
START/
STOP
PHOTO
SHOT
EXT
DISPLAY
DATE/
TIME
VOL
PLAY
STOPSKIP SKIP
MENU
ENTER
PAUSE
SEARCH
STILL ADV STILL ADV
SEARCH
1
2
3
4
6
5
7
8
9
10
Install a button-type battery
(supplied)
1 While pressing
the stopper A,
pull out the
battery holder.
2 Set the button-
type battery with
its (i) mark
facing upward
and then put the
battery holder
back in place.
≥ When the button-type battery runs down,
replace it with a new battery (part number:
CR2025). The battery should normally last
about 1 year, however this depends on how
frequently the unit is used.
Warning
Keep the Button-Type battery out of the reach
of children. Never put Button-Type battery in
mouth. If swallowed call your doctor.
HDCSD100EB-VQT1T81_mst.book 16 ページ 2008年7月11日 金曜日 午後6時57分

17
VQT1T81
Setup
1
Power supply
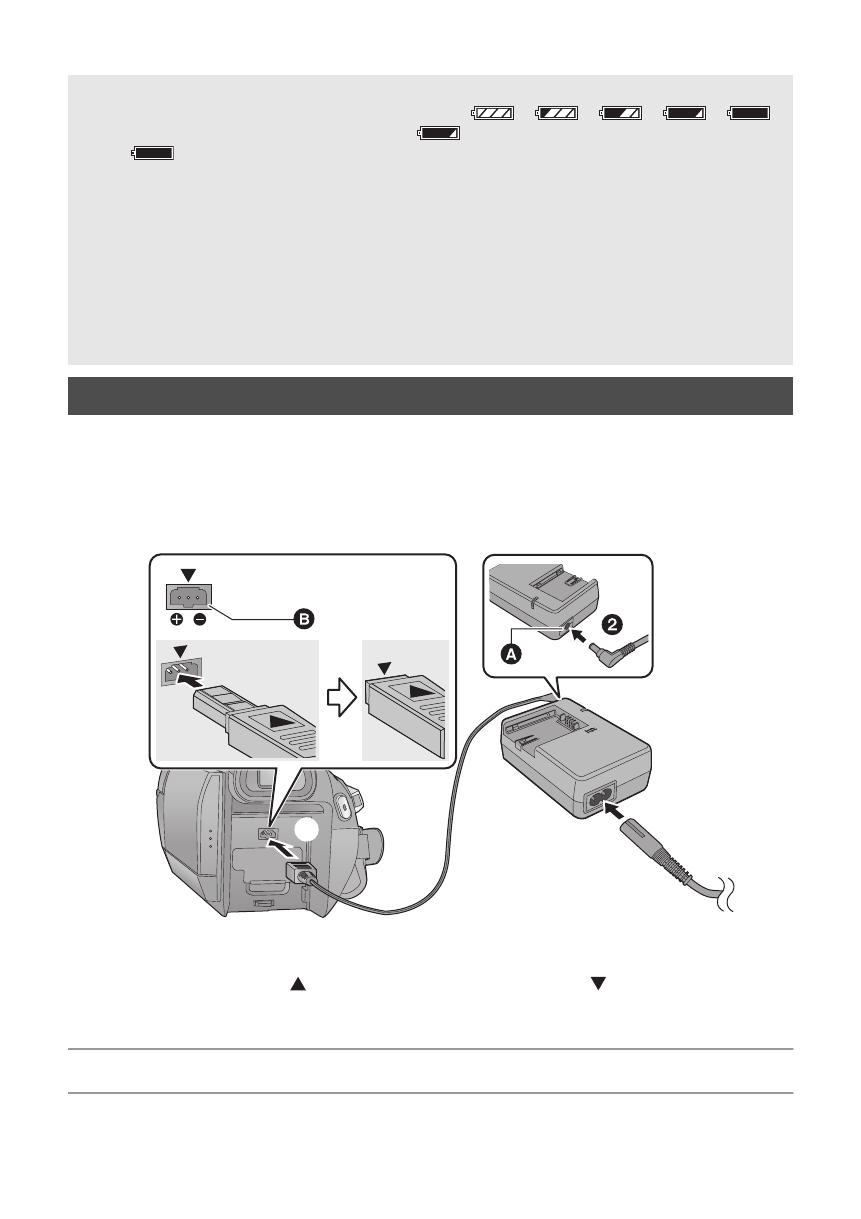
∫ About batteries that you can use with this unit
The Panasonic battery that can be used with this unit is VW-VBG130/VW-VBG260/VW-VBG6.
VW-VBG130/VW-VBG260/VW-VBG6 come with a function to check whether the battery and unit can
be safely used together.
≥ To use the VW-VBG6 for this unit, the battery pack holder kit VW-VH04 (optional) is required.
Important:
If the DC cable is connected to the AC adaptor, then the battery will not charge. Remove the DC
cable from the AC adaptor.
1 Connect the AC cable to the AC adaptor and the AC outlet.
2 Insert the battery into the battery charger by aligning the arrows.
It has been found that counterfeit battery packs which look very similar to the genuine product are
made available to purchase in some markets. Some of these battery packs are not adequately
protected with internal protection to meet the requirements of appropriate safety standards. There is
a possibility that these battery packs may lead to fire or explosion. Please be advised that we are not
liable for any accident or failure occurring as a result of use of a counterfeit battery pack. To ensure
that safe products are used we would recommend that a genuine Panasonic battery pack is used.
≥ Be aware that many batteries sold at extremely cheap prices or in situations where it is difficult to
verify the actual products before purchase have proven to be counterfeit.
Charging the battery
When this unit is purchased, the battery is not charged. Charge the battery before using this
unit.
Charging lamp [CHARGE] A
Lights up:
Charging (Battery charging time: l 19)
Goes off:
Charging completed
Flashing:
Make sure that the terminals of the battery or the
AC adaptor are not exposed to dirt, foreign objects
or dust, then reconnect them properly. (l 131)
HDCSD100EB-VQT1T81_mst.book 17 ページ 2008年7月11日 金曜日 午後6時57分

18
VQT1T81
≥ We recommend using Panasonic batteries (l 9, 19).
≥ If you use other batteries, we cannot guarantee the quality of this product.
≥ Do not heat or expose to flame.
≥ Do not leave the battery(ies) in an automobile exposed to direct sunlight for a long period of time with
doors and windows closed.
Install the battery by inserting it in the direction shown in the figure.
Inserting/removing the battery
Removing the battery
Make sure to turn the mode dial to OFF and
the status indicator is turned off, and then
remove by holding onto it taking care not to
drop.
Move the BATTERY lever in the direction
indicated by the arrow and remove the
battery when unlocked.
A Install the battery with the terminal cover
securely closed.
B Insert the battery until it clicks and locks.
CAUTION
Danger of explosion if battery is incorrectly
replaced. Replace only with the same or
equivalent type recommended by the
manufacturer. Dispose of used batteries
according to the manufacturer’s instructions.
HDCSD100EB-VQT1T81_mst.book 18 ページ 2008年7月11日 金曜日 午後6時57分

19
VQT1T81
∫ Charging/Recording time
≥ Temperature: 25 oC/humidity: 60%
≥ When using the viewfinder (times in parentheses are when using the LCD monitor)
* The battery pack holder kit VW-VH04 (optional) is necessary.
≥ These times are approximations.
≥ The indicated charging time is for when the battery has been discharged completely. The charging
time may vary depending on how the battery has been used. The charging time for the battery in hot/
cold environments or a battery that has not been used for long time may be longer than normal.
≥ The actual recordable time refers to the recordable time when repeatedly starting/stopping recording,
turning the unit on/off, moving the zoom lever etc.
≥ The recordable times will vary depending on the status of use. Be aware that the operating time of the
battery will become shorter in low temperatures. We recommend charging a spare battery for use
when recording.
≥ The batteries heat up after use or charging. This is not a malfunction.
≥ It is not necessary to consume the battery completely. The battery can be recharged even if some
capacity remains.
Charging and recording time
Battery model number Charging time
Maximum continuously
recordable time
Actual recordable
time
Supplied battery/
VW-VBG130 (optional)
2h35min
2h5min
(1 h 55 min)
1h20min
(1 h 10 min)
VW-VBG260 (optional) 4 h 40 min
3h50min
(3 h 35 min)
2h25min
(2 h 15 min)
VW-VBG6 (optional)
*
9h25min
9h35min
(8 h 55 min)
6h
(5 h 35 min)
HDCSD100EB-VQT1T81_mst.book 19 ページ 2008年7月11日 金曜日 午後6時57分
20
VQT1T81
The unit is in the standby condition when the AC adaptor is connected. The primary circuit is always
“live” as long as the AC adaptor is connected to an electrical outlet.
Important:
While the DC cable is connected to the AC adaptor, the battery will not charge.
≥ Do not use the AC cable with any other equipment as it is designed only for this unit. Do not
use the AC cable from other equipment with this unit.
A DC output terminal
B DC input terminal
Insert the DC cable so the [ ] mark is pointing upward matching the [ ] mark of the DC input
terminal.
1 Connect the AC cable to the AC adaptor and the AC outlet.
2 Connect the DC cable to the AC adaptor.
3 Connect the DC cable to the DC input terminal [DC IN].
Battery capacity indication
≥ The display changes as the battery capacity reduces. ####
If there is less than 3 minutes remaining, then will become red. If the battery discharges,
then ( ) will flash.
≥ The remaining battery capacity is displayed when using the Panasonic battery that you can use for
this unit. It may take time to display the remaining battery capacity. The actual time can vary
depending on your actual use.
≥ The maximum amount of remaining battery capacity able to be indicated is 9 hours 59 minutes. If
the actual remaining time exceeds 9 hours 59 minutes, the indication will stay green and will not
change until the remaining time falls below 9 hours 59 minutes.
≥ When turning the mode dial to switch modes, the time indication will turn off momentarily in order to
recalculate the remaining battery capacity time.
≥ When using the AC adaptor or batteries made by other companies, the remaining battery capacity
will not be shown.
Connecting to the AC outlet
DC IN
HDCSD100EB-VQT1T81_mst.book 20 ページ 2008年7月11日 金曜日 午後6時57分
/