Kawai ATX4 Owner's manual

Category
Supplementary music equipment
Type
Owner's manual
CN35
Owners Manual
Preparation Before Use
Playing the Piano
Internal Songs
Recorder
Settings
Appendix
Thank you for purchasing this Kawai CN35 digital piano.
This owner’s manual contains important information regarding the usage and operation of the CN35 digital piano.
Please read all sections carefully, keeping this manual handy for future reference.
About this Owners Manual
Before attempting to play this instrument, please read the Introduction section from page 10 of this owner’s manual. This section
explains the name and function of each part, how to connect the power cable, and how to turn on the power.
The Playing the Piano section (page 17) provides an overview of the instruments commonly used functions, allowing the CN35 digital
piano to be enjoyed almost immediately after being connected, while the Internal Songs section (page 36) includes information
regarding the instrument’s built-in lesson songs and Concert Magic function.
The Recorder section (page 46) provides instructions on how to record and play back pieces stored both in the instrument’s internal
memory, and also MP3/WAV audio les saved to a USB memory device. Additional functions to load and save songs and registration
memories from/to USB devices are further explained in the USB Functions chapter (page 66). The Settings section (page 75) details
the various options and settings that can be used to adjust the sound and operation of the instrument.
Finally, the Appendix section (page 116) includes stand assembly instructions and device connection information. This section
also lists the instrument’s internal sounds, demonstration songs, drum rhythms and drum sound maps, in addition to full technical
specication details.
4
WARNING
The product should be connected to
an AC outlet of the specied voltage.
If you are going to use an AC power cord,
make sure that its has the correct plug shape
and conforms to the specied power voltage.
Failure to do so may result in re.
120V 240V230V
Indicates a potential hazard that could result in death or
serious injury if the product is handled incorrectly.
Do not insert or disconnect the power
cord plug with wet hands.
Doing so may cause electric shock.
WARNING - When using electric products, basic precautions should always be followed, including the following.
The product is not completely disconnected from the
power supply even when the power switch is turned
o. If the product will not be used for a long time,
unplug the AC power cord from the AC outlet.
Failure to do so may cause re in case of
lightning.
Failure to do so may over-heat the product,
resulting in re.
Do not disassemble, repair or modify
the product.
Doing so may result in product breakdown, electric
shock or short-circuit.
This product may be equipped with a polarized line plug (one blade wider
than the other). This is a safety feature.
If you are unable to insert the plug into the outlet, contact an electrician to
replace your obsolete outlet.
Do not defeat the safety purpose of the plug.
When disconnecting the AC power cord's
plug, always hold the plug
and pull it to remove it.
Pulling the AC power cord itself may damage
the cord, causing a re, electric shock or
short-circuit.
Doing so may cause the product to fall over,
resulting in injury.
Do not lean against the keyboard.
When using the headphones, do not
listen for long periods of
time at high volume levels.
Doing so may result in hearing problems.
It is a good practice to have the instrument near the AC outlet and the power cord plug in a position
so that it can readily be disconnected in an emergency because electricity is always charging
while the plug is in the AC outlet even in a power switch o condition.
The chair must be used properly (it must be
used only when playing the product).
Do not play with it or stand on it.
Only one person is allowed to sit on it.
Do not sit on it when opening the lid.
Re-tighten the bolts occasionally.
Doing so may cause the chair to fall over or your
ngers to be trapped, resulting in injury.
Entry of water, needles or hair pins may result
in breakdown or short-circuit.
The product shall not be exposed to dripping or
splashing. No objects lled with liquids, such as
vases, shall be placed on the product.
Take care not to allow any foreign
matter to enter the product.
Important Safety Instructions
denotes that care should be taken.
The example instructs the user to take care not to allow ngers to be trapped.
denotes a prohibited operation.
The example instructs that disassembly of the product is prohibited.
denotes an operation that should be carried out.
The example instructs the user to remove the power cord plug from the AC outlet.
Examples of Picture Symbols
Read all the instructions before using the product.
CAUTION
RISK OF ELECTRIC SHOCK
DO NOT OPEN
AVIS : RISQUE DE CHOC ELECTRIQUE
- NE PAS OUVRIR.
TO REDUCE THE RISK OF ELECTRIC SHOCK, DO NOT OPEN THE AC ADAPTOR.
NO USER-SERVICEABLE PARTS INSIDE. REFER SERVICING TO QUALIFIED SERVICE PERSONNEL.
The lighting ash with arrowhead symbol, within
an equilateral triangle, is intended to alert the user
to the presence of uninsulated "dangerous
voltage" within the product's enclosure that may
be of sucient magnitude to constitute a risk of
electric shock to persons.
The exclamation point within an equilateral
triangle is intended to alert the user to the
presence of important operating and maintenance
(servicing) instructions in the leterature
accompanying the product.
WARNING
TO REDUCE THE RISK OF FIRE
OR ELECTRIC SHOCK, DO NOT
EXPOSE THIS PRODUCT TO
RAIN OR MOISTURE.
INSTRUCTIONS PERTAINING TO A RISK OF FIRE, ELECTRIC SHOCK, OR INJURY TO PERSONS
SAVE THESE INSTRUCTIONS
1) Read these instructions.
2) Keep these instructions.
3) Heed all warnings.
4) Follow all instructions.
5) Do not use this apparatus near water.
6) Clean only with dry cloth.
7) Do not block any ventilation openings. Install in
accordance with the manufacturer's instructions.
8) Do not install near any heat sources such as radiators,
heat registers, stoves, or other apparatus (including
ampliers) that produce heat.
9) Do not defeat the safety purpose of the polarized or
grounding-type plug. A polarized plug has two
blades with one wider than the other. A grounding
type plug has two blades and a third grounding
prong. The wide blade or the third prongs are
provided for your safety. If the provided plug does
not t into your outlet, consult an electrician for
replacement of the obsolete outlet.
10) Protect the power cord from being walked on or
pinched particularly at plugs, convenience
receptacles, and the point where they exit from the
apparatus.
11) Only use attachments/accessories specied by the
manufacturer.
12) Use only with the cart, stand, tripod, bracket, or table
specied by the manufacturer, or
sold with the apparatus. When a cart is used,
use caution when moving the cart/apparatus
combination to avoid injury from tip-over.
13) Unplug this apparatus during lightning storms or
when unused for long periods of time.
14) Refer all servicing to qualied service personnel.
Servicing is required when the apparatus has been
damaged in any way, such as power-supply cord or
plug is damaged, liquid has been spilled or object
have fallen into the apparatus, the apparatus has
been exposed to rain or moisture, does not operate
normally, or has been dropped.
5
WARNING
The product should be connected to
an AC outlet of the specied voltage.
If you are going to use an AC power cord,
make sure that its has the correct plug shape
and conforms to the specied power voltage.
Failure to do so may result in re.
120V 240V230V
Indicates a potential hazard that could result in death or
serious injury if the product is handled incorrectly.
Do not insert or disconnect the power
cord plug with wet hands.
Doing so may cause electric shock.
WARNING - When using electric products, basic precautions should always be followed, including the following.
The product is not completely disconnected from the
power supply even when the power switch is turned
o. If the product will not be used for a long time,
unplug the AC power cord from the AC outlet.
Failure to do so may cause re in case of
lightning.
Failure to do so may over-heat the product,
resulting in re.
Do not disassemble, repair or modify
the product.
Doing so may result in product breakdown, electric
shock or short-circuit.
This product may be equipped with a polarized line plug (one blade wider
than the other). This is a safety feature.
If you are unable to insert the plug into the outlet, contact an electrician to
replace your obsolete outlet.
Do not defeat the safety purpose of the plug.
When disconnecting the AC power cord's
plug, always hold the plug
and pull it to remove it.
Pulling the AC power cord itself may damage
the cord, causing a re, electric shock or
short-circuit.
Doing so may cause the product to fall over,
resulting in injury.
Do not lean against the keyboard.
When using the headphones, do not
listen for long periods of
time at high volume levels.
Doing so may result in hearing problems.
It is a good practice to have the instrument near the AC outlet and the power cord plug in a position
so that it can readily be disconnected in an emergency because electricity is always charging
while the plug is in the AC outlet even in a power switch o condition.
The chair must be used properly (it must be
used only when playing the product).
Do not play with it or stand on it.
Only one person is allowed to sit on it.
Do not sit on it when opening the lid.
Re-tighten the bolts occasionally.
Doing so may cause the chair to fall over or your
ngers to be trapped, resulting in injury.
Entry of water, needles or hair pins may result
in breakdown or short-circuit.
The product shall not be exposed to dripping or
splashing. No objects lled with liquids, such as
vases, shall be placed on the product.
Take care not to allow any foreign
matter to enter the product.
6
Doing so may cause the product to become
deformed or fall over, resulting in breakdown
or injury.
Do not stand on the product or exert
excessive force.
Doing so may result in discoloration or deformation
of the product.
When cleaning the product, put a soft cloth in
lukewarm water, squeeze it well, then wipe the
product.
Do not wipe the product with benzene
or thinner.
Failure to do so may damage them, resulting in
re, electric shock or short-circuit.
When connecting the AC power cord
and other cords, take care
not to get them tangled.
Doing so may cause the product to generate
noise.
If the product generates noise, move the
product suciently away from the electrical
appliance or connect it to another AC outlet.
Do not place the product near electrical
appliances such as TVs and radios.
Please lift up the product when moving it.
Please note that the product is heavy and must
be carried by more than two persons.
Dropping the product may result in breakdown.
Do not drag the product on the oor.
Take care not to drop the product.
Doing so may cause the illumination to fall over,
resulting in re.
Do not place naked ame, such as lighted
candles on the product.
CAUTION
Indicates a potential hazard that could result in injury or
damage to the product or other property if the product
is handled incorrectly.
Using the product in such areas may result in
product breakdown.
Use the product only in moderate climates (not
in tropical climates).
Do not use the product in the following areas.
Areas, such as those near windows, where the product is
exposed to direct sunlight
Extremely hot areas, such as near a heater
Extremely cold areas, such as outside
Extremely humid areas
Areas where a large amount of sand or dust is present
Areas where the product is exposed to excessive
vibrations
Closing it roughly may trap your ngers,
resulting in injury.
When you close the keyboard cover,
close it gently.
Failure to do so may cause breakdown of this
product and other devices.
Before connecting cords, make sure
that the power to this product
and other devices is turned
OFF.
OFF
The product should be located so that its location or position does not interfere with its proper ventilation. Ensure a
minimum distance of 5cm around the product for sucient ventilation.
Failure to do so may over-heat the product,
resulting in re.
Ensure that the ventilation is not
impeded by covering the ventilation
openings with items, such as newspaper,
table-cloths, curtains, etc.
Use only the AC adaptor included with this instrument to power the instrument.
Do not use other AC adaptors to power this instrument.
Do not use the included AC adaptor or AC power cord to power other equipment.
7
The product should be serviced by qualied service personnel when:
The power supply cord or the plug has been damaged.
Objects have fallen, or liquid has been spilled into the product.
The product has been exposed to rain.
The product does not appear to operate normally or exhibits a marked change in performance.
The product has been dropped, or the enclosure damaged.
Notes on Repair
Should an abnormality occur in the product, immediately turn the power OFF, disconnect the power cord plug, and then
contact the shop from which the product was purchased.
CAUTION:
To prevent electric shock, match wide blade of plug to wide slot, fully insert.
AT TENTION:
Pour éviter les chocs électriques, introduire la lame la plus large de la che dans la borne correspondante de la prise et
pousser jusqu'au fond.
An information on Disposal for users
If your product is marked with this recycling symbol it means that, at the end of its life, you must dispose of it
separately by taking it to an appropriate collection point.
You should not mix it with general household waste. Disposing of this product correctly will prevent potential negative
eects on the environment and human health which could otherwise arise due to inappropriate waste handling.
For further details, please contact your local authority.
(European Union only)
Instruction for AC power cord (U.K.)
IMPORTANT
THE WIRES IN THIS MAINS LEAD ARE COLOURED IN ACCORDANCE WITH THE FOLLOWING CODE.
BLUE : NEUTRAL
BROWN : LIVE
As the colours of the wires in the mains lead of this apparatus may not correspond with the coloured markings identifying
the terminals in your plug, proceed as follows:
The wire which is coloured BLUE must be connected to the terminal which is marked with the letter N or coloured BLACK.
The wire which is coloured BROWN must be connected to the terminal which is marked with the letter L or coloured RED.
Do not plug either terminal of the power cord to the the ground od AC outlet on the wall.
FCC Information (U.S.A)
CAUTION : Changes or modications not expressly approved by the party responsible for compliance could void the user’s
authority to operate the equipment.
NOTE : This equipment has been tested and found to comply with the limits for a Class B digital device, pursuant to Part 15 of
the FCC Rules. These limits are designed to provide reasonable protection against harmful interference in a residential
installation. This equipment generates, uses and can radiate radio frequency energy and, if not installed and used in
accordance with the instructions, may cause harmful interference to radio communications. However, there is no guarantee
that interference will not occur in a particular installation. If this equipment does cause harmful interference to radio or
television reception, which can be determined by turning the equipment o and on, the user is encouraged to try to correct
the interference by one or more of the following measures:
Reorient or relocate the receiving antenna.
Increase the separation between the equipment and receiver.
Connect the equipment into an outlet on a circuit dierent from that to which the receiver is connected.
Consult the dealer or an experienced radio/TV technician for help.
The nameplate label is located on
the
underside of the instrument, as
indicated below.
Nameplate
Declaration of Conformity
Products : Electronic Piano
Model Number : CN35
Responsible Party Name : Kawai America Corporation
Address : 2055 East University Drive Rancho
Dominguez, CA 90220
Telephone 310-631-1771
This device complies with Part 15 of the FCC Rules.
Operation is subject to the following two conditions:
(1) this device may not cause harmful interference, and
(2) this device must accept any interference received,
including interference that may cause undesired operation.
This applies only to products distributed by Kawai America Corporation.
8
Table of Contents
Important Safety Instructions . . . . . . . . . . . . . . . . . . . . . . . 4
Table of Contents . . . . . . . . . . . . . . . . . . . . . . . . . . . . . . . . . . . . 8
Introduction
Welcome to the Kawai CN35 ........................10
1. Feature Highlights ..............................10
2. Owner’s Manual Conventions . . . . . . . . . . . . . . . . . . 11
Part Names and Functions ..........................12
Setting Up the Piano ................................14
Using the Pedals . . . . . . . . . . . . . . . . . . . . . . . . . . . . . . . . . . . . 16
Playing the Piano
Selecting Sounds .................................... 17
Demo Songs .........................................18
Dual Mode ...........................................19
Split Mode ...........................................21
Four Hands Mode . . . . . . . . . . . . . . . . . . . . . . . . . . . . . . . . . . . 23
Enhancing the Sound ...............................25
1. Reverb . . . . . . . . . . . . . . . . . . . . . . . . . . . . . . . . . . . . . . . . . . 25
2. Eects . . . . . . . . . . . . . . . . . . . . . . . . . . . . . . . . . . . . . . . . . . 26
Touch ................................................27
Creating a User Touch Curve ......................28
Panel Lock ...........................................29
Transpose . . . . . . . . . . . . . . . . . . . . . . . . . . . . . . . . . . . . . . . . . . . 30
Metronome / Drum Rhythms .......................32
Registration Memories ..............................34
Lesson Function
Lesson Function .....................................36
1. Selecting a lesson book/song . . . . . . . . . . . . . . . . . . 36
2. Listening to the selected lesson song . . . . . . . . . . 37
3. Practicing left and right-hand parts separately . 38
4. Repeating sections of a lesson song ............39
5. Recording a lesson song practice ...............40
Lesson Function (cont.)
Concert Magic .......................................41
1. Performing a Concert Magic song ..............41
2. Concert Magic demo mode . . . . . . . . . . . . . . . . . . . . 43
3. Concert Magic song arrangement types . . . . . . . 44
4. Steady Beat mode . . . . . . . . . . . . . . . . . . . . . . . . . . . . . . 45
Recorder
Song Recorder (Internal memory) ........................46
1. Recording a Song ...............................46
2. Playing a Song ..................................48
3. Erasing a Part/Song .............................50
Audio Record/Playback
(USB memory) . . . . . . . . . . . . . . . . . 51
1. Recording an Audio le .........................51
2. Playing an Audio le ............................53
3. Overdubbing an Audio le . . . . . . . . . . . . . . . . . . . . . 55
4. Recording a MIDI le . . . . . . . . . . . . . . . . . . . . . . . . . . . 57
5. Playing a MIDI le ...............................60
6. Converting a MIDI le to an Audio le ..........62
7. Converting a Song to an Audio le . . . . . . . . . . . . . 64
8. Deleting an Audio/MIDI le .....................65
USB Functions
USB Menu . . . . . . . . . . . . . . . . . . . . . . . . . . . . . . . . . . . . . . . . . . . 66
1. Load Internal Song . . . . . . . . . . . . . . . . . . . . . . . . . . . . . 67
2. Load Registration ...............................68
3. Save SMF Song . . . . . . . . . . . . . . . . . . . . . . . . . . . . . . . . . 69
4. Save Internal Song ..............................70
5. Save Registration . . . . . . . . . . . . . . . . . . . . . . . . . . . . . . . 71
6. Rename File . . . . . . . . . . . . . . . . . . . . . . . . . . . . . . . . . . . . 72
7. Delete File . . . . . . . . . . . . . . . . . . . . . . . . . . . . . . . . . . . . . . 73
8. Format USB ..................................... 74
9
Settings
Settings Menus ......................................75
Basic Settings . . . . . . . . . . . . . . . . . . . . . . . . . . . . . . . . . . . . . . . 76
1-1 Tone Control ..................................77
Brilliance ......................................78
User EQ . . . . . . . . . . . . . . . . . . . . . . . . . . . . . . . . . . . . . . . 79
1-2 Speaker Volume . . . . . . . . . . . . . . . . . . . . . . . . . . . . . . 80
1-3 Phones Volume ...............................81
1-4 Line Out Volume ..............................82
1-5 Audio Recorder Gain ..........................83
1-6 Tuning . . . . . . . . . . . . . . . . . . . . . . . . . . . . . . . . . . . . . . . . 84
1-7 Damper Hold . . . . . . . . . . . . . . . . . . . . . . . . . . . . . . . . . 85
1-8 Four Hands . . . . . . . . . . . . . . . . . . . . . . . . . . . . . . . . . . . 86
1-9 Startup Setting . . . . . . . . . . . . . . . . . . . . . . . . . . . . . . . 87
1-10 Factory Reset . . . . . . . . . . . . . . . . . . . . . . . . . . . . . . . . 88
Virtual Technician ...................................89
2-1 Voicing ........................................91
2-2 Damper Resonance ...........................92
2-3 Damper Noise . . . . . . . . . . . . . . . . . . . . . . . . . . . . . . . . 93
2-4 String Resonance . . . . . . . . . . . . . . . . . . . . . . . . . . . . . 94
2-5 Key-o Eect . . . . . . . . . . . . . . . . . . . . . . . . . . . . . . . . . 95
2-6 Fall-back Noise. . . . . . . . . . . . . . . . . . . . . . . . . . . . . . . . 96
2-7 Hammer Delay ................................97
2-8 Topboard . . . . . . . . . . . . . . . . . . . . . . . . . . . . . . . . . . . . . 98
2-9 Decay Time ...................................99
2-10 Minimum Touch . . . . . . . . . . . . . . . . . . . . . . . . . . . . 100
2-11 Temperament . . . . . . . . . . . . . . . . . . . . . . . . . . . . . . 101
Stretch Tuning ..............................102
Stretch Curve . . . . . . . . . . . . . . . . . . . . . . . . . . . . . . . 103
User Tuning .................................104
Temperament Key ..........................105
User Temperament . . . . . . . . . . . . . . . . . . . . . . . . . 106
2-12 User Key Volume ............................107
2-13 Half-Pedal Adjust . . . . . . . . . . . . . . . . . . . . . . . . . . . . 108
2-14 Soft Pedal Depth . . . . . . . . . . . . . . . . . . . . . . . . . . . 109
Settings (cont.)
Key Settings ........................................ 110
3-1 Lower Octave Shift . . . . . . . . . . . . . . . . . . . . . . . . . . .111
3-2 Lower Pedal . . . . . . . . . . . . . . . . . . . . . . . . . . . . . . . . . 112
3-3 Layer Octave Shift . . . . . . . . . . . . . . . . . . . . . . . . . . . 113
3-4 Layer Dynamics .............................. 114
Power Settings ..................................... 115
4-1 Auto Power O . . . . . . . . . . . . . . . . . . . . . . . . . . . . . . 115
Appendix
Assembly Instructions . . . . . . . . . . . . . . . . . . . . . . . . . . . . . 116
Connecting to Other Devices ...................... 119
Jack Panel ........................................120
Headphone Panel ................................120
USB MIDI
(USB to Host connector) . . . . . . . . . . . . . . . . . . . . . . . . 121
Troubleshooting . . . . . . . . . . . . . . . . . . . . . . . . . . . . . . . . . . . 122
Demo Song List . . . . . . . . . . . . . . . . . . . . . . . . . . . . . . . . . . . . 124
Program Change Number List .....................125
Drum Sound Mapping List .........................134
Drum Rhythm List ..................................137
Settings List . . . . . . . . . . . . . . . . . . . . . . . . . . . . . . . . . . . . . . . . 138
Specications . . . . . . . . . . . . . . . . . . . . . . . . . . . . . . . . . . . . . . 140
Table of Contents
* For information regarding MIDI functions and settings, please download
the supplementary PDF manual from the Kawai Japan website:
http://www.kawai-global.com
10
Introduction
1
Feature Highlights
‘Responsive Hammer III’ weighted-key action, with Ivory Touch key surfaces and Let-o simulation
The new Responsive Hammer III (RHIII) action recreates the distinctive touch of an acoustic grand piano, with its realistic
movement and accurate 3-sensor technology providing a smooth, natural, and highly responsive piano playing experience.
The weight of the keyboard is appropriately graded to mirror the heavier bass hammers and lighter treble hammers of an
acoustic piano, while structural reinforcements within the action assembly ensure greater stability during fortissimo and
staccato passages.
The CN35 digital piano also features Kawai’s Ivory Touch key surfaces that gently absorb nger moisture to assist the players
performance, while, let-o simulation recreates the subtle ‘notch sensation felt when softly playing the keys of a grand
piano, satisfying the expectations of the most discerning pianists.
Progressive Harmonic Imaging (PHI) with 88-key piano sampling
The CN35 digital piano captures the beautiful sound of Kawai’s highly acclaimed hand-built concert grand piano, with all 88
keys of this exceptional instrument meticulously recorded, analysed and faithfully reproduced using proprietary Progressive
Harmonic Imagingtechnology. This unique process accurately recreates the broad dynamic range of the original grand
piano, aording pianists an extraordinary level of expressiveness ranging from the softest pianissimo to the strongest,
boldest fortissimo.
The instruments built-in Virtual Technician feature allows various characteristics of the acoustic piano sound to be shaped at
the touch of a button, with settings to adjust string and damper resonance. This personalised piano sound is further enhanced
with atmospheric reverberation eects, delivering a rich, vibrant piano tone with breathtaking realism and authenticity.
USB to Device functionality, with MP3/WAV le recording and playback
The CN35 digital piano is equipped with USB connectors that not only allow the instrument to be connected to a computer
for MIDI use, but also to load and save data to USB memory devices directly. This USB to Device feature allows registration
memories and songs recorded and stored in internal memory to be saved to USB for posterity, or standard MIDI les (SMF)
downloaded from the internet to be conveniently played back without additional hardware.
USB memory devices can also be used to play back MP3 or WAV audio les, allowing musicians to learn the chords or melody
for a new piece, or to simply play along with their favourite songs. It is even possible to save performances as MP3 or WAV
les for emailing to friends and family, listening to on a smartphone, or for further editing using an audio workstation.
Wide range of connectivity options
The CN35 digital piano features a variety of standard connectivity options, with Line-level output jacks that allow the
instrument to be enjoyed in larger settings such as churches and schools. Standard MIDI and USB to Host connectors ensure
exibility when using computers and other electronic instruments.
Welcome to the Kawai CN35
11
Introduction
2
Owner’s Manual Conventions
This owners manual utilises a number of illustrative conventions in order to explain the CN35’s various functions.
The examples below provide an overview of the button LED indicator states and press types, and the appearance
of dierence kinds of text.
Button LED indicator states
LED indicator o:
Sound/Function is not selected.
LED indicator on:
Sound/Function is selected.
LED indicator ashing:
Sound/Function is selected in a
temporary state.
Button press types
Normal press:
Select a sound or function.
Press twice:
Select a sound or function.
× 2
× 4
Press multiple times:
Cycle through sounds or settings.
Press and hold:
Select a function’s settings.
hold
Press and hold, then press X:
Combine two sounds, or store
registration memories etc.
hold
Text appearance
Normal instruction and explanation text
is written in regular type at 9 pt. size.
LCD display text
looks like this.
* Notes about functions are marked with an
asterisk and written in 8 pt. size.
Captions explaining the LCD display
or button functions, are written in
bold type at 8.5 pt. size.
Reminders about previous operations are
written in italic type at 9 pt. size.
Example operations are written in italic type
at 8 pt. size, and enclosed within a grey box.
Welcome to the Kawai CN35
12
Introduction
Part Names and Functions
r s t
ba c
i j k l m n o p q
f hgd e
u
v
zyxw
13
Introduction
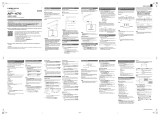
a MASTER VOLUME slider
This slider controls the master volume level of the instrument’s
built-in speakers or headphones, if connected.
* This slider does not aect the LINE OUT level. For information about
adjusting the LINE OUT level, please refer to page 82.
b CONCERT MAGIC button
This button is used to select the instrument's Concert Magic
function.
c LESSON button
This button is used to select the instrument's built-in Lesson
songs.
* When pressed simultaneously, the CONCERT MAGIC and LESSON
buttons are also used to select the instrument’s Demo mode.
d REGISTRATION button
This button is used to store and recall one of the 18 dierent
Registration memories. Each Registration can store sound, reverb/
eects settings, and various other panel and menu options.
e SOUND buttons
These buttons are used to select the sound(s) that will be heard
when playing the instrument’s keyboard. These buttons are
also used to select Registration memories
f MENU buttons
These buttons are used to navigate through the instrumnet’s
various function and settings menus.
g LCD display
The LCD display provides important information relating to the
currently selected sound, function, and setting.
* A protective plastic lm is attached to the display during production.
Please remove this lm before attempting to play the instrument.
h VALUE buttons
These buttons are used to adjust values, change settings, and
answer on-screen prompts.
i EFFECTS and REVERB buttons
These buttons are used to turn the instrument’s reverb and
eects functions on/o, and to adjust eect/reverb settings.
j BALANCE slider
This slider adjusts the volume balance of the two layered
sounds when Dual mode is selected, or the the upper and lower
sections when Split/Four Hands mode is selected.
k SPLIT button
This button is used to enable the Split/Four Hands mode
functions, allowing the keyboard to be divided into upper and
lower sections.
l METRONOME buttons
These buttons are used to turn the instrument’s metronome
function on/o, and to adjust metronome settings.
m RESET button
This button is used to reset the instrument’s song recorder, and
to rewind songs and MP3/WAV/SMF les to the beginning.
n REC and PLAY/STOP buttons
These buttons are used to record and playback songs stored in
the instruments internal memory, or MP3/WAV/SMF les saved
to a USB memory device.
o REW and FF buttons
These buttons are used to move the playing position of the
current recorder song or MP3/WAV/SMF backward or forward.
These buttons are also used to select the recorder song.
p LOOP button
This button is used to enable the instrument’s A-B Loop function,
allowing passages of a recorder song or MP3/WAV/SMF le to
be played back repeatedly.
q USB button
This button is used to access the instrument’s USB functions.
r TOUCH button
This button is used to access the instrument's Touch settings to
adjust the touch sensitivity of the keyboard.
s TRANSPOSE button
This button is used to adjust the pitch of the keyboard in
semitone steps.
t POWER switch
This switch is used to turn the instrument on/o.
* The CN35 digital piano features a power saving mode that can turn o
the instrument automatically after a specied period of inactivity. For
more information, please refer to the Auto Power O setting on page
115.
u PHONES jacks
These jacks are used to connect stereo headphones to the
instrument. Two pairs of headphones can be connected and
used simultaneously.
v USB to Device port
This port is used to connect a FAT or FAT32 formatted USB
memory device to the instrument in order to load/save recorded
song data, registration memories, and MP3/WAV/SMF les etc.
w LINE IN jacks
These jacks are used to connect the stereo output from audio
equipment, computers, or other electronic instruments to the
instrument's amplier and speakers.
x LINE OUT jacks
These jacks are used to connect the stereo output (Left/Right
1/4” phone plug) of the instrument to external ampliers,
mixers, recording devices, and similar equipment.
y USB to Host port
This port is use to connect the instrument to a computer using a
USB ‘B to A’ type cable in order to send and receive MIDI data.
z MIDI jacks
The jacks are used to connect the instrument to external MIDI
devices (such as other musical instruments or a computer) in
order to send and receive MIDI data.
Part Names and Functions
14
Introduction
Setting Up the Piano
1. Connecting the power adaptor
Connect the AC power adaptor to the DC IN terminal located on
the underside of the instrument, as indicated right.
2. Connecting the power adaptor to an outlet
Connect the AC power adaptor to an AC outlet.
3. Turning on the power
Press the POWER SWITCH located on the right hand side of the
front panel.
The instrument will turn on, and the words ‘Concert Grand’ will
be shown in the LCD display, indicating that the Concert Grand
sound is selected, and the instrument is ready to be played.
* The CN35 digital piano features a power saving mode that can turn o
the instrument automatically after a specied period of inactivity. For
more information, please refer to the ‘Auto Power Osetting on page
115.
4. Adjusting the volume
The MASTER VOLUME slider controls the volume level of the
instrument’s speakers, or headphones if connected.
Move the slider to the right to increase the volume, and to the
left to decrease the volume.
Use this slider to set the volume to a comfortable listening level
- the middle is often a good starting point.
* This slider does not aect the LINE OUT level. For information about
adjusting the LINE OUT level, please refer to page 82.
Decrease
volume
Increase
volume
15
Introduction
Setting Up the Piano
Using headphones
Use the jacks located beneath the keyboard on the left hand
side, to connect stereo headphones to the CN35 digital piano.
Two pairs of headphones can be connected and used
simultaneously. When a pair of headphones is connected,
sound will not be produced by the speakers.
Attaching the headphone hook (optional)
A headphone hook is included with the CN35 digital piano and
can be used to hang headphones when not in use.
If desired, attach the headphone hook to the underside of the
keyboard as shown in the illustration right.
16
Introduction
As with a grand piano, the CN35 digital piano features three pedals: sustain, sostenuto, and soft.
Sustain pedal (right pedal)
Depressing this pedal sustains the sound after one’s hands have
been lifted from the keyboard - greatly enriching the piano
sound, while also assisting smooth ‘legato’ passages.
The sustain pedal is capable of responding to half pedaling.
Soft pedal
Sostenuto pedal
Sustain pedal
Soft pedal (left pedal)
Depressing this pedal softens the sound, reducing its volume.
When the rotary speaker eect is selected, the soft pedal is also
used to alternate the speed of the rotary simulation between
‘Slow’ and ‘Fast’ eect modes.
Sostenuto pedal (centre pedal)
Depressing this pedal after playing the keyboard and before
releasing the keys, sustains the sound of only those notes that
have been played. Any keys that are subsequently played after
the sostenuto pedal is depressed will not be sustained.
Pedal support bolt
A pedal support bolt is attached at the base of the pedal board
to aid stability when the pedals are pushed.
Turn the bolt anti-clockwise until it makes contact with the oor
and supports the pedals rmly. If the pedal support bolt does
not make contact with the oor, the pedal board may become
damaged.
Pedal support bolt
When moving the instrument, always adjust or remove the pedal
support bolt, then readjust when the instrument is in its new position.
Caring for the pedals
If the surface of the pedals becomes dirty, clean the pedals using a dry dish-washing sponge.
Do not attempt to clean the pedals using rust-removing solvents, abrasives or les.
Grand Feel pedal system
The CN35 digital piano features the Grand Feel pedal system, which replicates the sustain, soft, and sostenuto pedal weighting of
Kawais EX Concert Grand piano.
Using the Pedals
17
Playing the Piano
Sounds are arranged into nine categories, with multiple sounds assigned to each category button. For a complete
listing of the available instrument sounds, please refer to page 125 of this owners manual.
By default, the ‘Concert Grand’ sound will be selected automatically when the instrument is turned on.
* The OTHERS button is assigned with 300 sounds, divided into 20 additional categories.
Sound categories and variations
PIANO 1
1 Concert Grand
2 Studio Grand
3 Mellow Grand
4 Modern Piano
PIANO 2
1 Concert Grand2
2 Studio Grand2
3 Mellow Grand2
4 Rock Piano
ELECTRIC PIANO
1 Classic E.P.
2 Modern E. P.
3 60’s E.P.
4 Modern E. P. 2
ORGAN
1 Jazz Organ 5 Church Organ
2 Blues Organ 6 Diapason
3 Ballad Organ 7 Full Ensemble
4 Gospel Organ 8 Diapason Oct.
HARPSI & MALLETS
1 Harpsichord
2 Harpsichord 2
3 Vibraphone
4 Clavi
BASS
1 Wood Bass
2 Electric Bass
3 Fretless Bass
4 W. Bass & Ride
CHOIR & PAD
1 Choir
2 Choir 2
3 New Age
4 Atmosphere
STRINGS
1 Slow Strings
2 String Pad
3 Warm Strings
4 String Ensemble
OTHERS
300 sounds
1. Selecting a sound category
Press the desired SOUND button.
The LED indicator for the button will turn on to indicate that this
category has been selected, and the name of the sound will be
shown in the LCD display.
Classic E.P.
Example: To select the ELECTRIC PIANO category, press the
ELECTRIC PIANO button.
2. Changing the selected sound variation
Several sound variations are assigned to each category button.
Press a SOUND button repeatedly to cycle through the dierent
sound variations.
Concert Grand2
Mellow Grand2
The
or
VALUE buttons can also be used to select sounds,
and cycle through the dierent sound variations.
* While holding down one of the VALUE buttons, pressing the other
VALUE button will jump to the next sound category within the
OTHERS selection.
× 3
Example: To select the Mellow Grand2 sound, press the
PIANO 2 button three times.
Selecting Sounds
18
Playing the Piano
The Demo function provides an excellent introduction to the varied capabilities of the CN35 digital piano.
There are 32 dierent demonstration songs available, highlighting the instruments rich selection of high quality
sounds, and powerful speaker system.
For a complete listing of the available demonstration songs, please refer to page 124 of this owners manual.
* Kawai regrets that sheet music for Kawai original demo songs is not available.
1. Entering demo mode
Press the CONCERT MAGIC and LESSON buttons simultaneously.
The LED indicators for both buttons will turn on and the SOUND
buttons will start to flash.
The demo song for the PIANO 1 category will start. After the
PIANO 1 demo songs have finished playing, the demo songs for
another sound category will be selected at random.
Demo
Concert Grand
Demo song name
* There are 4 songs stored for the PIANO 1 sound, which will be played
in order. Pressing the PIANO 1 button repeatedly will select the next
piano song.
2. Selecting a demo song
While Demo mode is selected and the demo songs are playing:
Press the desired SOUND button.
The LED indicator for the button will start to ash, and the rst
demo in the selected sound category will start to play.
Press the selected sound category button repeatedly to cycle
through the dierent demo songs in that category.
Demo
Modern Piano
The
or
VALUE buttons can also be used to cycle through all
of the dierent demo songs.
Example: To select the Modern Piano demo song, press
the PIANO 1 button three times.
3. Stopping the demo song and exiting demo mode
While Demo mode is selected and the demo songs are playing.
Press the CONCERT MAGIC or LESSON button.
The LED indicators will stop ashing, the demo songs will
stop playing, and the instrument will return to normal playing
mode.
or
Demo Songs
19
Playing the Piano
Dual Mode
The Dual Mode function allows two sounds to be layered together, creating a more complex sound.
For example, a piano sound layered with strings, or a church organ combined with a choir, etc.
1. Entering Dual mode
Press and hold a SOUND button to select the main sound, then
press another SOUND button to select the layered sound.
The LED indicators for both SOUND buttons will turn on to
indicate that Dual mode is in use, and the respective sound
names will be shown in the LCD display.
Layered sound
Concert Grand
Slow Strings
Main sound
2. Changing the main/layered sounds
To select a dierent variation for the layered sound:
Press and hold the main SOUND button, then press the layered
SOUND button repeatedly to cycle through the dierent sound
variations.
Concert Grand
String Ensemble
To select a dierent variation for the main sound:
Press and hold the layered SOUND button, then press the main
SOUND button repeatedly to cycle through the dierent sound
variations.
Mellow Grand
String Ensemble
To layer two variations assigned to the same SOUND button:
Press and hold a SOUND button, then press the or
VALUE
buttons to select the layered sound variation.
Classic E.P.
60's E.P.
* Preferred Dual mode sound combinations can be stored to a
Registration memory for convenient recall. Please refer to page 34
for more information.
hold
Example: To layer the Slow Strings sound with the
‘Concert Grand’ sound, press and hold the PIANO 1 button,
then press the STRINGS button.
hold
× 3
Example: To change the layered ‘Slow Strings’ sound to
the ‘String Ensemble’ sound, press and hold the PIANO 1
button, then press the STRINGS button three times.
hold
× 2
Example: To change the main ‘Concert Grand’ sound to
the ‘Mellow Grandsound, press and hold the STRINGS
button, then press the PIANO 1 button twice.
hold
× 3
Example: To layer the ‘Classic E.P.’ and ‘60’s E.Piano’ sounds
together, press and hold the ELECTRIC PIANO button, then
press the VALUE
button three times.
20
Playing the Piano
Dual Mode
3. Adjusting the main/layered sound volume balance
While Dual mode is in use:
Use the BALANCE slider to adjust the volume balance between
the two sounds.
As the volume of the main sound increases, the volume of the
layered sound decreases, and vice versa.
* The preferred Dual mode volume balance can also be stored to a
Registration memory for convenient recall. Please refer to page 34 for
more information.
* The Layer Octave Shift setting can be used to adjust the octave range
of the layered sound. Please refer to page 113 for more information.
* The Layer Dynamics setting can be used to adjust the dynamic
sensitivity of the layered sound. Please refer to page 114 for more
information.
4. Exiting Dual mode
While Dual mode is in use:
Press a single SOUND button.
The LED indicator for the button will turn on, the name of
the selected sound will be shown in the LCD display, and the
instrument will return to normal (single voice mode) operation.
Concert Grand
Increase
layered
sound
volume
Increase
main
sound
volume
  • Page 1 1
  • Page 2 2
  • Page 3 3
  • Page 4 4
  • Page 5 5
  • Page 6 6
  • Page 7 7
  • Page 8 8
  • Page 9 9
  • Page 10 10
  • Page 11 11
  • Page 12 12
  • Page 13 13
  • Page 14 14
  • Page 15 15
  • Page 16 16
  • Page 17 17
  • Page 18 18
  • Page 19 19
  • Page 20 20
  • Page 21 21
  • Page 22 22
  • Page 23 23
  • Page 24 24
  • Page 25 25
  • Page 26 26
  • Page 27 27
  • Page 28 28
  • Page 29 29
  • Page 30 30
  • Page 31 31
  • Page 32 32
  • Page 33 33
  • Page 34 34
  • Page 35 35
  • Page 36 36
  • Page 37 37
  • Page 38 38
  • Page 39 39
  • Page 40 40
  • Page 41 41
  • Page 42 42
  • Page 43 43
  • Page 44 44
  • Page 45 45
  • Page 46 46
  • Page 47 47
  • Page 48 48
  • Page 49 49
  • Page 50 50
  • Page 51 51
  • Page 52 52
  • Page 53 53
  • Page 54 54
  • Page 55 55
  • Page 56 56
  • Page 57 57
  • Page 58 58
  • Page 59 59
  • Page 60 60
  • Page 61 61
  • Page 62 62
  • Page 63 63
  • Page 64 64
  • Page 65 65
  • Page 66 66
  • Page 67 67
  • Page 68 68
  • Page 69 69
  • Page 70 70
  • Page 71 71
  • Page 72 72
  • Page 73 73
  • Page 74 74
  • Page 75 75
  • Page 76 76
  • Page 77 77
  • Page 78 78
  • Page 79 79
  • Page 80 80
  • Page 81 81
  • Page 82 82
  • Page 83 83
  • Page 84 84
  • Page 85 85
  • Page 86 86
  • Page 87 87
  • Page 88 88
  • Page 89 89
  • Page 90 90
  • Page 91 91
  • Page 92 92
  • Page 93 93
  • Page 94 94
  • Page 95 95
  • Page 96 96
  • Page 97 97
  • Page 98 98
  • Page 99 99
  • Page 100 100
  • Page 101 101
  • Page 102 102
  • Page 103 103
  • Page 104 104
  • Page 105 105
  • Page 106 106
  • Page 107 107
  • Page 108 108
  • Page 109 109
  • Page 110 110
  • Page 111 111
  • Page 112 112
  • Page 113 113
  • Page 114 114
  • Page 115 115
  • Page 116 116
  • Page 117 117
  • Page 118 118
  • Page 119 119
  • Page 120 120
  • Page 121 121
  • Page 122 122
  • Page 123 123
  • Page 124 124
  • Page 125 125
  • Page 126 126
  • Page 127 127
  • Page 128 128
  • Page 129 129
  • Page 130 130
  • Page 131 131
  • Page 132 132
  • Page 133 133
  • Page 134 134
  • Page 135 135
  • Page 136 136
  • Page 137 137
  • Page 138 138
  • Page 139 139
  • Page 140 140
  • Page 141 141
  • Page 142 142

Kawai ATX4 Owner's manual

Category
Supplementary music equipment
Type
Owner's manual

Ask a question and I''ll find the answer in the document

Finding information in a document is now easier with AI