Sharp MX-M363U User manual

Category
Multifunctionals
Type
User manual
MODEL:
Faxing
Using the fax function.
Before using the machine
Functions of the machine and
procedures for placing originals and
loading paper.
Copying
Using the copy function.
Printing
Using the printer function.
Scanning
Using the scan function.
Document filing
Storing jobs as files on the hard
drive.
System settings
Configuring settings to make the
machine easier to use.
Troubleshooting
Frequently asked questions and
how to clear paper misfeeds.
MX-M363U
MX-M453U
MX-M503U
DIGITAL MULTIFUNCTIONAL SYSTEM
Quick Start Guide
Quick Start Guide
Quick Start Guide
Keep this manual close at hand for reference
whenever needed.
OPERATION MANUALS AND HOW TO USE THEM
3 printed manuals and a manual in PDF format are provided with the machine.
Printed manuals
Quick Start Guide
(this manual)
Please read when the printer
expansion kit is installed.
Software Setup
Guide
To learn the parts of the machine and how to use them
To load paper
Before using the machine (page 7)
To make a copy
Copying (page 21)
What is document filing?
What is it used for?
Document filing (page 87)
To print a file
Printing (page 41)
To send a fax
Faxing (page 53)
What are the system settings?
System settings (page 95)
Frequently asked questions and how to
clear paper misfeeds
Troubleshooting (page 101)
This manual provides
easy-to-understand
explanations of the functions of
the machine in a single
manual.
The explanations in this manual
focus on frequently used
functions. For special functions,
troubleshooting, and detailed
procedures for using the
machine, see the manuals in
PDF format.
Explains the procedures for installing the
printer driver and scanner driver.
Please read before
using the machine.
Safety Guide
Contains important safety information
and the specifications of the machine.
These manuals are combined for environmental protection.
To send a scanned image
To use Internet fax
Scanning (page 71)
1
Manuals in PDF format
Convenient methods for using the Operation Guide
The first page contains a regular table of contents as well as an "I want to..." table of
contents.
"I want to..." lets you jump to an explanation based on what you want to do. For
example, "I use the copier function often, so I'd like to save paper".
Use either table of contents as appropriate based on what you want to know.
BEFORE USING THE MACHINE
COPIER
PRINTER
FACSIMILE
SCANNER / INTERNET FAX
DOCUMENT FILING
SYSTEM SETTINGS
TROUBLESHOOTING
For detailed
information
* To view the Operation Guide in PDF format, Adobe
®
Reader
®
or Acrobat
®
Reader
®
of Adobe Systems
Incorporated is required. Adobe
®
Reader
®
can be downloaded from the following URL:
http://www.adobe.com/
Detailed explanations of the functions that can be used on the machine are provided in the Operation Guide
in PDF format. The Operation Guide is on the CD-ROM that accompanies the machine.
The "MX-M363U/M453U/M503U
Series Operation Guide" CD-ROM
that accompanies the machine
contains the Operation Guide.
The contents of the Operation Guide are as follows:
Operation Guide
2
CHECKING THE IP ADDRESS
To check the IP address of the machine, print out the printer test page in the system settings.
1 Press the [SYSTEM SETTINGS] key.
2 Select the all custom setting list in
the touch panel.
(1) Touch the [List Print (User)] key.
(2) Touch the [Printer Test Page] key.
(3) Change the page with the key
and touch the [NIC Page] key.
The IP address is shown in the list that is
printed.
SYSTEM
SETTING
S
System Settings
Total Count Default Settings
List Print
(User)
Address Control
Fax Data
Receive/Forward
Document Filing
Control
USB-Device Check
Paper Tray
Settings
Printer Condition
Settings
Admin Password
Exit
System Settings
List Print (User)
All Custom Setting List
Printer Test Page
Sending Address List
OK
1/2
System Settings
Printer Test Page
NIC Page
OK
2/2
(1)
(2)
(3)
3
ACCESSING THE WEB SERVER IN THE
MACHINE
When the machine is connected to a network, the machine's built-in Web server can be accessed from a Web
browser on your computer.
Opening the Web pages
Access the Web server in the machine to open
the Web pages.
Start a Web browser on a computer that is
connected to the same network as the machine
and enter the IP address of the machine.
Recommended Web browsers
Internet Explorer: 6.0 or higher (Windows
®
)
Netscape Navigator: 9 (Windows
®
)
Firefox: 2.0 or higher (Windows
®
)
Safari: 1.5 or higher (Macintosh)
The Web page will appear.
The machine settings may require that user
authentication be performed in order to open the Web
page. Please ask the administrator of the machine for
the password that is required for user authentication.
4
TABLE OF CONTENTS
CHECKING THE IP ADDRESS. . . . . . . . . . . . . . . . . . . . . . . . . . . . . . . . . . . . . . . . . . . . . . . . . . . . . .2
ACCESSING THE WEB SERVER IN THE MACHINE . . . . . . . . . . . . . . . . . . . . . . . . . . . . . . . . . . . .3
PART NAMES AND FUNCTIONS . . . . . . . . . . . . . . . . . . . . . . . . . . . . . . . . . . . . . . . . . . . . . . . . . . .8
OPERATION PANEL . . . . . . . . . . . . . . . . . . . . . . . . . . . . . . . . . . . . . . . . . . . . . . . . . . . . . . . . . . . .10
USING THE TOUCH PANEL . . . . . . . . . . . . . . . . . . . . . . . . . . . . . . . . . . . . . . . . . . . . . . . . . . . . . .12
USER AUTHENTICATION . . . . . . . . . . . . . . . . . . . . . . . . . . . . . . . . . . . . . . . . . . . . . . . . . . . . . . . .13
PLACING ORIGINALS . . . . . . . . . . . . . . . . . . . . . . . . . . . . . . . . . . . . . . . . . . . . . . . . . . . . . . . . . . .14
CHANGING PAPER IN A TRAY . . . . . . . . . . . . . . . . . . . . . . . . . . . . . . . . . . . . . . . . . . . . . . . . . . . .15
BASE SCREEN OF COPY MODE . . . . . . . . . . . . . . . . . . . . . . . . . . . . . . . . . . . . . . . . . . . . . . . . . .22
MAKING COPIES . . . . . . . . . . . . . . . . . . . . . . . . . . . . . . . . . . . . . . . . . . . . . . . . . . . . . . . . . . . . . . .23
2-SIDED COPYING (Automatic Document Feeder). . . . . . . . . . . . . . . . . . . . . . . . . . . . . . . . . . . .24
COPYING ON SPECIAL PAPER (Bypass Copy) . . . . . . . . . . . . . . . . . . . . . . . . . . . . . . . . . . . . . .25
SELECTING THE EXPOSURE AND IMAGE TYPE . . . . . . . . . . . . . . . . . . . . . . . . . . . . . . . . . . . . .27
FITTING THE COPY IMAGE TO THE PAPER (Automatic Ratio Selection) . . . . . . . . . . . . . . . . .28
ENLARGEMENT/REDUCTION (Preset Ratios / Zoom) . . . . . . . . . . . . . . . . . . . . . . . . . . . . . . . . .29
INTERRUPTING A COPY RUN (Interrupt Copy) . . . . . . . . . . . . . . . . . . . . . . . . . . . . . . . . . . . . . .30
STORING COPY OPERATIONS (Job Programs) . . . . . . . . . . . . . . . . . . . . . . . . . . . . . . . . . . . . . .31
SPECIAL MODES . . . . . . . . . . . . . . . . . . . . . . . . . . . . . . . . . . . . . . . . . . . . . . . . . . . . . . . . . . . . . . .33
SELECTING A SPECIAL MODE . . . . . . . . . . . . . . . . . . . . . . . . . . . . . . . . . . . . . . . . . . . . . . . . . . .34
CONVENIENT COPY FUNCTIONS . . . . . . . . . . . . . . . . . . . . . . . . . . . . . . . . . . . . . . . . . . . . . . . . .35
PRINTING . . . . . . . . . . . . . . . . . . . . . . . . . . . . . . . . . . . . . . . . . . . . . . . . . . . . . . . . . . . . . . . . . . . . .42
CANCELLING PRINTING (AT THE MACHINE) . . . . . . . . . . . . . . . . . . . . . . . . . . . . . . . . . . . . . . . .47
SELECTING PRINT SETTINGS . . . . . . . . . . . . . . . . . . . . . . . . . . . . . . . . . . . . . . . . . . . . . . . . . . . .48
CONVENIENT PRINTER FUNCTIONS. . . . . . . . . . . . . . . . . . . . . . . . . . . . . . . . . . . . . . . . . . . . . . .50
Before using the machine
Copying
Printing
5
BASE SCREEN OF FAX MODE. . . . . . . . . . . . . . . . . . . . . . . . . . . . . . . . . . . . . . . . . . . . . . . . . . . .54
SENDING A FAX. . . . . . . . . . . . . . . . . . . . . . . . . . . . . . . . . . . . . . . . . . . . . . . . . . . . . . . . . . . . . . . .55
CHANGING THE SIZE OF A FAX . . . . . . . . . . . . . . . . . . . . . . . . . . . . . . . . . . . . . . . . . . . . . . . . . .56
CHANGING THE EXPOSURE . . . . . . . . . . . . . . . . . . . . . . . . . . . . . . . . . . . . . . . . . . . . . . . . . . . . .57
CHANGING THE RESOLUTION. . . . . . . . . . . . . . . . . . . . . . . . . . . . . . . . . . . . . . . . . . . . . . . . . . . .58
STORING A FAX NUMBER . . . . . . . . . . . . . . . . . . . . . . . . . . . . . . . . . . . . . . . . . . . . . . . . . . . . . . .59
FORWARDING RECEIVED FAXES (Fax Data Forward) . . . . . . . . . . . . . . . . . . . . . . . . . . . . . . . .61
CONVENIENT DIALLING METHODS . . . . . . . . . . . . . . . . . . . . . . . . . . . . . . . . . . . . . . . . . . . . . . .62
SENDING THE SAME FAX TO MULTIPLE DESTINATIONS (Broadcast Transmission). . . . . . .64
SPECIAL FAX MODES . . . . . . . . . . . . . . . . . . . . . . . . . . . . . . . . . . . . . . . . . . . . . . . . . . . . . . . . . . .66
SELECTING A SPECIAL MODE . . . . . . . . . . . . . . . . . . . . . . . . . . . . . . . . . . . . . . . . . . . . . . . . . . .67
CONVENIENT FAX FUNCTIONS . . . . . . . . . . . . . . . . . . . . . . . . . . . . . . . . . . . . . . . . . . . . . . . . . . .68
NETWORK SCANNER FUNCTION . . . . . . . . . . . . . . . . . . . . . . . . . . . . . . . . . . . . . . . . . . . . . . . . .72
BASE SCREEN OF SCAN MODE . . . . . . . . . . . . . . . . . . . . . . . . . . . . . . . . . . . . . . . . . . . . . . . . . .73
SCANNING AN ORIGINAL . . . . . . . . . . . . . . . . . . . . . . . . . . . . . . . . . . . . . . . . . . . . . . . . . . . . . . . .74
CHANGING THE EXPOSURE AND ORIGINAL IMAGE TYPE . . . . . . . . . . . . . . . . . . . . . . . . . . . .75
CHANGING THE RESOLUTION. . . . . . . . . . . . . . . . . . . . . . . . . . . . . . . . . . . . . . . . . . . . . . . . . . . .76
CHANGING THE FILE FORMAT . . . . . . . . . . . . . . . . . . . . . . . . . . . . . . . . . . . . . . . . . . . . . . . . . . .77
STORING A DESTINATION . . . . . . . . . . . . . . . . . . . . . . . . . . . . . . . . . . . . . . . . . . . . . . . . . . . . . . .78
CONVENIENT TRANSMISSION METHODS . . . . . . . . . . . . . . . . . . . . . . . . . . . . . . . . . . . . . . . . . .80
SENDING THE SAME IMAGE TO MULTIPLE DESTINATIONS (Broadcast Transmission) . . . .82
SPECIAL SCAN MODES . . . . . . . . . . . . . . . . . . . . . . . . . . . . . . . . . . . . . . . . . . . . . . . . . . . . . . . . .83
SELECTING A SPECIAL MODE . . . . . . . . . . . . . . . . . . . . . . . . . . . . . . . . . . . . . . . . . . . . . . . . . . .84
CONVENIENT SCANNER FUNCTIONS. . . . . . . . . . . . . . . . . . . . . . . . . . . . . . . . . . . . . . . . . . . . . .85
Faxing
Scanning
6
DOCUMENT FILING . . . . . . . . . . . . . . . . . . . . . . . . . . . . . . . . . . . . . . . . . . . . . . . . . . . . . . . . . . . . .88
QUICKLY SAVING A JOB (Quick File) . . . . . . . . . . . . . . . . . . . . . . . . . . . . . . . . . . . . . . . . . . . . . .90
APPENDING INFORMATION WHEN STORING A FILE (File) . . . . . . . . . . . . . . . . . . . . . . . . . . . .91
SAVING A DOCUMENT ONLY (Scan to HDD) . . . . . . . . . . . . . . . . . . . . . . . . . . . . . . . . . . . . . . . .93
PRINTING A SAVED FILE . . . . . . . . . . . . . . . . . . . . . . . . . . . . . . . . . . . . . . . . . . . . . . . . . . . . . . . .94
SYSTEM SETTINGS . . . . . . . . . . . . . . . . . . . . . . . . . . . . . . . . . . . . . . . . . . . . . . . . . . . . . . . . . . . . .96
SYSTEM SETTINGS MENU . . . . . . . . . . . . . . . . . . . . . . . . . . . . . . . . . . . . . . . . . . . . . . . . . . . . . . .98
FREQUENTLY ASKED QUESTIONS. . . . . . . . . . . . . . . . . . . . . . . . . . . . . . . . . . . . . . . . . . . . . . .102
REMOVING MISFEEDS . . . . . . . . . . . . . . . . . . . . . . . . . . . . . . . . . . . . . . . . . . . . . . . . . . . . . . . . .106
Document filing
System settings
Troubleshooting
Before using the machine
7
This section provides general information about the machine, including the
names and functions of the parts of the machine and its peripheral devices,
and the procedures for placing originals and loading paper.
X PART NAMES AND FUNCTIONS . . . . . . . . . . . . . . . . . . 8
X OPERATION PANEL . . . . . . . . . . . . . . . . . . . . . . . . . . . 10
X USING THE TOUCH PANEL . . . . . . . . . . . . . . . . . . . . . 12
X USER AUTHENTICATION . . . . . . . . . . . . . . . . . . . . . . . 13
X PLACING ORIGINALS. . . . . . . . . . . . . . . . . . . . . . . . . . 14
X CHANGING PAPER IN A TRAY . . . . . . . . . . . . . . . . . . 15
8
PART NAMES AND FUNCTIONS
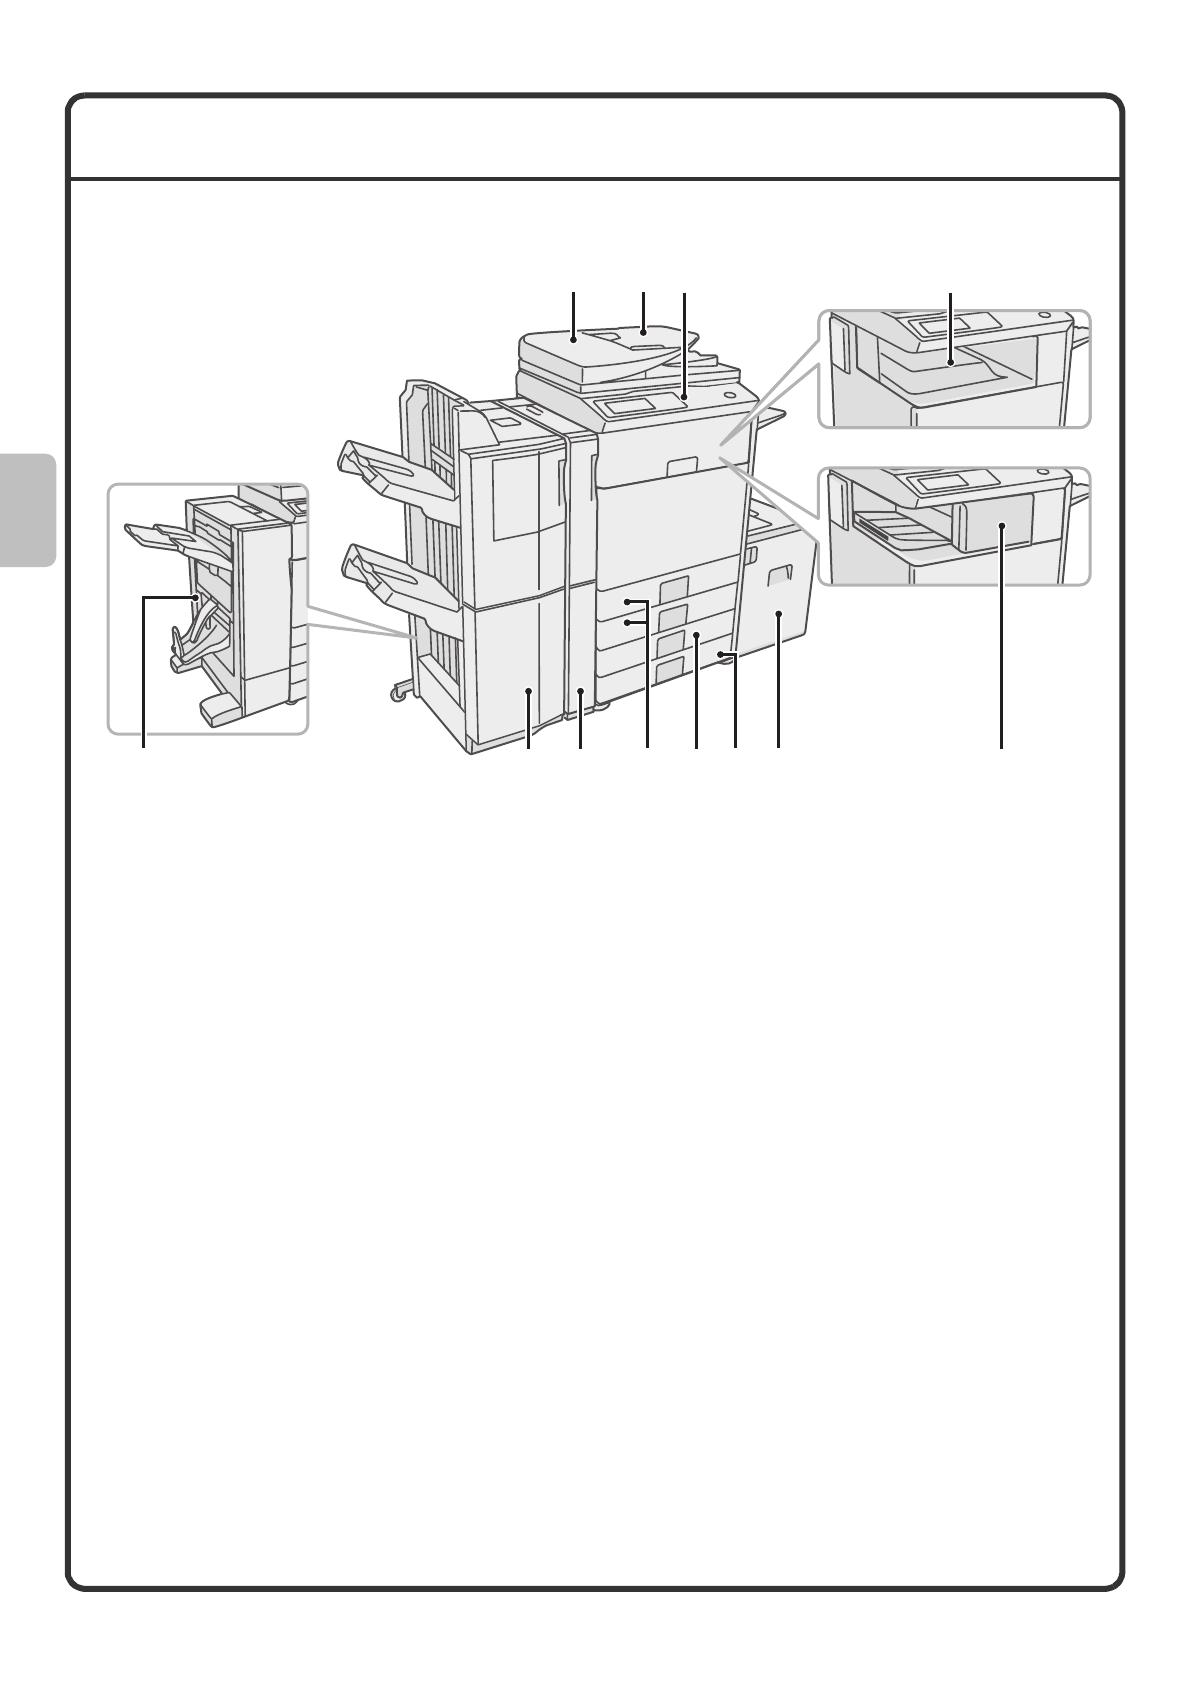
(1) Automatic document feeder
This automatically feeds and scans multiple originals.
Both sides of 2-sided originals can be scanned at
once.
(2) Document feeder tray
Place the originals in this tray when using the
automatic document feeder.
(3) Operation panel
(4) Output tray (centre tray)
Copy jobs and print jobs are delivered to this tray.
(When a finisher or saddle stitch finisher is installed,
the output tray (centre tray) cannot be used.)
(5) Saddle Stitch Finisher*
This can be used to staple output. The machine is
also equipped with the staple function, which folds
paper and staples it at the centre, and the fold
function, which folds paper in half. A punch module
can be installed to punch holes in output.
(6) Finisher (large stacker)*
This can be used to staple output.
(7) Punch module*
This is used to punch holes in output.
(8) Tray 1 / Tray 2
Up to 500 sheets of paper (80 g/m
2
(21 lbs.)) can be
loaded in each tray.
(9) Tray 3 (when a stand/1 x 500 sheet paper drawer
or stand/2 x 500 sheet paper drawer is installed)*
This holds paper. Up to 500 sheets (80 g/m
2
(21 lbs.))
of paper can be loaded.
(10) Tray 4 (when a stand/2 x 500 sheet paper drawer
is installed)*
This holds paper. Up to 500 sheets (80 g/m
2
(21 lbs.))
of paper can be loaded.
(11) Tray 5 (when a large capacity tray is installed)*
Up to 3500 sheets (80 g/m
2
(21 lbs.)) of paper can be
loaded. When a stand/1 x 500 sheet paper drawer is
installed, this is tray 4.
(12) Finisher*
This can be used to staple output. A punch module
can be installed to punch holes in output.
* Peripheral device. For more information, see "PERIPHERAL DEVICES" in "1. BEFORE USING THE
MACHINE" in the Operation Guide.
Some options may not be available in some countries and regions.
(1) (2) (3) (4)
(8)(6) (7) (9) (11)
(12)
(10)(5)
9
(13) Document glass
This is used to scan books and other originals that
cannot be scanned using the automatic document
feeder.
(14) Main power switch
This is used to power on the machine.
When using the fax or Internet fax functions, keep this
switch in the "on" position.
(15) Front cover
Open to replace a toner cartridge.
(16) Bypass tray
Special types of paper can be fed from the bypass
tray.
(17) Exit tray unit (right tray)*
When installed, output can be delivered to this tray.
(18) USB connector (type A)
This is used to connect a USB memory or other USB
device to the machine.
* Peripheral device. For more information, see "PERIPHERAL DEVICES" in "1. BEFORE USING THE
MACHINE" in the Operation Guide.
Some options may not be available in some countries and regions.
(14) (15) (16) (17) (18)(13)
10
OPERATION PANEL
JOB STATUS
IMAGE SEND
DOCUMENT
FILING
COPY
PRINT
READY
DATA
DATA
LINE
SYSTEM
SETTINGS
Ready to scan for copy.
Auto
Exposure
100%
Copy Ratio
Job Detail
Settings
2-Sided Copy
Original
0
Output
Special Modes
File
Quick File
2.
3.
4.
1.
Plain
A4R
B4
A3
A4
A4
A4
Touch panel
Messages and keys appear.
Operations are performed by directly
touching the keys with your fingers.
[JOB STATUS] key
Press this key to view the job
status screen. You can check
the status of jobs and cancel
jobs in the job status screen.
Print mode indicators
READY indicator
Print data can be received when this indicator is lit.
DATA indicator
This blinks while print data is being received
and lights steadily while printing is taking
place.
[SYSTEM SETTINGS] key
Mode select keys
Use these keys to change the mode displayed in the touch panel.
The indicator of the selected key lights up.
[DOCUMENT FILING] key
When you wish to print or send a file stored on the hard drive, press this
key to select document filing mode.
[IMAGE SEND] key
When you wish to use the scan or fax functions, press this key to select
network scanner / fax mode.
·
LINE indicator
This lights up during transmission or reception in fax mode. The
indicator also lights up during transmission in scan mode.
·
DATA indicator
When a received fax cannot be printed because of a problem such as
out of paper, the indicator blinks. The indicator lights steadily when
there is data that is waiting to be transmitted.
[COPY] key
When you wish to use the copy function, press this key to select copy
mode. You can hold down the [COPY] key to check the total page count
and how much toner remains.
Press this key to display the
system settings screen. The
system settings can be
adjusted to make the machine
easier to use, such as
configuring paper tray settings
and storing addresses.
Function key
To use the Sharp OSA function, press this
key to switch to Sharp OSA mode.
11
LOGOUT
Main power indicator
[CLEAR ALL] key
Press this key to redo an operation from
the beginning.
All settings will be cleared and
operation will return to the initial state.
Numeric keys
These are used to enter the number of
copies, fax numbers, and other numbers.
[LOGOUT] key ( )
When user authentication is enabled,
press this key to log out after using the
machine. When using the fax function,
this key can be pressed to send tone
signals on a pulse dial line.
[#/P] key ( )
Press this key to use a job program
when using the copier function. When
using the fax function, press this key to
dial using a program.
Use this key to activate power save mode. The
[POWER SAVE] key blinks when the machine is in
power save mode. This key is also used to
deactivate power save mode.
[START] key
Use this key to copy or scan an
original.
This key is also used to
send a fax in fax mode.
This indicator lights when the
main power is switched on.
[POWER] key
Use this key to turn the
machine power on and
off.
[POWER SAVE] key
[STOP] key
Press this key to stop a copy job or scanning of
an original.
[CLEAR] key
Press this key to return
settings such as the number
of copies to "0".
12
USING THE TOUCH PANEL
The touch keys that appear in the touch panel are grouped for easy operation. The layout and functions of the
touch keys are explained below.
Using general keys
(1) When the displayed screen is one of two or more screens, use the keys to switch through the screens.
(2) When a checkbox is touched, a checkmark will appear to indicate that the setting is enabled.
(3) The keys can be used to increase or decrease a value. To make a value change quickly, keep your
finger on the key. You can also directly touch a numeric value display key to change a number with the
numeric keys.
Ready to scan for copy.
Auto
Exposure
100%
Copy Ratio
Job Detail
Settings
Job Queue Sets / Progress Status
Spool
Complete
Detail
Priority
Stop/Delete
Internet FaxFax JobScan toPrint Job
Job Queue
Copy 020 / 001 Copying
Copy 020 / 000 Waiting
Computer01 020 / 000 Waiting
0312345678
1
2
3
4 002 / 000 Waiting
1/1
2-Sided Copy
Original
0
Output
Special Modes
File
Quick File
2.
3.
4.
1.
Plain
A4
A4
A3
A4
A4R
B4
Settings related to the
original are generally
grouped together on the
left side of the base
screen.
This indicates that an original has
been placed in the automatic
document feeder.
The size of the original appears
automatically.
This appears when one or more
special modes are selected.
Touch the icon to check what
modes are selected.
Advanced settings are grouped here.
You can have frequently used touch
keys displayed as shortcuts in this
position.
Settings related to output are generally
grouped together on the top right side
of the base screen.
A selected job can be given priority and
run ahead of other jobs, or a job
waiting in the queue can be cancelled.
Jobs are displayed as a list of touch
keys. The job keys appear in the order
that they will be run. A job key can be
touched to select it.
The job status screen normally appears behind the base screen of the currently selected mode. Only the left edge of
the job status screen appears, and this can be touched to bring the screen to the front.
This shows the status of the paper trays on the machine.
You can
check the paper size, paper type and amount of paper remaining.
The currently selected tray is highlighted.
A4
Special Modes
OK
2/4
Covers/Inserts
Book Copy Tab Copy Card Shot
Transparency
Inserts
Multi Shot
(1)
System Settings
Auto Clear Setting
Set the time for auto clear.
60
OK
Cancel Timer
(10~240)
sec.
(2)
(3)
13
USER AUTHENTICATION
When user authentication is enabled in the system settings, you must log in before using the machine. User
authentication is initially disabled.
When you have finished using the machine, log out.
User authentication methods
There are two methods for performing user authentication: login by user number and login by login name and
password. Ask the administrator of the machine for the information that is required to log in.
For details on user authentication, see "USER AUTHENTICATION" in "1. BEFORE USING THE MACHINE" in
the Operation Guide.
Login by user number
Login by login name and password*
* Does not appear when the printer expansion kit with hard drive is not installed.
Logging out
When you have finished using the machine, log out. Logging out prevents unauthorised use of the machine.
How to log out
You can log out from any mode of the machine by pressing the [LOGOUT] key ( ). However, note that the
[LOGOUT] key ( ) cannot be used to log out when a fax number is being entered in fax mode, as the [LOGOUT]
key ( ) functions as a numeric key at this time.
If a preset duration of time elapses after the machine is last used, the auto clear function will activate. When auto
clear activates, logout automatically takes place.
This method requires that you log in by entering your
user number (5 to 8 digits), which is stored in the
system settings of the machine.
This method requires that you log in by entering your
login name, password, and the login destination,
which are stored in the system settings of the
machine. Depending on how the machine
administrator has configured the system settings, an
e-mail address may also be used for authentication.
Admin Login
Enter your user number.
OK
Please enter your login name /
password.
User Authentication
Login Name
User Name
Login Locally
Password
Auth to:
OK
14
PLACING ORIGINALS
The automatic document feeder can be used to automatically scan many originals at once. This saves you the
trouble of manually feeding each original.
For originals that cannot be scanned using the automatic document feeder, such as a book or a document with
notes attached, use the document glass.
Using the automatic document feeder
When using the automatic document feeder, place the originals in the document feeder tray.
Make sure an original has not been placed on the document glass.
Using the document glass
Take care that your fingers are not pinched when closing the automatic document feeder.
After placing the original, be sure to close the automatic document feeder. If left open, parts outside of the original
will be copied black, causing excessive use of toner.
Place the originals face up with the edges
aligned evenly.
The indicator line indicates approximately
how many originals can be placed. The placed
originals must not be higher than this line.
Adjust the original guides
to the width of the originals.
Place the original
face down.
Place the original face down.
Align the top left corner of the
original with the tip of the
mark in the far left corner of the
glass.
To place a thick original such as
a book, push up the far edge of
the automatic document feeder
and then close the automatic
document feeder slowly.
15
CHANGING PAPER IN A TRAY
Names of the trays
The names of the trays are shown below.
For the number of sheets of paper that can be loaded in each tray, see the following manuals:
• Operation Guide, "Paper Tray Settings" in "7. SYSTEM SETTINGS"
• Safety Guide, "SPECIFICATIONS"
Print side face up or face down
Paper is loaded with the print side face up or face down depending on the paper type and tray.
Trays 1 to 4
Load the paper with the print side face up.
However, if the paper type is "Pre-Printed" or "Letter Head", load the paper with the print side face down*.
Bypass tray and tray 5
Load the paper with the print side face down.
However, if the paper type is "Pre-Printed" or "Letter Head", load the paper with the print side face up*.
* If "Disabling of Duplex" is enabled in the system settings (administrator), load the paper in the normal way (face
up in trays 1 to 4; face down in the bypass tray and tray 5).
(6)
(1)
(2)
(3)
(4)
(5)
(1) Tray 1
(2) Tray 2
(3) Tray 3
(4) Tray 4
(5) Tray 5 (large capacity tray)
(6) Bypass tray
16
Loading paper in a tray
To change the paper in a tray, load the desired paper in the tray and then change the tray settings in the machine
to specify the loaded paper. The procedure for changing the tray paper size is explained below. As an example,
the paper in tray 1 is changed from B4 (8-1/2" x 14") size plain paper to A4 (8-1/2" x 11") size recycled paper.
Do not load as shown below.
Gently pull out the paper tray.
If paper remains in the tray, remove it.
Insert the paper with the print side face
up.
Fan the paper well before inserting it.
Otherwise, multiple sheets may feed at
once and cause a misfeed.
Insert the paper and then gently push the
tray into the machine.
Move the two guides on the tray. For
example, move the guides from B4
(8-1/2" x 14") to A4 (8-1/2" x 11").
Indicator line
The indicator line indicates the maximum
height of the paper that can be loaded in
the tray. When loading paper, make sure
that the stack is not higher than the
indicator line.
17
Changing the tray settings
When you change the paper in a tray, the tray settings in the system settings must also be changed.
1 Press the [SYSTEM SETTINGS] key.
2 Configure the tray settings in the
touch panel.
Some of the settings only appear when you
have administrator rights.
(1) Touch the [Paper Tray Settings]
key.
(2) Touch the [Tray Settings] key.
(3) Touch the [Tray 1] key.
(4) Touch the [Recycled] key.
(5) Touch the [Auto-AB] key.
For more information, see "Paper Tray
Settings" in "7. SYSTEM SETTINGS" in
the Operation Guide.
(6) Touch the [OK] key.
The above steps change the paper
settings for tray 1 to A4 (8-1/2" x 11")
recycled paper.
SYSTEM
SETTING
S
System Settings
Total Count
Paper Tray
Settings
Printer Condition
Settings
Default Settings
Address Control
Document Filing
Control
Fax Data
Receive/Forward
List Print
(User)
USB-Device Check
Exit
System Settings
Paper Tray Settings
Auto Tray Switching
Tray Settings
Paper Type Registration
OK
System Settings
Paper Tray Settings
Tray 1
Print Copy Fax
I-Fax
Doc.
Filing
Type / Size
Plain / Auto-AB
OK
1/6
Fixed Paper Side
Disable Duplex
Disable Staple
Disable Punch
System Settings
Tray 1 Type/Size Setting
Type Size
Recycled
OKType
Manual
2/3
System Settings
Tray 1 Type/Size Setting
Select the paper type.
Plain
Pre-Printed
Recycled
Letter Head
Pre-Punched
Heavy Paper
Colour
Cancel
1/2
1/3
2/3
Auto-AB
Auto-Inch
Admin Password
11x17,8 x14,8 x11
8 x11R,7 x10 R
1
2
1
4
1
2
1
2
1
2
A3,A4,A4R,B4,B5
B5R,216x330(8 x13)
1
2
(1)
(2)
(3)
(6)
(4)
(5)
18
Loading paper in other trays
Bypass tray
Place paper that is A5 (7-1/4" x 10-1/2") or smaller
in the horizontal orientation.
Only the address side of envelopes can be printed on.
Place envelopes with the address side face down.
Special types of paper that cannot be loaded in other trays can be loaded in the bypass tray.
For detailed information on the bypass tray, see "LOADING PAPER IN THE BYPASS TRAY" in "1. BEFORE
USING THE MACHINE" in the Operation Guide.
When loading A3W, A3 or B4 size paper, pull out
the tray extension.
The maximum number of sheets that can be loaded
in the bypass tray is approximately 100 for plain
paper and approximately 20 for envelopes.
The side to be
copied on must
be face down!
Example: Loading an envelope
  • Page 1 1
  • Page 2 2
  • Page 3 3
  • Page 4 4
  • Page 5 5
  • Page 6 6
  • Page 7 7
  • Page 8 8
  • Page 9 9
  • Page 10 10
  • Page 11 11
  • Page 12 12
  • Page 13 13
  • Page 14 14
  • Page 15 15
  • Page 16 16
  • Page 17 17
  • Page 18 18
  • Page 19 19
  • Page 20 20
  • Page 21 21
  • Page 22 22
  • Page 23 23
  • Page 24 24
  • Page 25 25
  • Page 26 26
  • Page 27 27
  • Page 28 28
  • Page 29 29
  • Page 30 30
  • Page 31 31
  • Page 32 32
  • Page 33 33
  • Page 34 34
  • Page 35 35
  • Page 36 36
  • Page 37 37
  • Page 38 38
  • Page 39 39
  • Page 40 40
  • Page 41 41
  • Page 42 42
  • Page 43 43
  • Page 44 44
  • Page 45 45
  • Page 46 46
  • Page 47 47
  • Page 48 48
  • Page 49 49
  • Page 50 50
  • Page 51 51
  • Page 52 52
  • Page 53 53
  • Page 54 54
  • Page 55 55
  • Page 56 56
  • Page 57 57
  • Page 58 58
  • Page 59 59
  • Page 60 60
  • Page 61 61
  • Page 62 62
  • Page 63 63
  • Page 64 64
  • Page 65 65
  • Page 66 66
  • Page 67 67
  • Page 68 68
  • Page 69 69
  • Page 70 70
  • Page 71 71
  • Page 72 72
  • Page 73 73
  • Page 74 74
  • Page 75 75
  • Page 76 76
  • Page 77 77
  • Page 78 78
  • Page 79 79
  • Page 80 80
  • Page 81 81
  • Page 82 82
  • Page 83 83
  • Page 84 84
  • Page 85 85
  • Page 86 86
  • Page 87 87
  • Page 88 88
  • Page 89 89
  • Page 90 90
  • Page 91 91
  • Page 92 92
  • Page 93 93
  • Page 94 94
  • Page 95 95
  • Page 96 96
  • Page 97 97
  • Page 98 98
  • Page 99 99
  • Page 100 100
  • Page 101 101
  • Page 102 102
  • Page 103 103
  • Page 104 104
  • Page 105 105
  • Page 106 106
  • Page 107 107
  • Page 108 108
  • Page 109 109
  • Page 110 110
  • Page 111 111
  • Page 112 112

Sharp MX-M363U User manual

Category
Multifunctionals
Type
User manual

Ask a question and I''ll find the answer in the document

Finding information in a document is now easier with AI