Page is loading ...

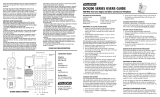
Master User Guide
S I P C o r d e d S e r i e s
Models:
SIP classic lobby hotel telephone - S1100/
SIP classic 1-line hotel telephone - S1210/
SIP classic 2-line hotel telephone - S1220/
SIP contemporary lobby hotel telephone - S2100/
SIP contemporary 1-line hotel telephone - S2210/
SIP contemporary 2-line hotel telephone - S2220/
SIP petite 1-line hotel telephone - S2211/
SIP petite 2-line hotel telephone - S2221

i
Important safety instructions
When using your telephone equipment, basic safety precautions should always be followed to reduce the risk of re, electric shock
and injury, including the following:
This product should be installed by a qualied technician.
This product should only be connected to the host equipment and never directly to the network such as Public Switch Telephone
Network (PSTN) or Plain Old Telephone Services (POTS).
Read and understand all instructions.
Follow all warnings and instructions marked on the product.
Unplug this product from the wall outlet before cleaning. Do not use liquid or aerosol cleaners. Use a damp cloth for cleaning.
Do not use this product near water. For example, do not use it next to a bath tub, wash bowl, kitchen sink, laundry tub or
swimming pool, or in a wet basement or shower.
Do not place this product on an unstable table, shelf, stand or other unstable surfaces.
Slots and openings in the back or bottom of the telephone base and handset are provided for ventilation. To protect them from
overheating, these openings must not be blocked by placing the product on a soft surface such as a bed, sofa or rug. This
product should never be placed near or over a radiator or heat register. This product should not be placed in any area where
proper ventilation is not provided.
This product should be operated only from the type of power source indicated on the marking label. If you are not sure of the
type of power supply on the premises, consult your dealer or local power company.
Do not allow anything to rest on the power cord. Do not install this product where the cord may be walked on.
Never push objects of any kind into this product through the slots in the telephone base or handset because they may touch
dangerous voltage points or create a short circuit. Never spill liquid of any kind on the product.
To reduce the risk of electric shock, do not disassemble this product, but take it to an authorized service facility. Opening or
removing parts of the telephone base or handset other than specied access doors may expose you to dangerous voltages or
other risks. Incorrect reassembling can cause electric shock when the product is subsequently used.
Do not overload wall outlets and extension cords.
Unplug this product from the wall outlet and refer servicing to an authorized service facility under the following conditions:
When the power supply cord or plug is damaged or frayed.
If liquid has been spilled onto the product.
If the product has been exposed to rain or water.
If the product does not operate normally by following the operating instructions. Adjust only those controls that are covered
by the operation instructions. Improper adjustment of other controls may result in damage and often requires extensive work
by an authorized technician to restore the product to normal operation.
If the product has been dropped and the telephone base and/or handset has been damaged.
If the product exhibits a distinct change in performance.
Avoid using a telephone (other than cordless) during an electrical storm. There is a remote risk of electric shock from lightning.
Do not use the telephone to report a gas leak in the vicinity of the leak. Under certain circumstances, a spark may be created
when the adapter is plugged into the power outlet, or when the handset is replaced in its cradle. This is a common event
associated with the closing of any electrical circuit. The user should not plug the phone into a power outlet, and should not put
a charged handset into the cradle, if the phone is located in an environment containing concentrations of ammable or ame-
supporting gases, unless there is adequate ventilation. A spark in such an environment could create a re or explosion. Such
environments might include: medical use of oxygen without adequate ventilation; industrial gases (cleaning solvents; gasoline
vapors; etc.); a leak of natural gas; etc.
Only put the handset of your telephone next to your ear when it is in normal talk mode.
Use only the power cord indicated in this manual. Check with local codes for possible special disposal instructions.
In wall mounting position, make sure to mount the telephone base on the wall by positioning the eyelets on the telephone base
and the mounting bracket against the mounting studs. Then slide the telephone base down on both mounting studs until it locks
into place. Refer to the full instructions in Installation in the user’s manual.
20. CAUTION: Keep small metallic objects such as pins and staples away from the handset receiver.
SAVE THESE INSTRUCTIONS
1.
2.
3.
4.
5.
6.
7.
8.
9.
10.
11.
12.
13.
14.
A.
B.
C.
D.
E.
F.
15.
16.
17.
18.
19.

ii
Table of contents
Parts checklist ........................................................................................................................1
Telephone layout ....................................................................................................................2
SIP classic lobby - S1100 .........................................................................................................2
SIP classic 1-line - S1210 ........................................................................................................3
SIP classic 2-line - S1220 ........................................................................................................4
SIP contemporary lobby - S2100 .............................................................................................5
SIP contemporary 1-line - S2210 .............................................................................................6
SIP contemporary 2-line - S2220 .............................................................................................7
SIP petite 1-line - S2211 ...........................................................................................................8
SIP petite 2-line - S2221 ..........................................................................................................9
Installation ............................................................................................................................10
SIP classic lobby/1-line/2-line - S1100/S1210/S1220 ............................................................. 10
SIP contemporary lobby/1-line/2-line - S2100/S2210/S2220 ................................................. 12
SIP petite 1-line/2-line - S2211/S2221 ................................................................................... 14
Telephone settings .............................................................................................................. 16
SIP classic/1-line/2-line - S1100/S1210/S1220 ....................................................................... 16
SIP contemporary lobby/1-line/2-line - S2100/S2210/S2220 ................................................. 16
SIP petite 1-line/2-line - S2211/S2221 .................................................................................... 16
Telephone operation ............................................................................................................ 17
SIP classic/contemporary lobby - S1100/S2100 .................................................................... 17
SIP classic 1-line - S1210 ...................................................................................................... 18
SIP classic 2-line - S1220 ......................................................................................................20
SIP contemporary 1-line - S2210 ...........................................................................................22
SIP contemporary 2-line - S2220 ...........................................................................................24
SIP petite 1-line - S2211 .........................................................................................................26
SIP petite 2-line - S2221 ........................................................................................................27
Appendix ...............................................................................................................................29
Troubleshooting ......................................................................................................................29
VTech Hospitality limited warranty program ..........................................................................30
FCC, ACTA and IC regulations .............................................................................................. 31
Maintenance ........................................................................................................................... 31
Technical specications .........................................................................................................32
Index ......................................................................................................................................33

1
Items contained in the respective telephone package:
Model name Model
number
Parts included
SIP classic lobby S1100
SIP classic 1-line S1210
SIP classic 2-line S1220
SIP contemporary lobby S2100
SIP contemporary 1-line S2210
SIP contemporary 2-line S2220
SIP petite 1-line S2211
SIP petite 2-line S2221
Parts checklist
Parts checklist
Telephone base with
faceplate and overlay Corded handset Cat-5 network cable
Telephone base with
faceplate and overlay
Corded handset Cat-5 network cable
Telephone base with
faceplate and overlay Corded handset Cat-5 network cable
Mounting bracket
Telephone base with
faceplate and overlay
Corded handset Cat-5 network cable
Mounting bracket
Telephone base with
faceplate and overlay
Corded handset Cat-5 network cable
Mounting bracket
Telephone base with
faceplate and overlay
Corded handset Cat-5 network cable
Telephone base with
faceplate and overlay
Corded handset Cat-5 network cable
Telephone base with
faceplate and overlay
Mounting bracket
Corded handset Cat-5 network cable
Mounting bracket

2
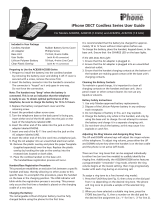
Telephone layout
SIP classic lobby - S1100
RJ-45 LAN port
Wall mount clip
+/- VOLUME
MUTE key cavity
/SPEAKER key cavity

3
Telephone layout
Telephone layout
SIP classic 1-line - S1210
+/- VOLUME
MUTE
FLASH
Speed Dial keys
RJ-45 COMPUTER port
MESSAGE WAITING LED
RJ-45 LAN port
Wall mount clip
/SPEAKER
REDIAL
LINE HOLD
/USB CHARGE ONLY
(USB port for charging only)

SIP classic 2-line - S1220
Telephone layout
RJ-45 LAN port
Wall mount clip
LINE 1 LINE 2
CONF
HOLD
+/- VOLUME
MUTE
FLASH
Speed Dial keys
RJ-45 COMPUTER port
MESSAGE WAITING LED
/SPEAKER
REDIAL
4
/USB CHARGE ONLY
(USB port for charging only)

5
Telephone layout
SIP contemporary lobby - S2100
Telephone layout
Wall mount clip
RJ-45 LAN port
MUTE key cavity
/SPEAKER
key cavity
-/VOLUME
+/VOLUME

6
SIP contemporary 1-line - S2210
Telephone layout
-/VOLUME
MUTE
FLASH
Speed Dial keys
MESSAGE WAITING LED
Wall mount clip
HOLD
/SPEAKER
+/VOLUME
RJ-45 LAN port
REDIAL
LINE
RJ-45 COMPUTER port
/USB CHARGE ONLY
(USB port for charging only)

7
Telephone layout
SIP contemporary 2-line - S2220
Telephone layout
LINE 1 LINE 2
CONF
HOLD
MUTE
FLASH
Speed Dial keys
MESSAGE WAITING LED
/SPEAKER
-/VOLUME
+/VOLUME
RJ-45 LAN port
REDIAL
Wall mount clip
RJ-45 COMPUTER port
/USB CHARGE ONLY
(USB port for charging only)

8
Telephone layout
SIP petite 1-line - S2211
MESSAGE WAITING LED
-/VOLUME
+/VOLUME
FLASH
HOLD
MUTE
IN USE light
RJ-45 COMPUTER port
/USB CHARGE ONLY
(USB port for charging only)
Speed Dial keys
RINGER VOL

9
Telephone layout
Telephone layout
SIP petite 2-line - S2221
MESSAGE WAITING LED
-/VOLUME
+/VOLUME
FLASH
HOLD
MUTE
Speed Dial keys
LINE 1
LINE 2
CONF
RJ-45 COMPUTER port
/USB CHARGE ONLY
(USB port for charging only)
RINGER VOL

10
SIP classic lobby/1-line/2-line - S1100/S1210/S1220
Installation
Telephone base installation
The telephone comes ready for desktop use. Install the telephone base as shown below.
Once installed, the telephone begins a four-step initialization and system registration process.
For S1100: (1) The MUTE key cavity LED and the /SPEAKER key cavity LED turn on and then go off. (2) The MUTE key
cavity LED ashes. (3) The MUTE key cavity LED stops ashing and then the /SPEAKER key cavity LED ashes. (4) Both
LEDs illuminate for 500ms when initialization and system registration are successful.
For S1210: (1) The MUTE key and the /SPEAKER key turn on and then go off. (2) The MUTE key ashes. (3) The MUTE
key stops ashing and then the /SPEAKER key ashes. (4) The MESSAGE WAITING LED, LINE, MUTE and /SPEAKER
illuminate for 500ms when initialization and system registration are successful.
For S1220: (1) The MUTE key and the /SPEAKER key turn on and then go off. (2) The MUTE key ashes. (3) The MUTE
key stops ashing and then the /SPEAKER key ashes. (4) The MESSAGE WAITING LED, LINE 1, LINE 2, CONF, MUTE
and /SPEAKER illuminate for 500ms when initialization and system registration are successful.
If the system registration fails, the /SPEAKER key blinks twice every second. To reset, disconnect the Cat-5 network cable
from the network wall jack with Power over Ethernet (PoE) and connect it back again.
1.
2.
•
•
•
CAUTION:
Use only the supplied Cat-5 network cable. Cat-5 network cable is not designed for use in any other IT devices. Misuse of Cat-5 network cable on
your other IT devices shall be prohibited. To order a replacement, visit our website at www.vtechhotelphones.com or call 1-888-907-2007.
Cat-5 network cable
Network wall jack with Power over Ethernet (PoE)
RJ-45 LAN port

11
Installation
SIP classic lobby/1-line/2-line - S1100/S1210/S1220
Installation
Installation option - converting from desktop to wall mount position
This telephone can be adapted to desktop use or mount on a standard telephone wall plate.
To mount the telephone base on the wall:
Unplug the Cat-5 network cable from the network wall jack.
Remove the corded handset from the telephone base cradle. On the telephone base, place a coin in the slit of the wall mount
clip and rotate a half turn (180 degrees). It locks into place with the protruding edge pointing towards the upper edge of the
telephone base. This protruding edge holds the corded handset when the phone is mounted on the wall.
Turn the telephone base over with the bottom side facing up. To remove the mounting bracket, press the tabs of the mounting
bracket in the direction indicated below to release and remove it from the telephone base.
Rotate the mounting bracket. Insert the tabs of the mounting bracket into the middle grooves on the telephone base as shown
below. Then press the tabs and push the mounting bracket into the lower grooves on the telephone base until they lock securely.
Mount the telephone base on the wall by aligning the eyelets with the mounting studs of the wall plate. Then slide the telephone
base down on both mounting studs until it locks into place.
Plug the Cat-5 network cable back in the network wall jack with Power over Ethernet (PoE). Then place the handset on the
telephone base cradle.
1.
2.
3.
4.
5.
6.
Protruding edge
Mounting
bracket
Eyelets

12
Installation
SIP contemporary lobby/1-line/2-line - S2100/S2210/S2220
CAUTION:
Use only the supplied Cat-5 network cable. Cat-5 network cable is not designed for use in any other IT devices. Misuse of Cat-5 network cable on
your other IT devices shall be prohibited. To order a replacement, visit our website at www.vtechhotelphones.com or call 1-888-907-2007.
Telephone base installation
This telephone can be adapted to desktop use or mount on a standard telephone wall plate.
Installation option - desktop position
Turn the telephone base over with the bottom side facing up. Connect the coiled handset cord to the telephone base.
Insert the lower tabs of the mounting bracket into the lower grooves of the telephone base. Press the upper tabs of the mounting
bracket and then push into the center of the telephone base until it locks into place.
Plug the Cat-5 network cable into the RJ-45 LAN port on the telephone base and the network wall jack.
Once installed, the telephone begins a four-step initialization and system registration process.
For S2100: (1) The MUTE key cavity LED and the /SPEAKER key cavity LED turn on and then go off. (2) The MUTE key
cavity LED ashes. (3) The MUTE key cavity LED stops ashing and then the /SPEAKER key cavity LED ashes.
(4) Both LEDs illuminate for 500ms when initialization and system registration are successful.
For S2210: (1) The MUTE key and the /SPEAKER key turn on and then go off. (2) The MUTE key ashes. (3) The MUTE
key stops ashing and then the /SPEAKER key ashes. (4) The MESSAGE WAITING LED, LINE, MUTE and
/SPEAKER illuminate for 500ms when initialization and system registration are successful.
For S2220: (1) The MUTE key and the /SPEAKER key turn on and then go off. (2) The MUTE key ashes. (3) The MUTE
key stops ashing and then the /SPEAKER key ashes. (4) The MESSAGE WAITING LED, LINE 1, LINE 2, CONF,
MUTE and /SPEAKER illuminate for 500ms when initialization and system registration are successful.
If the system registration fails, the /SPEAKER key blinks twice every second. To reset, disconnect the Cat-5 network cable
from the network wall jack with Power over Ethernet (PoE) and connect it back again.
1.
2.
3.
4.
•
•
•
Coiled handset cord jack
Cat-5 network cable
RJ-45 LAN port
Network wall jack with Power over Ethernet (PoE)

13
Installation
Installation
SIP contemporary lobby/1-line/2-line - S2100/S2210/S2220
Installation option - converting from desktop to wall mount position
To mount the telephone base on the wall:
Unplug the Cat-5 network cable from the network wall jack.
Remove the corded handset from the telephone base if it is cradled in the telephone base. On the telephone base, place a coin
in the slit of the wall mount clip and rotate a half turn (180 degrees). It locks into place with the protruding edge pointing towards
the upper edge of the telephone base. This protruding edge holds the handset when the phone is mounted on the wall.
Turn the telephone base over with the bottom side facing up. To remove the mounting bracket, rmly press down the tabs on the
mounting bracket and pull them out from the grooves on the telephone base.
Plug the Cat-5 network cable back into the network wall jack with Power over Ethernet (PoE). Then slide the telephone base
down on both mounting studs until it locks into place.
Place the handset on the telephone base cradle.
1.
2.
3.
4.
5.
Protruding edge
Mounting
bracket
Eyelets

14
Telephone base installation
The telephone can be adapted to desktop use or mount on a standard telephone wall plate.
Installation option - desktop position
Turn the telephone base over with the bottom side facing up. Connect the telephone line cord to the telephone base and route
along the wire duct.
Position the mounting bracket as shown. Insert the two small tabs of the mounting bracket into the lower slots on the telephone
base. Then press the large tab on the mounting bracket and rmly push it into the upper groove on the telephone base.
Install the telephone base as shown below. Then connect the coiled handset cord to the telephone base.
1.
2.
3.
Installation
SIP petite 1-line/2-line - S2211/S2221
Telephone line jack
Wire duct
Once installed, the telephone begins a four-step initialization and system registration process.
For S2211: (1) The MUTE key and IN USE lights turn on and then go off. (2) The MUTE key ashes. (3) The MUTE key
stops ashing. (4) The MESSAGE WAITING LED, MUTE and IN USE lights illuminate for 500ms when initialization and
system registration are successful.
If the system registration fails, the IN USE key blinks twice every second. To reset, disconnect the Cat-5 network cable from
the network wall jack with Power over Ethernet (PoE) and connect it back again.
For S2221: (1) The MUTE key and LINE 1 turn on and then go off. (2) The MUTE key ashes. (3) The MUTE key stops
ashing. (4) The MESSAGE WAITING LED, LINE 1, LINE 2, CONF and MUTE illuminate for 500ms when initialization and
system registration are successful.
If the system registration fails, the LINE 1 key blinks twice every second. To reset, disconnect the Cat-5 network cable from
the network wall jack with Power over Ethernet (PoE) and connect it back again.
4.
•
•
Cat-5 network cable
Network wall jack with Power over Ethernet (PoE)
CAUTION:
Use only the supplied Cat-5 network cable. Cat-5 network cable is not designed for use in any other IT devices. Misuse of Cat-5 network cable on
your other IT devices shall be prohibited. To order a replacement, visit our website at www.vtechhotelphones.com or call 1-888-907-2007.

15
Installation
Installation option - converting from desktop to wall mount position
To mount the telephone base on the wall:
Put the corded handset aside. On the telephone base cradle, place a coin in the slit of the wall mount clip and rotate a half
turn (180 degrees). It locks into place with the protruding edge pointing towards the upper edge of the telephone base. This
protruding edge holds the corded handset when the phone is mounted on the wall.
Unplug the telephone line cord from the telephone wall jack. Then press the large tab on the mounting bracket to remove it from
the upper groove on the telephone base.
Turn the mounting bracket upside down. Remove the telephone line cord from the wire duct and then route it through the
groove on the bottom part of the mounting bracket. Insert the small tabs on the mounting bracket into the upper slots on the
telephone base. Then press the large tab on the mounting bracket and rmly push it into the lower groove on the
telephone base.
Mount the telephone base on the wall by aligning the eyelets with the mounting studs of the wall plate. Then slide the telephone
base down on both mounting studs until it locks into place. Place the handset on the telephone base cradle.
1.
2.
3.
4.
Installation
SIP petite 1-line/2-line - S2211/S2221
Protruding edge
Cat-5 network cable
Network wall jack with Power over Ethernet (PoE)

16
SIP classic 1-line/2-line - S1100/S1210/S1220
SIP contemporary lobby/1-line/2-line - S2100/S2210/S2220
SIP petite 1-line/2-line - S2211/S2221
All telephone settings are programmed through the administrative web portal.
Please refer to the SIP Phone Conguration Guide for details.
Telephone settings

17
Telephone operation
Telephone operation
SIP classic/contemporary lobby - S1100/S2100
Receive a call
The telephone rings when there is an incoming call. Lift the corded handset from the telephone base to answer.
Place a call
Lift the corded handset and it automatically connects to the operator. Refer to the SIP Phone Conguration Guide for
automatic dialing.
End a call
Place the corded handset in the telephone base.
Volume
Listening volume and ringer volume can be adjusted at the telephone base.
To adjust the listening volume:
For S1100: During a call, press +/- VOLUME to adjust the listening volume. The next call returns to the default listening volume.
For S2100: During a call, press +/VOLUME or -/VOLUME to adjust the listening volume. The next call returns to the default
listening volume.
To adjust the ringer volume:
For S1100: When the telephone is idle, press +/- VOLUME to adjust the ringer volume.
For S2100: When the telephone is idle, press +/VOLUME or -/VOLUME to adjust the ringer volume.
/