
ENG
3510 PRIMUS Power Stove Set™ STOVE
INSTRUCTIONS FOR USE
3510
53138/1
-0845-12
ID: 845BP-0057
Design and Quality
Primus AB Sweden
P.O. Box 6041
SE-171 06 Solna
Sweden
Tel: +46 8 564 842 30
www.primus.se
Skype: primus_support
IMPORTANT: Read these instructions carefully before connecting
the gas appliance to the LP gas cartridge, and then study the
instructions regularly in order to remember the way the gas
appliance works. Keep these instructions for future use: Failure to
follow these instructions can result in serious personal injury and
death!
WARNING: This appliance consumes oxygen and produces
carbon dioxide. To avoid extreme danger, do NOT use or ignite this
appliance in unventilated space, indoors, in a tent, in a vehicle or
other enclosed space.
USE OUTDOORS ONLY!
NEVER cover the stove and LP gas cartridge with wind screen,
stones or similar, that can cause overheating and damage to the
stove and to the LP gas cartridge. Overheating the LP gas cartridge
in this way is extremely dangerous. Use the wind screen that
accompanies the stove.
1. INTRODUCTION
1.1 This appliance is intended for PRIMUS PowerGas (Propane/
Isobutane/Butane mix) 2206.
1.2 Use Primus LP gas cartridges. Connecting this appliance to
other types of LP gas cartridge can involve risk.
1.3 Gas consumption 116 g/h /5700 BTU/h / approx. 1.61 kW
at 1 bar gas pressure.
1.4 Size of jet: 0.32 mm, 733950.
1.5 The appliance fulfils requirements in accordance with EN 521
and ANSI Z21.72/11.2.
1.6 Avoid subjecting the hose to wear. Make sure that the HOSE
DOES NOT GET TWISTED.
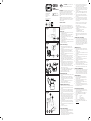
2. ADVICE FOR SAFE USE (Fig 1)
2.1 Ensure that the sealing joints of the appliance (1) are in
correct position and are in good condition before being
connected.
2.2 This appliance is only intended for outdoor use. To avoid
extreme danger, Do NOT use or ignite the appliance in
unventilated place, indoors, in a tent, in a vehicle or other
enclosed space.
2.3 Make sure that no inflammable objects are in the vicinity, as
described under Item 5.5.
2.4 When connecting and replacing the LP gas cartridge, this
must be carried out in a safe place, outdoors, not in the
vicinity of any conceivable source of ignition such as naked
flame, pilot flame or electric heater. Avoid replacing or
connecting up the LP gas cartridge where there are numbers
of people.
2.5 If the appliance leaks (smell of gas) immediately put it in a
well-ventilated place outdoors, not in the vicinity of a source
of ignition, where the leak can be inspected and stopped.
Checking for leaks may only be carried out outdoors.
Checking for leaks must never be carried out using a naked
flame. Us soapy water or similar.
2.6 Never use an appliance with damaged or worn sealing joints,
or a leaking, damaged or badly functioning appliance.
2.7 Never leave a lit appliance out of sight.
2.8 Make sure that saucepans do not boil dry.
3. HANDLING THE APPLIANCE
3.1 Do not touch the hot parts of the appliance during or directly
after use.
3.2 Storage: Always unscrew the LP gas cartridge from the
appliance when it is not being used. Keep the cartridge in a
dry, safe place, where there are no sources of heat. Avoid
solar radiation.
3.3 Do not misuse the appliance or use it for other purposes
than those for which it is intended.
3.4 Handle the appliance carefully. Do not drop it.
4. ASSEMBLING THE APPLIANCE (Fig 2)
4.1 Make sure that the valve (2) is closed (maximum clockwise).
4.2 Keep the LP gas cartridge (3) upright when connecting it to
the valve.
4.3 Connect the valve to the LP gas cartridge carefully. Make
sure the screws are not cross-threaded. Tighten until the
O-ring of the valve meets the LP gas cartridge. Only tighten
by hand.
4.4 Ensure that the connection is leak-proof. Check for any leaks
outdoors. Use soapy water or similar. Never use a naked
flame when checking for leaks. If using soapy water, any
leak will show itself as small bubbles at the point of leakage.
If you are unsure, or can hear or smell gas, never light the
appliance. Unscrew the LP gas cartridge and contact your
local Primus retailer.
4.5 Snap the burner and cup (4) into place in the windshield.
Place the hose and valve through the slot in the wind shield
(13).
4.6 Twist the pot supports into place (7) and make sure they are
fully extended.
4.7 The stove is now ready for use.
5. USE OF THE APPLIANCE (Fig 2)
5.1 Ensure that the hose is fully pulled out towards the LP gas
cartridge. Keep the LP gas cartridge away from heat that
radiates from the stove when in use.
5.2 Turn the burner valve counterclockwise (2) and ignite the
burner immediately by pressing the ignition button (8). Adjust
the flame by turning the burner valve (2).
5.3 When the stove is burning it should be kept as level as
possible and must not be moved around. Moving the
stove while in use can cause it to flare up.
5.4 Ensure that the stove is turned off completely after use by
turning the valve knob clockwise as far as it will go. There
will be some delay between turning the valve off and the
burner going out.
5.5 The distance to inflammable material in ceiling and walls
must be at least 500 mm, OTHERWISE they can catch
fire.
5.6 If the stove is being used in heavy wind, it should be
situated such that the burner’s air intake is turned to face
into the wind.
5.7 If you are preparing several dishes, or if you want to pick
up the pot right after cooking, the insulated storage bag
works great as a potholder or to keep the pot warm until
you are ready to eat.
ADVICE! The use of LP gas in cold weather is affected
by a number of factors which can be remedied with a
number of measures.
Factors that affect the efficiency of the stove:
- The mixture of gas in the LP gas cartridge (propane/
isobutane/butane)
- The quantity of LP gas in the cartridge
- The surrounding temperature
- The temperature of the LP gas cartridge
Measures which improve function during cold weather:
- Warm the LP gas cartridge with your hands or under
clothing.
6. CHANGING THE LP GAS CARTRIDGE
6.1 Close the valve on the LP gas cartridge by turning the
knob (2) clockwise as far as it will go. Make sure that the
stove goes out and that no other naked flame or source
of ignition is in the vicinity. Move the stove outdoors and
unscrew the valve from the LP gas cartridge. Replace the
valve’s O-ring if it is worn or damaged. Connect the valve
in accordance with items 4.3 and 4.4.
7. MAINTENANCE (Fig. 5)
7.1 If the stove does not burn or burns with reduced power
despite fuel being in the LP gas cartridge, the nozzle may
be blocked.
7.2 Cleaning the nozzle
Close the control knob (2) completely and unscrew the LP
gas cartridge (3).
7.3 Squeeze the spring-loaded burner holder (10) and remove
the burner.
7.4 Screw the knurled nut (14) on the injector tube (12) and
remove the heating coil (11).
7.5 Unscrew the jet (9) using an 8 mm open-end wrench or
with the ignitor’s hexagonal handle.
7.6 Clean the jet.
7.7 Mount the jet on the pipe and make it leak-proof by
tightening it carefully. Do not tighten too hard. Check that
it is leak-proof with soapy water or similar.
7.8 Place the pre-heating coil in the injector tube (12), fasten it
with the knurled nut (14) and reattach the burner holder.
8. CHECKING AND MAINTENANCE
8.1 Always make sure that the sealing joints are located in the
correct places and are in good condition. This should be
checked every time the appliance is assembled. Replace
sealing joints if they are damaged or worn. New sealing
joints can be purchased from you nearest Primus retailer.
9. SERVICE AND REPAIR
9.1 If it is not possible to rectify a fault by following these
instructions, the appliance should be returned to your
nearest Primus retailer.
9.2 Never try to carry out any other maintenance or repair
work than that which is described here.
9.3 Never make any alterations to the appliance, as it may
then be dangerous to use.
9.4 The stove has been approved with a factory-mounted
hose, and this must NOT be replaced with any other hose
than the genuine hose 732910.
10. SPARE PARTS AND ACCESSORIES
10.1 Only use genuine Primus spare parts and accessories.
Take care when assembling spare parts and accessories,
and avoid touching hot parts.
10.2 Only use PRIMUS PowerGas LP gas cartridges 2206
(Propane/Isobutane/Butane mix) for this appliance.
10.3 Spare parts
733950 Jet 0.32 mm
732440 O-ring
732910 Hose including valve
737460 Piezo ignitor with holder
10.4 If you have difficulty in obtaining spare parts or
accessories, contact your local Primus distributor. Visit
www.primus.se
PRIMUS
Power stove set™
Fig 4
Fig 5
Fig 3
3
7
12
1
Fig 1
2
4
13
Fig 2
10
14
11
9
8
Page is loading ...
Page is loading ...
Page is loading ...
Page is loading ...
Page is loading ...
Page is loading ...
Page is loading ...
-
 1
1
-
 2
2
-
 3
3
-
 4
4
-
 5
5
-
 6
6
-
 7
7
-
 8
8


Ask a question and I''ll find the answer in the document
Finding information in a document is now easier with AI
in other languages
- italiano: Primus Power Stove Set Manuale utente
- français: Primus Power Stove Set Manuel utilisateur
- español: Primus Power Stove Set Manual de usuario
- Deutsch: Primus Power Stove Set Benutzerhandbuch
- русский: Primus Power Stove Set Руководство пользователя
- Nederlands: Primus Power Stove Set Handleiding
- português: Primus Power Stove Set Manual do usuário
- dansk: Primus Power Stove Set Brugermanual
- polski: Primus Power Stove Set Instrukcja obsługi
- čeština: Primus Power Stove Set Uživatelský manuál
- Türkçe: Primus Power Stove Set Kullanım kılavuzu
- svenska: Primus Power Stove Set Användarmanual
- suomi: Primus Power Stove Set Ohjekirja
- română: Primus Power Stove Set Manual de utilizare
Related papers
-
Primus Spider Stove Set User manual
-
-
-
-
-
-
Primus Stena User manual
-
-
-
Other documents
-
Kayoba 025604 User manual
-
-
Thulos TH-GS019 Owner's manual
-
Rothenberger Mobiles Weichlötgerät MULTI MOBILE Set User manual
-
-
-
-
-
 campgo Logi Compact Camping Stove User manual
-
Outwell 650605 Appetizer 1 Burner Stove User manual
