
Montageanleitung Cross-Trainer „Cosmos GT”
Art.-Nr. 07858-000
Der Umwelt zuliebe: Wir drucken auf 100% Altpapier!
PL
I
E
NL
F
GB
D
Abb. ähnlich

2
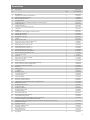
Inhalt
D
Contents
GB
Contenu
F
Inhoud
NL
Wichtige Hinweise . . . . . . . . . . . . . . . . . . . . . . . . . . . . . .3
Messhilfe für Verschraubungsmaterial . . . . . . . . . . . . . . . .13
Checkliste (Packungsinhalt) . . . . . . . . . . . . . . . . . . . . . . .14
Montageanleitung . . . . . . . . . . . . . . . . . . . . . . . . . . . . .15
Handhabungshinweis . . . . . . . . . . . . . . . . . . . . . . . . . . .18
Ersatzteilzeichnung und –liste . . . . . . . . . . . . . . . . . . . . . .20
Important information . . . . . . . . . . . . . . . . . . . . . . . . . . . .4
Measuring help for screw connections . . . . . . . . . . . . . . . .13
Checklist (contents of packaging) . . . . . . . . . . . . . . . . . . .14
Assembly instructions . . . . . . . . . . . . . . . . . . . . . . . . . . .15
Handling . . . . . . . . . . . . . . . . . . . . . . . . . . . . . . . . . . .18
Spare parts drawing and list . . . . . . . . . . . . . . . . . . . . . .20
Observations importantes . . . . . . . . . . . . . . . . . . . . . . . . .6
Gabarit pour système de serrage . . . . . . . . . . . . . . . . . . .13
Liste de vérification (contenu de l’emballage) . . . . . . . . . . .14
Instructions d’assemblage . . . . . . . . . . . . . . . . . . . . . . . .15
Indication relative à la manipulation . . . . . . . . . . . . . . . . .18
Dessin et liste des pièces de rechange . . . . . . . . . . . . . . . .20
Belangrijke instructies . . . . . . . . . . . . . . . . . . . . . . . . . . . .7
Meethulp voor schroefmateriaal . . . . . . . . . . . . . . . . . . . .13
Checklijst (verpakkingsinhoud) . . . . . . . . . . . . . . . . . . . . .14
Montageaanwijzing . . . . . . . . . . . . . . . . . . . . . . . . . . . .15
Bedieningsinstruktie . . . . . . . . . . . . . . . . . . . . . . . . . . . .18
Reserveonderdeeltekening en –lijst . . . . . . . . . . . . . . . . . .20
Contenuto
I
Indicazioni importanti . . . . . . . . . . . . . . . . . . . . . . . . . . .10
Misura per materiale di avvitamento . . . . . . . . . . . . . . . . .13
Lista di controllo (contenuto del pacco) . . . . . . . . . . . . . . .14
Istruzioni di montaggio . . . . . . . . . . . . . . . . . . . . . . . . . .15
Avvertenze per il maneggio . . . . . . . . . . . . . . . . . . . . . . .18
Disegno ed elenco dei pezzi di ricambio . . . . . . . . . . . . . .20
Indice
E
Informaciones importantes . . . . . . . . . . . . . . . . . . . . . . . . .9
Ayuda para la medición del material de atornilladura . . . . .13
Lista de control (contenido del paquete) . . . . . . . . . . . . . . .14
Instrucciones para el montaje . . . . . . . . . . . . . . . . . . . . . .15
Instrucciones de manejo . . . . . . . . . . . . . . . . . . . . . . . . .18
Designación y lista de las piezas de recambio . . . . . . . . . .20
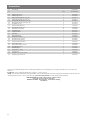
Spis treści
PL
Ważne informacje . . . . . . . . . . . . . . . . . . . . . . . . . . . . .12
Wzornik do połączeń śrubowych . . . . . . . . . . . . . . . . . . .13
Lista kontrolna (zawartość opakowania) . . . . . . . . . . . . . . .14
Instrukcja montażu . . . . . . . . . . . . . . . . . . . . . . . . . . . . .15
Wskazówki obsługowe . . . . . . . . . . . . . . . . . . . . . . . . . .18
Rysunek i lista części zamiennych . . . . . . . . . . . . . . . . . . .20
Page is loading ...

4
■ Das für einen Montageschritt notwendige Verschraubungsmate-
rial ist in der dazugehörigen Bildleiste dargestellt. Setzen Sie
das Verschraubungsmaterial exakt entsprechend der Abbildun-
gen ein. Alles erforderliche Werkzeug finden Sie im Kleinteile-
beutel.
■ Bitte verschrauben Sie zunächst alle Teile lose und kontrollieren
Sie deren richtigen Sitz. Drehen Sie die selbstsichernden Mut-
tern bis zum spürbaren Widerstand zuerst mit der Hand auf,
anschließend ziehen Sie sie gegen den Widerstand (Klemmsi-
cherung) mit einem Schraubenschlüssel richtig fest. Kontrollieren
Sie alle Schraubverbindungen nach dem Montageschritt auf
festen Sitz. Achtung: wieder gelöste Sicherheitsmuttern werden
unbrauchbar (Zerstörung der Klemmsicherung) und sind durch
Neue zu ersetzen.
■ Aus fertigungstechnischen Gründen behalten wir uns die Vor-
montage von Bauteilen (z.B. Rohrstopfen) vor.
■ Bewahren Sie die Originalverpackung des Gerätes gut auf, da-
mit sie später u. U. als Transportverpackung verwendet werden
kann.
Montagehinweise
■ Bitte prüfen Sie, ob alle zum Lieferumfang gehörenden Teile vor-
handen sind (s. Checkliste) und ob Transportschäden vorliegen.
Sollte es Anlaß für Beanstandungen geben, wenden Sie sich bit-
te an Ihren Fachhändler.
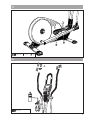
■ Sehen Sie sich die Zeichnungen in Ruhe an, und montieren Sie
das Gerät entsprechend der Bilderfolge. Innerhalb der einzel-
nen Abbildungen ist der Montageablauf durch Großbuchstaben
vorgegeben.
■ Die Montage des Gerätes muß sorgfältig und von einer er-
wachsenen Person vorgenommen werden. Nehmen Sie im
Zweifelsfall die Hilfe einer weiteren, technisch begabten Person
in Anspruch.
■ Beachten Sie, dass bei jeder Benutzung von Werkzeug und bei
handwerklichen Tätigkeiten immer eine mögliche Verletzungs-
gefahr besteht. Gehen Sie daher sorgfältig und umsichtig bei
der Montage des Gerätes vor!
■ Sorgen Sie für eine gefahrenfreie Arbeitsumgebung, lassen Sie
z. B. kein Werkzeug umherliegen. Deponieren Sie z. B. Ver-
packungsmaterial so, dass keine Gefahren davon ausgehen
können. Bei Folien/Kunststofftüten für Kinder Erstickungsgefahr!
Ersatzteilbestellung
Geben Sie bei Ersatzteilbestellungen bitte die vollständige Artikel-
nummer, die Ersatzteilnummer, die benötigte Stückzahl und die Seri-
ennummer an.
Bestellbeispiel: Art.-Nr. 07858-000/Ersatzteil-Nr. 10100016/
Stück /Serien-Nr: ........
Wichtig: Zu verschraubende Ersatzteile werden grundsätzlich
ohne Verschraubungsmaterial berechnet und geliefert. Falls Be-
darf an entsprechendem Verschraubungsmaterial besteht, ist die-
ses durch den Zusatz „mit Verschraubungsmaterial“ bei der Er-
satzteilbestellung anzugeben.
HEINZ KETTLER GmbH & Co. KG · Postfach 1020 ·
D–59463 Ense-Parsit
KETTLER Austria GmbH · Gewerbestraße 2 · A–5322 Hof
bei Salzburg
Trisport AG · Im Bösch · CH–6331 Hünenberg
www.kettler.de
CH
A
D
For Your Safety
■ The crosstrainer should be used only for its intended purpose,
i.e. for physical exercise by adult persons.
■ Any other use of the equipment is prohibited and may be dan-
gerous. The manufacturer cannot be held liable for damage or
injury caused by improper use of the equipment.
■ The product is not suitable for use by persons weighing over
150 kg.
■ The crosstrainer has been designed in accordance with the la-
test standards of safety. Any features which may have been a
possible cause of injury have been avoided or made as safe as
possible.
■ Incorrect repairs and structural modifications (e.g. removal or
replacement of original parts) may endanger the safety of the
user.
■ Damaged components may endanger your safety or reduce the
lifetime of the equipment. For this reason, worn or damaged
parts should be replaced immediately and the equipment taken
out of use until this has been done. Use only original KETTLER
spare parts.
■ If the equipment is in regular use, check all its components
thoroughly every 1–2 months. Pay particular attention to the
tightness of bolts and nuts. This is particularly true for the
attachment of grip strap, running plate and fastening of the
handlebar and front tube.
■ To ensure that the safety level is kept to the highest possible stan-
dard, determined by its construction, this product should be ser-
viced regulary (once a year) by specialist retailers.
■ Instruct persons using the equipment (in particular children) on
possible sources of danger during exercising.
■ Before beginning your program of exercise, consult your doctor
to ensure that you are fit enough to use the equipment. Base
your program of exercise on the advice given by your doctor.
Incorrect or excessive exercise may damage your health!
■ Any interference with parts of the product that are not described
within the manual may cause damage, or endanger the person
using this machine. Extensive repairs must only be carried out by
KETTLER service staff or qualified personnel trained by KETTLER.
■ In case of enquiry, please contact your KETTLER dealer.
Assembly Instructions
GB
Before assembling or using this fitness product, please read the following instructions carefully. They contain important
information for use and maintenance of the equipment as well as for your personal safety. Keep these instructions in a
safe place for maintenance purposes or for ordering spare parts.
Wichtige Hinweise
D

5
Handling the equipment
■ Before using the equipment for exercise, check carefully to en-
sure that it has been correctly assembled.
■ Before beginning your first training session, familiarize yourself
thoroughly with all the functions and settings of the unit.
■ It is not recommended to use or store the apparatus in a damp
room as this may cause it to rust. Please ensure that no part of
the machine comes in contact with liquids (drinks, perspiration
etc.). This may cause corrosion.
■ The machine is designed for use by adults and children should
not be allowed to play with it. Children at play behave unpre-
dictably and dangerous situations may occur for which the ma-
nufacturer cannot be held liable. If, in spite of this, children are
allowed to use the equipment, ensure that they are instructed in
its proper use and supervised accordingly.
■ The crosstrainer complies with the DIN EN 957–1/5, class HB.
It is therefore unsuitable for therapeutic use.
■ A slight production of noise at the bearing of the centrifugal
mass is due to the construction and has no negative effect upon
operation. Possibly occurring noise during reverse pedalling re-
sult from engineering and are absolutely safe.
■ Do not use corrosive or abrasive materials to clean the equip-
ment. Ensure that such materials are not allowed to pollute the
environment.
■ The crosstrainer has a magnetic brake system.
■ To operate correctly, the pulse function requires a minimum vol-
tage of 2,7 volts (only for computers working with batteries).
■ The equipment is dependent of revolutions per minute.
■ Please ensure that liquids or perspiration never enter the ma-
chine or the electronics.
■ Before use, always check all screws and plug-in connections as
well as respective safety devices fit correctly.
■ Always wear suitable shoes when using.
■ All electric appliances emit electromagnetic radiation when in
operation. Please do not leave especially radiation-intensive ap-
pliances (e.g. mobile telephones) directly next to the cockpit or
the electronic controlsystem as otherwise values displayed
might be distorted (e.g. pulse measurement.
■ In choosing the location of the apparatus, ensure a sufficient sa-
fety distance from any obstacles. The apparatus must not be mo-
unted in the immediate vicinity of main passageways (paths, do-
orways, corridors).
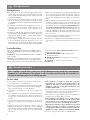
Instructions for Assembly
■ Ensure that you have received all the parts required (see check
list) and that they are undamaged. Should you have any cause
for complaint, please contact your KETTLER dealer.
■ Before assembling the equipment, study the drawings carefully
and carry out the operations in the order shown by the dia-
grams. The correct sequence is given in capital letters.
■ The equipment must be assembled with due care by an adult
person. If in doubt call upon the help of a second person, if pos-
sible technically talented.
■ Please note that there is always a danger of injury when wor-
king with tools or doing manual work. Therefore please be ca-
reful when assembling this machine.
■ Ensure that your working area is free of possible sources of
danger, for example don’t leave any tools lying around. Always
dispose packaging material in such a way that it may not cau-
se any danger. There is always a risk of suffocation if children
play with plastic bags!
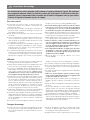
■ The fastening material required for each assembly step is sho-
wn in the diagram inset. Use the fastening material exactly as
instructed. The required tools are supplied with the equipment.
■ Bolt all the parts together loosely at first, and check that they
have been assembled correctly. Tighten the locknuts by hand un-
til resistance is felt, then use spanner to finally tighten nuts com-
pletely against resistance (locking device). Then check that all
screw connections have been tightened firmly. Attention: once
locknuts have been unscrewed they no longer function correctly
(the locking device is destroyed), and must be replaced.
■ For technical reasons, we reserve the right to carry out prelimi-
nary assembly work (e.g. addition of tubing plugs).
■ Please keep original packaging of this article, so that it may be
used for transport at a later date, if necessary.
Assembly Instructions
GB
List of spare parts
When ordering spare parts, always state the full item number,
spare–part number, the quantity require and the serial number of the
product.
Example order: item no. 07858-000 / spare-part no. 10100016
/ 2 pieces / serial no......
Important: spare part prices do not include fastening material; if
fastening material (bolts, nuts, washers etc.) is required, this
should be clearly stated on the order by adding the words „with
fastening material“.
KETTLER GB Ltd. · Kettler House, Merse Road · North Moons
Moat · Redditch, Worcestershire B98 9HL
KETTLER International Inc. · P. O. Box 2747 · Virginia Beach
· VA 23450-2747
http://www.kettler.de
USA
GB
Page is loading ...
Page is loading ...
Page is loading ...
Page is loading ...
Page is loading ...
Page is loading ...
Page is loading ...
Page is loading ...

14
1
1
1
✓
2
1
2
2
2
2
6
4
4
2
2
4
8
2
2
1
1
1
M 10 x 105
M 8 x 20
M 5 x 45
M 5
M 10
ø 21 x 8, 4
2
2
4
ø 25 x 10, 5
ø 25 x 8, 4
4
ø 10
ø 42
M 5 x 20
Checkliste (Packungsinhalt)
Checklist (contents of packaging)
Liste de vérification (contenu de l’emballage)
Checklijst (verpakkingsinhoud)
Lista de control (contenido del paquete)
Lista di controllo (contenuto del pacco)
Lista kontrolna (zawartość opakowania)
GB
F
NL
E
I
PL
2
ø 22,2 x 27,5

15
1
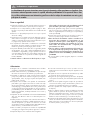
A
A
B
B
C
F
E
D
M 8 x 20
ø25x8,4 ø21x8,4
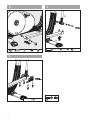
ACHTUNG !
Die beiden Schrauben mit gewölbter Unterlegscheibe (D) müssen
aus technischen Gründen zuerst angezogen werden. Erst dann die
Schrauben mit flacher Unterlegscheibe (E) anziehen
Important !
Due to technical reasons the screws with the curved washer (D)
have to be tightend first. Tighten the screws with the flat washer
(E) last.
ATTENTION!
Pour des raisons techniques il faut d’abord serrer les deux vis à
rondelles bombées (D). Serrez ensuite seulement les vis à rondelles
plates (E)
LET OP !
Om technische redenen moeten de beide schroeven met gewelfde
sluitring (D eerst vastgedraaid worden. Pas daarna de schroeven
met vlakke sluitring (E) vastdraaien.
¡ATENCIÒN!
Por razones técnicas, los dos tornillos con arandela abombada (D)
deben apretarse primero. A continuación apretar los tornillos con
la arandela plana (E).
ATTENZIONE!
Per motivi tecnici è necessario serrare dapprima le due viti con le
rondelle bombate (D). Soltanto dopo questa operazione si posso-
no serrare anche le viti con le rondelle piatte (E).
UWAGA!
Obie śruby z wypukłą podkładką
(D) muszą być z przy-
czyn technicznych dokręcane najpierw. Dopiero potem
dokręcić śruby z podkładką płaską (
E).
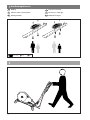
Schraubverbindung regelmäßig kontrollieren.
The screwed connections must be controled at regular intervals.
Resserrer le raccord à vis à intervalles réguliers.
Schroefverbinding moet regelmatig opnieuw vastgedraaid worden.
La atornilladura debe ser apretada con regularidad.
Il collegamento a vite va riserrato ad intervalli regolari.
Połączenie śrubowe musi być regularnie dokręcane.
PL
I
E
NL
F
GB
D
!
Page is loading ...
Page is loading ...
Page is loading ...
Page is loading ...

7
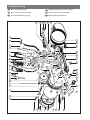
21 20 8
55
38
4
53
56
57
44-50
51
59
65 89
6652
73
74
9
63
71
69
60
6
22
37
2
5
36
3
29
18
19
82
35
78
77
30
31
64
35
28
58
62
1
90
68
25
40
23
24
88
70
39
27
83
61
84
43
42
32
41
80
81
54
33
34
72
75
26
86
76
85
20
87
Ersatzteilzeichnung
Spare parts drawing and list
Dessin et liste des pièces de rechange
Reserveonderdeeltekening en –lijst
Designación y lista de las piezas de recambio
Disegno ed elenco dei pezzi di ricambio
Rysunek i lista części zamiennych
GB
F
NL
E
I
PL
93
94
92
Page is loading ...
Page is loading ...
Page is loading ...
Page is loading ...
-
 1
1
-
 2
2
-
 3
3
-
 4
4
-
 5
5
-
 6
6
-
 7
7
-
 8
8
-
 9
9
-
 10
10
-
 11
11
-
 12
12
-
 13
13
-
 14
14
-
 15
15
-
 16
16
-
 17
17
-
 18
18
-
 19
19
-
 20
20
-
 21
21
-
 22
22
-
 23
23
-
 24
24


Kettler Cosmos GT Owner's manual
- Type
- Owner's manual
- This manual is also suitable for
Ask a question and I''ll find the answer in the document
Finding information in a document is now easier with AI
in other languages
- italiano: Kettler Cosmos GT Manuale del proprietario
- français: Kettler Cosmos GT Le manuel du propriétaire
- español: Kettler Cosmos GT El manual del propietario
- Deutsch: Kettler Cosmos GT Bedienungsanleitung
- Nederlands: Kettler Cosmos GT de handleiding
- polski: Kettler Cosmos GT Instrukcja obsługi
Related papers
-
Kettler CTR 1 Owner's manual
-
-
Kettler 07861-600 User manual
-
-
-
-
-
-
-
Other documents
-
 Smooth Fitness 7858-699 User manual
-
CARE FITNESS XIRIS II Owner's manual
-
-
-
-
-
-
-
-
