Page is loading ...

Nest Hello
Pro Installation & Configuration Guide
Last updated: April 2018
Version: 1.1

Table of Contents
General Information 2
Compatibility 2
Checking Compatibility - How to tell if Nest Hello will work in your customer’s home 3
Technical Specifications 4
Technical Specifications, continued 5
Installation & Setup 6
Installation Overview 6
Installation Process 6
Complex Installation Scenarios 11
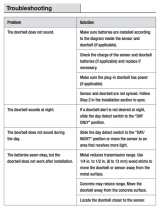
Troubleshooting 11
Where to Find Additional Help 12
1

General Information
Compatibility
Minimum Requirements - the following must be in place for Nest Hello to be compatible:
1. Hard-wired doorbell
2. Hard-wired doorbell chime
3. 14 to 30 Volts of line power at the doorbell
4. 16 to 24 Volt, 10 Volt Amp transformer *
* for a single doorbell application. For homes with two doorbells ringing the same chime box, there needs to be at least
a 16-24Volt, 20 or 30Volt/Amp transformer.
Connections:
Networking requirements:
● Two connections and wires at the Nest Hello
doorbell camera
● Four connectors and wires at the Nest Chime
Bypass
● Wi-Fi is required for software updates and remote
access via the Nest App
● 2Mbps upload speed reserved for the Nest Hello
● Wi-Fi 802.11 b/g/n, 2.4 GHz
● Secure: AES-128, SSL/TLS, WEP, WPA/WPA2
Product Requirements:
● Wi-Fi Internet connection
● Compatible phone or tablet with Bluetooth & Nest app
2

Checking Compatibility - How to tell if Nest Hello will work in your customer’s home
Follow the steps below to see if you can replace your customer’s doorbell with Nest Hello.
1. Check if there is an existing doorbell. If your customer does not already have a doorbell, they will need a
doorbell transformer and low voltage wires installed. Evaluate the work required and ask the customer if
they’d like for you to provide an estimate.
2. Check if they have an intercom, front gate control or other integrated device. Some advanced doorbell
systems have a built-in intercom, gate control or a doorbell that’s located far from the home (such as an
outside gate). These cases will not be compatible with Nest Hello.
3. Check how the doorbell and chime are powered.
a. If you see two or more wires, Nest Hello will probably work. But, you need to check the voltage.
b. If you see both wires and batteries, Nest Hello will probably work, but you need to check the
voltage. Go to step 4 below.
c. If you see only batteries and no wires, Nest Hello will not work. But in some cases, a battery
powered chime and doorbell are installed over old doorbell wires. If there are wires under the
battery powered chime and doorbell, they may work with Nest Hello.
4. Check the wire voltage. Nest Hello will work in most homes that already have a wired doorbell. But in
about 25% of those homes, the doorbell system can’t deliver enough voltage to Nest Hello.
a. Check the voltage at the doorbell wires. If the measured voltage is between 14 and 30 V AC, your
wiring should work with Nest Hello. If the measured voltage is below 14 or over 30, you may need
to upgrade your transformer so it can work with Nest Hello.
b. Find the doorbell transformer. Transformers can be difficult to locate. Common places for
transformers are inside the doorbell chime box, near the breaker or fuse box, in the attic space, or
in the basement or crawl space under the home. Use a tone generator if you have one to help
locate the transformer. Electrical transformers are typically labeled with a voltage rating. It’s
usually molded or etched into the transformer’s body. If the transformer is labeled anywhere
from 16 to 24 Volts AC and 10 VA, Nest Hello will be compatible. If it’s labeled below 16 Volts, or
over 24 Volts you will need to upgrade the transformer.
3

Technical Specifications
Dimensions:
1.7 in x 4.6 in x 1.0 in (4.3 cm x 11.7 cm x 2.6 cm)
Weight:
4.28 oz (121.6 g)
Power Requirements:
16VAC–24VAC 10VA transformer and wired doorbell
Camera:
1/3-inch, 3-megapixel (2K) color sensor, 8x digital zoom
Video:
HD UXGA 1600 x 1200, up to 30 frames/sec, H.264
encoding, HDR
Field of View::
160° diagonal
Audio:
High-quality speaker and microphone
Lights:
RGB light ring and status light
Night vision:
850 nm infrared LEDs
Operating Temperature:
–4° to 104°F (–20° to 40°C)
Weather Resistance:
IP65 rating
Security:
128-bit AES with TLS/SSL
4

Technical Specifications, continued
In the box:
● Nest Hello doorbell
● Chime connector
● 15° wedge
● Release tool
● Masonry drill bit
● Window decal
● Wall plate
● Extension wires
● Wall anchors
● Screws
● Quick Start Guide
Wireless:
● Wi-Fi 802.11a/b/g/n/ac, 2.4GHz or 5GHz (WEP, WPA, WPA2 encryption
supported)
● Bluetooth Low Energy (BLE)
● 802.15.4 at 2.4GHz
Product requirements:
Requires a wired doorbell and chime
Connectivity requirements:
● Wi-Fi 802.11a/b/g/n/ac, 2.4GHz or 5GHz (WEP, WPA, WPA2 encryption
supported)
● Working broadband internet connection with at least 2 Mbps upload speed (DSL
may not qualify).
● Requires a compatible phone or tablet with the free Nest app and Bluetooth 4.0.
Bandwidth requirements:
At 1600x1200, Nest Hello requires 800 to 2000 Kbps of upload bandwidth while
streaming video. Nest Hello will use more bandwidth to stream video when there is
more motion in the scene. At 1600x1200, each Nest Hello could use 150GB to 600GB
of upload bandwidth per month depending on the video quality.
Languages:
English (US, UK), French (Canada, France), Spanish (Americas, Spain)
Green:
● RoHS compliant
● REACH compliant
● Recyclable packaging
● Title 20 battery charger compliant
Support and limited warranty:
Comes with a 2-year limited warranty (details in box). For support, visit
nest.com/support.
5

Installation & Setup
Installation Overview
Installation of Nest Hello consists of the basic steps listed below. They are explained in more detail below and
on the pages that follow. The first step, confirm compatibility, is listed here but explained in detail previously in
this guide.
1. Confirm compatibility.
2. Test the existing doorbell.
3. Turn off power to the doorbell.
4. Add Nest Hello to the Nest App.
5. Wire the Nest Chime connector to the doorbell chime.
6. Replace the existing doorbell with Nest Hello.
7. Allow the Nest Hello to update.
8. Test Nest Hello.
9. Help your customer pair the Nest Thermostat with the Nest App.
10. Connect Nest Hello to Google Home.
Installation Process
1. Confirm compatibility.
See page 3 for details.
2. Test the existing doorbell.
Press the existing doorbell to check that the indoor chime rings and that the existing wired system is
intact.
3. Turn off power to the doorbell.
Locate the electrical panel and identify the breaker that controls the circuit on which the doorbell is
wired. This is to protect yourself and the device. If you can’t determine the circuit, turn off the main
circuit breaker after getting permission from your customer. Confirm the power is off by attempting to
activate the existing doorbell.
4. Add Nest Hello to the Nest App
As a Nest Pro, make it a part of your process to prepare your customer in advance of your visit. Ask
them to have two things in place prior to your arrival - the password to their Wi-Fi network and the Nest
App on a device (the App will prompt them to set up their account). If your customer has another Nest
product in their home, they will likely already have a Nest account established. In settings, select “Add
Product” and follow the on-screen prompts. The following are the steps for adding Nest Hello to the
Nest App.
6

a. Add product
b. Scan QR code on device
c. Check compatibility
d. Watch install video (optional)
e. Make sure you have
f. Review placement guidelines
7

← When you land on this
screen, you are ready to proceed
to wiring the chime connector.
g. To avoid risks
h. Find the chime connector
8

5. Wire and install the Chime Connector at the Chime Box
With Nest Hello successfully added to the Nest App, you are now ready to wire and install the chime
connector.
Why a Chime Connector? Nest Hello is more than just a doorbell and requires a continuous power
supply from the transformer. With just typical doorbell wiring, the video feed would only be live when
the doorbell is pressed. The chime connector provides that constant supply of power by acting as a
second switch.
a.
Before you begin, switch off power to the doorbell at the circuit breaker.
b.
Next, remove the chime box cover. Chimes come in different shapes and sizes and are
typically located in a hallway or common area near the center of the home. A few examples
are shown below.
c.
Review the existing doorbell circuit. A typical doorbell circuit will have three wires with two
connections at three different locations: at the doorbell, at the chime box, and at a
transformer. Take a picture of the existing chime wiring. This can be a helpful reference
during installation.
The illustration below depicts a typical circuit. Note: the colors of the wires are for
illustration purposes only and not intended to indicate what you will find.
d.
Now, insert the Chime Connector into the circuit (see illustration below).
● Insert the FRONT wire into the plastic clip on the chime connector’s white wire. This
wire is routed from the front doorbell to the chime box (blue in this example). First,
disconnect the FRONT wire from the chime box by loosening the screw and
removing the wire. Pinch the plastic clip to slide in the wire and release it to lock the
wire into place. Trim the wire to ¼” before inserting.
● Connect the chime connector’s white wire to the FRONT terminal at the chime box.
Hook the wire clockwise around the screw and tighten the screw into place.
● Disconnect the TRANS wire. This wire is connects the chime box to the transformer
(purple in this example). Loosen the screw and remove the wire.
● Insert the TRANS wire into the plastic clip on the chime connector’s gray wire.
Pinch the plastic clip to slide in the wire and release it to lock the wire into place.
Trim the wire to ¼” before inserting.
● Connect the chime connector’s gray wire to the TRANS terminal at the chime box.
9

Hook the wire clockwise around the screw and tighten the screw into place.
● Make sure your connections are secure. Lightly pull on the wires to make sure
everything is securely attached.
● Find a place for the chime connector. Make sure the chime connector won’t interfere
with moving parts and muffle the chime. You can use the adhesive backing to stick it
outside the box, or tuck it in if there’s room.
● The final wire (orange in this example) that connects the transformer to the doorbell
remains unchanged.
6. Replace existing doorbell with Nest Hello
With the Nest Chime Connector wired and installed, you are now ready to remove the existing doorbell
and replace it with Nest Hello. Before you begin, double check to make sure the power is still switched
off at the circuit breaker.
a.
Remove the old doorbell. Remove the screws attaching the doorbell to the wall or framing
and remove any additional hardware. Before disconnecting any wires, take a picture of the
existing wiring for reference.
b.
Disconnect the wires. If needed, wrap the wires around a pen or pencil to keep them from
falling into the hole in the wall.
c.
Consider the camera angle. Determine if you need to use the enclosed 15-degree wedge.
The wedge allows you to orient Nest Hello’s field of view to the left or to the right if the
existing doorbell is in a corner or any location that does not provide a good view of the area
directly in front of the door.
d.
Mark screw holes. Using the Nest Hello wall plate as a template, mark any new holes that
need to be drilled. Reuse existing holes when possible.
f.
Screw in the Nest Hello wall plate with the logo upright (and the 15-degree wedge behind it
if you have decided to use it) with the screws provided. For hard surfaces like brick or
stucco, use the included masonry bit to drill holes at your markings. Then use a mallet or
hammer to insert the wall anchors.
g.
Connect the wires to the doorbell screw terminals on the back of Nest Hello. It doesn’t
matter which wire is connected to which terminal. Trim excess wire if wires are too long or
use optional extension wires if they are too short. Using a phillips screwdriver, connect the
wires to the terminals on the back of the Nest Hello device and push any excess wire into
the hole. Upon doing this, you will close the doorbell circuit shown in step 2d above.
10

h.
Attach the doorbell to the wall plate. Slide the top of the doorbell up into the plate, then
snap in the bottom. You can remove it later if needed by inserting the special release tool
provided into the small hole at the bottom of the wall plate.
i.
Switch power back on. Then return to the doorbell to finish setup.
7. Allow Nest Hello to update
Nest Hello is a Wi-Fi enabled device and when first connected to Wi-Fi, it will look for a software update.
This should take no more than a minute or two.
8. Test Nest Hello
Press the Nest Hello doorbell button to make sure there is an audible chime at the doorbell, that the
interior chime rings, and that the customer receives a notification via the Nest App (default setting).
9. Help your customer set up Nest Hello in the Nest App
Go into the Nest Hello settings (gear icon) and walk your customer through the available features to
ensure the device is setup to their preferences. Let them know they can subscribe to Nest Aware for
continuous 24/7 recording and intelligent alerts. Advise them to visit nest.com/support for any future
questions about their Nest Hello device.
(1) Manually turn camera on and off.
(2) Turn indoor chime on and off.
(3) Use phone’s location to
automatically turn camera on and off.
(4) Set a schedule to customize when
the camera turns on and off.
(5) Choose types of activity, types of
notifications and when to receive them.
(6) Teach the camera to recognize
people your customer knows.
(7) Enable Google Assistant-enabled
speakers to announce visitors.
(8) Subscribe to keep familiar face
alerts and continuous video history.
a. Tap Settings (gear icon)
b. Explain available features
11

(9) Set video quality and bandwidth to Low, Med or High, or leave at default.
(10) Set Night Vision to Off, Auto or Always On, or leave at default.
(11) Only family account members can see camera’s video.
b. (continued) Explain features
(12) Set status light to on or off.
(13) If there is an electronic chime, set duration from 1 to 10 seconds.
(14) Turning off microphone disables audio streaming and audio recording.
(15) Select the language for Nest Hello’s quick responses.
(16) Change or update camera’s Wi-Fi settings.
(17) Choose the location for Nest Hello. This is what your customer will see in
the Nest App.
(18) View serial number, MAC & IP addresses, AC voltage and more.
b. (continued) Explain features
12

10. Connect Nest Hello to Google Home
If the customer has a Google Assistant-enabled speaker (Google Home, Mini or Max), the speaker can
be set up to announce when someone rings the doorbell. If the customer adds a Nest Aware
subscription to Nest Hello with familiar face alerts enabled, their speaker can even say the name of a
visitor they’ve told their camera to recognize.
Where to Find Additional Help
• Help online: https://nest.com/support/thermostat/
• Nest Pro Tech Support: 1-855-VIP-NEST (1-855-847-6378)
Dedicated Pro Support Hours: 6am-6pm (pacific), 9am-9pm (eastern)
13
/