Page is loading ...

OBR170M
• Warranty
• Assembly
• Parts
Owner's manual OBR170M
CAUTION: 1. Weight on this product should not exceed 150kg
2 Exercise of
a
strenuous nature, as is customarily done on this equipment,
Should not be undertaken without first consulting a physician.
No specific health claims are made or implied as they relate to the equipment.
Measurements made by the equipment are believed to be accurate, but only the
measurements of your physician should be relied upon.
IMPORTANT: Read all instruction carefully before using this product. Retain this product owner's
manual for future reference.

1
01 Assembly
PRECAUTIONS
WARNING: This bicycle has been designed and constructed to provide maximum safety. Nevertheless, certain
precautions should be taken when using exercise equipment. Read the whole manual before assembling and using
the bicycle. The following safety precautions should also be observed:
1. Before using the exercise bike, please read all instructions in this manual.
2. It is the responsibility of the owner to ensure that all users of the bike are adequately informed
of all precautions. Use the exercise bike only as described in this manual.
3. Use the bike indoors on a level surface and keep it away from moisture and dust. Place a mat
under the stabilizers to protect the carpet or floor.
4. Inspect and tighten all parts regularly. Replace and worm parts immediately
5. Keep children away from this equipment at all times. DO NOT leave them unsupervised in the room where this
bicycle is kept.
6. Wear appropriate exercise clothing when using the bike. Do not wear loose clothing that could
become caught in the bike.
7. If you feel pain or dizziness while exercising, stop immediately and cool down.
8. The pulse sensor is not a medical device. Various factors including the user’s movement, may
affect the accuracy of the heart rate readings. The Pulse sensor is intended only as an exercise
aid in determining heart rate rends in general.
Pre-assembly notes
OPEN THE BOXES
Make sure to inventory all the parts that are included in the boxes. Check The Hardware Chart
for a full count of the number of parts included for proper assembly.
GATHER YOUR TOOLS
Before starting the assembly of your unit, gather the necessary tools. Having all of the equipment at hand
will save time and make the assembly quick and hassle-free.
CLEAR YOUR WORK AREA
Make sure that you have cleared away a large enough space to properly
assemble the unit. Make sure the space is free from anything that may cause
injury during assembly. After the unit is fully assembled, make sure there is a
comfortable amount of free area around the unit for unobstructed operation.

2
Hardware chart
AR170
T-10 Allen Key(1)
Checking List
AR170
T-10 Allen Key(1)

3
Part list

4

5

6

7

8

9
Drawing for assembly

10
Explosion drawing

11
STEP 1
STEP 1STEP 1
STEP 1
X4
STEP
STEP STEP
STEP 2
22
2
X4
R
L

12
STEP 3
STEP 3STEP 3
STEP 3
STEP 4

13
Step 5
Step 6
X4

14
Step 7
Step 8

15
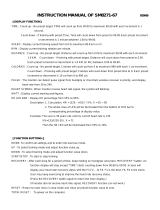
INSTRUCTION MANUAL OF SM1590-71
DISPLAY FUNCTIONS
ITEM DESCRIPTION
TIME Count up - No preset target, Time will count up from 00:00 to maximum 99:59 with each
increment is 1 minute.
Count down - If training with preset Time, Time will count down from preset to 00:00.
Each preset increment or decrement is 1 minute between 00:00 to 99:00.
SPEED Displays current training speed. Maximum speed is 99.9 KM/H or ML/H.
RPM Displays the Rotation Per Minute. Display range 0~15~999
DISTANCE Accumulates total distance from 0.00 up to 99.99 KM or ML. The user may preset target
distance data by using UP/DOWN button.
Each preset increment or decrement is 0.1KM or ML between 0.00 to 99.90.
CALORIES Accumulates calories consumption during training from 0 to maximum 9999 calories.
(This data is a rough guide for comparison of different exercise sessions which can not be
used in medical treatment.)
PULSE User may set up target pulse from 0 - 30 to 230; and computer buzzer will beep when actual
heart rate is over the target value during workout.
WATTS Display current workout watts. Display range 0~999.
MANUAL
Manual mode workout.
BEGINNER
4 PROGRAM selection.
ADVANCE
4 PROGRAM selection.
SPORTY
4 PROGRAM selection.
CARDIO Target HR training mode.
WATT PROGRAM WATT constant training mode.
KEY FUNCTION
ITEM DESCRIPTION
Up (Encoder)
Increase resistance level
Setting selection.
Down (Encoder)
Decrease resistance level
Setting selection.
Mode / Enter
Confirm setting or selection.
Reset
Press and hold for 2 seconds, computer will reboot and start from user setting.
Reverse to main menu during preset workout value or stop mode.
Start/ Stop
Start or Stop workout.
Recovery
Test heart rate recovery status.
Body fat
In stop mode, press it for body fat measurement

16
OPERATION:
POWER ON
Plug in power supply, computer will power on and display all segments on LCD for 2 seconds (Drawing 1).
Drawing 1
WORKOUT SELECTION
Use UP or DOWN (Encoder) to select workout Manual (Drawing 2) Beginner(Drawing 3) Advance (Drawing 4) Sporty(Drawing
5) Cardio(Drawing 6) Watt(Drawing 7).
Drawing 2 Drawing 3
Drawing 4 Drawing 5
Drawing 6 Drawing 7
Manual Mode
Press START in main menu may start workout in manual mode.
1. Use UP or DOWN (Encoder) to select workout program, choose Manual and press MODE / ENTER to get into.
2. Use UP or DOWN (Encoder) to set TIME (Drawing 8), DISTANCE (Drawing 9), CALORIES (Drawing 10), PULSE (Drawing 11) and
press MODE / ENTER to confirm.
3. Press START/STOP keys to start workout. Use UP or DOWN (Encoder) to adjust load level. Load level display in WATT window,
no adjusting for 3s, it will switch to display WATT (Drawing 12).

17
4. Press START/STOP keys to pause workout. Press RESET to reverse to main menu.
Drawing 8 Drawing 9
Drawing 10 Drawing 11
Drawing 12
Beginner Mode
1. Use UP or DOWN (Encoder) to select workout program, choose Beginner mode and press MODE / ENTER to get into.
2. Use UP or DOWN (Encoder) to select Beginner program 1~4 (Drawing 13) and press MODE / ENTER to get into.
3. Use UP or DOWN (Encoder) to set TIME.
4. Press START/STOP key to start workout. Use UP or DOWN (Encoder) to adjust load level.
5. Press START/STOP key to pause workout. Use RESET to reverse to main menu.
Drawing 13
Advance Mode
1. Use UP or DOWN (Encoder) to select workout program, choose Advance mode and press MODE / ENTER to get into.
2. Use UP or DOWN (Encoder) to select Advance program 1~4 (Drawing 14) and press MODE / ENTER to get into.
3. Use UP or DOWN (Encoder) to set TIME.
4. Press START/STOP key to start workout. Use UP or DOWN (Encoder) to adjust load level.
5. Press START/STOP key to pause workout. Use RESET to reverse to main menu.
Drawing 14

18
Sporty Mode
1. Use UP or DOWN (Encoder) to select workout program, choose Sporty mode and press MODE / ENTER to get into.
2. Use UP or DOWN (Encoder) to select Sporty program 1~4 (Drawing 15) and press MODE / ENTER to get into.
3. Use UP or DOWN (Encoder) to set TIME.
4. Press START/STOP key to start workout. Use UP or DOWN (Encoder) to adjust load level.
5. Press START/STOP key to pause workout. Use RESET to reverse to main menu.
Drawing 15
Cardio Mode
1. Use UP or DOWN (Encoder) to select workout program, choose H.R.C. and press MODE / ENTER to get into.
2. Use UP or DOWN (Encoder) to set Age (Drawing 16).
3. Use UP or DOWN (Encoder) to select 55% (Drawing 17).75%.90% or TAG (TARGET H.R.) (default: 100).
4. Use UP or DOWN (Encoder) to set workout TIME.
5. Press START/STOP key to start or stop workout. Use RESET to reverse to main menu.
Drawing 16 Drawing 17
Watt Mode
1. Use UP or DOWN (Encoder) to select workout program, choose WATT and press MODE / ENTER to get into.
2. Use UP or DOWN (Encoder) to set WATT target. (default: 120, Drawing 18)
3. Use UP or DOWN (Encoder) to set TIME.
4. Press START/STOP key to start workout. Use UP or DOWN (Encoder) to adjust Watt level.
5. Press START/STOP key to pause workout. Use RESET to reverse to main menu.
Drawing 18

19
RECOVERY
After exercising for a period, keep holding on hand grips or wearing chest strap and press RECOVERY key. All function display will stop
except “TIME” starts counting down from 00:60 to 00:00 (Drawing 19). Screen will display your heart rate recovery status with the F1,
F2 . to F6. F1 is the best, F6 is the worst (Drawing 20). User may keep exercising to improve the heart rate recovery status. (Press
the RECOVERY button again to return the main display.)
Drawing 19 Drawing 20
BODY FAT
1. In STOP mode, press the BODY FAT key to start body fat measurement.
2. Console will remind to input user GENDER (Drawing 21), AGE, HEIGHT, WEIGHT, then begin to measure.
3. During measuring, users have to hold both hands on the hand grips. And the LCD will display “= ” “= = ” (Drawing 22)for 8
seconds until computer finish measuring.
4. LCD will display BODY FAT advice symbol, BODY FAT percentage (Drawing 23), BMI (Drawing 24) for 30 seconds.
5. Error message:
*The LCD displays “= = ” “ = =” (Drawing 25) means not hand the grip or wear chest strap correctly.
*E-1 There is no heart rate signal input detected.
*E-4 Occurs when FAT% is below 5 or exceeds 50 and BMI result is below 5 or exceeds 50 (Drawing 26).
Drawing 21 Drawing 22
Drawing 23 Drawing 24
Drawing 25 Drawing 26
Noted:
1. After 4 minutes without pedaling or pulse input, console will enter into power saving mode. Press any key may wake the console
up.
2. When computer act abnormal, please plug out the adaptor and plug in again.
/