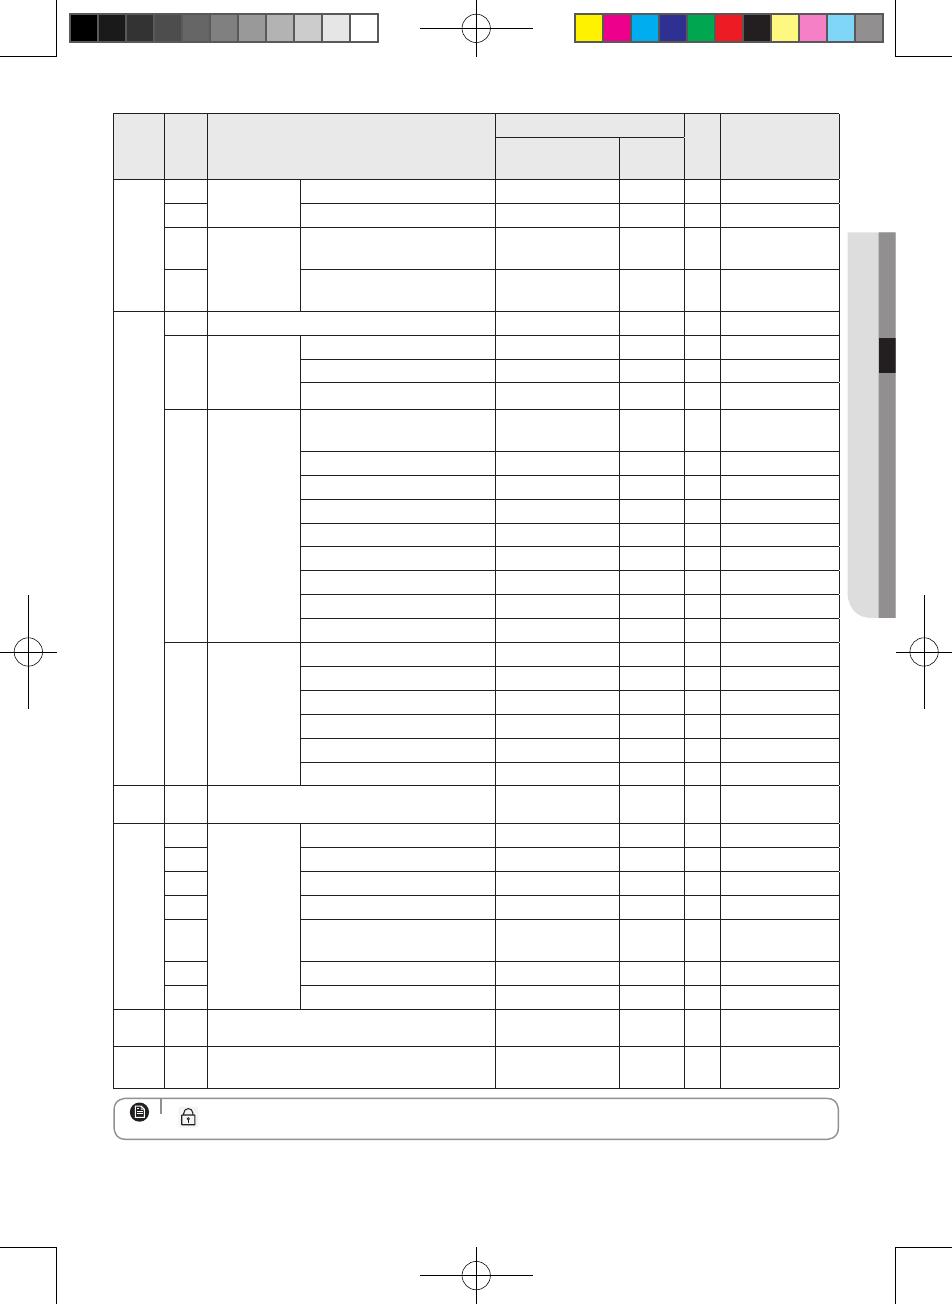
Samsung MWR-SH11N User manual

Category
Split-system air conditioners
Type
User manual

Samsung MWR-SH11N air conditioner offers a variety of features to keep you comfortable all year round. With its advanced functions like Wind-Free Cooling for draft-free cooling, Long Reach mode for wider airflow, and a Clean function to maintain air quality, you can enjoy a pleasant indoor climate. It also includes convenient features such as On/Off timers, Sleep mode, and Lock function for added convenience and energy saving. Moreover, the S-Plasma Ion feature helps purify the air, while the Outing mode ensures efficient operation when you're away from home.

Samsung MWR-SH11N air conditioner offers a variety of features to keep you comfortable all year round. With its advanced functions like Wind-Free Cooling for draft-free cooling, Long Reach mode for wider airflow, and a Clean function to maintain air quality, you can enjoy a pleasant indoor climate. It also includes convenient features such as On/Off timers, Sleep mode, and Lock function for added convenience and energy saving. Moreover, the S-Plasma Ion feature helps purify the air, while the Outing mode ensures efficient operation when you're away from home.

Air conditioner
User manual
Wired remote controller MWR-SH11N
Thank you for purchasing this Samsung Product.
Before operating this unit, please read this user manual carefully and retain it for future
reference.
DB68-08072A-00
ENGLISH-2
Contents
Preparation
Safety precautions ..........................................................................................................3
Names of the parts ..........................................................................................................6
Basic function
Basic operation of air conditioner............................................................................................9
Advanced function
Selecting the air ow direction ............................................................................................11
Selecting quiet operation .................................................................................................11
Wind-Free Cooling ........................................................................................................12
Long reach................................................................................................................13
Clean .....................................................................................................................13
Resetting lter cleaning alarm............................................................................................. 14
On-timer..................................................................................................................14
O-timer..................................................................................................................15
Sleep .....................................................................................................................15
Lock ......................................................................................................................16
S-Plasma Ion ..............................................................................................................16
Outing ....................................................................................................................17
Others
How to set additional user functions.......................................................................................18
The lowest set temperature is limited to 20 degree in the UAE according to UAE.S 5010-5:2016.
ENGLISH-3
01 PREPARATION
Safety precautions
This content is intended to protect the user’s safety and prevent property damage. Please
read it carefully for correct use of the product.
WARNING
Hazards or unsafe practices that may result in severe personal
injury or death.
CAUTION
Hazards or unsafe practices that may result in minor personal
injury or property damage.
Follow directions.
Do NOT attempt.
Make sure the machine is grounded to prevent electric shock.
Unplug the power plug from the wall socket.
Do NOT disassemble.
FOR INSTALLATION WARNING
The installation of this appliance must be performed by a qualied technician or
service company.
Failing to do so may result in electric shock, re, explosion, problems with the
product, or injury.
You must connect the product with rated power upon installation.
Failing to do so may result in problems with the product, electric shock, or re.
Do not install this appliance near a heater, inammable material. Do not install
this appliance in a humid, oily or dusty location, in a location exposed to direct
sunlight and water (rain drops). Do not install this appliance in a location where
gas may leak.
This may result in electric shock or re.
FOR INSTALLATION CAUTION
Install the product on a hard and even place that can support its weight.
If the place cannot support its weight, the product may fall down and it may cause
product damage.
PREPARATION
ENGLISH-4
Safety precautions
FOR POWER SUPPLY WARNING
Do not bend or pull the power cord excessively.
Do not twist or tie up the power cord.
This may result in electric shock or re.
FOR OPERATION WARNING
If the appliance generates a strange noise, a burning smell or smoke, stop the
operation immediately and contact your nearest service center.
Failing to do so may result in electric shock or re.
To reinstall the air conditioner, please contact your nearest service center.
Failing to do so may result in problems with the product, water leakage, electric
shock, or re.
A delivery service for the product is not provided. If you reinstall the product in
another location, additional construction expenses and an installation fee will be
charged.
If the malfunction diagnosis indicator appears or abnormal operation occurs,
stop operation immediately.
If you detect any burning smells from the product or abnormal operation occurs,
then immediately turn o the air conditioner and power, and then contact the
service center. Continuing to use the device in this state can cause electric shock,
re, or damage to the product.
Do not attempt to repair, disassemble, or modify the appliance yourself.
Failing to do so may result in electric shock, re, problems with the product, or
injury.
ENGLISH-5
01 PREPARATION
FOR OPERATION CAUTION
Do not allow water to enter the product.
This may result in re or explosion.
Do not operate the appliance with wet hands.
This may result in electric shock.
Do not spray volatile material such as insecticide onto the surface of the
appliance.
As well as being harmful to humans, it may also result in electric shock, re or
problems with the product.
Do not apply a strong impact to the remote controller and do not disassemble
the remote controller.
Do not use this product for other purposes.
This product is designed to only be used for a system air conditioner.
Do not press the buttons with any sharp objects.
This may result in electric shock or part damage.
FOR CLEANING WARNING
Do not clean the appliance by spraying water directly onto it. Do not use
benzene, thinner, alcohol or acetone to clean the appliance.
This may result in discoloration, deformation, damage, electric shock or re.
ENGLISH-6
Names of the parts
Wired remote controller
IR receiver (hidden)
Display
Buttons
• In case of duct type indoor unit, you can use wireless remote controller using IR receiver of this wired remote controller
without "Display and receiver kit". You can set this function in the user setting mode.
NOTE
ENGLISH-7
01 PREPARATION
Display
Classication Indication Function
Displays air conditioner operation.
Displays quiet operation.
Displays Indoor temperature/Set temperature.
Displays AC fan speed.
Displays air swing (Up/Down).
Displays ON/OFF time (scheduled time).
Displays lter cleaning (lter cleaning period).
Displays check.
Displays centralized control.
Displays S-Plasma Ion operation.
Displays outing mode.
Displays defrost operation.
Displays partial locking/all locking/invaild operation.
Displays IR receiver for wireless remote controller. (Default : disuse, indication on)
Displays Clean operation.
Displays Wind-Free Cooling operation.
Displays Long reach operation.
ENGLISH-8
Names of the parts
Buttons
Classication Button Function
Operation on/o button Turn the air conditioner power on/o
Mode button Select a desired air conditioner operation
Temperature setting button
Set a desired temperature and adjust the time
Fan speed button Change the air conditioner's fan speed
Air swing button Select the air ow direction of the air conditioner
Wind-Free button Select Wind-Free Cooling operation
OK/Cancel button
Conrm or cancel (by pressing and holding the button for 3 seconds)
Long button Select Long reach function
Outing/Lock button
Select outing operation for the air conditioner/Lock the wired
remote controller
(by pressing and holding the button for 3 seconds)
Sleep/Clean button
Select sleep/Clean operation for the air conditioner
(by pressing and
holding the button for 3 seconds)
Timer/Quiet button
Select the timer function/quiet operation for the air conditioner
(by
pressing and holding the button for 3 seconds)
ENGLISH-9
02 BASIC FUNCTION
BASIC FUNCTION
Basic operation of air conditioner
Basic operations can be selected by pressing the [ Mode ] button.
Auto
This operation allows you to automatically adjust the temperature and the fan speed to maximize your comfort.
• When the indoor temperature is very high, the device will produce a strong, cold breeze. When the indoor temperature
cools down, then weaker breeze will be produced.
Cool
This is a frequently used operation that allows you to adjust the fan speed, temperature, and air ow direction the way you
like.
• If you select heating operation during cooling operation, then the cooling operation is canceled.
Dry
This operation eectively removes all excess humidity so that you can feel refreshed during rainy days.
Fan
This operation produces breeze, just like a powerful fan, so that you can enjoy a refreshing breeze.
Heat
This function produces warm breeze so that you can use it in the fall or winter.
• Immediately after starting the heating operation, the air conditioner system may stop producing any breeze at all for a
while to avoid generating cold breeze.
• Defrost indicator ( )
- If you start removing frost from the outdoor unit during heating operation, the indicator will turn on.
When defrosting is over, the indicator will turn o.
(When the frost is being removed, the indoor unit does not generate any breeze.)
• If you stop the air conditioner after the heating operation, the air conditioner will produce some breeze to discharge all the
heat from the indoor unit.
• If you select the cooling operation during heating operation, then the heating operation is canceled.
ENGLISH-10
Basic operation of air conditioner
Press the button to operate the air conditioner.
Press the button to select a desired operation.
Press the button to select a fan speed.
Auto
(Auto)
Cool
(Low) , (Medium), (High), (Auto)
Dry
(Auto)
Fan
(Low) , (Medium), (High)
Heat
(Low) , (Medium), (High), (Auto)
• (Turbo) will be displayed if turbo fan speed is valid on the indoor unit.
NOTE
Press the button to set a desired temperature.
Auto You can adjust the desired temperature by 1 °C(1 °F) within a range of 18 °C~30 °C (65 °F~86 °F).
Cool You can adjust the desired temperature by 1 °C(1 °F) within a range of 18 °C~30 °C (65 °F~86 °F).
Dry You can adjust the desired temperature by 1 °C(1 °F) within a range of 18 °C~30 °C (65 °F~86 °F).
Fan You can’t change the desired temperature.
Heat
You can adjust the desired temperature by 1 °C (1 °F) within a range of 16 °C~30 °C (61 °F~86 °F).
* Nordic models (AC✴✴✴✴XSCH) : 8 °C~30 °C (46 °F~86 °F).
ENGLISH-11
03 ADVANCED FUNCTION
ADVANCED FUNCTION
Selecting the air ow direction
This function allows you to shift the air ow direction up and down.
1. Press the [ Swing ] button to tilt the blade up and down.
2. Press the [ Swing ] button one more time to set the air ow direction when the
blade reaches the desired position. The up/down tilting of the blade will stop
in place.
• If you press the [ Swing ] button for a duct type indoor unit, the air ow
direction will not be controlled and
lamp will blink.
NOTE
Selecting quiet operation
In quiet operation, the noise from the air conditioner operation will be decreased.
Press and hold the [ Quiet ] button for more than 3 seconds to select the quiet operation.
Auto
Quiet Cancel is repeated.
Cool
Quiet Cancel is repeated.
Dry
Quiet Cancel is repeated.
Fan
will blink.
Heat
Quiet Cancel is repeated.
• If you press the [ Quiet ] button for an air conditioner which does not
support the quiet operation,
will blink.
NOTE
ENGLISH-12
Wind-Free Cooling
Use the Wind-Free Cooling function to enjoy mild cool breeze exuding from ne holes on the Wind-Free panel with the air
ow blade closed, instead of getting cool wind directly. The automated control of the temperature and fan speed according
to the indoor temperatures keeps your room cool and pleasant.
Press the [ Wind-free ] button to select the Wind-Free Cooling function.
• To cancel this function, press the [ Wind-free ] button again.
• If the Wind-Free Cooling function is cancelled, the air conditioner returns
to the original fan speed.
• You can adjust the set temperature during the Wind-Free Cooling
function, and recommended set temperatures are 24 to 26
°C
(75 to 79°F). However, you cannot change the set temperature in the
Fan mode.
• You can use the Wind-Free Cooling function when the Cool, Dry, or
Fan mode is running.
• If the room temperature goes high because of rise of external
temperature, heat from cooking, or other reason, operate the Wind-Free
Cooling function after operating in the Cool mode.
• If you select the Wind-Free Cooling function in the Fan mode, the
compressor stops working so that cool air does not come out.
However, mild breeze comes out and starts to clean the air in the room.
• During the Wind-Free Cooling operation, the cold air may be
intermittently weakened depending on the temperature and humidity
in the room. But the Wind-Free air currents are maintained and the
weakened cold air is immediately recovered, consequently keeping
the room comfortable. (During the Wind-Free Cooling operation, the
air ow blades may open to control the indoor air currents smoothly,
depending on the installation settings. In this case, as soon as the indoor
temperature and humidity change, the air ow blades are closed and
the Wind-Free Cooling operation restarts.
For more information on the installation settings, see "Setting the indoor
unit addresses and the installation options" in the installation manual of
the indoor unit.)
Change of the air ow blade by temperature and humidity
Indoor
temperature
and humidity
Low High
Breeze is blown via
the micro holes on
the air ow blades
Breeze is blown via
the micro holes on
the air ow blades
Breeze comes from the air
ow blade depending on
the setting
Air ow blade Closed Closed (default)
Opened
(according to setting)
• When the Wind-Free Cooling function runs while sleeping, you may feel
cold air if the air conditioner is installed over the bed. In this case, set the
desired temperature higher than the normal setting temperature.
NOTE
ENGLISH-13
03 ADVANCED FUNCTION
Long reach
Use the Long reach function to deliver strong air ow that quickly reaches a far distance.
Press the [ Long ] button to select the Long reach function.
• To cancel this function, press the [ Long ] button again.
• You cannot change the fan speed.
• If the indoor unit is turned o or does not support the Long reach
function, the
indicator appears when you press the [ Long ] button.
NOTE
Clean
Use the Clean function to remove moisture from the inside of the air conditioner for preventing propagation of fungi,
bacteria, etc.
Press and hold the [ Clean ] button for more than 3 seconds.
- indicator will be displayed.
• Depending on the condition of the indoor unit, the Clean operation
stops after running for 30 seconds to 20 minutes.
• To cancel this function, press the [ Clean ] button again.
• When the Clean function is set, the Timer LED on the indoor unit blinks
3times for 3 seconds . (OFF ON OFF ON OFF ON OFF
Return to the previous state). When the Clean function is cancelled, the
Timer LED on the indoor unit blinks once for 1 second. (OFF ON
OFF Return to the previous state)
• If you turn on the air conditioner and then turn it o within 20 seconds,
the Clean function does not operate.
• When the air conditioner is turned o, the Clean function operates
immediately. When it is turned on, the Clean function operates after it
is stopped.
• Once the Clean function is started, it automatically continues to operate
until it is cancelled.
• When the Clean function is set,
is displayed on the wired remote
controller display even when the air conditioner is turned o.
NOTE
ENGLISH-14
Resetting lter cleaning alarm
When the appears on the remote controller, clean the lter and set the lter reset o in the user setting mode.
User Setting
Mode
• You can see how to access user setting mode at the page 18~19.
NOTE
On-timer
When an indoor unit is turned o,
Press the [ Timer ] button.
- Time segment will blink in 1 second period in setting mode.
- Press [ + ]/[ - ] button to adjust the time.
- Time is set by 30 minutes unit for less than 3 hours, and by 1 hour unit for more than 3 hours.
- Time can be set from 30 minutes to 24 hours maximum.
1. Press the [ OK ] button when time setting is completed. Time segment will stop blinking and remaining time
will decrease by 1 minute unit from set time.
- If there is no input during 3 minutes in setting mode, set time and the mode will be canceled.
2. Press and hold [ Cancel ] button for more than 3 seconds to cancel the setting mode without saving the
current setting.
3. Press and hold [ Cancel ] button for more than 3 seconds to cancel the on timer after setting is nished.
• On timer function can be set only when an indoor unit is turned o.
NOTE
ENGLISH-15
03 ADVANCED FUNCTION
O-timer
When an indoor unit is turned on,
Press the [ Timer ] button.
- Time segment will blink in 1 second period in setting mode.
- Press [ + ]/[ - ] button to adjust the time.
- Time is set by 30 minutes unit for less than 3 hours, and by 1 hour unit for more than 3 hours.
- Time can be set from 30 minutes to 24 hours maximum.
1. Press the [ OK ] button when time setting is completed. Time segment will stop blinking and remaining time will
decrease by 1 minute unit from set time.
- If there is no input during 3 minutes in setting mode, set time and the mode will be canceled.
2. Press and hold [ Cancel ] button for more than 3 seconds to cancel the setting mode without saving the current setting.
3. Press and hold [ Cancel ] button for more than 3 seconds to cancel the o timer after setting is nished.
• O timer function can be set only when an indoor unit is turned on.
NOTE
Sleep
With the sleep function, you can have the air conditioner turn o automatically after 6 hours without stopping the operation
in the middle of the night.
Auto
will blink.
Cool
Sleep Cancel is repeated.
Dry
will blink.
Fan
will blink.
Heat
Sleep Cancel is repeated.
• If you press the [ Sleep ] button for an air conditioner which does not support the quiet operation, will blink.
NOTE
ENGLISH-16
Lock
This function allows you to lock the whole display of the wired remote controller.
1. Press and hold the [ Lock ] button for more than 3 seconds.
- indicator will be displayed.
2. will blink if you press any buttons except [ Lock ] button.
- Press and hold the [ Lock ] button for more than 3 seconds again, this function will be canceled.
S-Plasma Ion
Eliminate dangerous airborne contaminants and allergens, as well as bacteria and virus.
You can set or cancel the S-Plasma Ion function in the user setting mode.
- If the S-Plasma Ion function is not supported, will blink when you set the S-Plasma Ion function.
• You can see how to access user setting mode at the page 18~19.
NOTE
User Setting
Mode
ENGLISH-17
03 ADVANCED FUNCTION
Outing
Outing function keeps minimum cooling/heating temperature of indoor on your absence.
1. Press the [ Outing ] button.
- Outing indicator will be displayed.
2. When an air conditioner is turned o,
- If indoor temperature has 5 °C (9 °F) dierence with desired outing temperature, the air conditioner will be turned on
automatically.
- If indoor temperature is same as desired outing temperature, the air conditioner will be turned o automatically.
- it is repeated depending on indoor temperature within 12 hours, and then outing function is canceled.
Auto
will blink.
Cool
Outing Cancel is repeated.
Dry
will blink.
Fan
will blink.
Heat
Outing Cancel is repeated.
• You can use outing function in only cool/heat mode.
• The outing function will be active when wired remote controller is turned o.
• The outing function operates with low fan speed.
• If there is any input button on your wired remote controller, outing function will be canceled.
• If your indoor unit's status is changed, outing function will be canceled.
• You can set the desired outing temperature on the user setting mode.
<Temperature setting range>
- Cool mode : 25~30 °C (77~86 °F), default : 27 °C (81 °F)
- Heat mode : 16~22 °C (61~72 °F), default : 16 °C (61 °F)
• You can use the outing function in the master wired remote controller. The slave wired remote controller just
displays it for a outing function status of the master wired remote controller.
- Press the [ Outing ] button on the slave wired remote controller, then the
will blink.
• The outing function operation will be canceled if you change the master/slave setting on your wired remote
controller.
NOTE
5 °C dierence between indoor temperature
and outing setting temperature
After 12 hr
ENGLISH-18
How to set additional user functions
Main menu
Sub menu
Setting
value
Page
Move menu Move page
1. If you want to use the various additional user functions for your wired remote controller, press the top left corner (hidden
button) of the display for more than 3 seconds.
- You will enter the additional function settings, and the main menu will be displayed.
2. Refer to the list of additional user functions for your wired remote controller on the next page, and select the desired
menu.
- Using the [ + ]/[ - ] buttons, select a main menu number and press the [ Mode ] button to enter the sub menu setting
screen.
- Using the [ + ]/[ - ] buttons, select a sub menu number and press the [ Mode ] button to enter data setting screen.
- Using the [ + ]/[ - ] buttons, select the settings.
- Press the [ Fan ] button to select page.
- Press the [ OK ] button to save the current settings. The [ OK ] button is invalid on the main menu or sub manu setting
screen.
- Press the [ Cancel ] button for more than 3 seconds to exit to normal mode without saving settings.
OTHERS
ENGLISH-19
04 OTHERS
Main
menu
Sub
menu
Function description
Setting value
Page Save location
Value
Factory
default
2
1
Temperature
Limit
Lower limit 8 ~ 30 °C (47 ~ 86 °F) 8 (47) 01
Wired remote controller
2 Upper limit 8 ~ 30 °C (47 ~ 86 °F) 30 (86) 01
Wired remote controller
3
Set Outing
Temperature
Cooling desire temperature on
outing function
25 ~ 30 °C (77 ~ 86 °F) 27 (81) 01
Wired remote controller
4
Heating desire temperature on
outing function
16 ~ 22 °C (61 ~ 72 °F) 16 (61) 01
Wired remote controller
3
1 Lock of all buttons
0-Unlock, 1-Lock 0
01
Wired remote controller
2
Partial Button
Lock 1
Lock of operation ON/OFF button 0-Unlock, 1-Lock 0 01
Wired remote controller
Lock of temperature setting buttons 0-Unlock, 1-Lock 0 02
Wired remote controller
Lock of fan speed button 0-Unlock, 1-Lock 0 03
Wired remote controller
3
Partial Button
Lock 2
Lock of ON/OFF timer function
button
0-Unlock, 1-Lock 0 01
Wired remote controller
Lock of Swing function button 0-Unlock, 1-Lock 0 02
Wired remote controller
Lock of Sleep function button 0-Unlock, 1-Lock 0 03
Wired remote controller
Lock of Quiet function button 0-Unlock, 1-Lock 0 04
Wired remote controller
Lock of Outing function button 0-Unlock, 1-Lock 0 05
Wired remote controller
Lock of Lock function button 0-Unlock, 1-Lock 0 06
Wired remote controller
Lock of Wind-Free Cooling function 0-Unlock, 1-Lock 0 07
Wired remote controller
Lock of Long reach function 0-Unlock, 1-Lock 0 08
Wired remote controller
Lock of Clean function 0-Unlock, 1-Lock 0 09
Wired remote controller
4
Operation Mode
Partial Button
Lock
Lock of operation mode button 0-Unlock, 1-Lock 0 01
Wired remote controller
Hide of auto mode 0-Unlock, 1-Lock 0 02
Wired remote controller
Hide of cool mode 0-Unlock, 1-Lock 0 03
Wired remote controller
Hide of dry mode 0-Unlock, 1-Lock 0 04
Wired remote controller
Hide of fan mode 0-Unlock, 1-Lock 0 05
Wired remote controller
Hide of heat mode 0-Unlock, 1-Lock 0 06
Wired remote controller
6 1 Checking/setting of backlight time out 0~30 (Disuse in 0) 5 01
Wired remote controller
(1 time use)
7
1
User Setting
Function
Resetting lter cleaning alarm 0-No reset, 1-Reset 0 01
Wired remote controller
2 Use of S-Plasma Ion 0-Disuse, 1-Use 0 01
Wired remote controller
3 Use display of current temperature 0-Disuse, 1-Use 1 01
Wired remote controller
4 Use of button melody 0-Disuse, 1-Use 1 01
Wired remote controller
5
Use of IR receiver for wireless remote
controller 1)*
0-Disuse, 1-Use 0 01
Wired remote controller
6 Use of Standby Mode 0-Disuse, 1-Use 1 01
Wired remote controller
7 Use of Indoor Unit Lighting ON/OFF 0-Disuse, 1-Use 1 01
Wired remote controller
8 1 Setting/Checking Easy Tuning -2 ~ +2 0 01
Wired remote controller
(1 time use)
0 1
Reset to default value of user setting mode
(except current time)
0-No reset, 1-Reset 0 01
Wired remote controller
(1 time use)
• will blink if you select a function that is not supported by the indoor unit.
NOTE
1)* In case of duct type indoor unit, you can use wireless remote controller using IR receiver of this wired remote controller
without "Display and receiver kit". Some functions may not be activated by the wireless remote controller.
ENGLISH-20
How to set additional user functions
Example of locking Power button and unlocking Mode button
1. Press the top left corner (hidden button) of display for more than 3 seconds to
enter to User Setting Mode.
2. Main menu segment will display as number 2 and blink in 1 second period
when accessed to User Setting Mode.
3. Set the Main menu as number 3 by pressing [ + ]/[ - ] button.
4. Select Sub menu by pressing [ Mode ] button.
- Sub menu will be displayed.
5. Set the Sub menu as number 2 by pressing [ + ]/[ - ] button.
6. Select Data by pressing [ Mode ] button.
- Page of current menu and data applied to the page will be displayed.
7. Set data as number 1 by pressing [ + ]/[ - ] button.
8. Select Page as number 2 by pressing [ Fan ] button.
9. Set data of page 2 as number 0 by pressing [ + ]/[ - ] button.
10. Save the current setting by pressing [ OK ] button.
- Mode will be changed to normal status without saving current settings by
pressing and holding [ Cancel ] button for more than 3 seconds.
  • Page 1 1
  • Page 2 2
  • Page 3 3
  • Page 4 4
  • Page 5 5
  • Page 6 6
  • Page 7 7
  • Page 8 8
  • Page 9 9
  • Page 10 10
  • Page 11 11
  • Page 12 12
  • Page 13 13
  • Page 14 14
  • Page 15 15
  • Page 16 16
  • Page 17 17
  • Page 18 18
  • Page 19 19
  • Page 20 20
  • Page 21 21
  • Page 22 22

Samsung MWR-SH11N User manual

Category
Split-system air conditioners
Type
User manual

Samsung MWR-SH11N air conditioner offers a variety of features to keep you comfortable all year round. With its advanced functions like Wind-Free Cooling for draft-free cooling, Long Reach mode for wider airflow, and a Clean function to maintain air quality, you can enjoy a pleasant indoor climate. It also includes convenient features such as On/Off timers, Sleep mode, and Lock function for added convenience and energy saving. Moreover, the S-Plasma Ion feature helps purify the air, while the Outing mode ensures efficient operation when you're away from home.

Ask a question and I''ll find the answer in the document

Finding information in a document is now easier with AI