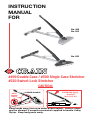
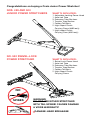
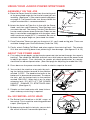
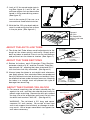
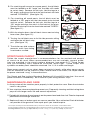
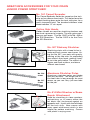
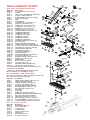
Crain 499 Junior Power Stretcher is a versatile tool designed for professional carpet installation. With its adjustable pin depth and locking handle, it allows precise stretching of tufted and synthetic carpets. The Auto-Lok Tube enables quick and easy length adjustments, while the Folding Tail Block adapts to different stretching scenarios, including corners and round posts. Its durable construction and plated tubes ensure longevity with proper maintenance.
Crain 499 Junior Power Stretcher is a versatile tool designed for professional carpet installation. With its adjustable pin depth and locking handle, it allows precise stretching of tufted and synthetic carpets. The Auto-Lok Tube enables quick and easy length adjustments, while the Folding Tail Block adapts to different stretching scenarios, including corners and round posts. Its durable construction and plated tubes ensure longevity with proper maintenance.


-
 1
1
-
 2
2
-
 3
3
-
 4
4
-
 5
5
-
 6
6
-
 7
7
-
 8
8
-
 9
9
-
 10
10
-
 11
11
-
 12
12


Crain 499 Owner's manual
- Type
- Owner's manual
Crain 499 Junior Power Stretcher is a versatile tool designed for professional carpet installation. With its adjustable pin depth and locking handle, it allows precise stretching of tufted and synthetic carpets. The Auto-Lok Tube enables quick and easy length adjustments, while the Folding Tail Block adapts to different stretching scenarios, including corners and round posts. Its durable construction and plated tubes ensure longevity with proper maintenance.
Ask a question and I''ll find the answer in the document
Finding information in a document is now easier with AI
Related papers
Other documents
-
Home Decorators Collection 0519920360 User manual
-
 StyleWell EPW0010382 User manual
-
-
-
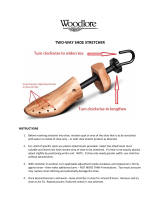 Woodlore 60021 Two Way Shoe Stretcher Operating instructions
-
-
 Segma NEX - HT80 - 403 User manual
-
Axminster AW140OSS User manual
-
 United Weavers Overstock 320-02151-58 User manual
-
 ferm LIVING Tufted Wall Deco Assembly Manual


