
Please pass these instructions on to the operator of this equipment.
Filter Housings
Installation and
Operating Instructions
Models: W10PR, W10J25MM, W20J25MM

2
Precautions
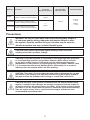
Model No. Description
Connection
BSP (Female parallel)
Nominated Max.
Working Pressure
Temperature Rating
W10PR
10" Standard Filter Housing (includes
spanner, mounting bracket and xings)
3/4"
(20mm)
860kPa
Working:
0 - 40ºC
Ambient:
0 - 50ºC
W10J25MM
10" Jumbo Filter Housing (includes
spanner, mounting bracket and xings)
1"
(25mm)
W20J25MM
20” Jumbo Filter Housing (includes
spanner, mounting bracket and xings)
WARNING: Do not use with water that is microbiologically unsafe or
of unknown quality without adequate disinfection before or after
the system. Systems certied for cyst reduction may be used on
disinfected waters that may contain lterable cysts.
CAUTION: Filter must be protected against freezing, which can cause
cracking of the lter and water leakage.
CAUTION: If your uid system is suspected to have high night time pressures
or occasional high pressure surges/water hammer (which can be induced
by the quick acting valves in equipment such as washing machines and
dishwashers) or the pressure is regularly/typically over 100psi / 680kPa - then
it is recommended that an anti-hammer device (before/after) or a pressure
reducing valve be installed before the lter housing.
CAUTION: The rubber O-ring provides the water-tight seal between the cap and
the bottom of the housing. It is important that the O-ring be properly seated in
the groove below the threads of the housing or a water leak could occur.
CAUTION: Because of the product’s limited service life and to prevent costly
repairs or possible water damage, we strongly recommend that the bottom of
all plastic housings be replaced every ten years. If the bottom of your housing
has been in use for longer than this period, it should be replaced immediately.
Date the bottom of any new or replacement housing to indicate the next
recommended replacement date.

3
Special Notes:
• For cold water use only.
• Do not install where system will be exposed to direct sunlight.
• Make certain that installation complies with all state and local laws and regulations.
• The contaminants or other substances removed or reduced by the selected cartridge are
not necessarily in your water. Ask your local water municipality for a copy of their water
analysis, or have your water tested by a reputable water testing lab.
• After prolonged periods of non-use it is recommended that the system be ushed
thoroughly. Let water run for 5–6 minutes before using.
• The lter cartridges used with this system have a limited service life. Changes in taste,
odour, and/or ow of the water being ltered indicate that the cartridge should be
replaced.
• Some harmless bacteria may attack cellulose media cartridges. If your cartridge
seems to disintegrate or develops musty or mouldy odour, switch to a synthetic media
cartridge or contact Davey for advice.
• Please read all instructions, specications, and precautions before installing and using
this lter.
Installation:
Housings are easily installed on cold water lines. The water supply should be turned off at
the meter or, preferably, a shut off valve installed before (and after is also recommended)
the housing inlet to allow for easy installation/replacement of cartridges.
NOTE: When installing your housing allow a minimum of 2” (50mm) clearance below
housing bowl to enable lter cartridge changes. The lter housing connections are
standard female BSP (parallel) threaded ¾”, 1”, 1 ½” connections and can easily be
installed on copper, plastic or galvanised pipe by use of the appropriate ttings.
CAUTION: In some countries metal pipework is used as earth. If applicable in
your country, housings installed on metal pipelines must have a jumper wire
installed from the metal pipe on the inlet to the metal pipe on the outlet. This
work must be carried out by suitably qualied person.
WARNING: Do not over tighten inlet/outlet connections – stripped threads
will result.
Pressure control and backow should be supplied and installed by a licensed practitioner.

4
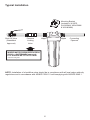
Typical Installation
Shut Off Valve
(WaterMark
Approved)
Pressure
Limiting
Valve
Mounting Bracket
(included in W10PR,
W10J25MM, W20J25MM
& W20J40MM)
Nipple Nipple Connecting
Pipework
* Pressure Limiting Valve
WHERE WATER PRESSURE EXCEEDS
500kPa. a WATERMARK approved
PLV* SHOULD BE FITTED TO INLET
NOTE: Installation of a backow valve should be in compliance with all local water authority
regulations and in accordance with AS/NZS 3500.1.2 and complying with AS/NZS 2845.1.

5
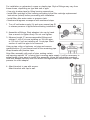
For installation on galvanised, copper or plastic pipe. Style of ttings may vary from
those shown, depending on type and size of pipe.
• Use only plumber tape for tting housing connections.
• Install lter cartridge in lter housing according to the lter cartridge replacement
instructions (below) before proceeding with installation.
• Install lter after water meter or pressure tank.
• Numbered diagrams correspond with numbered steps.
1. Turn off cold water supply (A) and open nearest tap (B)
to release pressure in pipes before starting installation.
2. Assemble all ttings. Start adapters into cap by hand.
Use a wrench to tighten rmly. Do not over-tighten.
3. Measure length (C) across assembled ttings and
subtract 1-inch if you are installing on 3/4-inch pipe,
or 11⁄2-inch if you are installing on 1-inch pipe. Mark
section of main line pipe to be removed.
Using a pipe cutter or hacksaw, cut pipe and remove
marked section (C) and thread ends of the remaining pipe.
Wrap threads with plumber tape.
Align lter assembly with ends of pipe, making certain
cap opening marked “IN” is facing your incoming water supply. It will be necessary to
spread ends of pipe apart to install lter assembly. Using two adjustable wrenches,
hold inlet adapter securely with one wrench and tighten with second wrench. Repeat
process for outlet adapter.
4. Attach bracket to cap with screws.
Attach bracket with cap to wall.

Filter Cartridge Replacement
A. (1) Turn off water supply to lter. (2) Depress blue pressure-relief
button to release trapped air.
NOTE: If turning off water supply to the lter, this will also turn off water to
the rest of the home, be sure to ll a bucket of water rst to allow
you to clean housing after it has been removed.
B. Remove bottom of housing by turning clockwise.
C. Empty out the water.
D. Locate and remove large o-ring (3), wipe clean of lubricant
and set aside.
Discard used cartridge (4). Rinse out bottom of housing and ll 1/3 full
with water. Add 2 tablespoons of bleach and scrub cap and bottom of
housing with non-abrasive sponge or cloth. Rinse thoroughly.
Lubricate o-ring (3) with clean silicone grease. Insert o-ring back into
groove and smooth into place with nger.
NOTE: This step is important to ensure proper housing seal. Make sure o-ring is
seated level in the groove.
Insert new cartridge (4) over standpipe in bottom of
housing.
E. (5) Screw bottom of housing onto the cap and hand-
tighten. Do not over-tighten. Make certain cap standpipe
slips into cartridge. Close ball valve.
(6) Turn on water supply slowly to allow lter to ll with
water. (7) Depress blue pressure-relief button to release
trapped air. Flush cartridge for 5 minutes before use. Flush again for 10 minutes
before using water. Check for leaks before leaving installation.
Do not use petroleum jelly or automotive grease as this will damage the
housing. Such damage is not covered by warranty.
To maintain performance, Australian Standards and warranty, cartridges and replacement
cartridges must be WaterMark certied. Contact Microlene for further advice.
6

7
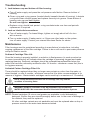
Troubleshooting
1. Leak between cap and bottom of lter housing:
a. Turn off water supply and press the red pressure-relief button. Remove bottom of
housing.
b. Clean o-ring and o-ring groove (located directly beneath threads of housing). Lubricate
o-ring with clean silicone grease and replace securely into groove. Screw bottom of
housing onto cap and hand-tighten.
Do not over-tighten.
c. Replace o-ring, should leak persist. o-ring can deteriorate over time and periodic
replacement is required.
2. Leak on inlet/outlet connections:
a. Turn off water supply. For brass ttings, tighten nut snugly about half of a turn
with a wrench.
b. Turn on water supply. If leaks persist, or if there are other leaks on the system,
turn off water supply. Contact your nearest Microlene Dealer for advice.
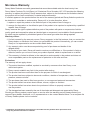
Maintenance
Filter housings must be maintained according to manufacturer’s instructions, including
ongoing replacement of the lter cartridge. Failure to do so will result in poor water pressure
and poor ltration results.
Sediment Cartridge Filter Life
Once the housing is properly installed, a reduction in ow/pressure (to such an extent as
to cause inconvenience) will indicate when the cartridge is becoming clogged and needs
replacing/cleaning. Sediment cartridges should be replaced/cleaned/sanitised when the
water ow has been noticeably reduced/or after 3-6 months - whichever comes rst (this is
for hygiene reasons).
Activated Carbon Cartridge Filter Life
These should be replaced when they no longer remove taste or odour from the water, or
when blocked, or after 6 months - whichever comes rst (the latter recommendation is for
reasons of hygiene - Bacteriostatic cartridges can be used up to a maximum of 12 months).
NOTE: Pleated cartridges 10 micron and greater are washable in mild dishwashing
detergent. Ensure they are rinsed thoroughly before use. In the event of damage to
the material, they must be replaced.
All other cartridge variants are not washable and must be replaced when a drop in
pressure occurs or the water taste becomes tainted.
NOTE: Actual ltration/purication life of cartridge can vary with the
condition of incoming water.
WARNING: DISINFECTION MAY ALSO BE REQUIRED ON UNTREATED
WATER SUPPLIES. We recommend SteriFlo Ultraviolet Disinfection Systems.

* Installation and operating instructions are included with the product when purchased new.
They may also be found on our website.
Microlene Warranty
Davey Water Products come with guarantees that cannot be excluded under the local country Law.
Davey Water Products Pty Ltd (Davey) of 6 Lakeview Drive Scoresby VIC 3179 provides the following
warranty in relation this product. Davey warrants that, subject to the exclusions and limitations below,
the product will be free from defects in material and workmanship.
If a defect appears in the product before the end of the warranty period and Davey nds the product to
be defective in materials or workmanship, Davey will, in its sole discretion, either:
1. replace or repair the product or the defective part of the product free of charge; or
2. arrange for the product or the defective part of the product to be repaired or replaced by a qualied
repairer free of charge.
Davey reserves the right to replace defective parts of the product with parts or components of similar
quality, grade and composition where an identical part or component is not available. Goods presented
for repair may be replaced by refurbished goods of the same type rather than being repaired.
Warranty claims:
1. If a fault covered by the warranty occurs, Davey suggests, in the rst instance, that you contact the
Davey dealer, or distributor from whom you purchased the product. Alternatively, you can contact
Davey or it’s representative on the contact details below.
2. Any warranty claim must be accompanied by proof of purchase and details of the
alleged defect.
3. On receipt of your claim, Davey will seek to resolve your difculties, or if the product is faulty or
defective, advise you on how to have your product repaired, obtain a replacement or a refund.
4. This warranty is limited to defects in the materials or workmanship in the product and does not
cover expendable parts or the replacement of parts due to fair wear and tear.
Exclusions:
The warranty will not apply where:
1.
The product has been modied, repaired or serviced by someone other than Davey, or an
authorised repairer.
2. Davey cannot establish any fault in the product after testing.
3. The product has been used other than for the purpose for which it was designed.
4. The product has been subject to abnormal conditions, whether of temperature, water, humidity,
pressure, stress or similar.
5. The purchaser has used or tted non-genuine, or non-approved parts and accessories.
6. The product defect has arisen due to abuse, misuse, neglect or accident.
7. The product defect has arisen due to the purchaser’s failure to properly maintain or
use the product.
8. The damage has been caused by the use of chemicals and detergents not approved by Davey.
Should your Davey product require repair or service after the warranty period, please contact your
nearest Davey dealer, distributor, or it’s representative on the contact details below. For a complete list
of Davey Dealers please visit our website.


P/N 402426-2
Filter Housings
Installation and
Warranty Instructions
Models: W10PR, W10J25MM, W20J25MM
-
 1
1
-
 2
2
-
 3
3
-
 4
4
-
 5
5
-
 6
6
-
 7
7
-
 8
8
-
 9
9
-
 10
10


Microlene W10J25MM Operating instructions
- Category
- Sanitary ware
- Type
- Operating instructions
Ask a question and I''ll find the answer in the document
Finding information in a document is now easier with AI
Other documents
-
Davey 50PP20 User guide
-
 American Plumber WFP3/4-10A Installation guide
-
Davey aquashield centurion ASC70 Operating instructions
-
-
-
-
Xiaomi Viomi L1 UV Germicidal Water Filter Kettle User manual
-
Davey microlene MCS Installation And Operating Instructions Manual
-
Davey Water Products Steriflo UV50 Operating instructions
-
Davey KRBS1 Operating instructions
