Page is loading ...

Creative X-Fi Sonic Carrier (Model MF8235)
X-Fi Sonic Carrier Subwoofer(Model MF8240)
User Manual
For the latest information, visit: www.creative.com/support/soniccarrier
Product Registration
Registering your product ensures you receive the most appropriate service and
product support
available. You can register your product during installation or at
http://www.creative.com/register.
Please note that your warranty rights are not dependent on registration.
PN 03MF823500000

Package Content
Main Unit
Sonic Carrier Main unit
IR remote control
AAA Battery x 2 for IR remote control
IR Blaster
Wall mount brackets + hardware
Wall mount bracket installation template
Driver décor rings x 8
Power cable
Warranty / Tech Support booklet
Safety and regulatory leaflets
QSG
Subwoofer
Subwoofer
Power cable
Link cable
Warranty / Tech Support booklet
Safety and regulatory leaflet
Inserting Batteries (AAA Battery x 2)
Slide the battery cover in the direction of the arrow until it is completely removed.
Insert 2 AAA atteries (1.5V) in the correct +/- polarity. Slide the battery cover back
into position.
+
+
-
-

Sonic Carrier Main unit Overview
Top Panel
Front Panel
Rear Panel

Remote Control
Power: Turn On/Off Main Power.
LED: Cycles to the next LED preset on all the
Subwoofers.
HDMI: Press to Switch to the last accessed HDMI
source, or to cycle between available HDMI sources.
SD: Press to Switch to the last accessed SD card, or to
cycle between available SD cards.
USB: Press to Switch to the last accessed USB drive, or
to cycle between available USB drives
HDMI: Press to Switch to the last accessed Optical
input, or to cycle between available optical inputs.
L-In: Switch to Line in
Aux: Switch to Aux in
BT: Switch to Bluetooth in
WIFI: Switch to WiFi audio
SPK: Selects sound output from main unit, mutes Line-
Out and BT headphone out
L-Out: Selects sound output from Line-output, mutes
main unit and BT headphone out
Bt-HP: Selects sound output from connected BT
headphone, mutes main unit and Line-Out
Bass+ : Bass level adjustment
Mic: Switch to next Microphone mode.
Key +-: Adjust Mic Vol, Key, Reverb for playback
Mouse: Toggles on/off mouse mode.
Home: Switch to OTT mode, Home screen.
Info: Displays any info or menu for OTT mode.
Cursor & OK: Navigates the OTT options.
Return: Backs up to previous screen/option.
Exit: Close current screen.
Volume +/- : Increase decrease volume.
Mute: Silence the unit or unmute it.
X-Fi : Off, Last Selected Sound Experiences,
SuperWide.
Channel +/- : increase decrease channel in OTT
mode.
Rewind/Previous: Press once to rewind. In rewind
mode, press and hold to auto rewind. In rewind
mode, press again to skip to previous track.
Play/Pause: Toggles between play and pause
Forward/Next: Press once to forward. In forward
mode press and hold to auto forward. In forward
mode, press again to skip to next track.
Like: Likes the current selected song.
Stop: Stops playback.
Shuffle: Toggles between shuffle and repeat
playback mode.
QuickPlay A-F: Custom buttons that can be
assigned to web services.

Subwoofer Rear Panel
Connecting Electrical Power
Connect the power cords to the main unit and subwoofers, socket location are located
at the back of the units and are marked below. Connect power cords to the mains
socket.
For more information about the power supply and power consumption, refere to the
label attached to the product. (Main Unit : Bottom panel, Subwoofer : Rear panel)
Mode: Multifunction key. Press to toggle between lighting modes. Hold
for wireless association mode
Out: Audio and data output port
IN: Audio and data input port
Service: USB ‘A’ connector for service only

Setting up the wireless subwoofer connection
1. Ensure the Main unit and Subwoofer are placed within 3M for the setup process
2. Ensure mains power is connected and switched on
3. Power on the Main unit by pressing the power button
4. Place subwoofer in association mode by pressing and holding the “mode” button,
until the front LED ring light flashes green (Roughly 4 sec)
Ring Light

5. Place main unit in association mode by pressing “Power” and “HDMI 1”
simultaneously.
6. Main unit and Subwoofer wireless is established when the subwoofer ring light
flashes blue.
Connecting to your TV
1. Connect the HDMI cable as shown in the illustration below
2. When TV sound is present, it is output automatically
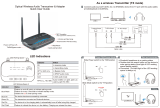
3. If you are placing the Sonic Carrier on a console, and it is blocking the IR
remote control sensor of the TV, please install the bundled IR transmitter as
shown. The transmitter should face the IR remote control sensor of the TV set.
Please note that the IR transmitter requires the Sonic Carrier to be powered On
or on Standby mode to work. Do not disconnect the Sonic Carrier from mains
power.

Connecting external devices
The sonic carrier is equipped with a wide range of connectivity options. The
following connection map illustrates the possibilities of connection, cable type
needed, as well as the corresponding ports to connect to at the source.
1. HDMI Connection
HDMI Cable (Not supplied)
2. Optical Connection
3. USB Connection
Front and Rear USB ports could be used to connect to USB flash drives or
USB Hard disk drives.
The USB port labeled “Power” does not support data transfer, but could be
used to provide power (Maximum: 5V 2A) to devices such as TV sticks.
4. Bluetooth Connection
Press the “BT” button on the remote control, or the “Bluetooth” button on the
main unit to switch to Bluetooth input.
Hold the main unit’s “Bluetooth” button till the display indicates BT Pairing to
pair with your Bluetooth device.
5. Analog Connections
A 3.5mm stereo input (Aux-In) is located on the front panel for easy access.

A pair of ¼” microphone inputs (Mic In 1, 2) is also located on the front panel,
and supports most cardioid type dynamic microphones.
A pair of stereo RCA analog Line inputs, and a pair of Stereo RCA Line
analog line outputs are located at the rear panel. Please note the color and
channel assignment of the RCA cable during connection (White = Left, Red =
Right)
6. SD Cards
1 SD and 3 Micro-SD card slots are located at the front of the main unit. Only
the selected card would be readable by the Android video engine.
Front of Main Unit
Installing the wall mount

Connecting to your WiFi network
1. Press Power and Wi-Fi buttons simultaneously to enter setup mode.
2. Sonic Carrier becomes an Access Point (AP) with SSID
SonicCarrierConfigure_XXXXXX. Where XXXXXX is a randomly
generated identifier.
3. Front Panel should display “Wi-Fi Setup Mode”
4. Using a Wifi enabled computer or mobile device, join the Sonic Carrier AP

5. Launch a browser and Enter 192.168.43.1 to enter the setup WebUI
6. Select the WiFi network to connect to, enter the passcode and click on “Save”
7. A confirmation message will be displayed after successful connection.
Video Tutorials
Hit the “Home” button on the remote control to access a series of video tutorials, with
step-by-step instructions on how to best use the Sonic Carrier
User Control Summary
Main Unit Button
Action
Volume Control -
Volume Down
Press-Hold to mute
Volume Control +
Volume Up
Press and Hold to volume up quickly.
X-Fi
Cycles through Off, and all the Sound Experiences
Previous
Press once to rewind. In rewind mode, press and hold to auto rewind.
In rewind mode, press again to skip to previous track.
Play/Pause
Toggles between play and pause
Next
Press once to forward. In forward mode press and hold to auto
forward. In forward mode, press again to skip to next track.
A/D
Custom buttons that can be assigned to web services. Short press to
trigger A,
Press and Hold to trigger D.
B/E
Custom buttons that can be assigned to web services. Short press to
trigger B,
Press and Hold to trigger E.
C/F
Custom buttons that can be assigned to web services. Short press to
trigger C,
Press and Hold to trigger F.
Bluetooth
Switch to Bluetooth mode
Press and Hold to goto Bluetooth Pairing
WIFI
Switch to Wifi mode
Press and Hold to goto WIFI Setup
Home
Switch to Android OTT mode, and show home screen. Press and hold
to start connecting to subwoofer
Out
Switch between available outputs like BT-HP, L-OUT-SPK
Mic
Switch between available microphone mode, Mic Vol, Mic Key, Mic
Reverb.
Mic Control -
Decrease the vol, key or reverb for both the microphones, depending
on the microphone mode. In volume mode, press and hold button to
mute.
Mic Control +
Increase the vol, key or reverb for both the microphones, depending
on the microphone mode.
HDMI
Switch between available HDMI Inputs. LED 1-4 will be lighted to
indicate input source.
SD
Switch between available SD Inputs. LED 1-4 will be lighted to indicate
input source.

USB
Switch between available USB inputs.
OPT
Switch between available Optical Inputs
L-In
Switch to Line Input
Aux
Switch to Aux Input
LED
Cycle LED patterns on Subwoofer. All LED patterns can be cycled, the
LCD display will show the LED name
Specifications
DIMENSIONS AND WEIGHT
MAIN UNIT
Product name :CREATIVE X-FI SONIC CARRIER
Model Number :MF8235
Input rating :100~240V 50/60Hz 120W.
Operating temperature range: 0°C to 45°C
Dimensions (L x W x H) :1521 x 151 x 96mm (59.9” x 5.9” x 3.8”)
Weight :16kg (35.3 lbs)
SUBWOOFER
Product name :CREATIVE X-FI SONIC CARRIER SUBWOOFER
Model Number :MF8240
Input rating :100~240V 50/60Hz 120W.
Operating temperature range: 0°C to 45°C
Dimensions (L x W x H) :531 x 306 x 582mm (20.9” x 12.0” x 22.9”)
Weight :27kg (59.5 lbs)
ELECTRONIC AND ACOUSTIC SPECIFICATIONS
Amplifer type: Class D
System power: 1000W RMS, 2000W peak
Main unit: 400W RMS, 800W peak
Subwoofer: 600W RMS, 1200W peak
ANDROID VIDEO PLAYBACK ENGINE
Quad-core 64-bit high performance ARM Cortex A-53 with NEON
processor 2GHz
Mali T720 GPU with OPENGL ES3.1 support
2GB RAM, 16GB built-in flash storage
Supports 4K 60fps video playback
Supports H.265/HEVC Codec

WI-FI AUDIO
Supports DLNA, Tidal and Spotify Connect
DRIVERS AND ACOUSTICS
Sonic Carrier Main Unit Drivers
o Five 1” coated aluminum alloy tweeters, capable of 40kHz
high frequency reproduction
o Eight 2.75” aluminum-magnesium alloy midbass drivers
with individually sealed enclosures
o Two 2.25” aluminum-magnesium alloy full-range drivers
for surround channel reproduction with individually sealed
enclosures
WIRELESS AND WIRED CONNECTIVITY
Bluetooth version: 4.1
Operating Frequency: 2402 - 2480 MHz
Bluetooth codec: aptX®, aptX Low Latency, AAC, SBC
Bluetooth profiles and features: A2DP receiver for audio playback
on Sonic Carrier, A2DP transmission for audio playback on
Bluetooth headphones, AVRCP (Bluetooth remote control)
Bluetooth operating range: Up to 10M, measued in open space
Bluetooth RF Output Power: <4dBm
Wi-Fi: 802.11a/b/g/n/ac 2.4GHz & 5GHz
Speaker-Speaker wireless link: 2.4Ghz. Supports up to 4 wireless
subwoofers
Speaker-Speaker wireless link operating range: Up to 10M,
measured in open space.
Line level input: Stereo 2Vrms analog RCA connectors
Line level ouput: Stereo 2Vrms analog RCA connectors
Auxiliary input: Stereo 1Vrms analog 3.5mm connector
Microphone inputs: 2 x ¼” microphone connector supporting most
dynamic microphones
USB host: 2 x USB 2.0 type A connector for USB flash drives and
HDDs
USB power: USB type A connector for providing power to
peripheral devices (Rated 5V 2A)
SD card slots: 1 x SD card slot, 3 x MicroSD card slots
HDMI inputs: 4 x HDMI 2.0a with HDCP 2.2
HDMI output: 1 x HDMI 2.0a with HDCP 2.2 and ARC
Optical inputs: 2 x Toslink supporting up to 24Bit/96Khz
Ethernet: 1 x Gigabit Ethernet

Decoder support: Dolby Atmos, Dolby TrueHD, Dolby Digital Plus™,
DTS:X upgradeable via firmware update
Power supply: Auto-switching 100-240 V, 50-60 Hz AC universal
input
Bluetooth
- Bluetooth version: 4.1
- Operating Frequency: 2402-2480MHz
- RF Output Power: <4dBm
- Bluetooth version: 4.0+EDR
- Operating Frequency: 2402-2480MHz
- RF Output Power: <6.12dBm
Wi-Fi 2.4GHz
- 802.11b/g/n
- Operating Frequency: 2402-2480MHz
- RF Output Power: <13dBm
Wi-Fi 5GHz
- 802.11a/n/ac
- Operating Frequency: 5180-5825MHz
- RF Output Power: <19dBm
Wireless audio link
- Operating Frequency: 2400 – 2483.5MHz
- RF Output Power: <14dBm
Wireless performance is dependent on your device’s Bluetooth or WiFi
wireless technology. Refer to your device manufacturer’s manual. Creative
will not be liable for any lost of data or leakages resulting from the use of
these devices.
Walls and structures may also affect range of device.
REMOTE CONTROL
Sonic Carrier mobile app for iOS and Android
IR remote control (2 x AAA / R3 batteries)
IR blaster to transmit IR signal to TV
© 2017 Creative Technology Ltd. All rights reserved. Creative, the Creative Logo, X-Fi, Sonic Carrier are trademarks or
registered trademarks of Creative Technology Ltd. in the United States and/or other countries.
State of California Proposition 65 WARNING: This product may expose you to chemicals know in the State of California to
cause cancer and birth defects or reproductive harm. Explanatory Note: To meet the requirements of Proposition 65, it is out
responsibility to notify consumers in the State of California that they may be exposed to chemicals that are known to cause
cancer and/or reproductive toxicity. It does not mean the product is in violation of any product-safety standards or requirements.
The exposure might be below the level of concern, or even zero. For additional information, visit www.P65Warnings.ca.gov
/