Page is loading ...

TACO BELL HOLDING CABINET
MODEL: TB-916
OWNER / OPERATOR’S MANUAL
Part Number: 18400-3093 M435 091202cps, rev:081004,122603JJO
TABLE OF CONTENTS
Warranty, warranty exclusions and limitations……....2
Shipping Damage and Claim Procedure……………...2
Introduction………………………………………….. 3
Owner Information…………………………………... 3
Specifications ………………………………………. 4
Operating Features and Controls ……………….…... 5
Precautions and General Information …………….… 6
Agency Listing Information ………………………... 6
Installation ……………………………………….…. 7
Operation …………………………………….…… 8
Cleaning ………………………………….………. 9
Troubleshooting Suggestions ………….…………. 10
Programming Instructions ………..………………… 11
Wiring Diagram ……………..……………………. 12
Replacement Parts List…...………………………….. 13
Contact Information…….…………………………… 14
CARTER-HOFFMANN
A Division of Carrier Commercial Refrigeration
1551 McCORMICK AVENUE
MUNDELEIN, IL 60060 U.S.A.
PHONE: 847-362-5500
FAX: 847-367-8981
EMERGENCY SERVICE: 800-421-3744
EMAIL: [email protected]

2
and to all other component parts and labor for 12
months. Repair or replacement under this warranty
will be performed, unless otherwise authorized in
writing by Carter-Hoffmann, at its factory. All parts or
components to be repaired or replaced under this
warranty are to be shipped prepaid to Carter-
Hoffmann, with reimbursement credit for such part or
component to be given if found by Carter-Hoffmann
to be defective.
Carter-Hoffmann neither makes nor assumes
and does not authorize any other person to
make or assume any obligation or liability in
connection with its products other than that
covered in this warranty. This warranty applies
only within the continental United States and
Canada. In Alaska and Hawaii, this warranty
applies only to and is limited to the supply of
replacement parts.
Carter-Hoffmann warrants to the initial purchaser
of its standard Carter Line Products that Carter-
Hoffmann will, at its option, repair or replace,
during the warranty period set forth below, any
part of such products made necessary due to a
defect in material or workmanship which is present
when the product leaves its factory and which
manifests itself during the warranty period under
normal use and service.
This warranty applies only to original equipment
owned and possessed by the initial purchaser
and the warranty period begins on the date of
original shipment from the Carter-Hoffmann
factory and extends as follows: to electrical and
refrigeration components for one year; to
electrical and refrigeration labor for 120 days; to
refrigeration compressor unit for 1 year (limited
to replacement of the unit only-not to include
the labor for removal, repair or replacement),
CARTER-HOFFMANN WARRANTY
ANY IMPLIED WARRANTY OF MERCHANT-
ABILITY OR FITNESS FOR A PARTICULAR
PURPOSE IS HEREBY SPECIFICALLY
DISCLAIMED BY CARTER-HOFFMANN. There
are no warranties, express or implied, which
extend beyond the description on the face
thereof.
This warranty does not cover and
Carter-Hoffmann shall not under any
circumstances be liable for any incidental,
consequential or other damages (such as injury
to persons or property, loss of time,
inconvenience, loss of use, loss of business or
profits, or other matters not specifically covered)
arising in connection with the use of, inability to
use, or failure of these products.
Note: Due to our continuous process of product
improvement and innovation, all listed
specifications are subject to change.
WARRANTY EXCLUSIONS AND LIMITATIONS
NOTE: For your protection, please note that
equipment in this shipment was carefully inspected
and packaged by skilled personnel before leaving the
factory. Upon acceptance of this shipment, the
transportation company assumes full responsibility
for its safe delivery.
IF SHIPMENT ARRIVES DAMAGED:
1. VISIBLE LOSS OR DAMAGE: Be certain that
any visible loss or damage is noted on the freight
bill or express receipt, and that the note of loss
or damage is signed by the delivery person.
2. FILE CLAIM FOR DAMAGE IMMEDIATELY:
Regardless of the extent of the damage.
3. CONCEALED LOSS OR DAMAGE: if damage
is unnoticed until the merchandise is unpacked,
notify the transportation company or carrier
immediately, and file “CONCEALED DAMAGE”
claim with them. This should be done within
fifteen (15) days from the date the delivery was
made to you. Be sure to retain the container for
inspection.
Carter-Hoffmann cannot assume liability for damage
or loss incurred in transit. We will, however, at your
request, supply you with the necessary documents to
support your claim.
SHIPPING DAMAGE CLAIM PROCEDURE

3
Thank You for purchasing this Carter-Hoffmann appliance. Proper installation, professional operation and con-
sistent maintenance of this appliance will ensure that it gives you the very best performance together with a
reliable, long lasting and economical life. This manual contains information needed to properly install, operate
and maintain this appliance
This product is the result of extensive research and field testing. The materials used were selected provides
optimum performance, maximum durability and an attractive appearance. At Carter-Hoffmann, every single
unit is thoroughly inspected and functionally tested prior to shipment.
This Carter-Hoffmann holding cabinet provides the best environment for food products by digitally regulating
the air temperature. This model uses only hot air (no moisture) which is circulated through heating distribution
ducts located on panels at each side of the unit.
INTRODUCTION
CAUTION
WARNING
DANGER
This manual provides the installation, safety and operating instructions for your cabinet. We
recommend all installation, operating and safety instructions appearing in this manual be read
prior to installation or operation of your unit.
Safety instructions that appear in this manual after a warning symbol and the words
WARNING or CAUTION printed in boldface are very important.
WARNING means there is the possibility of serious injury or death to yourself or others.
CAUTION means there is the possibility of minor or moderate injury.
CAUTION without the symbol signifies the possibility of equipment or property damage only.
IMPORTANT OWNER INFORMATION
Please take the time to record the model number and serial number, the identification decal
is normally located on the lower right hand side of the unit. Also be sure to record your
voltage and purchase date of your piece of Carter-Hoffmann equipment in the spaces below.
It is extremely helpful to have this information available when calling Carter-Hoffmann for
service or assistance.
Cabinet Model #:____________________________________
Cabinet Serial #: ____________________________________
Heater Head Model #:____________________________________
Heater Head Serial #:____________________________________
Voltage: ______________________________________
Wattage: ___________________________
Phase: ________________________________________
Date of Installation: _______________________________
Invoice / Sales Order #:_______________

4
SPECIFICATIONS
ELECTRICAL: PLUG: WEIGHT:
120 Volts AC Empty cabinet shipping weight
60 Hz is approximately # 450 lbs
Single Phase
2000 Watts
16.7 Amps

5
FEATURES and OPERATING CONTROLS

6
PRECAUTIONS and GENERAL INFORMATION
WARNING: Electric Shock Hazard
All servicing requiring access to non-insulated components must be performed by qualified
service personnel. Do not open any access panels which require the use of tools. Failure to
heed this warning can result in electrical shock. Disconnect this appliance from electrical
power before performing any maintenance or servicing.
WARNING: Injury Hazard
All installation procedures must be performed by qualified personnel with full knowledge of all
applicable electrical codes. Failure could result in property damage and personal injury.
WARNING Electric Shock Hazard
Appliance must be plugged into a properly grounded receptacle to prevent possible shock
hazard. Electrical shock will cause death or serious Injury.
This appliance is intended for use in commercial
establishments, where all operators are familiar with
the appliance use, limitations and associated hazards.
Operating instructions and warnings must be read and
understood by all operators and users.
This appliance is intended for use to hold pre-cooked foods
for human consumption. No other use is recommended or
authorized by the manufacturer or its agents.
Cleanliness of this appliance is essential to good sanitation.
Read and follow all included cleaning instructions and
schedules to ensure the safety of the food product.
DO NOT submerge this the heating unit in water. Do not
splash or pour water on, in or over any controls, control panel
or wiring.
Interior surfaces of this appliance can be hot to the touch and
may cause burns.
Do not operate this appliance if the control panel is damaged.
Do not operate this appliance if the keypad section of the
control panel is torn or broken. Call your Authorized Carter-
Hoffmann Service Agent for service.
All included trouble shooting guides, component views and
parts lists are included for general reference, and are
intended for use by qualified service personnel.
Listings with and are pending.
AGENCY LISTING INFORMATION
WARNING:
Burn Hazard
Interior surfaces of the appliance
may be HOT to the touch, and can
cause serious burns.
CAUTION: Equipment
Electrical Damage
DO NOT plug in or energize this
appliance until all Installation
Instructions are read and followed.
Damage to the appliance will
occur if these instructions are not
followed.
This manual is considered to be a
permanent part of this
appliance. This manual must
remain with the appliance if it is
sold or moved to another location.

7
INSTALLATION
Unpack the holding and heating units. Ensure that all packing
materials and protective plastic has been removed from the
unit. Inspect all components for completeness and condition.
Appliance should be thoroughly cleaned before use. See
CLEANING INSTRUCTIONS, page 9.
LEVELING THE UNIT
Set the holding unit in its operating location and level. Set up
the appliance only on a firm, level, non-combustible surface.
Verify local codes for requirements. Concrete, tile, terrazzo
or metal surfaces are recommended. Metal over combustible
material may not meet code for non-combustible surfaces.
A spirit level should be placed on the top of the unit as a
guide when making level adjustments. Level the unit from
left to right and front to back by turning the adjustable feet.
Be sure all four feet touch the floor to prevent tipping.
ASSEMBLY
Set the heating unit on top of the holding unit with the control
panel facing forward. Verify that the blower fan turns freely.
Verify that the main power switch is OFF, then plug the
heating unit into a properly grounded NEMA 5-20R electrical
receptacle.
Install tray slides. Pay particular attention that slides are level
front-to-rear, and that opposite pairs will allow the trays to be
installed level side-to-side. Adjustment increment is 3/4".
NOTE: DO NOT discard
the carton or other packing
materials until you have
inspected the appliance for
hidden damage and tested it for
proper operation.
Refer to SHIPPING DAMAGE
CLAIM PROCEDURE on PAGE 3
of this manual.
WARNING:
Risk of
personal injury
Installation procedures must
be performed by a qualified
technician with full knowledge of
all applicable electrical codes.
Failure can result in personal
injury and property damage.
CAUTION:
Electrical Shock
Hazard
The ground prong of the power
cord is part of a system designed
to protect you from electric shock
in the event of internal damage.
DO NOT cut off the large round
ground prong or twist a blade to fit
an existing receptacle.
IMPORTANT:
Power cord is 10' long. Contact a
licensed electrician to install an
appropriate 20 amp electrical
circuit with NEMA 5-20R
receptacle if one is not available
within 10 feet. DO NOT use an
extension cord.
IMPORTANT:
Damage due to being connected
to the wrong voltage or phase is
NOT covered by warranty.

8
NORMAL OPERATION
NORMAL OPERATION
When the power switch is turned on, the blower fan will start
and the air heater will energize. The heating element will be
energized until the cabinet reaches the AIR TEMPERATURE
SETPOINT. The display will read the actual cabinet
temperature. The controller air temperature is factory set at
165ºF and the low temperature alarm at 120ºF.
The HEAT ON light will glow when the air temperature in the
cabinet is below the air temperature setpoint.
The controller display will flash (alternately LO and the cabinet
air temperature) until the cabinet air temperature is above the
LOW ALARM SETPOINT,
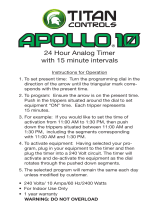
TIMER
The TIMER allows the appliance blower fan and heater
system to turn on and off automatically.
Lift the TIMER ACCESS DOOR. Lift the TRIPPERS on the
timer dial for the desired ON times. Each raised tripper will
hold the unit ON for 30 minutes.
Turn the TIMER WHEEL until the indicator arrow points to the
current time.
Turning the TIMER BYPASS SWITCH ON turns the blower
fan and heater system ON, regardless of the timer position.
NOTE:
The air temperature setpoint
is factory set at 165ºF.
If a change in setpoint or
temperature range is required,
refer to: PROGRAMMINGON
page 11.
NOTE:
The low temperature alarm
is factory set at 120ºF.
If a change in alarm tempera-
ture or alarm range is required,
refer to: PROGRAMMING,
page 11.
NOTE:
This is a 24 hour timer. Use care to en-
sure that the proper meridian (AM or PM)
is used to set the current time.
In the example:3
TIME is 8:00 AM
ON occurs at 5:30 AM
OFF occurs at 6:00 PM

9
CLEANING
Turn the main power switch OFF and allow the unit to cool
before cleaning. DO NOT spray or splash water on the built-
in heater, control panel, timer or wiring.
1. Racks or shelves are easily removed without tools for
cleaning, Simply lift up and pull out. The tray racks may
be hand washed or run through an automatic washer.
2. To clean stainless steel surfaces use only cleansers,
detergents, degreasers, or sanitizers that are certified to
be "chloride-free" and "phosphate-free," and cleansers,
degreasers, or sanitizers only in the recommended
concentrations. DO NOT exceed recommended
concentrations or mixing ratios. After cleaning and
sanitizing, rinse all exposed surfaces thoroughly with
large amounts of clean, clear water. Wipe off any
standing liquid or residue from all surfaces, corners and
rear edges.
IMPORTANT:
Cleansers, detergents, degreasers, sanitizers or bleaching
agents that contain chlorides or phosphates will cause
permanent damage to stainless steel products. This damage
appears as pits, eruptions, voids, small holes, cracks, severe
discolorations or dulling of the metal finish. Water with a high
chlorine content can also damage stainless steel. If unsure
of your water quality, we recommend you have it tested.
THIS DAMAGE IS PERMANENT, COSTLY TO REPAIR,
AND IS NOT COVERED BY WARRANTY.
IMPORTANT:
DO NOT use steel wool pads. The ferrous metal in the pad
will cause rusting.
CAUTION:
ELECTRIC SHOCK
HAZARD
Unplug the unit from electric
power before performing cleaning
or maintenance procedures.
CAUTION:
BURN HAZARD
Allow the unit to cool before
performing maintenance or
cleaning or procedures.
CAUTION:
ELECTRIC SHOCK
HAZARD
DO NOT spray or splash water on
the built-in heater, control panel,
timer or wiring.
PURPOSE FREQUENCY CLEANING
AGENT
METHOD OF APPLICATION
Routine
Cleaning
Daily Soap, ammonia,
detergent and
water
Swab with cloth. Rinse with clear water, wipe dry.
Smear and
Fingerprints
As Needed Stainless steel
cleaner, similar
products
Rub with cloth as directed on package. Rub in
direction of grain of stainless steel. Do not use on
vinyl trim or control panel.
Stubborn
Spots and
Stains
Daily, or
As Needed
Any chloride-
free or phos-
phate-free
cleanser
Apply with damp sponge or cloth. Rub in direction
of grain. Rinse thoroughly. Do not use on vinyl trim
or control panel.
Hard Water
Spots
Daily, or
As Needed
Vinegar Swab with cloth. Rinse with clear water, wipe dry.
RECOMMENDED "TIPS" FOR CLEANING STAINLESS STEEL

10
TROUBLESHOOTING SUGGESTIONS
PROBLEM PROBABLE CAUSE POSSIBLE REMEDY
No power to unit
(Display does not light, cooling fan
and blower do not run)
Not plugged in or circuit breaker off
or tripped
Plug into receptacle.
Reset circuit breaker
Main switch off or damaged Check main power switch, re-
place if damaged
Timer off Reset timer or turn bypass on
Damaged power cord Replace cord
Hi-limit safety tripped Allow unit to cool, hi-limit will reset
automatically
Display does not light, cooling fan
and blower running
Damaged 24V transformer Replace transformer
Damaged controller Replace controller
Timer not working Timer bypass turned on Turn bypass off
Timer or timer trippers not set Pull trippers out for "on", push in for
"off. Set timer to current time.
Unit does not heat Cabinet temp above setpoint
(setpoint too low)
Change setpoint
Damaged wiring Repair wiring
Damaged relay Replace relay
Damaged controller Replace controller
Damaged heating element Replace element
Unit overheats Setpoint too high Change setpoint
Temp probe damaged Replace probe
Damaged controller Replace controller
Controller intermittent Dirty or damaged cooling fan Clean or replace fan
Damaged controller Replace controller
Blower fan not running Blower fan jammed Un-jam fan
Damaged fan motor Replace motor
Cooling fan not running Cooling fan dirty or damaged Clean or replace fan
Damaged door gasket Replace gasket
Door not latched properly Replace defective latch, adjust door
Temp probe damaged Replace probe
Damaged controller Replace controller
Unit does not hold temperature

11
TO CHANGE TEMPERATURE SETPOINTS
Turn the power switch on. Press and hold the Temp Set
button. While holding the temperature set button, press the Up
Arrow or Down Arrow button until the desired air temperature
is displayed. The display will advance in 1ºF increments.
TO CHANGE TEMPERATURE RANGE
Turn the power switch off. Press and hold the Up Arrow and
Down Arrow buttons, While holding the buttons turn the
cabinet power back on. The display will read Ser F. To
change the range, press and release the Temp Set button.
This will activate the temperature range mode. Press the Temp
Set button. The display will read Rlo, To change the
temperature lower, press the Down Arrow button until desired
temperature range is displayed. (Minimum setting 150ºF)
Press the Temp Set button again, The display will read Rhi.
To change the temperature higher, press the up arrow button
until the desired temperature range is displayed. (Maximum
190ºF.)
When changes are complete, turn off the power switch to store
and save the changes.
TO CHANGE ALARM SETPOINTS
Turn the power switch on. Press and hold the alarm reset
button. While holding the alarm reset button, press the Up
Arrow or Down Arrow button until the desired alarm
temperature is displayed. The display will advance in 1ºF
increments.
TO CHANGE ALARM RANGE
Turn the power switch off. Press and hold the Up Arrow and
Down Arrow buttons. While holding the buttons turn the power
switch back on. The display will read Ser F To change the
range, press and release the Alarm Reset button. This will
activate the alarm range mode. The display will read Alo. To
change the alarm range lower, press the Down Arrow until
desired range is displayed. (Minimum setting 110ºF.)
To change the alarm range higher, press the Alarm Reset
button, The display will read Ali. Press the Up Arrow button
until the desired range is displayed. (Maximum setting 150ºF.)
When changes are complete, turn off the power switch to store
and save the changes.
PROGRAMMING INSTRUCTIONS
NOTE:
The air temperature setpoint is
factory set at 165ºF.
If a change in setpoint is required,
refer to: CHANGE TEMPERATURE
SETPOINTS
NOTE:
The low temperature alarm is
factory set at 145ºF.
If a change in alarm setpoint is re-
quired, refer to: CHANGE ALARM
SETPOINTS

12
WIRING DIAGRAM
18616-0223

13
Spare Parts List
NOTE:
Spare parts must be ordered
through the local Authorized
Service and Parts Distributor.
Please contact our factory for
pricing, lead times and
contact information.
PART
NUMBER
DESCRIPTION
TB916N1
DUTCH DOOR
120V/2000W/
20AMP/60HZ
TB9160000B
TB916N2
DUTCH DOOR
LEFT HINGED
120V/2000W/
20AMP/60HZ
TB9160001B
TB916N3
DUTCH DOOR
W/ WINDOW
9 SHELVES
MENU BRKT
TB9160002B
16001-4093 SHELF ASSY, TB916
X
16006-0018 DOOR ASY, TB916 RIGHT HINGED
X
16006-0040 DOOR ASY, TB916 LEFT HINGED
X
17020-2168 CABINET GASKET NON-MAGNETIC
TB916
X X X
18302-0050 LATCH MAG & CHRM OFFSET
X X X
18302-0054 STRIKE RETHERM #R25-X002
X X X
18302-0086 MEDIUM SNAP-IN MAGNET
X X X
18302-0294 24 HOUR TIMER 120V 20AMP
X X X
18304-0044 SELF CLOSING HINGE W/STOPS
X X X
18309-0066 6" ADJ. LEG S.S. 1 5/8"OD NP9
X X X
18312-0244 TB916 HOLDING CABINET OVERLAY
X X X
18312-0253 ON/OFF LABEL, TB916
X X X
18400-3093 EQUIPMENT MANUAL, TB916
X X X
18600-0046 HI-LIMIT SWITCH AUTO
X X X
18602-0031 SWITCH BOOT
X X X
18602-0083 TOGGLE SWITCH 30A 120V
X X X
18603-5014 3/8 FAN BLADE
X X X
18607-0009 TERMINAL BLOCK (6) VDE
X X X
18612-0335 HEATING ELEMENT 2000 WATTS
X X X
18614-0266 FAN GUARD #SC120-W3
X X X
18614-0291 MOTOR 208/240V 50/60HZ
X X X
18614-0314 MUFFIN FAN 115V
X X X
18614-0316 CORD SET X 40" #4C552
X X X
18616-0135 TRANSFORMER
X X X
18616-0198 PROBE 3/16 X 1.5 X 18.5
X X X
18616-0207 CONTRLLER W/GREEN LED
X X X
18616-0223 RELAY SPST-NO
X X X
I1000-1699 WIRING DIAGRAM, TB916
X X X
TB916H000A TB916 HEATER ASSEMBLY, 120V
X X X

Manufactured for:
Carter-Hoffmann
A Division of Carrier Commercial Refrigeration
1551 McCormick Ave.
Mundelein, Illinois, 60060 USA
Phone: 847-362-5500
Toll Free (USA and Canada): 800-323-9793
Fax: 847-367-8981
After Hours Emergency: 800-421-3744
Normal business hours are 8:30 am - 5:00 pm, C.S.T., Monday-Friday
Service E-mail: [email protected]
Sales and Marketing E-mail: [email protected]
Company Website: www.carter-hoffmann.com
To obtain Warranty Service, call Carter-Hoffmann direct
14
/