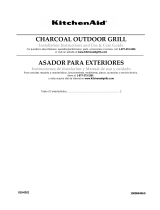
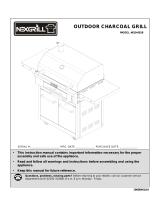
KitchenAid 810-0021 Installation Instructions And Use & Care Manual
- Category
- Barbecues & grills
- Type
- Installation Instructions And Use & Care Manual

CHARCOALOUTDOORGRILL
InstallationInstructionsandUse&CareGuide
For questions about features, operation/performance, parts, accessories or service, call: 1-877-373-2301
or visit our website at www.Kitchenaidgrills.com
ASADORPARAEXTERIORES
InstruccionesdeinstalaciónyManualdeusoycuidado
Para consultas respecto a características, funcionamiento, rendimiento, piezas, accesorios o servicio técnico,
llame al: 1-877-373-2301
o visite nuestro sitio de internet en www.Kitchenaidgrills.com
Table of Contents/Índice................................................................................. 2
810-0021
19000449A0

OUTDOOR GRILL SAFETY
……………………………....3
INSTALLATION REQUIREMENTS……………………….....4
Tools and Parts……………...………………………………….4
TABLE OF CONTENTS
OUTDOOR GRILL USE …………………………………….….16
Using Your Outdoor Grill ………………………………..…..….16
TIPS FOR OUTDOOR GRILLING ……………………….…...17
Location Requirements…………………………………..…....4
Product Dimensions……………………………….…………...5
REPLACEMENT PARTS………………………………..…....6
PACKAGE CONTENTS LIST…………………...……….… 8
ALL PRE-ASSEMBLED SCREW LIST.............................10
INSTALLATION INSTRUCTIONS………………….…...….11
Freestanding Outdoor Grill Installation……………………..11
OUTDOOR GRILL CARE …………………………………..…18
General Cleaning ………………………………………............18
ASSISTANCE ……………………………………………..……18
WARRANTY ……………………………………………….…...19
ÍNDICE
SEGURIDAD DEL ASADOR PARA EXTERIORE
20
USO
DEL
ASADOR
PARA
EXTERIORES
33
SEGURIDAD
DEL
ASADOR
PARA
EXTERIORE
….............
20
REQUISITOS DE INSTALACIÓN…………..………………...21
Herramientas y piezas ……………...………………...…….....21
Requisitos de ubicación ……………………………...………. 21
Medidas del producto ……………………………….………....22
PIEZAS DE REPUESTO ……………………………...………23
PAQUETE LISTA DE CONTENIDO …..…….............……...25
Tools los Tornillos pre-ensamblados listo…………………....27
INSTRUCCIONES DE INSTALACIÓN ……………….……..28
USO
DEL
ASADOR
PARA
EXTERIORES
…………………...
33
Cómo usar el asador para exteriores …………………………..33
CONSEJOS PARA ASAR AL AIRE LIBRE …………………..34
CUIDADO DEL ASADOR PARA EXTERIORES ………….….35
Limpieza general ………………………………………………….35
ASISTENCIA………………………………………………..……..35
GARANTÍA …………………………………………………..…....36
Instalación del asador autónomo para exteriores .........……28
2

OUTDOOR GRILLSAFETY
S f C lif i P i i 6 W i
S
tate o
f
C
a
lif
orn
i
a
P
ropos
i
t
i
on
6
5
W
arn
i
ngs:
WARNING: This product contains one or more chemicals known to the State of California to cause cancer.
WARNING: This product contains one or more chemicals known to the State of California to cause birth defects or other
reproductive harm.
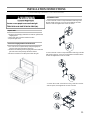
IMPORTANT SAFETY INSTRUCTIONS
IMPORTANT: To reduce the risk of fire, injury to persons, or damage when using the outdoor cooking appliance,
follow basic precautions, including the following:
•Do not install portable or built-in outdoor cooking appliances in or on a recreational vehicle, portable trailer, boat, or
in any other moving installation.
•Always maintain minimum clearances from combustible construction, see "Locations Requirements" section.
•The outdoor cooking appliance shall not be located under overhead unprotected combustible construction.
•This outdoor cooking appliance shall be used only outdoors and shall not be used in a building, garage, or any other
enclosed area.
•Keep outdoor cooking appliance clear and free from combustible materials, gasoline or other flammable vapors or
liquids.
•This grill will become very hot while in use. Do not move it during operation.
•Do not use alcohol, gasoline or comparable fluids for lighting or re-lighting grill.
•Do not use this grill as a heater.
•Grill is to be used on a stable, level, non-flammable surface such as asphalt, concrete or
solid ground Do not use this grill on flammable material such as carpet or a wood deck
solid
ground
.
Do
not
use
this
grill
on
flammable
material
such
as
carpet
or
a
wood
deck
.
•Do not use this product in a manner other than its intended purpose.
•Do not leave the grill unattended while in use.
•Do not leave hot ashes unattended until the grill cools completely.
•Do not move the grill while in use or while ashes are still hot. Allow the grill to cool completely before moving or
storing.
•Dispose of cold ashes by placing in a noncombustible container. Make sure that there are
no other combustible materials in or near the container.
3
SAVE THESE INSTRUCTIONS

INSTALLATION REQUIREMENTS
Tools and Parts
Gather these required tools and parts before starting
installation Read and follow the instructions provided with
installation
.
Read
and
follow
the
instructions
provided
with
any tools listed here.
Tools needed
Phillip screwdriver
Wrench or pliers
Scissors or cutting
pliers (to remove
tiedowns)
Location Requirements
Select a location that provides minimum exposure to
wind and traffic paths. The location should be away from
strong draft areas.
Clearance to combustible construction for grill:
A minimum of 36”
(
91.4 cm
)
must be maintained
()
between the front of the grill hood, sides and back of
the grill and any combustible construction.
A 36” (91.4 cm) minimum clearance must also be
maintained below the cooking surface, and the grill
shall not be used under overhead combustible
construction.
4

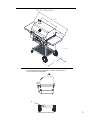
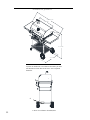
Product Dimension
30"(760mm)
59.9"(1522.5mm)
15"(380mm)
51.3"(1305mm)
The model/serial number rating plate is located on the right side of
cart. See the following illustration.
28.9"(735mm)
A. Model/serial number plate
A
5

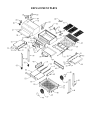
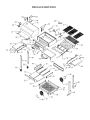
REPLACEMENT PARTS

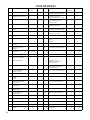
No. Part (Description) Warranty
coverage
QTY No. Part (Description) Warranty
coverage
QTY
1 Main lid 1 1 28 Charcoal pan adjustment L
shape bracket ,left
11
Parts List
2 Main lid hinge 1 2 29 Charcoal pan adjustment L
shape bracket ,right
11
3 Chimney lid 1 1 30 Charcoal pan raising rod
fixing bracket
12
4 Charcoal Chimney 1 1 31 Charcoal pan adjustment
assembly
11
T
1
1
32
Ch l dj
1
2
5
T
emperature gauge
housing
1
1
32
Ch
arcoa
l
pan a
dj
ustment
assembly support bracket
1
2
6 Temperature gauge 1 1 33 Stage screw B 1 4
7 Main lid handle seat 1 2 34 Charcoal ash tray 1 1
8 Main lid tube 1 35 Charcoal ash tray handle
Assembly
11
9 Cooking grid lifter 1 1 36 Left cart leg ,back 1 1
10 Cooking grid with hole 3 3 37 Left cart leg, front 1 1
11 Charcoal bowl
assembly
Non-
replaceable
1 38 Swivel caster with brake 1 1
12 Main control panel 1 1 39 Swivel caster 1 1
13
Ventilation adjustment
1
1
40
Firebox support side panel
1
2
13
Ventilation
adjustment
bracket
1
1
40
Firebox
support
side
panel
1
2
14 Stage screw A 1 4 41 Charcoal ash tray support
bracket, side
12
15 Logo 1 1 42 Charcoal ash tray support
bracket, middle
11
16 Ventilation doo
r
1 1 43 Firebox su
pp
ort rear
p
anel 1 1
control knob
pp p
17 Ventilation panel 1 1 44 Side shelf, right 1 1
18 Charcoal pan control
knob
1 1 45 Right cart leg, back 1 1
19 Side shelf support
bracket A
1 2 46 Right cart leg, front 1 1
20 Side shelf trim piece,
left
1 1 47 Wheel 1 2
21 Side shelf support
bracket B
1 2 48 Wheel cap 1 2
22 Side shelf stage screw 1 8 49 Bottom panel cross bar A 1 2
23 Side shelf hook 1 4 50 Bottom
p
anel cross bar B 1 2
p
24 Side shelf, left 1 1 51 Bottom panel 1 2
25 Warming rack 1 1 52 Cart beam, front 1 1
26 Charcoal pan 1 1 53 Heat shield panel 1 2
27 Charcoal pan support 1 1 54 Side shelf trim piece, right 1 1
7

A. Left front leg-1pc B. Right front leg-1pc C. Left rear leg-1pc D. Right rear leg-
1
p
c
E. Firebox assembly
--1
p
c
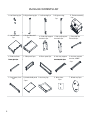
PACKAGE CONTENTS LIST
p
p
F. Left side shelf-
1pc
G. Right side shelf-
1pc
H. Side shelf support
bracket A-2pc
I. Side shelf support
bracket B-2pc
J. Side shelf trim
Piece,left-1pc
K. Side shelf trim
Piece right
-
1pc
L. Side panel-2pcs
M. Rear panel-1pc
N. Ash tray support
bracket,side
-
2pcs
O. Ash tray support
bracket
,
middle
Piece
,
right
1pc
bracket,side
2pcs
,
--1pc
P. Cart beam, front--
1pc
Q. Head shield panel
--2pcs
R. Ash tray-1pc T. Wheel cap-2pcs S. Mica plate -
2pcs
8

U. Bottom panel
cross bar A-2pcs
V. Bottom panel
cross bar B-2pcs
W. Bottom panel
-1pc
X. Ash tray handle
seat-2pcs
Y. Ash tray handle
-1pc
Z. Cooking grid-
3pcs
AA. Warming rack
-1pc
AB. Chimney-1pc AC. Chimney lid-
1pc
AD. Grid lifter-1pc
AE. Charcoal pan
control knob-1pc
AF. Swivel caster
with brake-1pc
AG. Swivel caster
-1pc
AH. Wheel-2pcs
9

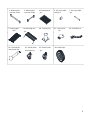
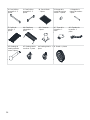
HardwareContents
All Pre-Assembled Screws List
Screw W5/32"-
14 PCS
12PCS
Screw W1/4"-
20x3/5"
32x2/5"
1 PCSM6 Washer
1 PCS
Nut W1/4"-20
1 PCS
Chimney lid
s
p
rin
g
4 PCS
Stage Screw
¼-in.x15-mm
pg
10

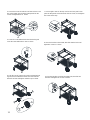
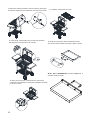
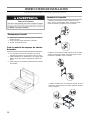
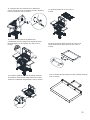
INSTALLATION INSTRUCTIONS
Freestanding Outdoor Grill Installations
Assemble the Grill
Unpack Grill
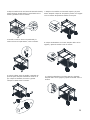
1. Loosen the two screws on top and bottom of two legs, add
the side panel on the top, cross bar on the bottom and slide
into the screws and tighten the screws as shown.
1. Remove all packaging materials and remove grill from the
shipping base.
2. Move grill close to desired outdoor location.
3. Open the grill hood.
Remove Packaging Material Inside the Grill
1. Use scissors to cut yellow straps and packing tape to
open box from top and remove the boxes
2. Remove the warming shelf and grill grates from inside the
grill and remove the package inside the firebox.
3. Remove foam block and wrap from inside the grill.
2. Loosen the two screws on top and bottom of two legs, add the
side panel on the top, cross bar on the bottom and slide into the
screws and tighten the screws as shown.
3. Loosen the screws on inside face of leg , slide the cross bar
and rear panel , then tighten the screws as shown
11

4. Loosen the screws in inside face of front and rear cross
bar on the bottom, then slide the bottom panel into the
screws and tighten them as shown.
7. Loosen eight screws on the top cross bar and rear panel. Then
place the two panels and slide into the hole as shown, do not tighten
the screws at this step.
5. Screw the caster without brake into the front leg and
screw the caster with brake in rear as shown.
8. Place the bracket on the middle ,then slide into the holes and
tighten the screws as shown.
6. Take the cap off, remove the screws and washer from
leg axle, then assemble the wheels onto axle and add
washers and nuts and tighten. Add the cap as shown.
9. Place the brackets on the left and right side ,then slide into
the holes and tighten the screws as shown.
12

10. Place the firebox assembly into the cart , then use
4 pieces W1/4"-20x3/5“ to screw the firebox with leg as
shown
12. Screw and tighten 4 pieces ¼-in.x15-mm stage
screw as shown.
11. a) Use 8 pieces W1/4"-20x3/5“ screws to assembly the
four brackets on the four out corner of firebox as shown.
b) Use 4 pieces W5/32
"
32x2/5
“
screws from firebox inside to
13. Insert the charcoal chimney from inside lid to outside.
Seat the chimney to the inside of the lid, then attach it
onto the hood with the 2 pieces W5/32
"
-
32x2/5
"
screws
b)
.
Use
4
pieces
W5/32
-
32x2/5
screws
from
firebox
inside
to
outside to assembly the left and right side shelf trim piece as
shown 2 pieces for left , 2 pieces for right.
c). Use 4 pieces W5/32"-32x2/5“ screws from the bottom of
side shelf trim piece to the top as shown.
onto
the
hood
with
the
2
pieces
W5/32
-
32x2/5
screws
and tighten.
13

14. Attach the chimney lid onto the charcoal chimney, then spring
and then the washer and nut. Tighten the nut in the end as shown.
17. Install the cooking grids as shown.
15. Insert 4 legs of the warming rack into two holes in firebox
side panel back and two holes in lid as shown.
18. Insert the charcoal ash drawer handle tube into the
charcoal ash drawer handle seat and mica plate as shown.
19 U 4 i ST4 2*10 lf
iihd
16. Place the charcoal pan control knob onto charcoal pan
control rod located behind of control panel and tighten clockwise
to secure as shown.
19
.
U
se
4
p
i
eces screws to t
i
g
h
ten an
d
screw the handle as shown.
14
W 5/32"-32x2/5"

20. Slide the charcoal ash drawer into the grill cart as
shown.
21. Before using your grill the first time, please see “Pre-
seasoning the Charcoal Tray” for instructions on
maintaining your grill.
15

OUTDOOR GRILL USE
Using Your Outdoor Grill
1.Always wait for any charcoal flames to subside
before placing food on cooking grid.
2. Once briquettes are glowing, use the charcoal pan
handle to adjust charcoal pan to desired cooking
position
Grilling/Searing
Charcoal Briquettes Lighting Instructions:
1.Open grill lid.
2.Remove grill grids (see “Grill Grid Removal & Grid Lifter”)
3. Lift the charcoal tray handle to adjust charcoal pan to
middle height position. (see “Charcoal Tray Handle
Operation”).
4
Pour charcoal briquettes into the charcoal pan and
position
.
3. Place food on grill grids and close grill lid.
4. Grill food to desired doneness, turning or flipping as
necessary.
RltiHt
4
.
Pour
charcoal
briquettes
into
the
charcoal
pan
and
arrange into a pile. Note: Charcoal should not go above grill
grid. Maximum recommended amount of charcoal is 8lb.
5. With the grill lid open, light the charcoal using one of the
following types of charcoal lighting methods:
a. Compressed wood fiber stick / briquette fire starter
b. Chimney charcoal starter
c. Electric grill starter
d. Charcoal infused with lighter fluid (ready light charcoal
R
egu
l
a
ti
ng
H
ea
t
To raise, lower or maintain the burning intensity, more
charcoal briquette may be needed or an adjustment to
charcoal tray position or the front air ventilation may be
needed. (see “Adjusting Temperatures and “Adding
Charcoal Briquette During Cooking” section).
briquettes)
e. Paper and wood
(Follow all manufacturer's instructions regarding the use of
their products).
6. With grill lid open, allow charcoal to burn until flames
subside. Evenly spread the coals out in the bottom of the
charcoal pan. NOTE: To extend the life of your grill, make
sure that hot coals do not touch the walls of the grill.
7 Adjust charcoal pan handle to low position
Add Charcoal Briquette During Cooking
Additional charcoal briquettes may be required to maintain
or increase cooking temperature.
1.Open grill lid.
7
.
Adjust
charcoal
pan
handle
to
low
position
.
8. Replace the grill grids.
2. Using the charcoal pan handle, adjust the charcoal pan
to the low position.
3. Remove the food from grill grid, then remove the grill grid.
4. Use cooking tongs add charcoal briquettes to the
charcoal pan.
5. When the charcoal briquette is burning strong again,
evenl
y
s
p
read them out in the bottom of the charcoal
p
an
yp p
and adjust charcoal pan to desired cooking level.
6. Replace food on the grill grid.
7. Close the grill lid. Allow food to continue grilling.
16

Operating Tips
Ventilation Door Control Knob Operation
To open the ventilation door, pull the ventilation knob.
To adjust ventilation, move the ventilation knob to the right or
TIPS FOR OUTDOOR GRILLING
Grill Grid Removal & Grid Lifter
When removin
g
g
rill
g
rids or addin
g
charcoal bri
q
uettes use the
left.
gg g g
q
grid lifter to remove grill grid to add charcoal briquettes to the
charcoal pan. Do not leave the grid lifter inside the grill as it will
get too hot to handle.
Charcoal grid lifter
Charcoal ventilation
control knob
Charcoal tray
handle
To control the cooking temperature, shift the ventilation knob at
the front of the grill to open and close the ventilation. To
increase tem
p
erature
,
o
p
en the ventilation. To dam
p
en
p,p p
temperature, close the ventilation.
NOTE: The temperature should not exceed 500°F, The
temperature can be checked using the temperature gauge on
the grill lid.
ADJUSTING TEMPERATURE
Charcoal Tray Handle Operation
By lifting the charcoal pan handle, the charcoal pan can be
raised or lowered to adjust the cooking heat at any time during
cooking. Raising the pan increases direct heat. Lowering the
pan reduces direct heat. Raise the tray after unit has cooled
down completely to make it easier to brush left over ash into the
ash tray. Do not raise the tray higher than halfway when fully
loaded with fresh charcoal briquettes.
Low Level
Middl L l
Middl
e
L
eve
l
High Level
Charcoal pan
17

OUTDOOR GRILL CARE
IMPORTANT: Before cleaning, make sure the grill is cool. Always
follow label instructions on cleanin
g
p
roducts.
General Cleaning
Cleaning the Charcoal Tray
To clean the charcoal tray after use, ensure all charcoal
briquettes have cooled completely
gp
For routine cleaning, wash with soap and water using a soft cloth
or sponge. Rinse with clean water and dry at once with a soft,
lint-free cloth to avoid spots and streaks.
Do not use steel wool to clean the grill, as it will scratch the
surface.
To avoid weather damage to finish, use grill cover and store in a
dry, protected location.
STAINLESS STEEL
briquettes
have
cooled
completely
.
1. Sweep ash down through the charcoal tray holes into
the ash tray. Empty ash drawer.
2. Avoid using soap as this will remove any oil coating
pre-seasoned onto the charcoal grid. Use only water
and a soft, non-abrasive material to clean if needed.
Dry thoroughly.
3. Re-a
pp
l
y
a thin coatin
g
of cookin
g
oil to
p
rotect the
IMPORTANT: To avoid damage to stainless steel surfaces, do
not use soap-filled scouring pads, abrasive cleaners, cooktop
polishing crème, steel wool, gritty wash cloths or paper towels.
Cleaner should not contain chlorine. Damage may occur.
Food spills should be cleaned as soon as entire grill is cool. Spills
may cause permanent discoloration.
STAINLESS
STEEL
Before calling for assistance, please check
“Troubleshooting.” If you still need help, follow the
instructions below
ASSISTANCE
pp y g g p
tray while it is being stored for the next use.
Rub in direction of grain to avoid scratching or damaging the
surface.
Stainless steel cleaner.
Liquid detergent or all-purpose cleaner.
Rinse with clean water and dry with soft, lint-free cloth.
Vinegar to remove hard water spots.
Glass cleaner to remove fingerprints.
Cleaning Method:
instructions
below
.
When calling, please know the purchase date and the
complete model and serial number of your appliance. This
information will help us to better respond to your request.
If you need replacement parts
If you have questions or need to order replacement parts,
contact Customer Service Center at
1
-
877
-
373
-
2301 .
Glass
cleaner
to
remove
fingerprints.
The quality of this material resists most stains and pitting,
providing that the surface is kept clean, polished and covered.
Apply stainless steel polish to all non-cooking areas before
first use Reapply after each cleaning to avoid permanent
EXTERIOR
contact
Customer
Service
Center
at
1
877
373
2301
.
Please direct all correspondence to:
Nexgrill Industries, Inc.
14050 Laurelwood Place, Chino, CA 91710
Please include a daytime phone number in your
correspondence.
first
use
.
Reapply
after
each
cleaning
to
avoid
permanent
damage to surface.
Cleaning should always be followed by rinsing with
clean warm water. Wipe the surface completely dry with a
soft cloth.
For tough spots or baked-on grease, use a commercial
degreaser stainless steel.
INTERIOR
Pre-seasoning the Charcoal Tray
Before using your grill the first time, the charcoal tray needs to be
seasoned to prevent rusting.
1. Make sure the charcoal tray is clean and does not have
charcoal briquettes in it
INTERIOR
18
charcoal
briquettes
in
it
.
2. Rub or spray on a thin coat of cooking oil (avoid oils with salt
content) over the entire charcoal tray.
3. Use the grill according to lighting instructions.

LIMITED WARRANTY (Model # 810-0021)
The manufacturer warrants to the original consumer-purchaser only that this product (Model #810-0021) shall be free from defects in workmanship
and materials after correct assembly and under normal and reasonable home use for the periods indicated below beginning on the date of
purchase. The manufacturer reserves the right to require photographic evidence of damage, or that defective parts be returned, postage and/or
freight pre-paid by the consumer, for review and examination.
LIMITED WARRANTY (Model # 810-0021)
.
•Stainless Steel Parts: 3 Year LIMITED warranty against perforation, does not cover cosmetic issue like surface corrosion, scratched and rust .
•ALL PARTS: 1 year LIMITED warranty (Includes, but not limited to frame, housing, cart, control panel) *Does not cover chipping, scratching,
cracking surface corrosion, scratches or rust.
Upon consumer supplying proof of purchase as provided herein, Manufacturer will repair or replace the parts which are proven defective during the
applicable warranty period. Parts required to complete such repair or replacement shall be free of charge to you except for shipping costs, as long
as the purchaser is within the warranty period from the original date of purchase. The original consumer-purchaser will be responsible for all
shipping charges of parts replaced under the terms of this limited warranty. This limited warranty is applicable in the United States and Canada
only is only available to the original owner of the product and is
not transferable
Manufacturer requires reasonable proof of your date of purchase
only
,
is
only
available
to
the
original
owner
of
the
product
and
is
not
transferable
.
Manufacturer
requires
reasonable
proof
of
your
date
of
purchase
.
Therefore, you should retain your sales receipt and/or invoice. If the unit was received as a gift, please ask the gift-giver to send in the receipt on
your behalf, to the below address. Defective or missing parts subject to this limited warranty will not be replaced without registration or proof of
purchase. This limited warranty applies to the functionality of the product ONLY and does not cover cosmetic issues such as scratches, dents,
corrosions or discoloring by heat, abrasive and chemical cleaners or any tools used in the assembly or installation of the appliance, surface rust, or
the discoloration of stainless steel surfaces. Surface rust, corrosion, or powder paint chipping on metal parts that does not affect the structural
integrity of the product is not considered a defect in workmanship or material and is not covered by this warranty. This limited warranty will not
reimburse you for the cost of any inconvenience, food, personal injury or property damage. If an original replacement part is not available, a
comparable replacement part will be sent. You will be responsible for all shipping charges of parts replaced under the terms of this limited warranty.
MANUFACTURER WILL NOT PAY FOR:
•Service calls to your home.
•Repairs when your product is used for other than normal, single-family household or residential use.
•Damage resulting from accident, alteration, misuse, lack of maintenance/cleaning, abuse, fire, flood, acts of God, improper installation, and
installation not in accordance with electrical or plumbing codes or misuse of product..
•Any food loss due to product failures.
•Replacement parts or repair labor costs for units operated outside the United States or Canada.
•Pickup and delivery of your product.
•Postage fees or photo processing fees for photos sent in as documentation.
Repairs to parts or s stems res lting from na thori ed modifications made to the prod ct
•
Repairs
to
parts
or
s
y
stems
res
u
lting
from
u
na
u
thori
z
ed
modifications
made
to
the
prod
u
ct
.
•The removal and/or reinstallation of your product.
•Shipping cost, standard or expedited, for warranty/non warranty and replacement parts.
DISCLAIMER OF IMPLIED WARRANTIES; LIMITATION OF REMEDIES
Repair or replacement of defective parts is your exclusive remedy under the terms of this limited warranty. Manufacturer will not be responsible for
any consequential or incidental damages arising from the breach of either this limited warranty or any applicable implied warranty, or for failure or
damage resulting from acts of God, improper care and maintenance, grease fire, accident, alteration, replacement of parts by anyone other than
manufacturer, misuse, transportation, commercial use, abuse, hostile environments (inclement weather, acts of nature, animal tampering), improper
installation or installation not in accordance with local codes or printed manufacturer instructions.
installation
or
installation
not
in
accordance
with
local
codes
or
printed
manufacturer
instructions.
THIS LIMITED WARRANTY IS THE SOLE EXPRESS WARRANTY GIVEN BY THE MANUFACTURER. NO PRODUCT PERFORMANCE
SPECIFICATION OR DESCRIPTION WHEREVER APPEARING IS WARRANTED BY MANUFACTURER EXCEPT TO THE EXTENT SET FORTH
LIMITED WARRANTY. ANY IMPLIED WARRANTY PROTECTION ARISING UNDER THE LAWS OF ANY STATE, INCLUDING IMPLIED
WARRANTY OF MERCHANTABILITY OR FITNESS FOR A PARTICULAR PURPOSE OR USE, IS HEREBY LIMITED IN DURATION TO THE
DURATION OF THIS LIMITED WARRANTY.
Neither dealers nor the retail establishment selling this product has any authority to make any additional warranties or to promise remedies in
addition to or inconsistent with those stated above. Manufacturer's maximum liability, in any event, shall not exceed the documented purchase price
of the product paid by the original consumer. This warranty only applies to units purchased from an authorized retailer and or
r
e-seller. NOTE:
Some states do not allow an exclusion or limitation of incidental or consequential damages, so some of the above limitations or exclusions may not
apply to you; this limited warranty gives you specific legal rights as set for herein. You may also have other rights which vary from state to state.
If you wish to obtain performance of any obligation under this limited warranty, you should write to:
Nexgrill Customer Relations
14050 Laurelwood Place,
Chino, CA 91710
All consumer returns, parts orders, general questions, and troubleshooting
assistance can be acquired by calling :
1
877
373
2301
assistance
can
be
acquired
by
calling
:
1
-
877
-
373
-
2301
19

SEGURIDAD DEL ASADOR PARA EXTERIORES
Advertencias de la Proposición 65 del estado de California:
Advertencias
de
la
Proposición
65
del
estado
de
California:
ADVERTENCIA: Este producto contiene una o más sustancias químicas identificadas por el estado de California como
causantes de cáncer.
ADVERTENCIA: Este producto contiene una o más sustancias químicas identificadas por el estado de California como
causantes de defectos congénitos o algún otro tipo de daños en la función reproductora.
INSTRUCCIONES DE SEGURIDAD IMPORTANTES
IMPORTANTE: Para reducir el peligro de incendio, lesiones y daños al usar su dispositivo de cocción en exteriores, siga las
siguientes precauciones básicas.
•No instale dispositivos de cocción portátiles o empotrados en un vehículo recreativo, remolque, bote o cualquier otra instalación
móvil.
•Mantenga siempre un libramiento mínimo de la construcción combustible; vea la sección "Requisitos de ubicación".
•Los dispositivos de cocción para exteriores no deben situarse en una construcción combustible desprotegida.
•El dispositivo de cocción para exteriores debe de usarse únicamente en exteriores y no en una cochera o en otra área cerrada.
•Mantenga el dispositivo de cocción para exteriores despejado y lejos de materiales combustibles, gasolina y demás vapores y
líquidos inflamables
•Este asador puede ponerse muy caliente cuando se usa. No lo mueva mientras esté en funcionamiento.
•No use alcohol, gasolina o líquidos semejantes para encender o reencender el asador.
•
No use este asador como calefactor.
No
use
este
asador
como
calefactor.
•El asador debe usarse en una superficie estable, nivelada, no inflamable como asfalto, concreto o tierra apisonada. No utilice
este asador sobre un material inflamable tal como una alfombra o piso de madera.
•No utilice este producto con otro fin que no sea para el que fue diseñado.
•No descuide el asador mientras lo esté utilizando.
•Preste atención a las cenizas calientes hasta que el asador se haya enfriado por completo.
N l d i t l té tili d i t l i ú té li t A t d d l d
•
N
o mueva e
l
asa
d
or m
i
en
t
ras
l
o es
té
u
tili
zan
d
o o m
i
en
t
ras
l
as cen
i
zas a
ú
n es
té
n ca
li
en
t
es.
A
n
t
es
d
e mover o guar
d
ar e
l
asa
d
o
r
,
espere a que se enfríe por completo.
•Deseche las cenizas frías colocándolas en un recipiente incombustible. Revise que no haya materias combustibles en el
recipiente o cerca de él.
GUARDE ESTAS INSTRUCCIONES
20
Page is loading ...
Page is loading ...
Page is loading ...
Page is loading ...
Page is loading ...
Page is loading ...
Page is loading ...
Page is loading ...
Page is loading ...
Page is loading ...
Page is loading ...
Page is loading ...
Page is loading ...
Page is loading ...
Page is loading ...
Page is loading ...
Page is loading ...
-
 1
1
-
 2
2
-
 3
3
-
 4
4
-
 5
5
-
 6
6
-
 7
7
-
 8
8
-
 9
9
-
 10
10
-
 11
11
-
 12
12
-
 13
13
-
 14
14
-
 15
15
-
 16
16
-
 17
17
-
 18
18
-
 19
19
-
 20
20
-
 21
21
-
 22
22
-
 23
23
-
 24
24
-
 25
25
-
 26
26
-
 27
27
-
 28
28
-
 29
29
-
 30
30
-
 31
31
-
 32
32
-
 33
33
-
 34
34
-
 35
35
-
 36
36
-
 37
37


KitchenAid 810-0021 Installation Instructions And Use & Care Manual
- Category
- Barbecues & grills
- Type
- Installation Instructions And Use & Care Manual
Ask a question and I''ll find the answer in the document
Finding information in a document is now easier with AI
in other languages
- español: KitchenAid 810-0021
Related papers
Other documents
-
 Kitchenaid - Old 810-0021 - Old Owner's manual
-
Home Decorators Collection 7474900210 Operating instructions
-
ROOMS TO GO 21425144 Assembly Instructions
-
 Nexgrill 810-0018 Owner's manual
-
 Nex - Old 720-0686 - Old Owner's manual
-
 Nexgrill 720-0686 Owner's manual
-
BBQ PG-CG004 Owner's manual
-
Members Mark GR2071001-MM-00 Owner's manual
-
Kingsford BC222 User manual
-


