Page is loading ...

USER MANUAL
ARMASIGHT by FLIR
MSI8000
®
Universal Long-Range Flashlight

ARMASIGHT by FLIR
MSI8000
USER MANUAL
2
© 2017 FLIR Systems, Inc. All rights reserved worldwide. No parts
of this manual, in whole or in part, may be copied, photocopied,
translated, or transmitted by any electronic medium or in
machine-readable form without the prior written permission of
FLIR Systems, Inc.
Names and marks appearing on the products herein are either
registered trademarks or trademarks of FLIR Outdoor & Tactical
Systems and/or its subsidiaries. All other trademarks, trade names, or
company names referenced herein are used for identification only and
are the property of their respective owners.
This product is protected by patents, design patents, patents pending,
or design patents pending.
If you have questions that are not covered in this manual, or need
service, contact FLIR OTS customer support for additional information
prior to returning a flashlight.
Phone:1-888-959-2259
E-mail: OTS-Support@flir.com
This documentation is subject to change without notice.
Proper Disposal of Electrical
and Electronic Equipment (EEE)
The European Union (EU) has enacted Waste Electrical
and Electronic Equipment Directive 2002/96/EC (WEEE),
which aims to prevent EEE waste from arising; to
encourage reuse, recycling, and recovery of EEE waste;
and to promote environmental responsibility.
In accordance with these regulations, all EEE products labeled with the
“crossed out wheeled bin” either on the product itself or in the product
literature must not be disposed of in regular rubbish bins, mixed with
regular household or other commercial waste, or by other regular
municipal waste collection means. Instead, and in order to prevent
possible harm to the environment or human health, all EEE products
(including any cables that came with the product) should be responsibly
discarded or recycled.
To identify a responsible disposal method where you live, please
contact your local waste collection or recycling service, your original
place of purchase or product supplier, or the responsible government
authority in your area.
Business users should contact their supplier or refer to their purchase
contract.
Important Instructions and Notices
to the User:
Modification of this device without the express authorization of FLIR
Commercial Systems, Inc. may void the user’s authority under FCC
rules to operate this device.
Note 1: This equipment has been tested and found to comply with the
limits for a Class B digital device, pursuant to Part 15 of the FCC rules.
These limits are designed to provide reasonable protection against
harmful interference in a residential installation.
This equipment generates, uses, and can radiate radio
frequency energy and, if not installed and used in accordance
with the instructions, may cause harmful interference to radio
communications. However, there is no guarantee that the interference
will not occur in a particular installation. If this equipment does
cause harmful interference to radio or television reception, which
can be determined by turning the equipment off and on, the user is
encouraged to try to correct the interference by one or more of the
following measures:
• Reorient or relocate the receiving antenna
• Increase the separation between the equipment and receiver
• Connect the equipment into an outlet on a circuit different from
that of the receiver
• Consult the dealer or an experienced radio/television
technician for help.
Industry Canada Notice:
This Class B digital apparatus complies with
Canadian ICES-003.
Avis d’Industrie Canada:
Cet appareil numérique de la classe B est conforme à la norme
NMB-003 du Canada.
FLIR Outdoor & Tactical Systems
815 Dubuque Avenue, South San Francisco, CA 94080
Phone: 1-888-959-2259 or (650) 492-7755
Fax: 1-888-959-2260
International Phone/Fax: (650) 492-7755
E-mail: OTS-[email protected]
www.flir.com
©2017 FLIR Systems, Inc. Specifications are subject to change
without notice, check our website: www.flir.com.

ARMASIGHT by FLIR
MSI8000
USER MANUAL
3
CONTENT
Page
Safety Statement 4
1. Introduction 5
2. Getting Started 6
3. Operating 8
4. Maintenance 11
5. Warranty 12
6. Specifications 13
7. Spare Parts 14

ARMASIGHT by FLIR
MSI8000
USER MANUAL
4
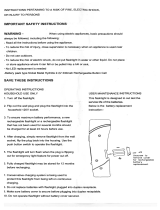
SAFETY STATEMENT
• Read and follow all instructions.
• Heed all warnings.
• Only use the attachments/accessories specified by the manufacturer.
• All services must be provided by the manufacturer.
WARNING:
• When used in total darkness, the light from the infrared (IR)
illuminator is invisible to the unaided eye. However, the light can be
detected by Night Vision Devices (NVD).
• To reduce the risk of detection by an NVD, avoid prolonged activation
of the IR illuminator.
• The IR light is more easily detected by an NVD when used in smoke,
fog and rain. Avoid prolonged activation of the IR illuminator in these
conditions.
CAUTION:
• Do not scratch the external lens surfaces.
• Use only the supplied battery, and do not install any other types.
• Keep the lithium batteries well away from flames or extreme heat or
combustible materials. If handled or recharged incorrectly, lithium ion
batteries can cause fires, explosions, property damage, injuries, and
death.
• Keep the batteries and charger away from water or liquids of
any kind. Exposure to water may cause shock hazards and fatal
electrocution.
• Do not leave lithium ion rechargeable batteries and chargers
unattended while recharging.
• Do not operate the charger on wood, carpet, fabric, or any other soft
or flammable surfaces.
• Do not attempt to recharge disposable lithium batteries. Do not use
any unprotected lithium ion rechargeable batteries. Never recharge
lithium ion batteries in any chargers other than those designed for
the specific battery types being used.
MSI8000
®
Universal Long-Range Flashlight
The MSI8000
®
long-range infrared illuminator/ flashlight can be used
as a handheld device or mounted on the Weaver rail. Nevertheless,
in the industry, and throughout this manual, this type of device is also
referred to as flashlight.

ARMASIGHT by FLIR
MSI8000
USER MANUAL
5
SECTION 1. INTRODUCTION
1.1 FLASHLIGHT
This manual covers the MSI8000 universal long range flashlight and
all applicable components. It is recommended that you read and
understand this manual to optimize the flashlight operation.
1.2 INTRODUCTION
MSI8000 universal long range flashlight includes everything you need
to recover your game after the sun goes down or to enhance the
capabilities of night vision weapon sights and observation devices. You
can choose IR, white, and optional red or green interchangeable LED
modules for your intended game. Changing your LED module color can
be done in less than 30 seconds in the field.
NO filtered lenses are used. Filtered lenses decrease your useful beam
distance by more than 50%. By using a clear lens and colored LED, you
are assured to reach maximal distance from your illumination. MSI8000
with IR LED module significantly extends the capabilities of Night
Vision devices.
With 3 power modes (Low, Medium, and High), the MSI8000 flashlight
provides a powerful, focusable circle of light.
MSI8000 comes standard equipped with a rechargeable battery and
charger unit. Optional weapon kit includes a wireless remote control
and weapon mount. An optional Afocal Doubler doubles the distance of
illumination for ultra long distance observation.
1.3 FEATURES
• Powerful, long range flashlight/ IR illuminator
• Interchangeable LED modules (IR, White)
• High power diodes
• Power adjustment
• Wide range beam angle adjustment
• Eye safe
• Low battery warning indicator
• Auto Power Off function for over-heat protection and battery saving
• Lightweight and rugged
• Ideal for extreme, low light conditions
• Can be used as a handheld device or mounted on the Weaver rail
• Mount with a beam direction adjustment
• Optional Afocal Doubler for ultra long distance observation
• Limited Two-Year Warranty
1.4 REGISTER YOUR MSI8000
You can register your product online at:
www.flir.com

ARMASIGHT by FLIR
MSI8000
USER MANUAL
6
SECTION 2. GETTING STARTED
2.1 UNPACKING AND INSPECTING
The MSI8000 is available with the features, options, and accessories
described in this manual. Refer to the packing list enclosed with your
product to determine the actual contents of your product package.
2.2 BATTERY
The MSI8000 operates on a single 18650 rechargeable battery.
Fully charge the battery before installing in MSI8000. Insert the 18650
battery into charger, aligning the polarity symbols on the battery
with the polarity symbols on the charger. Never install the battery
backwards.
Connect the power cord to an appropriate power source. A charger
indicator light will flash red when a battery is charging, and will change
to green when the battery has been fully charged. Remove the battery
promptly after charging has been completed.
LOW BATTERY INDICATOR
When the flashlight is ON, a flashing FIRE indicator placed on the
tail cap of MSI8000 indicates that the battery is low. This indicator
provides an alert to recharge the battery.
BATTERY INSTALLATION
1. Unscrew the tail cap in a counter-clockwise direction.
2. Insert the battery with the negative (-) pole pointing forward (toward
the light head). Align the polarity symbols on the battery with the
polarity symbols on the cap.
3. Replace the tail cap.
Thank You CardQuick Start Guide
Charger
18650
Rechargeable Battery
White LED
Module
(preinstalled)
IR LED
Module
Lens Cap
Flashlight
Soft Carrying Case
Tail Cap
BatteryLight Head

ARMASIGHT by FLIR
MSI8000
USER MANUAL
7
2.3 OPTIONAL EQUIPMENT
Optional items are shown and listed in the table below. The PART NO.
column indicates the primary number used by the manufacturer to
identify an item.
OPTIONAL EQUIPMENT PART NO.
Afocal Doubler
Doubles the distance of MSI8000 flashlight
beam. Comes complete with an thread adapter.
ANAF18XLRM
Weapon Kit
Includes dedicated mount for the MSI8000 to be
installed on a Picatinny/Weaver rail, wireless
remote control for flashlight on/off, and adapter
for mounting the remote control unit to the
Picatinny/Weaver rail.
ANAMMFI001
Green LED Module
Interchangeable module with green LED.
ANLDGREEN1
Red LED Module
Interchangeable module with red LED.
ANLD00RED1
Green LED
Module
Red LED
Module
Afocal Doubler Weapon Kit

ARMASIGHT by FLIR
MSI8000
USER MANUAL
8
SECTION 3. OPERATING
3.2 OPERATING PROCEDURES
1. Open the lens cap.
2. Set the function switch to the position corresponding to the required
light power.
3. Press the operating button to activate the flashlight.
4. Adjust the light beam focus by rotating the light head.
5. Adjust the light power by selection position of the function switch
(LOW-MID-HI).
6. Set the function switch to the OFF position to turn off the flashlight.
3.3 AUTO POWER OFF FUNCTION
Auto Power Off is a feature of the MSI8000 that protects the
flashlight for overheat and helps to guard against draining the battery
prematurely by inadvertently leaving the flashlight on.
The flashlight automatically switches to standby mode after
approximately five minutes of operation.
If the Auto Power Off function turns off the MSI8000 when it is used
you need turn on the flashlight again by pushing the operating button.
3.4 REPLACING THE LED MODULE
1. Loosen the locking screw of the light head (make two full turns of
the screw).
2. Unscrew the light head.
3. Unscrew the LED module by using the ledges of the lens cap.
4. Remove the protective cap from the interchangeable LED module.
5. Screw the LED module onto the place by using the lens cap.
6. Screw the light head onto the place.
7. Secure the light head with a locking screw. Do not force to tighten
the screw.
Lens Cap
Ledge
Light Head
LED Module
Locking Screw
3.1 CONTROLS
This section details the use of the flashlight’s controls.
FIRE Indicator
Lens Cap
Locking Screw
Eyelet for Strap
Operating Button
Light Head
Function Switch
3.1.1 FUNCTION SWITCH
The function switch performs the following functions:
• Selects the power mode: LOW (1/3 power), MID (1/2 power), or HI
(full power).
• Activates standby mode when turned to LOW, MID, or HI position. In
standby mode the flashlight can be activated/deactivated by pushing
the operation button or by an optional wireless remote control.
• Deactivates the flashlight when turned to OFF.
3.1.2 OPERATING BUTTON
The operating button performs the following functions:
• Activates the flashlight in preselected power mode.
• Turns off the light when pressed again.
3.1.3 INDICATION
The green LED indicate the following states of the flashlight:
• FIRE indicator glows green light when flashlight is activated.
• FIRE indicator flashes when the battery is low.
3.1.4 FOCUS ADJUSTMENT
The light beam can be focused manually by turning the light head of
flashlight. The direction of rotation to a floodlight and to a spotlight is
marked on the light head.

ARMASIGHT by FLIR
MSI8000
USER MANUAL
9
3.5 POWER LIMITING
WARNING:
The optional Green and Red interchangeable LED modules works
only in LOW and MID power modes.
Use a special limiting screw to block high power mode (HI) as follows:
1. Unscrew the limiting screw from the storage socket.
2. Screw the limiting screw to the HI limiting position.
Limiting Screw
Limiting Position
Storage Socket
3.6 USING THE OPTIONAL AFOCAL LENS
An optional Afocal Doubler for MSI8000 doubles the distance of light
for long-distance observation.
Afocal Doubler
To mount the afocal lens to flashlight, screw it into the threading of the
standard objective lens on the MSI8000.
3.7 USING THE OPTIONAL WEAPON KIT
WARNING:
Always make sure your firearm is unloaded before you place
the equipment on the firearm. Always verify that the chamber
is empty, especially if you stop the procedure and resume later.
Safe handling rules should be followed at all times.
THE USER ASSUMES ALL RESPONSIBILITY AND LIABILITY
FOR HAVING THE ARMASIGHT BY FLIR EQUIPMENT PROPERLY
MOUNTED TO A FIREARM AND USING THE ARMASIGHT BY LIR
EQUIPMENT PROPERLY. ALWAYS CHECK THE CONDITION OF
YOUR MOUNTING SYSTEM PRIOR TO USING YOUR FIREARM.
To mount the MSI8000 to a weapon use a Quick-Release Picatinny
Mount (QRM) adapter from the optional Weapon Kit. This small arms
adapter allows the MSI8000 to be mounted onto Picatinny/Weaver rail.
3.7.1 QRM ADAPTER INSTALLATION
To install the QRM adapter to flashlight perform the following steps:
1. Unscrew four screws and remove the clamp from the mount.
2. Remove top insert.
3. Place the MSI8000 into mount with insert.
4. Install the top insert and align it with the second insert.
5. Install the clamp and fasten it with four screws.
Clamp Screws
MSI8000
Insert
Insert
Clamp
Mount
3.7.2 MOUNTING THE MSI8000 ON A PICATINNY/
WEAVER RAIL
Mount the MSI8000 on a Picatinny/Weaver rail as follows:
1. Unlock the clamping device of the QRM adapter by pushing down on
the lever holder and unlocking the lever.
MSI8000
Picatinny/Weaver Rail
QRM Adapter

ARMASIGHT by FLIR
MSI8000
USER MANUAL
10
2. Install the flashlight on the Picatinny/Weaver rail so that the stop of
QRM slides into the transverse slots on the rail.
UNDERSIDE VIEW OF THE MOUNT.
LOCKED POSITION
Stop
Clamping
Device
Lever Holder
Lever
3. Affix the mount to the rail by locking the lever.
4. Verify that the clamping device is firmly holding the flashlight. If
necessary, adjust the clamping device as detailed below.
3.7.3 CLAMPING DEVICE ADJUSTMENT
To adjust the mount’s clamping device, do the following:
1. Remove the MSI8000 from the rail.
2. With unlocked clamping device push the cam towards the arrow,
which will cause the nut to slide out of its hole.
UNDERSIDE VIEW OF THE MOUNT.
UNLOCK POSITION
Nut
Cam
Clamping
Device
3. To tighten/ loosen the clamping device, push down on the cam
and turn the nut clockwise/counterclockwise respectively, in one-two
increments (see note below). Much like when the cam is released,
backward-moving springs will cause the nut to slide back into its hole.
NOTE:
The eight-sided nuts of the mount’s lever-cam locks will only fit
into their holes if turned in one of the discrete positions, using
45-degree increments.
4. Verify that the adjusted clamping device is securely holding the
weapon’s mounting rail.
3.7.4 LIGHT SPOT POSITION ADJUSTMENT
Adjust the flashlight spot position as follows:
1. Loosen the screws of the clamp on the mount.
2. Turn on the flashlight. Turn on night vision device if you use flashlight
with IR module.
3. Carefully move the MSI8000 up and down and side to side and
observe the light spot position relative to the aiming point of weapon or
the night vision device.
4. Once the light spot is centered in the field of view, tighten the
screws of the clamp.
Screws of Clamp
3.7.5 FASTENING A WIRELESS REMOTE CONTROL
TO A WEAPON
Using the supplied Velcro
®
tape, fasten the remote control to your
weapon in an easily accessible place (e.g., on the front of the rifle
stock).
If your rifle has a Picatinny/Weaver rail on the front end, you can use
the Picatinny adapter for the Wireless Remote. Install the adapter onto
the rail. Insert the remote control unit into the adapter.
Velcro
®
Tape
Remote Control
Remote Control
Picatinny Adapter
Picatinny/Weaver Rail
3.7.6 USING THE WIRELESS REMOTE CONTROL
To operate the MSI8000 with remote control, turn the operation switch
to LOW, MID, or HI position. To activate the flashlight, press the remote
control button. To deactivate the flashlight, press the remote control
button again.

ARMASIGHT by FLIR
MSI8000
USER MANUAL
11
SECTION 4. MAINTENANCE
Wipe the housing with a damp cloth, as needed. Use a high quality
lens cloth to remove dirt or smudges from the lens surface.
CAUTION: Do not use abrasives or solvents to clean the housing, lens,
or display window.
PREFERRED METHOD FOR CLEANING THE LENS
Materials:
• Optical-grade cloth
• Pure water (de-ionized or other)
• Isopropyl alcohol (IPA)
Saturate a piece of the lens tissue with the water and drape it over
the lens. Let the surface tension of the water pull the tissue onto the
lens surface and then drag the tissue across the lens surface. Repeat
several times with different pieces of tissue.
Repeat the same step using IPA instead of water. Drag the final piece
of tissue over the lens several times to prevent pooling, which could
leave a residue behind.

ARMASIGHT by FLIR
MSI8000
USER MANUAL
12
SECTION 5. WARRANTY
5.1 GLOBAL LIMITED WARRANTY
Follow the link http://www.flir.com/uploadedFiles/Corporate/Support/
FLIR-Personal-Vision-Systems-2-3-10-Limited-Warranty.pdf to retrieve
FLIR’s Warranty document.
5.2 PRODUCT REGISTRATION
In order to validate the warranty on your product, FLIR Outdoor
& Tactical Systems must receive a completed Product Warranty
Registration Card for each unit, or the Customer can complete
the warranty registration form on our website by completing and
submitting FLIR Outdoor & Tactical Systems’ PRODUCT REGISTRATION
FORM (http://www.flir.com/hunting-outdoor/display/?id=74583).
5.3 OBTAINING WARRANTY SERVICE
For service, repair or replacement, please contact:
FLIR Outdoor & Tactical Systems
815 Dubuque Avenue, South San Francisco, CA 94080
Phone: 1-888-959-2259 or (650) 492-7755
Fax: 1-888-959-2260
International Phone/Fax: (650) 492-7755
E-mail: OTS-[email protected]
www.flir.com/ots

ARMASIGHT by FLIR
MSI8000
USER MANUAL
13
SECTION 6. SPECIFICATIONS
SYSTEM SPECIFICATIONS
Interchangeable LED Modules IR White Green (optional) Red (optional)
IR Emitter Type LED LED LED LED
Output 1300 mW 610 lm 160 lm 150 lm
Peak Wavelength 850 nm -- 528 nm 625 nm
Illumination Range Up to 1000 m Up to 1000 m Up to 1000 m Up to 1000 m
Divergence 3.8° to 28° 4.6° to 32° 3.8° to 28° 3.8° to 28°
Compatible Night Vision Devices Gen 1, CORE, Gen2, Gen 3, Digital
USER INTERFACE
Operation Switch Congures Operational Settings:
• Power Off
• Low Power (a third power)
• Mid Power (half power)
• Hi Power (full power)
Operating Button Light On / Light Off
Focus Adjusts the light beam from a flood light to a spotlight
Battery Indicator Indicates Low Battery by ashing LED
Remote Control Wireless (optional)
POWER
Battery Type Single 18650 (3.7v ) Rechargeable Battery
Battery Life (Operating) Up to 4 hr
ENVIRONMENTAL
Operating Temperature Range -20 to +50°C (-4 to +122°F)
Storage Temperature Range -50 to +70°C (-58 to +158°F)
PHYSICAL
Weight (w/o Battery) 262 g (9.2 oz)
Size 180x46x46 mm (7.1x1.8x1.8 in)
Mount Type (optional) Picatinny, MIL-STD-1913, and Weaver Rails
Color (housing) Black
PACKAGE INCLUDES
Flashlight, Interchangeable LED Modules (White and IR), 18650 Rechargeable Battery, Charger, Soft Carrying Case, Quick Start Guide
OPTIONAL ACCESSORIES
ANLDGREEN1 – Green Light LED Module
ANLD00RED1 – Red Light LED Module
ANAMMFI001 – Weapon Kit
ANAF18XLRM – Afocal Doubler

ARMASIGHT by FLIR
MSI8000
USER MANUAL
14
SECTION 7. SPARE PARTS
The parts authorized in the below list of spare parts are required for
operator maintenance. This list includes parts that must be removed in
order to replace authorized parts.
The ITEM NO. column indicates the number used to identify items in
figure below.
The PART NO. column indicates the primary number used by the
manufacturer to identify an item; this number controls the design and
characteristics of the item by means of its engineering, specifications,
standards, and inspection requirements.
ITEM NO. DESCRIPTION PART NO.
1 Lens Cap MSI8LNCP
2 Lens Cap Retainer MSI8OLCRT
3 Light Head Assembly MSI8LHAS
4 Locking Screw MSI8LHLS
5 Body MSI8BDY
6 Tail Cap Assembly MSI8TCAS
7 Function Switch MSI8FNSW
8 Limiting Screw MSI8LMSC
9 Light Head O-ring (not shown) MSI8LHOR
10 Tail Cap O-ring (not shown) MSI8TCOR
11 18650 Rechargeable Battery -
12 Charger MSI8CHR
13 White LED Module MSI8WTLM
14 IR LED Module MSI8IRLM
15 Soft Carrying Case ABFMOSCC
16 Quick Start Guide MSI8QSG
11
12
13
14
15
16
1
2
3
4
5
6
7
8

ARMASIGHT by FLIR
MSI8000
USER MANUAL
15

OUTDOOR & TACTICAL SYSTEMS
815 Dubuque Avenue, South San Francisco, CA 94080
Phone: 1-888-959-2259 or (650) 492-7755
Fax: 1-888-959-2260
International Phone/Fax: (650) 492-7755
US Commercial Sales:
OTS-Sales@ir.com
Government Sales:
OTS-Gov@ir.com
International Sales and Export:
OTS-Export@ir.com
Technical Support, Repairs, Returns, Refunds & Warranty:
OTS-Support@ir.com
www.ir.com
Equipment described herein is subject to US export regulations and may
require a license prior to export. Diversion contrary to US law is prohibited.
Imagery for illustration purposes only. Specications are subject to change
without notice. ©2017 FLIR Systems, Inc. All rights reserved.
Rev.1 - 01/03/2018
/