1
SimpliFire • Wall Mount Bracket Kit • 2040-930 Rev. B • 9/19
Wall Mount Bracket Kit
BRACKET-ALL48, BRACKET-ALL60, BRACKET-ALL84
Model: SF-ALL40-BK, SF-ALL48-BK, SF-ALL60-BK, SF-ALL84-BK,
SF-ALLP50-BK, SF-ALLP60-BK, SF-ALLP72-BK
- Instructions -
CAUTION! Risk of Cuts, Abrasions or Flying Debris.
Wear protective gloves and safety glasses during
installation and service. Sheet metal edges are sharp.
Leave this manual with party responsible for use
and operation.
WARNING! Risk of Shock! Always unplug the cord or
turn off the circuit breaker before moving or servicing.
Tools and Supplies Needed
Before beginning the installation be sure that the following
tools and building supplies are available.
Tape measure
Needle-nose pliers
Hammer
Gloves
Level
Phillips screwdriver
Safety glasses
Drill
1/2 in. drill bit for 3/16 in. diameter toggle bolts
(applicable if installing on drywall-sheathed walls)
Masonry drill bit 5/16 in. (applicable if installing on
masonry walls)
WARNING! Risk of Personal Injury or Property Dam-
age! Failure to follow instructions below may result in
damage to the equipment and or may expose the user to
the risk of re, serious injury, illness or death.
Kit Contents:
Wall Mount Bracket
(8) Toggle Bolts
(8) Masonry Anchors
(8) ST6X50 Screws
(2) M5X10 Screws
Introduction
This kit provides installation instructions for the wall mount
bracket kit.
Appliance Kit Sku
Minimum
# of Anchors
Required
SF-ALL40-BK
SF-ALL48-BK
SFALLP50-BK
BRACKET-ALL48 6
SF-ALL60-BK
SF-ALLP60-BK
BRACKET-ALL60 6
SF-ALLP72-BK BRACKET-ALL60 8
SF-ALL84-BK BRACKET-ALL84 8
Table 1
BRACKET-ALL48 & BRACKET-ALL60 Kit also includes:
Side Panels (1-right side, 1-left side)
(4) ST4X8 Screws
SimpliFire • Wall Mount Bracket Kit • 2040-930 Rev. B • 9/192
Figure 3 Installing Anchors in Hollow Wall
Figure 2 Toggle Bolt Installation through Mounting Bracket
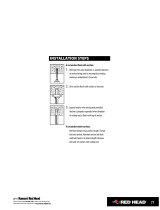
Figure 1 3/16 Toggle-Bolt Anchor
The toggle-bolt anchors are provided to accomodate
the required anchor points based on the appliance.
Use of toggle bolt anchors requires drywall thick-
ness of minimum 1/2 in. and drilled holes size of 1/2
in. diameter.
Insert the bolt through the front side of the mounting
bracket and thread the toggle onto it from the rear of
the bracket. See Figure 2.
Fold the toggle wings ush against the bolt and push
them through a drilled hole until the toggle wings
expand open on the other side. See Figure 3.
Pull back on the bolt and tighten. See Figure 3.
Note: This product cannot be installed on a wall
sheathed with drywall less than 1/2 in. thick, unless
all six (6) anchor points in the mounting bracket
align with structural framing members.
Framed Wall
Locate the mounting bracket on the wall in the
desired location of the appliance. Level the bracket,
then mark its location on the wall, including a mark-
ing for each of the fastener holes in the bracket.
For each of the marked mounting point locations,
determine which points align with a structural fram-
ing member. A minimum of two (2) locations should
be secured into a framing member.
At the points where a wood or metal framing mem-
ber exists, the ST6X50 screw can be installed
directly into that structural member.
For every mounting hole that does not align with a
structural framing member, a wall board toggle-bolt
anchor must be used. See Figure 1.
Direct Wall Mounting with Wall Mounting
Bracket
The wall mounting bracket can be installed on masonry
walls such as those constructed of brick or concrete,
or to framed walls constructed of wood or steel framing
sheathed with gypsum wallboard, drywall, wood, etc.
The method used to mount the mounting bracket is dif-
ferent between masonry walls and framed walls. Refer
to the following sections for more detail on the method
applicable to this installation.
WARNING! Risk of Damage or Personal Injury! Al-
lowable pull-out and shear strength are 25% of ultimate
values or less, as required by building authorities.
NOTICE: Minimum six (6) screws and/or toggle bolt an-
chors are required for wall mounting the SF-ALLP50-BK,
SF-ALL60-BK and SF-ALLP60-BK. Minimum of eight
(8) screws and/or toggle bolt anchors are required for
wall mounting the SF-ALLP72-BK and SF-ALL84-BK.
3
SimpliFire • Wall Mount Bracket Kit • 2040-930 Rev. B • 9/19
Masonry Wall
Locate the mounting bracket on the wall in the
desired location of the appliance. Level the bracket,
then mark its location on the wall, including a mark-
ing for each of the fastener holes in the bracket.
Wall
Masonry Anchors
Figure 5 Masonry Anchor Placement
In the marked locations, drill 5/16 in. diameter x 2 in.
deep holes. See Figure 4.
NOTICE: See Table 1 for list of minimum number of
anchors required for wall mounting by model.
Insert the provided wall anchors into the holes.
Gently tap the anchors with a hammer until they are
ush with the wall surface.
With mounting hooks pointed up, attach the bracket
to the masonry anchors with ST6X50 screws . See
Figure 5.
NOTICE: The supplied wall anchors are designed for
solid masonry wall such as brick or poured concrete. Do
not use the supplied wall anchors when mounting this
product to hollow concrete block walls. If mounting this
product to concrete block, contact your local building
supply retailer to source a fastener system that is com-
patible with concrete block and rated minimum 150 lbs.
load capacity at each required anchor point.
WARNING! Risk of Damage or Personal Injury! Do
not use supplied masonry anchors on hollow walls,
sheathed with wood, gypsum wallbaord, drywall or other
materials.
Figure 5 Bracket Attachment
Mounting Hooks
Point Up
Note: For non-masonry walls,
at least two mounting points
(screws ST6X50) must align
with structural framing member.
Appliance Installation
Hang appliance on the mounting bracket.
Align the slots on the back of the appliance with the
hooks on the top two corners of the bracket.
Hang the appliance and pull down to ensure the hooks
are fully engaged. See Figure 6.
Secure the appliance to the bracket with two M5X10
screws. See Figure 6.
1
2
Secure with screw on each
side of appliance.
Figure 6 Attaching Appliance to Bracket
Mounting Hooks
Point Up
SimpliFire • Wall Mount Bracket Kit • 2040-930 Rev. B • 9/194
SimpliFire, a brand of Hearth & Home Technologies
7571 215
th
Street West, Lakeville, MN 55044
www.hearthnhome.com
Installing Side Panels (SF-ALLP50-BK, SF-
ALLP60-BK AND SF-ALLP72-BK models only)
NOTICE: Side panels are included with the BRACKET-
ALL48 and BRACKET -ALL60 kits only. If installing an
appliance other than SF-ALLP50-BK, SF-ALLP60-BK or
SF-ALLP72-BK, the side panels may be discarded.
Install side panels in the orientation shown in Figure
7.
Insert the panel tabs into the slots on the top of he
appliance.
Fasten each panel with two (2) ST4X8 screws on the
bottom of appliance.
Secure with (2) screws at
the bottom.
Figure 7 Installing Side Panels
  • Page 1 1
  • Page 2 2
  • Page 3 3
  • Page 4 4

Ask a question and I''ll find the answer in the document

Finding information in a document is now easier with AI