Page is loading ...

In s ta l l at I o n a n d C a r e G u I d e
• Alida CSC Installation and Care Guide • Wilson Audio

Wilson Audio® is a registered trademark of Wilson Audio Specialties, Inc.
Wilson Audio (Stylized)®, WAMM®, Master Chronosonic®, WAMM Master Subsonic®, Chronosonic XVX®,
Alexx®, Alexx V®, Alexia®, Alexia V®, Sasha DAW®, Yvette®, Sabrina®, SabrinaX®, Alida®, TuneTot®,
LōKē®, Thor’s Hammer®, Pedestal®, Wilson Audio Acoustic Diode®, Reliable Capacitor®, Rel-Cap®,
AudioCap®, AudioCapX®, WATCH®, IsoBase®, Wilson Audio Authentic Excellence®, Wilson Audiophile
Recordings LLC®, and Special Applications Engineering® are registered trademarks of Wilson Audio
Specialties, Inc.
Chronosonic XVX 4 Seasons™, Grand SLAMM™, Sasha V™, Sasha W/P™, WATT™, WATT/Puppy™, Sophia™,
Alida CSC™, Mezzo CSC™, WASAE Center™, WATCH Center™, XS™, Submerge™, WATCH Dog™, ActivXO™,
Excellence in All Things™, Certified Authentic™, It’s About Time™, WilsonGloss™, Convergent Synergy
Carbon™, QuadraMag™, X-Material™, S-Material™, and V-Material™ are trademarks of Wilson Audio
Specialties, Inc.
This manual was produced by the Wilson Audio Engineering and the Marketing Departments. The infor-
mation contained herein is subject to change without notice.
Current Revision 1.0. If you are in need of a more recent manual, please contact your Dealer or
download one at www.wilsonaudio.com.
The information in this manual is the sole property of Wilson Audio Specialties, Inc. Any reproduction,
in whole or in part, without the express written permission of Wilson Audio Specialties, Inc., is pro-
hibited. No material contained herein may be transmitted in any form or by any means, electronic or
mechanical, for any purpose, without the express written permission of Wilson Audio Specialties, Inc.
Copyright © 2023 Wilson Audio Specialties, Inc.
Authentic Excellence
WA Dealers

Ta b l e o f C o n T e n T s 1
Wilson Audio Specialties
Co n T e n T s
se C T i o n 1—WasP seTuP ������������������������������������������������������� 5
Section 1.1—Wilson Audio Setup Procedure ........................... 6
Zone of Neutrality: Alida CSC ..................................................... 6
Section 1.2—Speaker Placement/Listening Position ................. 9
Room Shapes.............................................................................. 9
Multi-Channel Audio ................................................................. 10
Final Listening Room Setup (Voicing) .......................................... 12
se C T i o n 2—un C r aT i n g a l i d a CsC ������������������������������������ 15
se C T i o n 3—in s Ta l l i n g a l i d a CsC ������������������������������������ 19
Section 3.1—Installation Prep ............................................ 20
Adjustable Mounting System ..................................................... 20
Section 3.2—Safety Warning ................................................ 21
Mounting Surface Evaluation .................................................... 23
Table of Contents

2 al i d a C s C i n s Ta l l aT i o n a n d C a r e g u i d e
Authentic Excellence
Section 3.3—Mounting Bracket to a Surface ....................... 24
Marking Location ................................................................... 24
Drilling Pilot Holes ................................................................ 24
Section 3.4—Installing Alida CSC ...................................... 25
Placing Alida CSC on Bracket ................................................... 26
Section 3.5—Connecting Speaker to Amplifier ..................... 27
Section 3.6—Locking Down the Alida CSC .......................... 28
Section 3.7—Removing the Protective Film ......................... 28
se C T i o n 4—Ca r e & fi n i s h ������������������������������������������������ 31
Section 4.1—Resistors ..................................................... 32
Mid-Woofer and Tweeter Resistors ........................................... 32
Section 4.2—Surface Care ................................................ 34
Dusting the Alida CSC ............................................................. 34

Ta b l e o f C o n T e n T s 3
Wilson Audio Specialties
Care of the Grilles ................................................................... 35
Break-in Period ......................................................................... 35
se C T i o n 5—sP e C i f i C aT i o n s ������������������������������������������������� 37
Section 5.1—Specifications ................................................. 38
Section 5.2—Graphical Dimensions ...................................... 39
Section 5.3 —Alida CSC Phase Curve ..................................... 40
Section 5.4—Alida CSC Impedance Curve ............................... 41
se C T i o n 6—Mo u n T i n g C h a r T ������������������������������������������� 43
se C T i o n 7—Wa r r a n T y ��������������������������������������������������������� 47


se C T i o n 1—WasP seTuP
Wilson Audio Specialties

6 al i d a C s C i n s Ta l l aT i o n a n d C a r e g u i d e
Section 1.1—Wilson Audio Setup Procedure
An instructional video outlining the Wilson Audio Setup Procedure (WASP) can be found here:
www.wilsonaudio.com/wasp The proper positioning of your new loudspeakers within your room
is critical in order to extract its formidable performance envelope. When carefully followed, the
WASP has proven to be the most effective method for setting up Wilson Audio Loudspeakers. Your
authorized Wilson Audio Dealer is trained in this process, and is the best resource for you to ensure your
Loudspeakers are setup properly.
Viewing the video is the best way to learn how to properly employ WASP for floorstanding
Loudspeakers. We have included additional instructions in this Manual for the unique nature of Alida
CSC, as a boundary-mounted Loudspeaker. WASP works equally well for front Left and Right channels,
(which are set up first) and for additional speakers such as a Center channel, boundary-mounted
channels, and/or Subwoofers.
You will need the following items:
• Tape Measure
• Known Listening Position
• Masking Tape & Pen
Zone of Neutrality: Alida CSC
The Zone of Neutrality is the Speaker location where your Loudspeakers sound most natural and
interact the least with the room. We realize that the location of your boundary-mounted Speakers is not
very flexible. Nevertheless, careful selection of the mounting location will improve the performance of
the Speakers. If you are able to be flexible as to the location of the Alida CSC on the wall, you will be
able to more fully optimize their sound. To find the best Zone for placement, do as follows:
Authentic Excellence
WASP Video

se C T i o n 1 � 1 —W i l s o n au d i o s e T u P P r o C e d u r e 7
Wilson Audio Specialties
1. Carefully stand on a ladder or a chair against the wall in the general location where
you would like to place the Alida CSC. Position your head at the highest point possible
for mounting the Alida CSC. Speaking in a moderately loud voice, and at a constant
volume, project your voice out into the room. By moving slowly down the rungs of the
ladder you move your voice vertically.
2. As you move down the wall, (you will need to have another listener seated in the lis-
tening position to aid you in the evaluation), listen to how the voice “frees up” from
the added bass energy imparted by the ceiling boundary.
3. When you hear the voice “free up” from this artifact, place a piece of tape on the wall
to mark this location.
4. As you move lower, you will hear where your voice begins to interact with the floor.
Put a piece of tape in this location. You have a good vertical range in which to opti-
mize the best possible placement of your Alida CSCs.
5. Repeat the procedure while moving away from the side walls. Again, listen for your
voice to lose the added bass energy from the wall behind you and continue until there
is an obvious interaction with the opposite wall in front of you. Complete each speaker
location individually.
What you should have at the end of this procedure are two rectangles on the wall (usually nearer
the corners), which is your Zone of Neutrality for each channel. By installing your Alida CSCs in this gen-
eral area, you ensure getting the most performance and musical satisfaction.
Note: The more reflective or “live” sounding the room is, the more difficult it will be to detect the
changes in your voice. Thus, you may have to repeat this process until the Zones have been deter-
mined.

8 al i d a C s C i n s Ta l l aT i o n a n d C a r e g u i d e
Authentic Excellence
When carefully followed, the WASP has proven
to be the most effective method for setting up
Wilson Audio loudspeakers.

se C T i o n 1 � 2 — s P e a k e r P l a C e M e n T /l i s T e n i n g P o s i T i o n 9
Wilson Audio Specialties
Theoretically, the Zone of Neutrality for any room runs like a path, parallel to the walls all around
the room. Adjacent to very large windows and open doors, the outer edge of the Zone of Neutrality
moves closer to the wall and becomes wider. If you were to extend the inner and outer boundaries of the
Zone for the sidewalls and the front wall (behind the Speakers), they would intersect.
Section 1.2—Speaker Placement/Listening Position
Many people place the Speakers on one end and sit at the other end of the room. This approach will
not yield the finest sound. Carefully consider your listening position. Our experience has shown that any
listening position that places your head closer than 14” from a wall (or exactly in the center of a room)
will diminish the sonic results of your listening, due to the deleterious effects of boundary interaction.
Room Shapes
Standing waves are pressure waves propagated by the interaction of sound and opposing parallel
walls. This interaction creates patterns of low and high acoustical pressure Zones that accentuate and
attenuate particular frequencies. Those frequencies are dependent on room size and dimension.
There are three basic shapes for most rooms: Square, Rectangular, and L-Shaped.
A perfectly square room is the most difficult room in which to set up Speakers. By virtue of its
shape, a square room is perfect for building and sustaining standing waves. These rooms heavily influ-
ence the music played by Loudspeakers, greatly diminishing the listening experience.
Long, narrow, rectangular rooms also pose their own special acoustical problems for Speaker setup.
They have the ability to create several standing wave nodes, which will have different standing wave fre-

10 al i d a C s C i n s Ta l l aT i o n a n d C a r e g u i d e
Authentic Excellence
quency exaggerations depending on where you are sitting.
Multi-Channel Audio
Multi-Channel audio systems and Home Theaters can be organized many different ways. Some use
rows of couches. Others use rows of multiple chairs. In addition to watching movies, most users want to
listen to two-channel music at the highest quality possible. Therefore, it is desirable to choose a single
optimum seating position in a Multi-Channel system and build the rest of the seating positions around
this position.
If your preferred “sweet spot” is located on a couch, you should optimize the calibration of your

se C T i o n 1 � 2 — s P e a k e r P l a C e M e n T /l i s T e n i n g P o s i T i o n 11
Wilson Audio Specialties
system to the middle position of the couch. Odd numbers of chairs arranged in rows work best as this
will allow a single chair to be positioned in the center. This approach will also provide the best overall
sound for the greatest number of seats.
Wilson Audio has done everything possible to eliminate the boundary interactions caused by
mounting a Speaker onto the wall. The Mounting Bracket allows for significant improvements in detail,
speed, and clarity. The Alida CSCs will perform well in almost any location in which they are placed. The
Mounting Bracket and the carefully fine-tuned design of the Alida CSC have eliminated most of the son-
ic problems encountered when placing a standard Speaker too close to a boundary. Nevertheless, we
have performed extensive testing on the Alida CSC and found that significant improvement on speaker
linearity and integration can be achieved by careful selection of the Alida CSC mounting location.
We realize that when used as a rear or side channel augmenting a Multi-Channel system, the loca-
tion of the Alida CSC is generally set by the architecture of the room. However, if you have some flexi-
bility in locating your Alida CSCs, we suggest that you use WASP as outlined above to find the Zone of
Neutrality. Be sure to listen for room modes and frequency response peaks or dips.

12 al i d a C s C i n s Ta l l aT i o n a n d C a r e g u i d e
Authentic Excellence
Final Listening Room Setup (Voicing)
For Alida CSC’s size and single-module configuration, it is unmatched in its ability to reproduce
the musical event and surround channel information. However, room acoustics and boundary
interactions affect the sound of a Loudspeaker to such a large degree that poor setup can seriously
degrade your enjoyment of even the finest Loudspeaker. We strongly suggest that you have your
authorized Wilson Audio Dealer perform the final Speaker “voicing” with you. Wilson Audio Dealers are
specially trained in setting up Wilson Audio Loudspeakers and will ensure that you realize the full value
of your purchase.

se C T i o n 1 � 2 — s P e a k e r P l a C e M e n T /l i s T e n i n g P o s i T i o n 1 3
Wilson Audio Specialties

ϭϬͬϲͬϮϬϮϯ
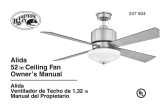
ůŝĚĂ^
ƌĂƚŝŶŐ/ŶƐƚƌƵĐƚŝŽŶƐ
ϭ͘ ZĞŵŽǀĞƐĐƌĞǁƐĂƐƐŚŽǁŶŝŶŝŵĂŐĞ͘
Ϯ͘ ZĞŵŽǀĞĂŶĚƐĞƚĂƐŝĚĞĐƌĂƚĞůŝĚ͕ĨŽĂŵůĂLJĞƌ͘
ϯ͘ ZĞŵŽǀĞŵŽƵŶƚ͕ƚŽŽůŬŝƚĂŶĚŵĂŶƵĂůĂŶĚƐĞƚ
ĂƐŝĚĞ͘hƐĞĐĂƵƚŝŽŶƚŽƉƌĞǀĞŶƚĚĂŵĂŐĞ͘
ϰ͘ ZĞŵŽǀĞůŝĚĂ^ĂŶĚƐĞƚĂƐŝĚĞ͘hƐĞĐĂƵƚŝŽŶƚŽ
ƉƌĞǀĞŶƚĚĂŵĂŐĞ͘
dŽŽůŬŝƚ
DĂŶƵĂů

se C T i o n 2—un C r aT i n g a l i da CsC
Wilson Audio Specialties

1 6 al i d a C s C i n s Ta l l aT i o n a n d C a r e g u i d e
Authentic Excellence
Section 2.1—Uncrating Alida CSC
Note: To avoid damaging the Alida CSC’s painted surface please remove any jewelry (rings, watches,
necklaces, and bracelets) along with covering any belt buckles and zippers during this process.
Initial Check
The Alida CSC and its Mounting Bracket is shipped in two wooden crates (see page 14 for visual
guide). Upon receiving these crates, please check their condition. If either of the crates has been dam-
aged, please report it to the shipping company immediately for insurance verification.
The following items are recommended for this procedure:
• Electric Screwdriver/Drill
• Phillips Head Drive Bit
• Suitable Tool to Cut Crate Band
Unpacking the Alida CSC
1. Cut the band wrapped around the crate. With the crate lid facing up, unscrew the wood
screws securing the lid. Remove the lid.
2. Gently lift the Alida CSC out of the crate and remove all other contents from the crate.
Note: Alida CSC is heavy. Care should be taken to prevent injury and/or damage to the product.
3. Remove the plastic outer bag by tilting the Alida CSC over on one side and opening
the bag at the base of the Alida CSC. Do not remove the protective film until you are
ready to place the Alida CSCs onto the Mounting Bracket.

se C T i o n 2 � 1 — u n C r aT i n g a l i d a C s C 1 7
Wilson Audio Specialties
Note: DO NOT CUT THE BAGS OFF THE ALIDA CSC. By using scissors or a knife, you could uninten-
tionally mark the cabinet or damage a driver element. Keep the bags in case you need to repack-
age the Alida CSCs. Likewise, save your shipping crates and all packing materials. They are specif-
ically designed to prevent harm from coming to your Alida CSCs.
4. Move the Alida CSCs and associated tools into the desired location. Be careful not to
touch the driver elements when you are moving the Alida CSC.
• (2x) Expanding Spike
• 1/2” Combo Wrench (binding post)
• 3/8” Combo Wrench (expanding spike)
• 5/16” Socket (RAWL bolt)
• 7/16” Socket (lag bolt)
• 1/4” Ratchet
• Universal Allen Driver
• 1/8” Allen Bit (resistor panel screw)
• 5/32” Allen Bit (driver screw)
• 3” Masonry Bit (concrete/metal stud mounting)
• 3/16” x 3” Drill Bit (wood stud mounting)
• Owners Manual
• Full-Line Brochure
• Warranty Registration Form
• (1x) Polishing Cloth
• (1x) Mount Template
• (2x) Mounting Bracket
• (2x) Enclosure Grille
• (2x) Alida CSC
• (8x) 1/4” x 2 1/2” Lag Bolt (wood stud mounting)
• (8x) 1/4” x 1 3/4” RAWL Bolt (concrete/metal stud mounting)
• (8x) 5/16” x 3/4” Stainless Steel Flat Washer
You will be using tools and parts in this kit throughout the installation process. Keep the Tool Kit at hand.

/