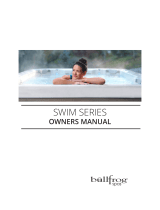
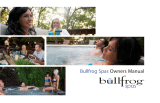
bullfrog spas 2022 Swim Series Owner's manual
- Category
- DJ controllers
- Type
- Owner's manual

SWIM SERIES
OWNERS MANUAL

1
QUICK REFERENCE
To assist you with the installation and maintenance
service of your new spa, please ll out the following
information and keep it on hand for future reference.
My Spa Information
Model:
Serial Number:
Dealership:
Dealer’s Phone Number:
Date Purchased:
Date Installed:
Contractor Information
General
1. Name:
Telephone:
2. Name:
Telephone:
Electrician
1. Name:
Telephone:
2. Name:
Telephone:
Concrete, Decking, and Masonry
1. Name:
Telephone:
2. Name:
Telephone:
Landscaping
1. Name:
Telephone:
2. Name:
Telephone:

2
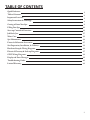
TABLE OF CONTENTS
Quick Reference:
Table of Contents:
Important Overview:
Safety Instructions & Warnings:
Getting to Know Your Spa:
Filling Your Spa:
Start-up, Controls & Functions:
JetPaks & Jets:
Water Care:
Spa Maintenance:
Fitness & Relaxation Accessories:
Site Preparation, Installation, & Delivery:
Hardware Setup & Wiring Diagrams:
Electrical Chaseway & Stub-up Diagrams:
GFCI Wiring Diagrams:
Display and Error Messages:
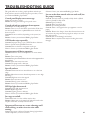
Troubleshooting Guide:
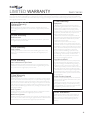
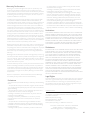
Limited Warranty:
1
2
3
4
8
10
11
17
19
24
27
31
36
37
38
39
40
41

3
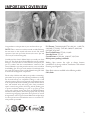
IMPORTANT OVERVIEW
Congratulations on the purchase of your new Swim Series spa.
NOTE: Take a moment to read this manual carefully. Following
the instructions in this manual will ensure the safe and smooth
operation of your new spa. In this document, the terms “Spa” and
“Pool” may be used interchangeably.
Carefully read this Owner’s Manual before you install your Swim
Series spa. Your Swim Series Limited Warranty may be voided if
damage is caused by failure to install, maintain, and operate your
spa in accordance with the recommendations contained in this
Owner’s Manual or any other printed instruction, notice or bulletin
from Bullfrog Spas. Your spa’s serial number is located both on the
base under the equipment door and the Manufacturing ID Label
located inside the equipment compartment.
For the safety of all those who utilize your spa and its surroundings,
please make sure your spa and any adjoining installations, including
the electrical hook-up, are completed according to codes of and
only after acquiring any necessary approvals and permits from your
local, state/provincial, and/or national government. Follow all local,
state, and natonal safety and wiring rules. Some jurisdictions
require certain fencing and/or self-closing and self-latching gates
to prevent accidental drowning in a pool or spa. Your spa cover
comes with a locking system that meets the ASTM F1346-91
Standard for Safety Covers, which when properly used, may satisfy
certain fencing and gating requirements. Your spa meets or exceeds
all requirements of the Virginia Graeme Baker Pool and Spa Safety
Act. Your spa has been tested and either meets or exceeds the UL-
1563 portable spa standard.
U.S. Patents: 7,908,684, 8,661,576, 8,881,321, 8,689,370,
8,869,469, 5,754,989, 5,987,663, 6,000,073, 6,092,246,
6,256,805, 6,543,067.
New Zealand Patent: 555112, 334,093
Australia Patent: 737,335
Canada Patents: 2,588,884, 2,260,237, 2,915,184
Other patents pending worldwide
Bullfrog Spas reserves the right to change features,
specications & design without notication and without
incurring any obligation.
Swim Series units are available in the following models:
S150, S200
B20-10-26

4
SAFETY INSTRUCTIONS & WARNINGS
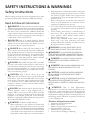
Safety Instructions
When installing and using this electrical equipment, basic safety
precautions should always be followed, including the following:
Read, & follow all instructions:
1. WARNING: To reduce the risk of injury, do not permit
children to use this product unless closely supervised at all times.
2. As per UL requirements (U.S.), a wire connector is provided on
this unit to connect a minimum No. 8 AWG (8.4mm2) solid
copper conductor between this unit and any metal equipment,
metal enclosures of electrical equipment, metal water pipe, or
conduit within 5 feet (1.5m) of the unit.
3. DANGER: Risk of Accidental Drowning. Extreme
caution must be exercised to prevent unauthorized access by
children. To avoid accidents, ensure that children cannot use
this spa unless they are supervised at all times.
4. DANGER: Risk of Injury. e suction ttings in the
spa are sized to match the specic water ow created by the
pump. Should the need arise to replace the suction ttings or
the pump, be sure that the ow rates are compatible. Never
operate the spa if the suction ttings are broken or missing.
Do not replace a suction tting with one rated less than the
ow rate marked on the original suction tting.
5. DANGER: Risk of Hair Entrapment. e spa includes
parts that rotate and/or oscillate. Extreme caution must be
exercised by those with long hair to avoid contact with moving
parts and potential entrapment. It is highly recommended
that hair is controlled and/or kept out of the water in such a
way as to avoid moving spa parts.
6. DANGER: Risk of Electric Shock. As per UL
requirements (U.S.), install spa at least 5 feet (1.5m) from all
metal surfaces. A spa may be installed within 5 feet (1.5m) of
metal surfaces if each metal surface is permanently connected
by a minimum of No. 8 AWG (8.4mm2) solid copper
conductor to the wire connector on the terminal box that is
provided for this purpose.
7. DANGER: Risk of Electric Shock. Do not permit any
electrical appliances, such as a light, telephone, radio, or
television within 5 feet (1.5m) of the spa. ese units DO
NOT have an integral ground fault circuit interrupter. e
installation of an integral ground fault circuit interrupter
MUST be completed by a qualied Electrician and must meet
all local and nationald electrical codes.
8. WARNING: To Reduce the Risk of Injury:
a. Water temperature in a spa should never exceed 104˚F
(40 ˚ C). Water temperatures between 100˚ F (38˚C) and
104˚F (40˚C) are considered safe for a healthy adult. Water
temperature in excess of 104˚ F (40˚ C) may be harmful
to your health. Lower temperatures are recommended for
young children and/or when spa use exceeds 10 minutes.
b. High temperatures could have a potential for causing fetal
damage during pregnancy. Pregnant women or women
that could be pregnant should consult a physician and
possibly limit spa usage when temperatures are in excess
of 100˚ F (38˚ C).
c. Before entering the spa, measure the water temperature
with an accurate thermometer since tolerances of water
temperature regulating devices may vary.
d. Use of alcohol, drugs, or medication before or during spa
use may lead to unconsciousness with the possibility of
drowning.
e. Persons suering from obesity or a medical history of
heart disease, low or high blood pressure, circulatory
system problems, and/or diabetes should consult a
physician before using a spa.
f. Persons using medication should consult a physician
before using a spa. Some medications may induce
drowsiness while other medication may aect heart rate,
blood pressure, and/or circulation.
9. WARNING: PEOPLE WITH INFECTIOUS
DISEASES SHOULD NOT USE A SPA OR POOL.
10. WARNING: TO AVOID INJURY, EXERCISE
CARE WHEN ENTERING OR EXITING THE SPA
OR POOL. NEVER DIVE OR JUMP INTO THE SPA.
11. WARNING: DO NOT USE A SPA OR POOL
IMMEDIATELY FOLLOWING STRENUOUS
EXERCISE.
12. WARNING: PROLONGED IMMERSION IN A
SPA OR POOL MAY BE HARMFUL TO YOUR
HEALTH.
13. CAUTION: MAINTAIN WATER CHEMISTRY
IN ACCORDANCE WITH MANUFACTURER’S
INSTRUCTION.
14. CAUTION: ADEQUATE DRAINAGE MUST BE
PROVIDED IF THE EQUIPMENT IS TO BE
INSTALLED IN A SPAVAULT OR BELOW GROUND
LEVEL.
15. WARNING: Risk of Fatal Hyperthermia.
Hyperthermia occurs when the internal temperature of the
body reaches a level several degrees above the normal body
temperature of 98.6˚ F (37˚ C). e symptoms of Hyperthermia
include dizziness, lethargy, drowsiness, and fainting. e use of
alcohol, drugs, and/or medication can greatly increase the risk
of fatal Hyperthermia .
e eects of Hyperthermia include:
a. Unawareness of impending hazard
b. Failure to perceive heat
c. Failure to recognize the need to exit the spa
d. Physical inability to exit the spa
e. Fetal damage in pregnant women
f. Unconsciousness and danger of drowning

5
16. WARNING: Risk of Children Drowning. Your spa
cover is not rated as a safety cover. It is suggested to always
keep the spa cover securely fastened when not in use. is will
discourage children from attempting to enter the spa
unsupervised. If cover is damaged it should be replaced.
17. WARNING: Risk of Drowning. Use caution when
bathing alone. Overexposure may cause nausea, dizziness, and
fainting.
18. CAUTION: Risk of Injury. Young children should
always be supervised so that they do not play in or around the
spa.
19. WARNING: Keep all glassware and other breakable
objects away from the spa area.
20. WARNING: Risk of Injury: Short-term inhalation of
high concentrations of ozone and long-term inhalation of low
concentrations of ozone can cause serious physiological eects.
21. CAUTION: Unauthorized Access. Secure the spa area
against unauthorized access. Make sure all spa barriers (fences,
enclosures, etc.) meet all applicable national and local codes.
Keep spa cover on and locked when it is not being used.
22. CAUTION: Risk of Damage to Spa or Equipment. By
performing maintenance as described in this manual, the
chance of damage to your spa and its equipment will be
reduced. Never block the air vents that lead to the spa’s
equipment compartment, doing so may cause the spa to
overheat.
23. WARNING: Risk of Electric Shock or Death. Do not
operate spa during severe weather conditions (e.g. electrical
storms, tornadoes, etc.).
24. CAUTION: Non-Approved Accessories. Using
accessories not approved by Bullfrog International, LC could
void your warranty or cause other problems. Please consult
your authorized Bullfrog Spas dealer.
25. CAUTION: Spa Location. Locate your spa on a
foundation that can support the maximum lled weight of
your spa along with the weight of all the occupants using the
spa (see Site Selection and Preparation). Also, locate your spa
in an environment that can withstand repeated exposure to
water and the possibility of a major spill.
26. CAUTION: Power cords must be replaced only with
a special cord assembly available from the Manufacturer, its
Service Agent, or similarly qualied persons in order to avoid
a hazard.
27. WARNING: is appliance is not intended for use by
young children or unhealthy persons without supervision.
28. WARNING: Before obtaining access to supply
terminals, all supply circuits must be disconnected.
29. WARNING: Risk of Injury or Accidental Drowning:
Do not use spa without lters, lter plate, and lter SnapCaps™
installed; these parts serve as a barrier against bodily
entrapment against the lter suction tting(s).
30. CAUTION: Test the GFCI or RCD ( Residual
Current Device) before each use of the spa.
31. WARNING: Spas equipped with JetPaks are intended
to operate with all JetPaks. Do not operate spa without all
JetPaks, pillows, and snapcaps securely in place.
32. WARNING: Risk to Infants, Elderly, and Women
Planning or Experiencing Pregnancy. Please consult your
physician if the above applies to you or anyone using the spa
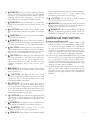
Additional Instructions
(Canadian Installations Only):
33. A green-colored terminal or a terminal marked G, GR,
Ground, Grounding or the international grounding symbol
is located inside the supply terminal box or compartment.
To reduce the risk of electric shock, this terminal must be
connected to the grounding means provided in the electric
supply service panel with a continuous copper wire equivalent
in size to the circuit conductors supplying this equipment.
34. At least two lugs marked “BONDING LUGS” are provided
on the external surface or on the inside of the supply terminal
box or compartment. To reduce the risk of electric shock,
connect the local common bonding grid in the area of the spa
or hot tub to these terminals with an insulated or bare copper
conductor not smaller than No. 6 AWG.
35. All eld-installed metal components such as rails, ladders,
drains, or other similar hardware located within 10 feet
(3m) of the spa or hot tub must be bonded to the equipment
grounding bus with copper conductors not smaller than No.
6 AWG.

6
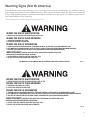
Warning Signs (North America)
Included with the spa are required warning signs to inform spa users of the risks involved with a spa, including a warning
against diving and reminder to watch children at all times.* ese signs are suitable for indoor and outdoor use in a proteted
location. ey should be placed in a noticeable and visible location adjacent to the spa. For free additional copies, contact
your Authorized Swim Series Dealership.
* Final warning sticker is included with spa for installation by owner.
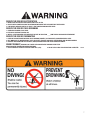
THIS MARKING IS TO BE REMOVED ONLY BY THE OWNER AFTER SAFETY SIGN IS INSTALLED 69.1-S
REDUCE THE RISK OF ELECTROCUTION
1. NEVER PLACE AN ELECTRIC APPLIANCE WITHIN 5 FEET OF SPA
REDUCE THE RISK OF CHILD DROWNING
1. SUPERVISE CHILDREN AT ALL TIMES.
2. ATTACH SPA COVER AFTER EACH USE.
REDUCE THE RISK OF OVERHEATING
1. CHECK WITH A DOCTOR BEFORE EACH USE IF PREGNANT, DIABETIC, IN POOR HEALTH, OR UNDER MEDICAL CARE.
2. EXIT IMMEDIATLY IF UNCOMFORTABLE, DIZZY, OR SLEEPY. SPA HEAT CAN CAUSE HYPERTHERMIA AND UNCONSCIOUSNESS
3. SPA HEAT IN CONJUNCTION WITH ALCOHOL, DRUGS, OR MEDICATION CAN CAUSE UNCONSCIOUSNESS.
WHEN PREGNANT, SOAKING IN HOT WATER FOR LONG PERIODS CAN HARM YOUR FETUS.
MEASURE WATER TEMPERATURE BEFORE ENTERING.
1. DO NOT ENTER SPA IF WATER IS HOTTER THAN 100˚F (38˚C)
2. DO NOT STAY IN SPA FOR LONGER THAN 10 MINUTES.
70.1-0
REDUCE THE RISK OF ELECTROCUTION
1. NEVER PLACE AN ELECTRIC APPLIANCE WITHIN 5 FEET OF SPA
REDUCE THE RISK OF CHILD DROWNING
1. SUPERVISE CHILDREN AT ALL TIMES.
2. ATTACH SPA COVER AFTER EACH USE.
REDUCE THE RISK OF OVERHEATING
1. CHECK WITH A DOCTOR BEFORE EACH USE IF PREGNANT, DIABETIC, IN POOR HEALTH, OR UNDER MEDICAL CARE.
2. EXIT IMMEDIATLY IF UNCOMFORTABLE, DIZZY, OR SLEEPY. SPA HEAT CAN CAUSE HYPERTHERMIA AND UNCONSCIOUSNESS
3. SPA HEAT IN CONJUNCTION WITH ALCOHOL, DRUGS, OR MEDICATION CAN CAUSE UNCONSCIOUSNESS.
WHEN PREGNANT, SOAKING IN HOT WATER FOR LONG PERIODS CAN HARM YOUR FETUS.
MEASURE WATER TEMPERATURE BEFORE ENTERING.
1. DO NOT ENTER SPA IF WATER IS HOTTER THAN 100˚F (38˚C)
2. DO NOT STAY IN SPA FOR LONGER THAN 10 MINUTES.

7
REDUCE THE RISK OF ELECTROCUTION
1. NEVER PLACE AN ELECTRIC APPLIANCE WITHIN 5 FEET OF SPA
2. DO NOT INSTALL UNDER SPA SKIRT OR WITHIN AN ENCLOSURE THAT WOULD RESTRICT VENTILATION.
3. IF BLOWER IS INCLUDED, INSTALL AT LEAST 1 FOOT ABOVE MAXIMUM WATER LEVEL.
REDUCE THE RISK OF CHILD DROWNING
1. SUPERVISE CHILDREN AT ALL TIMES.
2. ATTACH SPA COVER AFTER EACH USE.
3. INSTALL A SUCTION GUARD WITH MARKED FLOW RATE NO LESS THAN ____GPM TO AVOID HAIR & BODY ENTRAPMENT.
REDUCE THE RISK OF OVERHEATING
1. CHECK WITH A DOCTOR BEFORE EACH USE IF PREGNANT, DIABETIC, IN POOR HEALTH, OR UNDER MEDICAL CARE.
2. EXIT IMMEDIATLY IF UNCOMFORTABLE, DIZZY, OR SLEEPY. SPA HEAT CAN CAUSE HYPERTHERMIA AND UNCONSCIOUSNESS
3. SPA HEAT IN CONJUNCTION WITH ALCOHOL, DRUGS, OR MEDICATION CAN CAUSE UNCONSCIOUSNESS.
WHEN PREGNANT, SOAKING IN HOT WATER FOR LONG PERIODS CAN HARM YOUR FETUS.
MEASURE WATER TEMPERATURE BEFORE ENTERING.
1. DO NOT ENTER SPA IF WATER IS HOTTER THAN 100˚F (38˚C) 2. DO NOT STAY IN SPA FOR LONGER THAN 10 MINUTES.
70.2-E

8
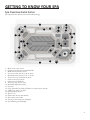
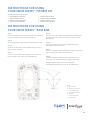
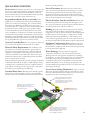
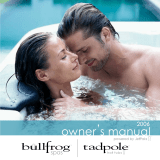
GETTING TO KNOW YOUR SPA
Spa Overview Swim Series
[S150 pictured with optional premium SwimDek package]
1. Main touch-screen control
2. Simplicity spa lter (located behind JetPak)
3. Multi-function auxiliary control
4. Accessory anchors (4a, 4b, 4c, 4d, 4e, & 4f )
5. Brandmark water features (5a, 5b, 5c, & 5d)
6. Vertical accessory mounts (6a, 6b, & 6c)
7. Swim current jets (7a & 7b)
8. Swim & exercise hand rail
9. Easy-entry steps (9a, 9b, & 9c)
10. Main LED lights (10a & 10b)
11. Ozone jet
12. Snap cap/headrest assembly & JetPak access (12a, 12b, 12c, & 12d)
13. JetPaks (13a, 13b, 13c, & 13d)
14. Splash pad kids play area
15. Exercise seat
16. Filter intakes & weirs (16a & 16b)
17. Floor drains (17a & 17b)
18. Foot, leg, & arm therapy jets (multiple)
19. Spa wall therapy jets (multiple)
1
2
3
4a
4d
4e
4c
4b
4f
5a
5b
5c
5d
6a
6b
6c
7a 7b
8
11
12b
12a
12c
12d
13a 13b
13c
13d
14
15
16a
16b
9a
9b
9c
18
19
17a
17b
10a 10b

9
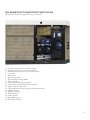
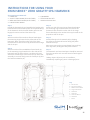
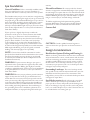
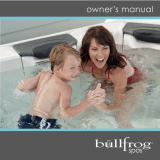
1. Jet pump 1 (not pictured, access from end panel)
2. Jet pump 2 (not pictured, access from end panel)
3. Filtration pump (not pictured, access from end panel)
4. Control box
5. Water heater
6. EOS ozone generator
7. EOS ozone/water mixing module
8. EOS carbon lter
9. Safety certicate label and serial number
10. Serial number sticker (visible with door installed)
11. Support studs (11a, 11b, & 11c)
12. Cabinet attachment notches in support stud (12a, 12b, & 12c)
13. ABS spa base pan
14. Lighting control box
15. Audio control box
16. Acrylic spa shell
17. Main plumbing lines
18. Drain cap & assembly
Spa Equipment Compartment Swim Series
[S150 pictured, shown with equipment access panel removed]
4
5
86
7
13
11a 11b 11c
12a 12b 12c
14
15
16
17
Serial #:
123456 10
3
2
1
18
9

10
WARNING: An empty spa (spa without water in it) must
not be left exposed to sunlight as shell damage may occur. Once
the spa is unwrapped, ll spa with water immediately or shade the
spa with cover to prevent direct exposure to sunlight.
IMPORTANT: Do not turn power on to the spa without
water in the spa. Serious damage to the pumps and/or heater may
occur.
WARNING: Make sure power is o to your spa prior to
following spa lling procedure. Failure to do so may result in
serious injury.
NOTE: To avoid a possible airlock condition be sure to open
all valves in the JetPaks and all other jets in the spa before lling.
is will allow as much air as possible to escape from the system
during the lling process.
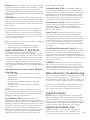
Spa Filling
IMPORTANT: Never ll the spa with soft water unless an
appropriate mineral supplement is immediately added (see your
authorized Bullfrog Spas Dealer). If your water is extremely hard,
it is preferable to either dilute the water’s hardness by blending
the water with water from a water softener, using a mineral lter,
or by the addition of a special water softening chemical (see your
authorized Bullfrog Spas Dealer).
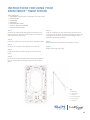
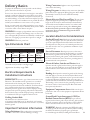
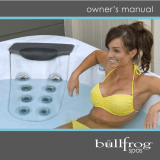
Step 1: Select any seat with a JetPak. Lift the headrest and cap
assembly to exposed the opening behind the JetPak.
Step 2: Place garden hose in the opening behind the JetPak.
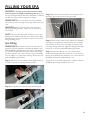
Step 3: Fill to the water level indicator or the mid point of the
lter intake grate and proceed to start up procedure.
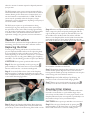
Step 4: Check for leaks: After the spa is lled, check all ttings
and equipment in equipment compartment for signs of leakage
before turning on the spa. Turn on pump(s), once again, check
for leakage. If a leak is detected, tighten the tting by hand. If the
leak persists contact your authorized Bullfrog Spas Dealer.
Step 5: Install Cover: e spa cover comes with tie down
straps and locking hardware that attaches the cover to the spa or
decking. If your dealer did not install the cover, refer to the Cover
Installation Instructions included with the cover.
Cover locks are an essential component for compliance with the
ASTM F1346-91 safety standard for spa covers.
FILLING YOUR SPA
Water Level Indicator

11
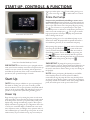
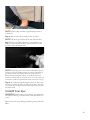
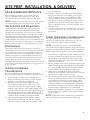
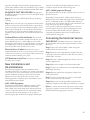
Swim Series Touch Control
Swim Series Standard Auxiliary Control
IMPORTANT: Your Swim Series spa is equipped with one
main control and one auxiliary control that correspond to the spa
model. Locate your controls by matching with the photo here
and follow the specic instructions in the section dedicated to the
operation of your spa model and type of controls.
Start Up
NOTE: Ensure the spa is lled to its correct operating level.
For details see “Filling your spa” section. To avoid a possible
airlock condition be sure to open all valves in the JetPaks and all
other jets in the spa before lling. is will allow as much air as
possible to escape from the system during the lling process.
Power Up
Begin the start up process by turning the power on at the main
power panel. is is most often done by moving a breaker switch
to the On position. Once the spa is powered, the control panel
display will go through an initializing sequence. is sequence
displays information regarding the spa conguration. After a few
seconds, your control will display a standard status screen with
time, temperature status, jet and light status, operation mode, etc.
Once initialized, the spa control will go to sleep after 30 seconds
without activity. To proceed with start up, tap screen with your
nger tip to wake up the control. Touch and drag the logo icon
to the reverse logo icon to unlock and access controls.
Prime the Pumps
Pumps must be primed directly after lling to ensure correct
operation of your spa. After initial start up, verify that the home
status screen appears on the panel. Ensure that your Swim Series
spa is in Spa mode. Prime each of the pumps. Begin by pressing
the “Jets 1” button once to prime Pump 1 in low-speed.
After Pump 1 turns on and water is visibly owing from the jets
wait a few seconds and then press “Jets 1” again to initiate
high-speed operation of Pump 1. e pump has primed when
water is owing from the jets.
Repeat the priming process for each additional pump on your
Swim Series model. All pumps will have primed when water is
observed owing from the jets associated with each pump.
After priming all jet pumps in Spa mode, switch to Swim mode
by locating the Spa Mode icon in the center of the main
control, touch the Swim Mode icon . Wait 20 seconds for
Swim Mode to initiate. Turn on the swim jets by pressing the
Start icon . Increase current intensity with the right arrow
icon . Ensure water is owing from both the top and bottom
swim jets and turn o by pressing the Stop icon .
IMPORTANT: If pumps fail to prime you may have a
condition know as "air lock." Pumps should not be allowed to run
in this condition (without priming and no water owing out of
the jets) for more than 2 minutes. Doing so may cause damage to
the pump(s).
NOTE: Closing and opening all adjustable jets and JetPak
valves may help release air from the system. In addition,
momentarily turning the pump o and on may also help release
air from the system, allowing pumps to prime. Do not attempt to
turn pumps o and on more than 5 times. If the pump(s) will not
prime, shut o the power to the spa and call for service.
START-UP, CONTROLS, & FUNCTIONS

12
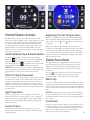
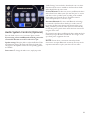
Home/Status Screen
e Home/Status screen on your Swim Series main control
shows basic statuses including: time, jet status, light status, screen
orientation, current water temperature, heating/cooling status,
spa operation mode, audio status (optional), day/night status,
and settings. Most basic functions of operating your spa can be
performed with one touch from the Home/Status screen. In
addition, any necessary error or maintenance messages will appear
at the bottom of the screen.
Switch Between Spa & Swim Modes
To switch from Spa Mode to Swim mode touch the Swim
Mode icon . e electronic valve will actuate.* Swim Mode
functions will become operational. To switch to Spa Mode
touch the Spa Mode icon . icon and the electronic valve will
actuate* and Spa Mode functions will become opaerable.
*NOTE: During valve actuation a notication will appear and
neither Spa Mode nor Swim Mode functions will be operable for
approximately 20 seconds as you switch between modes.
Start or Stop Accessories
To start or stop an accessory (jets, lights, etc.), press the associated
icon button. Icons will become animated when their accessory is
turned on, and inanimate when turned o. Icons on the screen
will reect the speed or state of the devices running on your spa.
When an accessory has more than two states, such as the swim
current jets, press the button once, and then again, until it reaches
the desired state.
Light Operation
Press the (lights) icon to access the lights menu. Use the
(interior) icon to turn on interior lights. Use the (exterior
leights) icon to turn on exterior lights. Use the associated menu
options to control interior light modes (ashing, fading, solid
color) and/or colors.
Invert Screen
From the home status screen you may press the (invert
screen) icon to rotate the screen 180 degrees for easier viewing
from inside the spa.
Adjusting the Set Temperature
Within 1 to 2 minutes after spa start up and initialization, the
water temperature will be displayed in the center of the home
status screen. Press the and buttons to set the desired
temperature.
When the set value is lower than the current temperature
“Cooling to xx.x” will appear at the bottom of the screen. When
the set value is higher than the current temperature, “Heating
to xx.x” will be indicated. Normally there may be a short delay
before the heating starts, during which “Heating suspended” is
indicated under the value.
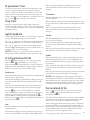
Swim Functions
Your Swim Series spa is equipped with several features and
functions allowing you to pursue your tness goals. Use the
following section to understand swim drills, tness modes,
and how to customize and tailor your experience to t your
preferences.
Press the (swim setting) icon to access the swim settings
menu. Here you can adjust swim drill settings, select pre-
programmed drills, or personalize your own swim drills.
Warm Up
Use the up or down arrows on the left of the Warm Up screen to
congure the duration of your warm up period between 0 and 5
minutes. Use the up or down arrows at the right of the Warm Up
screen to adjust the intensity of your warm up between speeds 1
and 5.
NOTE: Pressing the blue arrows at the bottom of the Warm
Up screen will allow you to cycle and select between Warm Up,
Cool Down, Preparation Time, Step Time, and Light Feedback,
in this order.
Cool Down
Use the up or down arrows on the left of the Cool Down screen
to adjust the duration of your cool down period between 0 and
5 minutes. Use the up or down arrows at the right of the Cool
Down screen to adjust the intensity of your cool down.
Selections range from speeds 1 through 5.
Spa Mode Display Swim Mode Display

13
Preparation Time
Use the up or down arrows on the left of the Preparation Time
screen to congure the duration of your preparation period
between 0 and 60 seconds. is is the amount of time you will
need to move from the controls to the swim lane to begin your
workout. Preparation Time will diplay as a countdown timer once
you press the (go) iconto begin your swim drill
Step Time
Step Time is the time between speed changes within your
selected swim drill. Use the up or down arrows on the Step Time
screen to congure the duration of each step in your drill between
90 and 180 seconds.
Light Feedback
Use the Light Feedback function to use specic lights to give you
warnings and feedback during your swim workouts.
Press the (light 1) icon to enable interior light feedback. All
interior lights will ash to alert the swimmer of speed changes.
Press the (light 3) icon to enable exterior light feedback.
All exterior lights will ash to alert spectators outside of the spa
(coaches, parents, etc.) of speed changes.
NOTE: Pressing the (light 2) icon will not make any
changes. is function is currently inactive in Swim Series spas.
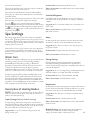
Pre-Programmed Drills
Press the (swim setting) icon to access the swim settings
menu. Press the (swim drills) icon to view the pre-
programmed drill menu. You will be able to select from ve pre-
programmed swim drills: Endurance, Lap, Transition, Cardio, or
Power. Press the name of your desired drill to begin.
Endurance
is swim drill will operate at the selected Intensity and Duration
without “Step” or speed changes.
Select the desired length of your Endurance drill by pressing the
up or down arrows under Duration. Scroll between 10 and 60
minutes.
Select the desired intensity by pressing the up or down arrows
under Intensity. Swim current speeds range from 1 through 5.
Press the (go) icon to start the Preparation countdown.
Your countdown time setting may be adjusted according to your
preference in the Preparation Time menu. Pressing the
(pause/standby) icon will temporarily suspend timer operation,
while pressing the (stop) icon will stop the drill and revert to
the previous setup screen.
Lap
is swim drill will perform both high and low-intensity intervals
of equal step time.
Select the desired length of your Lap drill by pressing the up or
down arrows under Duration. Scroll between 10 and 60 minutes.
Next, select the desired intensity by pressing the up or down
arrows under Intensity. Swim current speeds range from 1
through 5.
Transition
is swim drill will perform a series of equal length steps at
random intensities.
Select the desired total length of your transition drill by pressing
the up or down arrows under Duration. Scroll between 10 and 60
minutes.
Next, select the desired intensity by pressing the up or down
arrows under Intensity. Swim current speeds range from 1
through 5.
Cardio
is swim drill will perform two successive steps at high intensity
for one step at low intensity.
Select the desired length of your Cardio drill by pressing the
up or down arrows under Duration. Scroll between 10 and 60
minutes.
Next, select the intensity by pressing the up or down arrows under
Intensity. Swim current speeds range from 1 through 5.
Power
is swim drill will perform a pyramid-shaped program, where
intensity will progressively increase until a maximum intensity
level is reached. It will then decrease progressively, ending with a
low intensity.
Select the desired total length of your Power drill by pressing the
up or down arrows under Duration. Scroll between 10 and 60
minutes.
Next, select the intensity by pressing the up or down arrows under
Intensity. Swim current speeds range from 1 through 5.
NOTE: Swim drill Duration and Intensity operate between
previously selected “Warm Up” and “Cooldown” cycles. Warm Up
and Cooldown cycles are represented by gray bars on the outside
of the white swim drill graph. Warm Up time is also shown as a
countdown timer, located on the lower left of the progress bar.
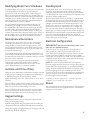
Personalized Drills
Press the (swim setting) icon to access the swim settings
menu. Press the (personalized drills) icon to view the
personalized drill menu.
Your Swim Series spa allows you to create your own personalized
swim drills to acommodate your training needs. e on-board
controls can save up to three personalized training drills.
Start by selecting the drill location that you wish to congure by
pressing the double arrow to the right of Personalized 1, 2, or 3.
Enter the name of your personalized drill, using the keyboard on
the personalized input screen. Once complete press the return
button to proceed to the conguration screen.
Use your nger to drag each line up or down, to increase or

14
decrease the intensity levels.
e top of the graph represents swim current speed 5, while the
bottom represents swim current speed 1.
Select the desired total duration of your Personalized drill by
pressing the up or down arrows under Duration. Scroll between
10 and 60 minutes.
Next, select the intensity by pressing the up or down arrows under
Intensity. Swim current speeds range from 1 through 5.
Press the (go) icon to start the Preparation”countdown
previously congured and begin your selected swim drill. Pressing
the (pause/standby) iconwill temporarily suspend operation,
while pressing the (stop) icon will stop the drill and revert to
the previous setup screen.
Spa Settings
e settings on the Swim Series main control are navigated by
the use of the (Settings) button. One press gives you access to
several menus where you can manage the specic settings of your
spa. After pressing the Settings button you may access a submenu
by pressing the associated icon.
Note that if an accessory is not present in your spa conguration,
its menu will not appear. Refer to the following section to get
details about the possible settings, accessories, and their detailed
functionalities.
Water Care
e Water Care submenu will help you set up your ideal ltration
and heating settings. Choose from Super Energy (default),
Standard/Beginner, Away, Energy Saving, or Weekender,
depending on your preference. Touch the mode name to select
a setting. A conrmation message will appear to prevent
inadvertent modication of water care settings. Touch the check-
mark icon to conrm your choice or touch the x icon to decline.
In Super Energy, Away, Energy Saving, and Weekender modes,
the water temperature set point will be reduced by 20°F* (11°C),
which means that the heating system will not be engaged until
the temperature falls to a point at least 20°F (11°C) below the set
temperature. Use Standard/Beginner mode to maintain a contstant
water temperature at all times and days of the week.
Description of Heating Modes
NOTE: Your spa will come from the factory in "Super Energy"
mode. See operation mode options below and select the best
mode for your anticipated usage.
Super Energy (factory default setting)
In Super Energy mode the spa temperature set point will be
reduced by 20°F (11°C) during peak daytime hours. Spa will heat
to normal set point during evening hours, every day of the week.
is is the default factory setting for new spas.
Suggested use: Use to save maximum energy and heat only
during set lter cycles.
Economy time: Only heats during ltration cycles.
Filter cycle start time: 8:00 AM, duration 3 hours and 8:00 PM,
duration 3 hours.
Standard/Beginner
In Standard mode the spa will heat to the set point at all times
and all days of the week. Spa will lter according to set ltration
schedule.
Suggested use: Use to maintain readiness for use everyday at all
times of day.
Filter cycle start times: 8:00 AM, duration 3 hours and 8:00
PM, duration 3 hours.
Away
In Away mode the spa temperature set point will be reduced by
20°F (11°C) at all times of the day and all days of the week.
Suggested use: Use when on vacation or not using the spa for
longer than 2 weeks.
Economy time: Everyday of the week, 24 hours per day.
Filter cycle start time: 8:00 PM, duration 3 hours.
Energy Saving
In Energy Saving mode the spa temperature set point will be
reduced by 20°F during peak daytime hours. Spa will heat to
normal set point during evening hours on weekdays and at all times
of day on the weekend.
Suggested use: Use to save energy during weekday daytime hours
and make ready for use at night and all day on weekends.
Economy time: Monday - Friday, 6:00 AM - 6:00 PM.
Filter cycle start time: 7:00 PM, duration 3 hours.
Weekender
In Weekender mode the spa temperature set point will be reduced
by 20°F (11°C) from Monday to Friday. Spa will heat to set point
at all times of the day over the weekend (Saturday & Sunday).
Suggested use: Use when spa is used only on weekends and not
on weekdays.
Economy time: Monday - Friday, 24 hours per day.
Filter cycle start time: 8:00 AM, duration 3 hours and 8:00 PM,
duration 3 hours.
Default Settings: e Default Settings option will restore
all Water Care modes and schedules to the spa’s default
settings. You will be asked to conrm your choice.

15
Modifying Water Care Schedules
To modify a Water Care category, touch the pen icon at the right
of the desired Water Care option to open the submenu.
Touch the Economy tab to change the economy setting and
Filter cycle tab for the ltration settings (or schedules). You can
add economy or ltration schedules by touching the title labeled
“Add lter cycle” or “Add economy cycle”. To delete a schedule,
touch the garbage can icon at the right of the desired function
title. Conrm your action when prompted.
You can modify the programmed schedules by selecting one
and adjusting the schedule. You have several possibilities for
the schedule (Mon-Fri, weekend, every day, or single days). e
schedules will be repeated each week. e time and duration
are set in 30-minute increments. When changes are done, press
“conrm”. If you don’t want to keep any changes, press “cancel” or
use the calendar icon to go back. Ensure that you have selected
the desired Water Care mode in the main Water Care menu.
Maintenance Reminders
e Swim Series main control can be set up to remind you of
several types of maintenance required on your spa, including
rinsing the lter, cleaning the lter, changing spa water, and
2-year professional maintenance checks. Each task has its own
standard duration, based on normal use, or you may adjust to t
your specic expected usage.
Access the Reminders submenu by pressing the Reminders icon
in the Settings menu.Maintenance reminders allow you to verify
the time left before maintenance is required, as well as to reset the
time once a task is completed.
To reset a task, select it by pressing the title of the specic
reminder, then conrm when prompted. Once you have
conrmed, the task timer will be reset. You can also use the
option “Reset Reminders” to reset all the reminders.
Set Date and Time of Day
Setting the correct date and time is important for settings to function
as expected. Upon restarting your spa adjust the time format (24 hr.
or AM/PM), change the year, date, and time as needed.
Within the Settings menu select “Date & Time” to access these
submenus.
Select “Set Date” to adjust the year, month and day. Swipe up and
down the column you want to change and select the desired value.
When you are done, touch the Settings icon to save.
Select “Set Time” to change the hour, minute and time format.
Swipe up and down the column you want to change and select
the desired value. When done, touch the Settings icon to save.
Keypad Settings
In the Keypad submenu you can change the temperature unit
settings or the language setting.
From the Cong button, change temperature units by touching the
“Temperature Units” title and then the desired unit of measurement.
Change the language setting by touching the “Language” title and
then selecting the desired language.
Standby/Lock
Standby mode allows you to service your spa. Pumps can be
stopped for 30 minutes in this mode, and will automatically
restart after. Select Standby mode by pressing the pause/standby
icon. e home/status screen and normal spa function will resume
after the 30 minute standby period.
e Lock option allows the user to partially or completely lock
the keypad. Selecting the “Lock” option will lock all functions on
the control while the “Partial Lock” option will allow jets, audio,
and lights to remain funtional. To lock the keypad select “Lock
Settings” then select “Lock” or “Partial Lock” according to the
functions you wish to lock. When asked, select a 4-digit code.
e same code will be needed to unlock the keypad. To lock the
keypad again, you will be prompted to select another 4-digit code.
e keypad can be unlocked with a universal unlock code (3732)
or by a reset of the keypad. When Full Lock is selected, all
functions are locked. In Partial Lock, you may activate accessories,
but spa settings may not be changed.
Electrical Conguration
IMPORTANT: Please do not make changes in this section
unless you are a qualied electrician.
In this section you can change the low-level conguration, as
well as modify the number of phases and the input current
value.* Please refer to the diagram on the spa control center box,
located inside of the equipment compartment, for the default
conguration of your specic spa model. Once the modication is
completed, conrm selection when asked and touch the Settings
icon to return to the Settings menu.
NOTE: On initial connection the installer is prompted for
electrical congurations. e Low-Level setting is selected by the
installer. e Phase and Amperage is set automatically. Default
settings should be conrmed by the installer to match the actual
phase and amperage at the spa’s installation location. In rare
occassions it may be necessary to adjust the Phase and Amperage
setting to match the actual service availableat the installation
location using the instructions above.
* Depending on the pack conguration, a code may be required to
modify the low-level number. is code is 5555.
About
is section displays technical information about the Swim Series
control software version and applicable revisions of the dierent
components of your system.

16
Audio System Controls (Optional)
Press the Audio icon to access “in.stream 2” player controls.
If you are using a device with Bluetooth technology, it must be
connected for functions to work. Use code 5555 to pair.
Speakers settings: Move the sliders to adjust the Balance, Fader
and Subwoofer settings. e Fader and Subwoofer sliders will
only appear in the Speakers menu if the corresponding speakers
are available.
Source menu: To change the audio source, simply tap on the
“Audio Settings” menu and select desired audio source or device.
Note that only the sources available on the Swim Series Audio
will be displayed in the source menu.
Connect Bluetooth: e rst time you use your Bluetooth device
with a Swim Series Audio system you must rst “pair” or connect
your device to the spa audio system according to the standard
functionality of your specic device.* Each device must be
connected separately. Use code 5555 to pair.
Disconnect Bluetooth: If a device with Bluetooth technology
is connected to the Swim Series Audio, you can disconnect it
by pressing the Disconnect button at the bottom of the screen.
Doing so will also prevent the audio system from automatically
reconnecting to this specic device until it has been reconnected
using the device itself.
For proper function, place your Bluetooth device within 20 feet (6
meters) of your spa. e device should have “line of sight” to the
spa control panel / equipment door area.
NOTE: Certain house construction materials and other
obstructions can impair Bluetooth connectivity. You may need to
experiment with where to place your device for best results.

17
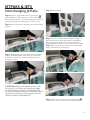
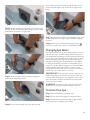
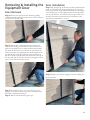
Interchanging JetPaks
Step 1: Place the spa in Standby mode by pressing the
(pause/standby) icon. e home/status screen and normal spa
function will resume after a 30 minute standby period. is will
prevent the pump(s) from activating (see Control Systems).
Step 2: Remove the head rest and Snap-Cap entirely by lifting
upwards.
Step 3: While applying pressure downward on the manifold
push the manifold toward the inside of the spa to release the
manifold from the wall clip assembly, then lift the jet plate
straight up to remove.
CAUTION! WHILE PERFORMING STEPS 3 AND
4 YOU MUST USE THE BLACK MANIFOLD AREA
AS THE POINT OF CONTACT AS SHOWN IN THE
PICTURE. PRESSURE APPLIED TO THE FRONT FACE
(ACRYLIC PLATE) MAY CAUSE DAMAGE TO THE
JETPAK VOIDING THE WARRANTY
Step 4: Exchange JetPak.
Step 5: Lower the manifold of the new JetPak carefully as to
align the lower valve assembly and gasket into the bulkhead
tting. Apply pressure downward as you move the JetPak
manifold until the manifold is secured in the wall clip assembly.
Step 6: Replace the Snap-Cap and head rest over the JetPak
and press down rmly to snap into place.
Step 7: Return spa to normal operation by pressing the
(cancel) icon on the main control to cancel Standby mode.
JETPAKS & JETS

18
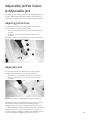
Adjustable JetPak Valves
& Adjustable Jets
e jetting options oered as part of the JetPak erapy System,
as well as additional therapy jets throughout your Swim Series
model may be adjusted to provide an optimal therapy experience.
Adjusting JetPak Flow
To adjust the water ow to the entire JetPak turn the valve
located in the lower portion of each JetPak.
• To increase jet water pressure, turn the valve handle counter
clockwise.
• To decrease jet water pressure, turn the valve handle
clockwise.
e JetPak control valve is adjustable with a range of about 120
degrees between the on and o positions.
Adjustable Jets
To adjust the water ow to adjustable jets in other locations
throughout your Swim Series spa turn the inner jet face.
• To increase jet water pressure, turn the jet face clockwise.
• To decrease jet water pressure, turn the jet face counter
clockwise.
NOTE: Not all jets are adjustable. Certain jets throughout
your Swim Series spa may be xed in the on position by design
and will not be able to be adjusted. Attempting to turn or
manipulate these jets may cause damage to the jet itself or the
spa. All adjustable jets will turn easily with very little eort. Never
attempt to turn a jet or jet face with undo force or any type of
tool. If you beliecve a jet that is intended to be adjustable is stuck
contact your Authorized Bullfrog Spas dealer for service.

19
Chemical Water Sanitizers
Properly maintaining your spa water is very important to ensure
enjoyment in using your spa and to maximize spa shell and
equipment life. Properly maintaining your spa water chemistry
will require regular attention to prevent poor water quality,
potential unhealthy conditions, and possible damage to your spa.
For all water care related questions please refer all water care-
related questions and concerns to your local Authorized Swim
Series Dealer. Your dealer can recommend the correct products
and procedures for safely sanitizing and maintaining your spa
according to local water chemistry, regulations, and your specic
circumstances.
Spa Water Care
Consult your local Authorized Swim Series dealership for specic
options for maintaining water quality. Your Authorized Swim
Series dealer can recommend the correct products and procedures
for safely sanitizing and maintaining your spa according to local
source water chemistry dierences, regulations, and your specic
circumstances.
CAUTION:
• Always follow chemical manufacturers’ instructions and
never mix chemical sanitizers.
• Use an accurate test kit to perform all chemical tests.
• Add chemicals directly to the spa water, evenly spreading
the chemicals over the surface of the water with the jets
operating, or use an appropriate feeding or metering device.
• Check chemical levels often.
• Run the pumps on high speed, with the cover removed,
for at least 30 minutes after applying any chemicals to
mix adequately and avoid potential damage to equipment,
accessories, or surfaces.
• Names of spa chemicals often vary from one manufacturer to
another. Please contact your authorized Swim Series dealer if
you have any questions.
Starting the Spa with New Water
IMPORTANT: Soft or hard source water may require
special attention. Never ll the spa with soft water unless an
appropriate mineral supplement is immediately added. Or, if your
source water is extremely hard or contains a high concentration
of metals, a pre-lter may be required. It may also be possible
to either dilute the water’s hardness by blending the water no
more than 50/50 with softened water from a water softener, or
by the addition of a special water softening chemical. For more
information and recommendations contact your Authorized
Swim Series dealer.
Step 1: If possible, have your authorized Swim Series dealer test
the calcium hardness (CH) of your spa source water. If necessary,
make appropriate preparations for your specic water conditions
following your dealer’s recommendations.
Step 2: Fill spa according to instructions provided in Filling
Your Spa. Once lled, add the prescribed dose of water clarier
to remove micro-particulates. Depending on your local water
chemistry, it may also be encouraged to add a prescribed dose
of stain and scale inhibitor as you ll. is can provide initial
protection against metalic staining and mineral scaling.
Step 3: Test and adjust the total alkalinity (TA). e TA should
measure 125 to 150 parts per million (PPM).
Step 4: Test and adjust the pH. e pH should measure 7.4 to 7.6.
Step 5: Add the appropriate sanitizer. If you applied water
clarier, allow water to circulate for one hour before sanitizing.
To sanitize add ½ teaspoon of granular chlorine or 1 teaspoon of
granular bromine for each 200 gallons (909.2l) of spa water.
After several hours, check sanitizer level with a test kit approved
by your Authorized Swim Series Dealer and adjust dissolved
sanitizer, if necessary, to the following levels:
• Chlorine Level: 3.0-5.0 PPM (parts per million).
• Bromine Level: 3.0-6.0 PPM (parts per million).
Step 6: Startup water chemistry is now complete. However, it
may take additional time for the lter to completely clear the
water.
Maintaining Sanitizer & pH Levels
It is important to test and adjust the sanitizer and pH level of
your spa on a frequent basis. If the spa is used 0-3 times weekly,
we recommend that you test the water a minimum of 2 times
a week. If the spa is used 3 or more times weekly test the water
one additional time per use. Approved test kits and supplies are
available from your Authorized Swim Series dealer.
pH Control: Proper pH balance is extremely important in
controlling bacteria, providing water that is comfortable to the
user, and preventing damage to the spa and equipment. e pH
scale ranges from 0-14. Levels of pH less than 7.0 are acidic while
pH levels greater than 7.0 are basic. e proper pH range for a
spa is 7.4-7.6.
High pH levels (greater than 7.6): Can cause scale build-
up on the spa and its equipment, cloudy water, a prematurely
dirty lter, and less eective chlorine sanitation. To correct high
pH levels, add a dealer-approved pH decreaser.
NOTE: Never use Muriatic or Hydrochloric acid to adjust pH
as it can damage the spa shell and surroundings.
Low pH levels (less than 7.4): Can cause discomfort to
the spa users and corrosion to the spa equipment. To increase pH
levels, add a dealer-approved pH increaser.
IMPORTANT: Always test, and adjust the pH level to the
correct range before you test and adjust the sanitizer level.
WATER CARE
Page is loading ...
Page is loading ...
Page is loading ...
Page is loading ...
Page is loading ...
Page is loading ...
Page is loading ...
Page is loading ...
Page is loading ...
Page is loading ...
Page is loading ...
Page is loading ...
Page is loading ...
Page is loading ...
Page is loading ...
Page is loading ...
Page is loading ...
Page is loading ...
Page is loading ...
Page is loading ...
Page is loading ...
Page is loading ...
Page is loading ...
Page is loading ...
-
 1
1
-
 2
2
-
 3
3
-
 4
4
-
 5
5
-
 6
6
-
 7
7
-
 8
8
-
 9
9
-
 10
10
-
 11
11
-
 12
12
-
 13
13
-
 14
14
-
 15
15
-
 16
16
-
 17
17
-
 18
18
-
 19
19
-
 20
20
-
 21
21
-
 22
22
-
 23
23
-
 24
24
-
 25
25
-
 26
26
-
 27
27
-
 28
28
-
 29
29
-
 30
30
-
 31
31
-
 32
32
-
 33
33
-
 34
34
-
 35
35
-
 36
36
-
 37
37
-
 38
38
-
 39
39
-
 40
40
-
 41
41
-
 42
42
-
 43
43
-
 44
44


bullfrog spas 2022 Swim Series Owner's manual
- Category
- DJ controllers
- Type
- Owner's manual
Ask a question and I''ll find the answer in the document
Finding information in a document is now easier with AI
Related papers
-
 bullfrog spas 2023 Swim Series Owner's manual
-
 bullfrog spas 2015 Owner's manual
-
 bullfrog spas 2023 X Series Owner's manual
-
 bullfrog spas 2022 Owner's manual
-
 bullfrog spas 2019 Owner's manual
-
 BullFrog 2005 Owner's manual
-
 bullfrog spas 2008 Owner's manual
-
 bullfrog spas 2006 Owner's manual
-
 bullfrog spas 2010 Owner's manual
-
 bullfrog spas 2009 Owner's manual


Other documents
-
Villeroy & Boch X7 Reference guide
-
Master Spas INT H2X THERAPOOL SE Owner's manual
-
 L.A. Spas IN-FIT Owner's manual
-
 Dimension One Spas 01513-192 User manual
-
 PDC spas SYNERGY Series FX15 Owner's manual
-
 Vita Spa xStream User manual
-
 PDC spas TruSwim Series TSX19 Owner's manual
-
 Legacy Whirlpool LW 715 Owner's manual
-
 MAAX Spas Spas Owner's manual
-
 Cal Spas swim spas Owner's manual


