Graff G-5370-LM57D Installation guide
- Category
- Sanitary ware
- Type
- Installation guide

IOG 2879.63
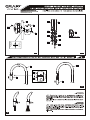
Model
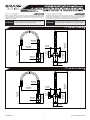
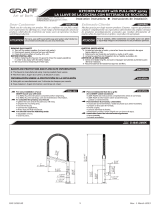
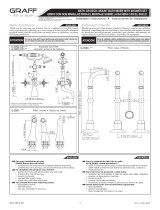
Modelo GN-4671-LM49D
8-11/16"
(220mm)
Ø15/16"
(24mm)
Ø1-3/4"
(45mm)
4-15/16"
(126mm)
3-3/8"
(85mm)
5-1/8"
(130mm)
Ø2-1/8"
(54mm)
5-15/16"
(151mm) 16-15/16"
(430mm)
8-15/16"
(227mm)
1
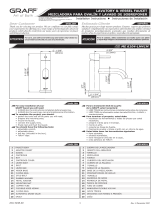
Model
Modelo GN-4370-LM57D
8-11/16"
(220mm)
Ø15/16"
(24mm)
Ø1-3/4"
(45mm)
4-15/16"
(126mm)
3-3/8"
(85mm)
5-1/8"
(130mm)
Ø2-1/8"
(54mm)
5-15/16"
(151mm) 16-15/16"
(430mm)
8-15/16"
(227mm)
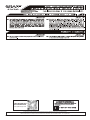
ear s er Es a l e e
Thank you for selecting our product. We are confident we can fully satisfy Muchas gracias por elegir nuestro producto. Estamos seguros que podemos
your expectations by offering you a wide range of technologically advanced satisfacer completamente sus expectativas ofreciéndole una amplia variedad
products which directly result from our many years of experience in faucet de productos tecnológicamente avanzados que resultan directamente de
and fitting production. muchos años de experiencia en grifos y su producción apropiada.
ESPANOL
For care, use soft towel with soap and water only! Under no
circumstances should you use any chemicals.
ATTENTION! ATENCIÓN! Para el cuidado, utilice solamente una toalla suave con jabón
y aqua! Bajo ninguna circunstancia no use productos químicos.
Rev 3 November 2023

L .1
L .1
IOG 2879.63
2
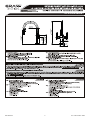
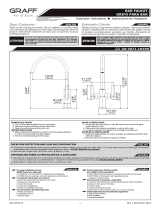
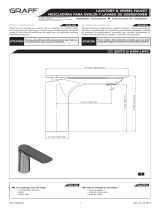
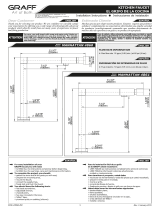
15/16"
24mm
5-3/16"
132mm
3-3/8"
86mm
4-15/16"
126mm
1-3/4"
45mm
12-5/16"
312mm
Model
Modelo G-5370-LM57D
2-1/8"
54mm
Rev 3 November 2023

IOG 2879.63
3
3
4
5
1
7
6
8
9
11 10
12
12
25
26
25
26
27
21
15
16
17
18
19
20
15
16
17
18
19
20
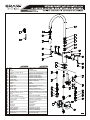
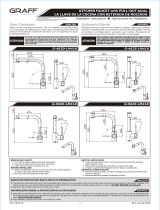
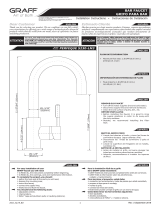
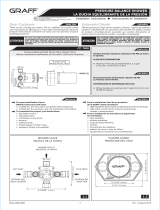
TUBE
BODY
PULLOUT
FLOW REG. CHECK VALVE
INSERT
SPOUT SLEVVE
SLIDING RING
SLIDING RING
O-RING SEAL
CERAMIC HEAD
SHROUD
LEVER
FAUCET base
O-RING
SUPPLY TUBE
O-RING SEAL
FLEXIBLE HOSE 17-11/16” (450MM)
FLOW REG. CHECK VALVE
NIPPLE
SEAL WITH SIEVE
HOSE WITH LONG ENDING
PULLOUT HOSE 71” (1800MM)
HOSE WEIGHT
SCREWS
SCREW
HOLE PLUG
STUD BOLT
RUBBER WASHER
METAL WASHER
MOUNTING NUT
SPECIAL KEY FOR THE AERATOR
2MM HEX KEY
TUBO FLEXIBLE DE TELEDUCHA
CUERPO
PULVERIZADOR
VALVULA DE CHEQUEO DE FLUIDO
INSERTO DE COLOCACIÓN
CASQUILLO DEL CAŃO
CASQUILLO DESLIZANTE
CASQUILLO DESLIZANTE
EMPAQUETADURA DE ANILLO
CABEZA CERÁMICA
CHAPA
MANILLA
BASE DE LA MEZCLADORA
JUNTA TÓRICA
TUBO DE SUMINISTRO
EMPAQUETADURA DE ANILLO
MANGUERA FLEXIBLE 17-11/16” (450MM)
VALVULA DE CHEQUEO DE FLUIDO
NIPLE
JUNTA CON COLADOR
MANGUERA CON TERMINACION ALARGADA
MANGUERA DE LA PULVERIZADOR 71” (1800MM)
PESO DE LA MANGUERA
EMPULGUERAS
TORNILLO
OBTURADOR
TORNILLO
ARANDELA DE GOMA
ARANDELA DE METAL
TUERCA DE MONTAJE
LLAVE ESPECIAL PARA EL AEREADOR
LLAVE ALLEN 2MM
28
29
30
A
B
1
2
3
4
5
6
7
8
9
10
11
12
13
14
15
16
17
18
19
20
21
22
23
24
25
26
27
28
29
30
A
B1
22
24
24
23
2
26
25
10 11
13
14
Rev 3 November 2023

IOG 2879.63
4
1
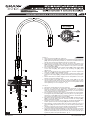
FAUCET INSTALLATION INSTALACIÓN DE LA GRIFERÍA
2
30
29
27
17
MAX.1-11/16”
(42mm)
ø1-1/2”
(38mm)
14
28 15
13
1
21
Screw the stud bolt (27) into small hole.
Hand tighten the supply hoses (17) into the threaded ends of copperlines
(15). (With the spout facing towards you, screw the red labeled hose into
the left tube and the blue labeled hose into the right tube).
Put through the assembly hole in the sink (from top) the sprayer hose
(22) and place the kitchen faucet in the axis of the hole. Make sure that
the o-ring (14) is situated in correct position n the groove in the lower
part of faucet base (13).
From underneath the sink place rubber washer (28), metal washer (29)
on the stud bolt (27), then screw on the mounting nut (30). Hand
tighten only.
Make sure that the faucet is in proper position on the sink. Tighten the
mounting nut (30) using adjustable wrench.
In order to ensure a slide run long enoough to pullout the shower head
attach the hose weight
fig. 3. (24), just above the bend (use screws provided)-
Please check label on flexible supply hose for identyfication of hot (red
sticker) or cold (blue sticker) water.
Connect flexible hoses (17) and inlet check valves (18) to the inlet
valves of water supply lines. Be sure to hold the flexible hoses in place
when tightening the nut so as not twist the hoses. Use adjustable wrench
when tightening. Do not overtighten - fig. 4.
See fig. 2
ENGLISH
1.
2.
3.
4.
5.
6.
7.
8.
Atornille el tornillo (27) en el agujero pequeno.
Enrosque las mangueras de suministro (17) ajustando a mano al
extremos roscados los tubos (15). (Con el surtidor de la mezcladora
hacia usted, enrosque la manguera de etiqueta roja en el tubo izquierdo
y la de etiqueta azul en el tubo derecho).
Por el agujero de montaje (por arriba) en el fregadero de cocina insertar
la manguera del pulverizador (22) y colocar el grifo en el eje del agujero.
Verificar si el anillo (14) esté en la posición correcta en la incisión de la
parte inferior del zócalo el grifo de cocina (13).
Por debajo del bidé coloque la arandela de goma (28), arandela de metal
(29) en el tornillo (27), entonces atornille la tuerca de montaje (30).
Apriete únicamente a mano.
Asegúrese de que el batería se encuentra en la posición apropiada en el
lavabo. Ajuste la tuerca de montaje (30) usando la llave inglesa.
Para asegurar un buen deslice altirar de la ducha, instale el peso de la
manguera
fig. 3. (24), apenas sobre la curva (use los tornillos proporcionados)-
Verifique la etiqueta de la manguera flexible suministrada para ident ficar
si es agua caliente (etiqueta roja) o agua fría (etiqueta azul).
Conecte las mangueras flexibles (17) y la válvula de chequeo de entrada
(18) a las líneas de fuente de entrada de agua. Mientras fijas la tuerca,
sujeta el tubo flexible para queno se tuerza. Use la llave ajustable para
ajustar las piezas. No ajuste demasiado - fig. 4.
Ver. fig. 2
1.
2.
3.
4.
5.
6.
7.
8.
22
21
27
Rev 3 November 2023

IOG 2879.63
5
3
9/16-24 UNEF
17
19
18
20
19
18
20
18
17
4
3
1
3
1
3
1
5
6
24
22
23
24
Rev 3 November 2023
Hose Weight
location
Hose Weight
location

IOG 2879.63
6
All dimensions and drawings are for reference only. For details, please refer to actual products.
Todas las dimensiones y dibujos sirven únicamente de referencia. Para consultar detalles, ver los productos.
www.graff-designs.com
MORE INFORMATION
MÁS INFORMACIÓN
Rev 3 November 2023
-
 1
1
-
 2
2
-
 3
3
-
 4
4
-
 5
5
-
 6
6


Graff G-5370-LM57D Installation guide
- Category
- Sanitary ware
- Type
- Installation guide
Ask a question and I''ll find the answer in the document
Finding information in a document is now easier with AI
in other languages
Related papers
-
 Graff G-5676-LM49D Installation guide
-
 Graff G-5671-LM49D Installation guide
-
 Graff G-4625-LM41K Installation guide
-
 Graff G-4612-LM3 Installation guide
-
 Graff G-4640-LM66K Installation guide
-
 Graff G-6104-LM41M Installation guide
-
 Graff Faucets G-6300-LM42-PC Installation guide
-
 Graff G-5230-LM3 Installation guide
-
 Graff G-3896-C2 Installation guide
-
 Graff G-4866 Installation guide


Other documents
-
Jacuzzi MX78827 Installation guide
-
-
-
 Graff Faucets G-7005 Installation guide
-
-
Moen S72308BG Installation guide
-
-
Delta 9997T-CZ-DST Installation guide
-
-
 Pfister GT529-TMY Installation guide

