Page is loading ...

2
1
When using your iron, basic safety precautions should always be followed,
including the following:
❑
READ ALL INSTRUCTIONS BEFORE USING.
❑ Use iron only for its intended use.
❑ To protect against a risk of electric shock, do not immerse the iron in water
or other liquid.
❑ The iron should always be turned off (refer to "How to Use" section) before
plugging into or unplugging from an outlet. Never yank cord to disconnect
from outlet; instead grasp plug and pull to disconnect.
❑ Do not allow cord to touch hot surfaces. Let iron cool completely before
putting away. Loop cord loosely around cord wrap when storing.
❑ Always disconnect iron from electrical outlet when filling with or emptying
of water, and when not in use.
❑ Do not operate iron with a damaged cord or if the iron has been dropped
or damaged. To avoid the risk of electric shock, do not disassemble the
iron, take it to a qualified serviceman for examination and repair. Or, call
the appropriate toll-free number listed on the cover of this manual. Incorrect
reassembly can cause a risk of electric shock when the iron is used.
❑
Close supervision is necessary for any appliance being used by or near
children. Do not leave iron unattended while connected or on an
ironing board.
❑
Burns can occur from touching hot metal parts, hot water, or steam.
Use caution when you turn a steam iron upside down or use the surge
of steam — there may be hot water in the water tank. Avoid rapid
movement of iron to minimize hot water spillage.
SPECIAL INSTRUCTIONS
❑
To avoid a circuit overload, do not operate another high-wattage
appliance on the same circuit.
❑
If an extension cord is absolutely necessary, a 10-ampere cord should
be used. Cords rated for less amperage may overheat. Care should be
taken to arrange the cord so that it cannot be pulled or tripped over.
IMPORTANT SAFETY
INSTRUCTIONS
SAVE THESE INSTRUCTIONS.
IMPORTANT DOWNY WRINKLE RELEASER
®
LIQUID INSTRUCTIONS
1. The physiological effects of the operation of the Downy Wrinkle Releaser
®
liquid, beneficial or otherwise, have not been investigated by Underwriters
Laboratories Inc.
2. First aid measures –
a. Eye Contact: Immediately flush eyes with plenty of water for at least
15 minutes. If irritation occurs or persists, have eyes examined or treated
by medical personnel.
b. Skin Contact: Remove contaminated clothing and footwear. Wash material
off skin with plenty of soap and water. Wash clothing and footwear before
reuse.
c. Ingestion: Drink milk or water to dilute. Induce vomiting only if advised
by physician or poison control center. Contact physician or poison control
center.
3. Personal precaution –
a. Avoid prolonged exposure.
b. Use rubber or neoprene, when needed, to prevent skin contact.
c. Use safety glasses recommended for handling spills.
4. Care and storage – Store in a cool, dry place. In poorly ventilated areas,
solvent fumes may be irritating. Masks rated for ammonia or organic solvents
may be desirable. Make sure you have good ventilation when handling liquid
spills.
5. Disposal Considerations – Disposal of this Downy Wrinkle Releaser
®
liquid
must be in accordance with local, state and federal regulations.
Soft-Touch Parts
Note: The soft-touch parts of this unit are free of natural rubber and latex.
They are safe for individuals allergic or sensitive to these materials.
POLARIZED PLUG (120V Models Only)
This appliance has a polarized plug (one blade is wider than the other). To reduce
the risk of electric shock, this plug will fit into a polarized outlet only one way. If the
plug does not fit fully in the outlet, reverse the plug. If it still does not fit, contact a
qualified electrician. Do not attempt to modify the plug in any way.
TAMPER-RESISTANT SCREW
Warning: This appliance is equipped with a tamper-resistant screw to prevent
removal of the outer cover. To reduce the risk of fire or electric shock, do not
attempt to remove the outer cover. There are no user-serviceable parts inside.
Repair should be done only by authorized service personnel.
Note: If the power supply cord is damaged, it should be replaced by qualified
personnel or in Latin America by an authorized service center.
AS202Pub1000003006 5/18/06 3:34 PM Page 2

How to Use
This appliance is for household use only. It is specially designed with a 2-Tank™ system.
Tank 1 is for use with water only for steam. Tank 2 is for use with Downy Wrinkle
Releaser
®
liquid for spray to smooth away the wrinkles as you iron. (The iron does not
require distilled or treated water for steam or spray.)
GETTING STARTED
Remove any labels, stickers or tags attached to the body or soleplate of the iron. Note: Use
ordinary tap water for ironing. Do not use water processed through a home softening
system.
Important: For optimum performance, let the iron stand for 90 seconds before beginning
to iron.
STEAM IRONING
Filling Tank 1 with Water
1. Open the water-fill cover (A).
2. Tilt the iron and using a clean measuring cup, pour water into
opening until the water reaches the MAX level mark on the water
tank (B). Do not overfill.
Important:
• Do not pour any Downy Wrinkle Releaser
®
liquid, into
Tank 1 as it will damage your iron and potentially stain
your clothes once the fluid is heated.
• If you accidentally pour this liquid into Tank 1, empty the tank (refer to Empting Water
Tank instructions) then refill the tank with regular water.
• Use the auto-cleaning feature; see Auto-Cleaning instructions.
3. Close the water-fill cover.
4. Plug in the iron. The temperature-ready light glows green (C).
Tip: If unsure of a garment’s fiber, test a small area (on an inside
seam or hem) before ironing.
5. Move the selector to the desired steam level (D).
4
3
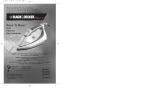
Product may vary slightly from what is illustrated.
1. Spray nozzle
2. Tank 1 water-fill cover
3. Tank 2 for Downy Wrinkle Releaser
®
liquid fill cap
4. Dry/steam selector
5. Spray button
6. Steam button for water only
7. Temperature-ready and auto shutoff light
8. Comfort Grip™ handle
9. 360° pivoting cord
10. Heel rest
11. Fabric-select dial
12. AUTO CLEAN button
13. Tank 1 for water only
14. Soleplate
Steam
for use with Tank 1
Spray
for use with Tank 2
Dry
Symbols
A
B
C
D
AS202Pub1000003006 5/18/06 3:34 PM Page 4

6. Turn the fabric-select dial to appropriate steam setting (between 4
and 6) for your fabric (E). Read garment’s label to help you
determine fabric type.
• The temperature-ready light glows green until it reaches the
appropriate temperature.
• It then glows on and off during ironing. This is normal.
7. When finished ironing, turn the fabric-select dial to lowest heat
setting, move the dry/steam selector to and unplug the iron.
SURGE OF STEAM
Use to remove stubborn creases.
• Horizontal
1. With Tank 1 filled with water to the MAX mark, turn the fabric-select dial to at least
setting 4 and wait for the temperature-ready light to go off.
2. To remove tough wrinkles, pump the button at 5-second intervals for
a concentrated blast of steam.
• Vertical
Use for removing wrinkles from hanging clothes and drapes.
1. Hang the garment to be steamed on a clothes hanger
(curtains or drapes can be steamed once they are hung).
2. Move the selector to .
3. Hold the iron close to, but not touching, the fabric.
4. Pull the fabric tight in your free hand and pump the
button as you move the iron over the fabric (F).
IRONING WITH SPRAY (TANK 2)
Using Downy Wrinkle Releaser
®
Liquid
1. Grasp Tank 2 fill cap, twist and pull off. Be careful not to pull
it too hard (G).
2. Pour Downy Wrinkle Releaser
®
liquid into opening to fill
tank (H).
3. Replace cap and twist to close.
4. Press button to apply to fabric as you iron.
5. If spray is weak, pump the button a few times.
Using Water Only
Important: For best results, do not mix tap water with Downy
Wrinkle Releaser
®
liquid.
1. Repeat step 1 above.
2. Using a clean cup, fill Tank 2 with water (J).
3. Replace cap and twist to close.
4. Press button to spray water as you iron.
5. If spray is weak, pump the button a few times.
6
5
ANTI-DRIP SYSTEM
The anti-drip system prevents water spotting at low temperatures.
DRY IRONING
1. Make sure selector is set to . You may want to empty the water (see “Emptying
Water Tank 1 After Ironing - Optional”).
2. Turn the fabric-select dial to the lowest setting.
Read garment’s label to help you determine fabric type.
• The temperature-ready light glows until it reaches the appropriate temperature.
• It then glows on and off during ironing.
3. When finished ironing, unplug the iron and place it on its heel rest.
4. Move the dry/steam selector to .
3-WAY AUTOMATIC SHUTOFF
The automatic shutoff feature in your iron works as follows:
• Once the iron reaches appropriate temperature, it will turn off
after 30 seconds of inactivity if left on its soleplate or tipped over
on its side. If left vertically on its heel rest, it will shut off after
8 minutes (K).
• As soon as you pick up the iron, it will start heating again.
Note: Wait for iron to reheat completely before resuming
operation.
EMPTYING TANK 1 AFTER IRONING (OPTIONAL)
Note: It is not necessary to empty the water after each use.
1. Turn the fabric-select dial to the lowest setting.
2. Unplug the iron and let it cool.
3. Open the water-fill cover.
4. Empty the water by holding the iron over a sink with the tip
pointing down. Water will empty out of water-fill opening (L).
Care and Cleaning
This product contains no user serviceable parts. Refer service to qualified service
personnel.
CLEANING OUTSIDE SURFACES
1. Make sure iron is unplugged and has cooled completely.
2. Wipe the soleplate and outer surfaces with a soft cloth dampened with water and a mild
household detergent. Never use abrasives, heavy-duty cleansers, vinegar or scouring
pads that may scratch or discolor the iron.
3. After cleaning, plug in the iron.
4. Steam iron over an old cloth to remove any residue from the steam vents.
AUTO CLEANING
To keep the steam vents free of any buildup, about once a month follow these instructions.
1. Fill Tank 1 with water well below the MAX line.
2. Plug in the iron.
3. Turn the fabric-select dial to 6 and stand the iron on its heel rest. Allow it to heat until
the auto shutoff indicator light goes out and comes on again.
4. Turn fabric-select dial to lowest setting, unplug the iron and hold over a sink with the
soleplate facing down.
E
K
F
G
J
L
H
8 minutes
30 seconds
AS202Pub1000003006 5/18/06 3:34 PM Page 6

8
7
5. Press and hold the AUTO CLEAN button. Be careful, as hot
water and steam will come out of the steam vents (M). Continue
to hold AUTO CLEAN button until all the water has emptied, or
until you feel all mineral deposits have been flushed. If
necessary, rock iron side to side and front to back.
6. When finished, release the button, stand the iron on its heel rest
and plug it in. Heat for about 2 minutes to dry out any
remaining water.
CLEANING AND MAINTENANCE OF TANK 2
About once a month, to keep Tank 2 free and clear of any buildup or deposits you should
follow these instructions.
1. Unplug iron.
2. Over a sink, grasp Tank 2 fill cap, twist and pull off. Be careful not to pull it too hard.
3. Empty any remaining contents of Tank 2.
4. Fill half of Tank 2 with warm water.
5. Replace the cap, twist to close and shake the iron vigorously to remove deposits.
6. Remove the cap, twist to open and empty the contents.
7. You are now ready to refill the tank with water or Downy Wrinkle Releaser
®
liquid.
STORING YOUR IRON
1. Unplug the iron and allow it to cool.
2. Check that the selector is set to .
3. Store vertically on its heel rest to prevent water leaking from the soleplate.
M
INSTRUCCIONES IMPORTANTES
DE SEGURIDAD
Siempre que utilice su plancha, debe seguir algunas precauciones básicas
de seguridad, incluyendo las siguientes:
❑
LEA TODAS LAS INSTRUCCIONES ANTES DE UTILIZAR
EL PRODUCTO.
❑ Use la plancha únicamente para planchar.
❑ No sumerja la plancha en agua ni en ningún otro líquido para evitar el
riesgo de un choque eléctrico.
❑ Siempre apague la plancha (vea la sección "Como usar") antes de conectarla
o desconectarla de la toma de corriente. Nunca tire del cable para
desconectarlo, sujete el enchufe para hacerlo.
❑ No permita que el cable entre en contacto con superficies calientes. Permita
que la plancha se enfríe antes de guardarla. Enrolle el cable holgadamente
alrededor del talón de la plancha.
❑ Siempre desconecte la plancha cuando la llene o la vacíe y cuando no esté
en uso.
❑ No haga funcionar la plancha si ésta tiene dañado el cable o si la plancha
se ha dejado caer y se ha estropeado. A fin de reducir a un mínimo el
riesgo de un choque eléctrico, no desarme la plancha. Acuda a una persona
de servicio, calificada para revisar y efectuar las reparaciones necesarias.
También puede llamar gratis al número apropiado que aparece en la
cubierta de este manual. El armar la plancha incorrectamente puede
ocasionar el riesgo de un choque eléctrico cuando la plancha esté en
funcionamiento.
❑
Se requiere supervisión cuando cualquier unidad electrica esté siendo
usada cerca de los niños o por ellos mismos. No desatienda la plancha
mientras esté conectada o cuando esté sobre la tabla de planchar.
❑
Pueden ocurrir quemaduras si se tocan las partes metálicas, el agua
caliente, o el vapor. Tome precaución al invertir una plancha de vapor
ya que puede haber agua caliente dentro del tanque. Evite los
movimientos bruscos para no derramar agua caliente.
AS202Pub1000003006 5/18/06 3:34 PM Page 8

¿Cómo se puede obtener servicio?
• Conserve el recibo original de compra.
• Por favor llame al número del centro de servicio autorizado.
Esta garantía no cubre:
• Los productos que han sido utilizados en condiciones distintas a las normales
• Los daños ocasionados por el mal uso, el abuso o negligencia.
• Los productos que han sido alterados de alguna manera
• Los daños ocasionados por el uso comercial del producto
• Los productos utilizados o reparados fuera del país original de compra
• Las piezas de vidrio y demás accesorios empacados con el aparato
• Los gastos de tramitación y embarque asociados al reemplazo del producto
• Los daños y perjuicios indirectos o incidentales
BESOIN D’AIDE?
Pour communiquer avec les services d’entretien ou de réparation, ou pour adresser
toute question relative au produit, composer le numéro sans frais approprié indiqué
sur la page couverture. Ne pas retourner le produit où il a été acheté. Ne pas poster
le produit au fabricant ni le porter dans un centre de service. On peut également
consulter le site web indiqué sur la page couverture.
Garantie limitée de un an
(Valable seulement aux États-Unis et au Canada)
Quelle est la couverture?
• Tout défaut de main-d’oeuvre ou de matériau; toutefois, la responsabilité de la
société Applica se limite au prix d’achat du produit.
Quelle est la durée?
• Un an après l’achat original.
Quelle aide offrons nous?
• Remplacement par un produit raisonnablement semblable nouveau ou réusiné.
Comment se prévaut-on du service?
• Conserver son reçu de caisse comme preuve de la date d’achat.
• Visiter notre site web au www.prodprotect.com/applica, ou composer sans frais le
1 800 231-9786, pour obtenir des renseignements généraux relatifs à la garantie.
• On peut également communiquer avec le service des pièces et des accessoires au
1 800 738-0245.
Qu’est-ce que la garantie ne couvre pas?
• Des dommages dus à une utilisation commerciale.
• Des dommages causés par une mauvaise utilisation ou de la négligence.
• Des produits qui ont été modifiés.
• Des produits utilisés ou entretenus hors du pays où ils ont été achetés.
• Des pièces en verre et tout autre accessoire emballés avec le produit.
• Les frais de transport et de manutention reliés au remplacement
du produit.
• Des dommages indirects (il faut toutefois prendre note que certains états ne
permettent pas l’exclusion ni la limitation des dommages indirects).
Quelles lois régissent la garantie?
• Les modalités de la présente garantie donnent des droits légaux spécifiques.
L’utilisateur peut également se prévaloir d’autres droits selon l’état ou la province
qu’il habite.
NEED HELP?
For service, repair or any questions regarding your appliance, call the appropriate
"800" number on the cover of this book. Do not return the product to the place of
purchase. Do not mail the product back to the manufacturer nor bring it to a
service center. You may also want to consult the website listed on the cover of this
manual.
One-Year Limited Warranty
(Applies only in the United States and Canada)
What does it cover?
• Any defect in material or workmanship; provided; however, Applica’s liability will
not exceed the purchase price of the product.
For how long?
• One year after the date of original purchase.
What will we do to help you?
• Provide you with a reasonably similar replacement product that is either new or
factory refurbished.
How do you get service?
• Save your receipt as proof of the date of sale.
• Check our on-line service site at www.prodprotect.com/applica, or call our toll-
free number, 1-800-231-9786, for general warranty service.
• If you need parts or accessories, please call 1-800-738-0245.
What does your warranty not cover?
• Damage from commercial use
• Damage from misuse, abuse or neglect
• Products that have been modified in any way
• Products used or serviced outside the country of purchase
• Glass parts and other accessory items that are packed with the unit
• Shipping and handling costs associated with the replacement of the unit
• Consequential or incidental damages (Please note, however, that some states do
not allow the exclusion or limitation of consequential or incidental damages, so
this limitation may not apply to you.)
How does state law relate to this warranty?
• This warranty gives you specific legal rights, and you may also have other rights
that vary from state to state or province to province.
¿NECESITA AYUDA?
Para servicio, reparaciones o preguntas relacionadas al producto, por favor llame al
número del centro de servicio en el país donde usted compró su producto. NO
devuelva el producto al fabricante. Llame o lleve el producto a un centro de
servicio autorizado.
DOS AÑOS DE GARANTÍA LIMITADA
(No aplica en México, Estados Unidos o Canadá)
¿Qué cubre la garantía?
• La garantía cubre cualquier defecto de materiales o de mano de obra. Applica no
se responsabiliza por ningún costo que exceda
el valor de compra del producto.
¿Por cuánto tiempo es válida la garantía?
• Por dos años a partir de la fecha original de compra.
24
23
AS202Pub1000003006 5/18/06 3:34 PM Page 24

Copyright © 2006 Applica Consumer Products, Inc.
Pub. No. 1000003006-00-RV00
Made in People’s Republic of China
Printed in People’s Republic of China
Importado por:
Applica de México S. de R.L. de C.V.
Blvd. Manuel Avila Camacho 2900 Int. 902
Los Pirules, Tlalnepantla,
Edo. Mex.
C.P. 54040
México
Teléfono: (55) 1106-1400
Del interior marque sin costo
01 (800) 714-2499
Fabricado en la República Popular de China
Impreso en la República Popular de China
Fabriqué en République populaire de Chine
Imprimé en République populaire de Chine
is a trademark of The Black & Decker Corporation, Towson, Maryland, USA
Marca registrada de The Black & Decker Corporation, Towson, Maryland, E.U.
Marque de commerce déposée de la société The Black & Decker Corporation, Towson, Maryland, É.-U
Downy
®
and its logos are trademarks of The Procter & Gamble Company,
used under license by Changing Paradigms.
Downy
®
y todos sus logotipos son marcas comerciales de la sociedad The Procter & Gamble Company,
empleados bajo autorización de Changing Paradigms.
Downy
md
et ses logos sont des marques de commerce déposées de la société The Proctor & Gamble
Company et la société Changing Paradigms en est un usager inscrit.
Downy Wrinkle Releaser
®
is a registered trademark of Procter & Gamble Company.
Downy Wrinkle Releaser
®
es una marca registrada de Procter & Gamble Company.
Downy Wrinkle Releaser
md
est un marque de commerce déposée de Procter & Gamble Company.
2006/4-20-44E/S/F
1200 W 120 V 60 Hz
AS202Pub1000003006 5/18/06 3:34 PM Page 28
/