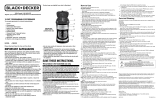
Black & Decker CM1609 User manual

Category
Small kitchen appliances
Type
User manual

This manual is also suitable for

*
* Filters not included.
* No incluye los filtros.
MODEL/MODELO
CM1609
8-CUP THERMAL PROGRAMMABLE
COFFEEMAKER
CAFETERA
TÉRMICA PROGRAMABLE DE 8 TAZAS
IMPORTANT
WASH CARAFE
BEFORE FIRST USE!
IMPORTANTE
¡LAVE LA JARRA
ANTES DEL PRIMER USO!
Customer Care Line:
USA 1-800-231-9786
Accessories/Parts (USA)
1-800-738-0245
For online customer service
and to register your product, go to
www.prodprotect.com/applica
Servicio para el cliente:
México 01-800 714-2503
Accesorios/Partes (EE.UU)
1-800-738-0245
Para servicio al cliente y para
registrar su garantía visite
www.prodprotect.com/applica
2
3
Please Read and Save this Use and Care Book
IMPORTANT SAFEGUARDS
When using electrical appliances, basic safety precautions should
always be followed to reduce the risk of fire, electric shock and/or
injury to persons, including the following:
Read all instructions.
Do not touch hot surfaces. Use handle or knobs.
To protect against electric shock, do not place cord, plug or
appliance in water or other liquids.
Close supervision is necessary when any appliance is used by or
near children.
Unplug from outlet when not in use and before cleaning. Allow to
cool before putting on or taking off parts and before cleaning the
appliance.
Do not operate any appliance with a damaged cord or plug
or after the appliance malfunctions, or has been damaged in
any manner. Return the appliance to the nearest authorized
service facility for examination, repair or adjustment. Or, call the
appropriate toll-free number on the cover of this manual.
The use of an accessory not evaluated for use with this appliance
may cause injuries.
Do not use outdoors.
Do not let cord hang over the edge of table or counter, or touch
hot surfaces.
Do not place on or near a hot gas or electric burner or in a
heated oven.
To disconnect, turn any control to OFF, then remove plug from
wall outlet.
Do not use this appliance for other than intended use.
Keep lid on the carafe when in use.
Scalding may occur if the lid is removed during the brewing
cycles.
SAVE THESE INSTRUCTIONS.
This product is for household use only.
ENGLISH
POLARIZED PLUG (120V Models Only)
This appliance has a polarized plug (one blade is wider than the other). To reduce
the risk of electric shock, this plug is intended to fit into a polarized outlet only
one way. If the plug does not fit fully into the outlet, reverse the plug. If it still
does not fit, contact a qualified electrician. Do not attempt to modify the plug in
any way.
TAMPER-RESISTANT SCREW
Warning: This appliance is equipped with a tamper-resistant screw to
prevent removal of the outer cover. To reduce the risk of fire or electric
shock, do not attempt to remove the outer cover. There are no user-
serviceable parts inside. Repair should be done only by authorized service
personnel.
ELECTRICAL CORD
a) A short power-supply cord (or detachable power-supply cord) is to be
provided to reduce the risk resulting from becoming entangled in or
tripping over a longer cord.
b) Longer detachable power-supply cords or extension cords are available
and may be used if care is exercised in their use.
c) If a long detachable power-supply cord or extension cord is used,
1) The marked electrical rating of the detachable power-supply cord
or extension cord should be at least as great as the electrical rating
of the appliance,
2) If the appliance is of the grounded type, the extension cord should
be a grounding-type 3-wire cord, and
3) The longer cord should be arranged so that it will not drape over
the countertop or tabletop where it can be pulled on by children
or tripped over.
Note: If the power supply cord is damaged, it should be replaced by qualified
personnel; in Latin America, by an authorized service center.
4
5
Product may vary slightly from what is illustrated.
1. Cover
2. Removable filter basket (Part # CM1609-01)
3. Water reservoir with cup level markings
4. Sneak-A-Cup
®
feature
5. Carafe lid (Part # CM1609-02)
6. Stainless steel carafe with lid 8 cups / 44 oz. / 1300 ml (Part # CM1609-03)
7. Cord storage (inside of unit)
8. Control panel
Note: † indicates consumer replaceable/removable parts
ENGLISH
CONTROL PANEL
1. Digital display
2. Power indicator light
3. Program (PROG) button
4. AUTO button
5. ON/OFF button
6. Minute (MIN) button
7. HOUR button
6
7
How to Use
This product is for household use only.
GETTING STARTED
Remove all packing material and any stickers.
Remove and save literature.
Register your warranty at www.prodprotect.com/applica.
Wash all removable parts. Check CARE AND CLEANING section for help.
Fill the water reservoir with fresh cold water.
Place basket-shaped paper filter (8-12 cup) into filter basket
(A).
Fill the carafe with hot tap water and empty (this will help to
hold the coffee at the brewed temperature). To close carafe
lid, place lid with tab over arrow to right of the handle. Turn
clockwise until tab is over the handle (B).
Place empty carafe on the carafe plate.
Pull the power cord out of the cord storage on the back of the
coffeemaker and plug into an outlet. To clean coffeemaker,
brew water with no coffee grounds.
Note: This removes any dust or residue that may remain in the system during the
manufacturing process.
Empty carafe and throw away the paper filter.
Press OFF button and unplug. Let coffeemaker cool.
ADJUSTING THE POWER CORD LENGTH
Pull enough cord from back of coffeemaker to reach outlet. Gently
pull down and out of the slot away from the coffeemaker.
To shorten, feed extra cord back (C).
SETTING THE CLOCK
1. Plug in coffeemaker. The display flashes 12:00 AM.
Important: You must set the clock in order to use delayed
brewing.
2. To change the time: Press HOUR button until the correct time
appears. Repeat with the MIN button (D).
Note: For PM there will be a small light in the top left corner of
the display. For AM, there will be no light on the display.
Tip: Hold the buttons down to make the hours and minutes change faster after a short
delay. Tap to change the time by 1 hour or 1 minute at a time.
ENGLISH
C
Note: If the appliance is unplugged, the time will need to be reset. Follow steps 1 and 2.
BREWING COFFEE
Note: You don’t need to set the clock to brew coffee right away.
1. Open cover of coffeemaker. Fill water reservoir with cold tap
water. Use lines on side of reservoir as a guide. Do not fill
with more than 8 cups of water (E).
Important: If too much water is added, water will leak from
the back of the coffeemaker.
2. Place paper filter into the filter basket. Add ground coffee
(we suggest 1 heaping tablespoon per cup). Put filter basket
in place (F).
3. To close carafe lid place lid with tab over arrow to right of
the handle. Turn clockwise until tab is over the handle (G).
Note: Coffee may run over if lid is not in place on carafe.
4. Place empty carafe on the carafe plate (H).
5. Plug cord into an outlet. Press ON/OFF button and brewing
begins (J).
6. When coffee grounds are cool, carefully remove and throw
away used grounds and filter.
7. To turn off the coffeemaker at any time press the ON/OFF
button.
8. Unplug appliance when not in use.
9. Press tab on carafe lid to pour coffee (K).
A
B
D
MAX
F
E
H
J
K
G
8
9
ENGLISH
SNEAK-A-CUP
®
FEATURE
Remove the carafe and brewing is paused. The carafe must be placed back on the carafe
plate within 30 seconds to prevent overflow. Brewing begins again.
DELAYED BREWING
Follow steps 1 through 4 under BREWING COFFEE.
Make sure clock has been set to correct time of day or follow the directions in SETTING
THE CLOCK.
1. Press the PROG button (Step 1). The AUTO light will flash
several times. The clock displays 12:00.
Note: If the coffeemaker has not been unplugged, the last
delayed brewing time will appear on the display.
To set the auto brew time: Within 5 seconds press HOUR button
(Step 2), then the MIN button (Step 3) to choose the time you
would like the coffee to start brewing (for example, 8:30 AM) (L).
2. Press the AUTO button to set delayed brewing. The AUTO light
at the bottom left of the display stops blinking. The display will
change to the time of day (M).
3. To check the set auto time: Press PROG button. Press AUTO
button to return to AUTO BREW.
4. To cancel delayed brewing: Press the ON/OFF button. All lights
turn off. The time of day will still show on the display.
COFFEE BREWING TIPS
Coffee gets stronger as it brews; stir coffee before serving to have each cup taste the
same.
Not sure how much coffee to use? Try 1 heaping scoop of medium grind coffee for each
cup.
Never reuse paper coffee filters! They will make the coffee taste stale; they may also tear
and spill grinds into the brewed coffee.
Store coffee grounds in a tightly sealed container in a dark place. It is best to grind coffee
just before it is brewed.
For added flavor: whip some heavy cream with 1 or 2 tablespoons of hazel nut, chocolate
or almond liqueur. Use to top off each cup of coffee.
Rinse both the carafe and the filter basket with warm water immediately after each use to
maintain good coffee flavor.
For iced coffee make coffee ice cubes from left over coffee and use to chill the coffee.
Care and Cleaning
This product contains no user serviceable parts. Refer service to qualified service
personnel.
CLEANING
Make sure your coffeemaker is unplugged and cool.
1. Open the coffeemaker cover. Remove the filter basket. Throw away the used paper
filter and coffee grounds.
2. Wash the filter basket and carafe in the dishwasher (top-rack) or by hand in hot,
soapy water.
3. Wipe the outside of the coffeemaker, control panel and carafe plate with a soft,
damp cloth.
Note: Do not use abrasive cleansers or scouring pads. Never immerse the coffeemaker
in water.
4. To clean the inside of the cover, open the cover and leave in the open position; wipe
surfaces with a damp cloth.
CLEANING WITH VINEGAR
Note: With regular use, minerals and hard water can clog your coffeemaker. A full
cleaning with vinegar is recommended once a month.
1. Pour white vinegar into the water reservoir up to the 3-cup mark on the water
window. Add cold water up to the 8-cup mark.
2. Put a paper filter in the filter basket and close the cover. Set the empty carafe on the
carafe plate.
3. Turn on the coffeemaker. Let half the cleaning mixture brew into the carafe (until the
level is around 4). Turn off the coffeemaker and let it soak for at least 15 minutes.
4. Turn on the coffeemaker again and brew the remaining cleaning mixture into the
carafe. Turn off the coffeemaker; empty carafe and discard the paper filter.
5. Fill the reservoir with cold water to the 8-cup line; replace carafe on carafe plate
and then turn on the coffeemaker for a complete brewing cycle to flush out the
remaining cleaning mixture. You may want to repeat this step to completely remove
the vinegar smell/taste.
6. Wash the filter basket and carafe as shown in CLEANING.
L
(M)
M
The lightning symbol refers to “dangerous voltage”; the exclamation symbol
refers to maintenance instructions. See below.
Warning: To reduce the risk of fire or electric shock, do not remove the cover
of the coffeemaker. There are no user-serviceable parts inside. Repair should
be done by authorized service personnel only.
WARNING
RISK OF FIRE OR ELECTRIC SHOCK. DO NOT OPEN.
10
11
ENGLISH
TROUBLESHOOTING
PROBLEM POSSIBLE CAUSE SOLUTION
Coffeemaker
does not turn on.
Coffeemaker is not plugged in. Make sure appliance is plugged
into a working outlet and the
ON/OFF button is ON.
Coffeemaker is
leaking.
There may be too much
water in the reservoir.
Cover may not be correctly
placed on carafe.
Carafe may not be in place
on carafe plate.
Do not fill reservoir above the
MAX fill line.
Make sure cover is correctly
placed and tightened on
carafe.
Make sure carafe is placed
correctly on carafe plate and
is centered under the filter
basket holder.
Brewing takes too
long.
The coffeemaker might need
cleaning.
Follow procedure under
CLEANING WITH VINEGAR.
Coffee is not
brewing.
Water reservoir might be
empty.
Make sure water reservoir has
enough water to brew desired
number of cups of coffee.
The coffeemaker
brews clear
water.
There may be no coffee
grounds in the removable
filter basket.
Add coffee grounds to paper
filter inside filter basket.
The cover does
not close.
Removable filter basket may
not be correctly placed.
Remove filter basket and replace
correctly into holder.
Filter basket
overflows.
Cover may not be correctly
placed on carafe.
Carafe may be improperly
placed on the carafe plate.
Make sure cover is correctly
placed and tightened on
carafe. Remove carafe and
replace so carafe rests within
the grooves on the carafe
plate.
Grounds in the
brewed coffee.
The paper filter and/or the
filter basket are not properly
placed.
Insert paper filter into filter
basket and insert basket
properly into holder.
Coffeemaker is
brewing slowly;
brewed coffee
tastes bad.
Coffeemaker needs cleaning;
wrong grind being used.
Follow directions for cleaning
coffeemaker. Use only coffee
ground for automatic drip
coffeemaker.
NEED HELP?
For service, repair or any questions regarding your appliance, call the
appropriate 800 number on cover of this book. Please DO NOT return the
product to the place of purchase. Also, please DO NOT mail product back to
manufacturer, nor bring it to a service center. You may also want to consult
the website listed on the cover of this manual.
Two-Year Limited Warranty
(Applies only in the United States and Canada)
What does it cover?
Any defect in material or workmanship provided; however, Applica’s
liability will not exceed the purchase price of product.
For how long?
Two year(s) from the date of original purchase with proof of such purchase.
What will we do to help you?
Provide you with a reasonably similar replacement product that is either
new or factory refurbished.
How do you get service?
Save your receipt as proof of date of sale.
Visit the online service website at www.prodprotect.com/applica, or call
toll-free 1-800-231-9786, for general warranty service.
If you need parts or accessories, please call 1-800-738-0245.
What does your warranty not cover?
Damage from commercial use
Damage from misuse, abuse or neglect
Products that have been modified in any way
Products used or serviced outside the country of purchase
Glass parts and other accessory items that are packed with the unit
Shipping and handling costs associated with the replacement of the unit
Consequential or incidental damages (Please note, however, that some
states do not allow the exclusion or limitation of consequential or
incidental damages, so this limitation may not apply to you.)
How does state law relate to this warranty?
This warranty gives you specific legal rights. You may also have other rights
that vary from state to state or province to province.
is a trademark of The Black & Decker
Corporation, Towson, Maryland, USA
Made in People’s Republic of China
Printed in People’s Republic of China
  • Page 1 1
  • Page 2 2
  • Page 3 3
  • Page 4 4
  • Page 5 5
  • Page 6 6
  • Page 7 7
  • Page 8 8
  • Page 9 9
  • Page 10 10
  • Page 11 11
  • Page 12 12
  • Page 13 13

Black & Decker CM1609 User manual

Category
Small kitchen appliances
Type
User manual
This manual is also suitable for

Ask a question and I''ll find the answer in the document

Finding information in a document is now easier with AI

in other languages