• Before connecting the device to your power supply, please ensure that the
supply voltage stated on the rating plate is compatible with your mains supply.
• Only use this unit according to the intended purpose and as directed in the
instructions for use. If misused, all guarantee rights shall become null and void.
• The appliance is designed for private households only and not for commercial
use.
• Do not use the device if it is not working correctly, if it has been dropped or has
fallen into water or has been damaged.
• Never touch an appliance that has fallen into water. Unplug the unit from the
mains outlet immediately.
• You must not continue to use the unit if the lead or the mains adaptor are
damaged. In order to prevent hazards, always send the unit in to the service
centre.
• Do not use the unit in the vicinity of high-frequency electromagnetic transmit-
ters, as this could damage the functions on the device.
• Do not expose the appliance to direct sunlight or high temperatures.
• Protect the device from moisture.
• You must never submerge the unit, the lead or the mains adaptor in water or
hold them under running water.
• Only handle the mains adaptor when your hands are dry.
• Do not lay the cable near sources of heat or pull it over any sharp edges.
• Never carry, pull or turn the mains adaptor by the mains lead and do not let the
lead get tangled.
• To separate the device from the power source disconnect the plug.
• Always make sure that the plug is easily accessible when the device is con-
nected.
• Protect the device from impact and shocks.
• If a fault occurs, do not attempt to repair the unit yourself. Repairs must only be
carried out by an authorized specialist dealer or other suitably qualied person-
nel.
• Place the device on a solid and at surface for use, to ensure that it cannot tip
over or fall down.
• This appliance can be used by children aged from 8 years and above and per-
sons with reduced physical, sensory or mental capabilities or lack of experience
and knowledge if they have been given supervision or instruction concerning
use of the appliance in a safe way and understand the hazards involved.
• Children shall not play with the appliance.
• Cleaning and user maintenance shall not be made by children without supervi-
sion.
• Before cleaning the device, make sure that it is turned off and the mains adap-
tor is removed from the socket.
• The appliance is not designed for lighting rooms. Do not use it in rooms which
have no lighting of their own.
• Only use the attachments/accessories specied by manufacturer.
Read the instruction manual carefully before using this device,
especially the safety instructions, and keep the instruction manual
for future use. Should you give this device to another person, it is
vital that you also pass on these instructions for use.
GB
Safety Information
Scope of supply
Please check rst of all that the device is complete and is not damaged in any way. In case of doubt,
do not use the appliance and contact your dealer or your service centre.
The following parts are included:
• 1 MEDISANA Wake up Light WL 444 • 1 Cable antenna
• 1 Power supply • 1 Instruction manual
The packaging can be reused or recycled. Please dispose properly of any packaging material
no longer required. If you notice any transport damage during unpacking, please contact your
dealer without delay.
WARNING
Please ensure that the polythene packing is kept away from the reach of children!
Risk of suffocation!
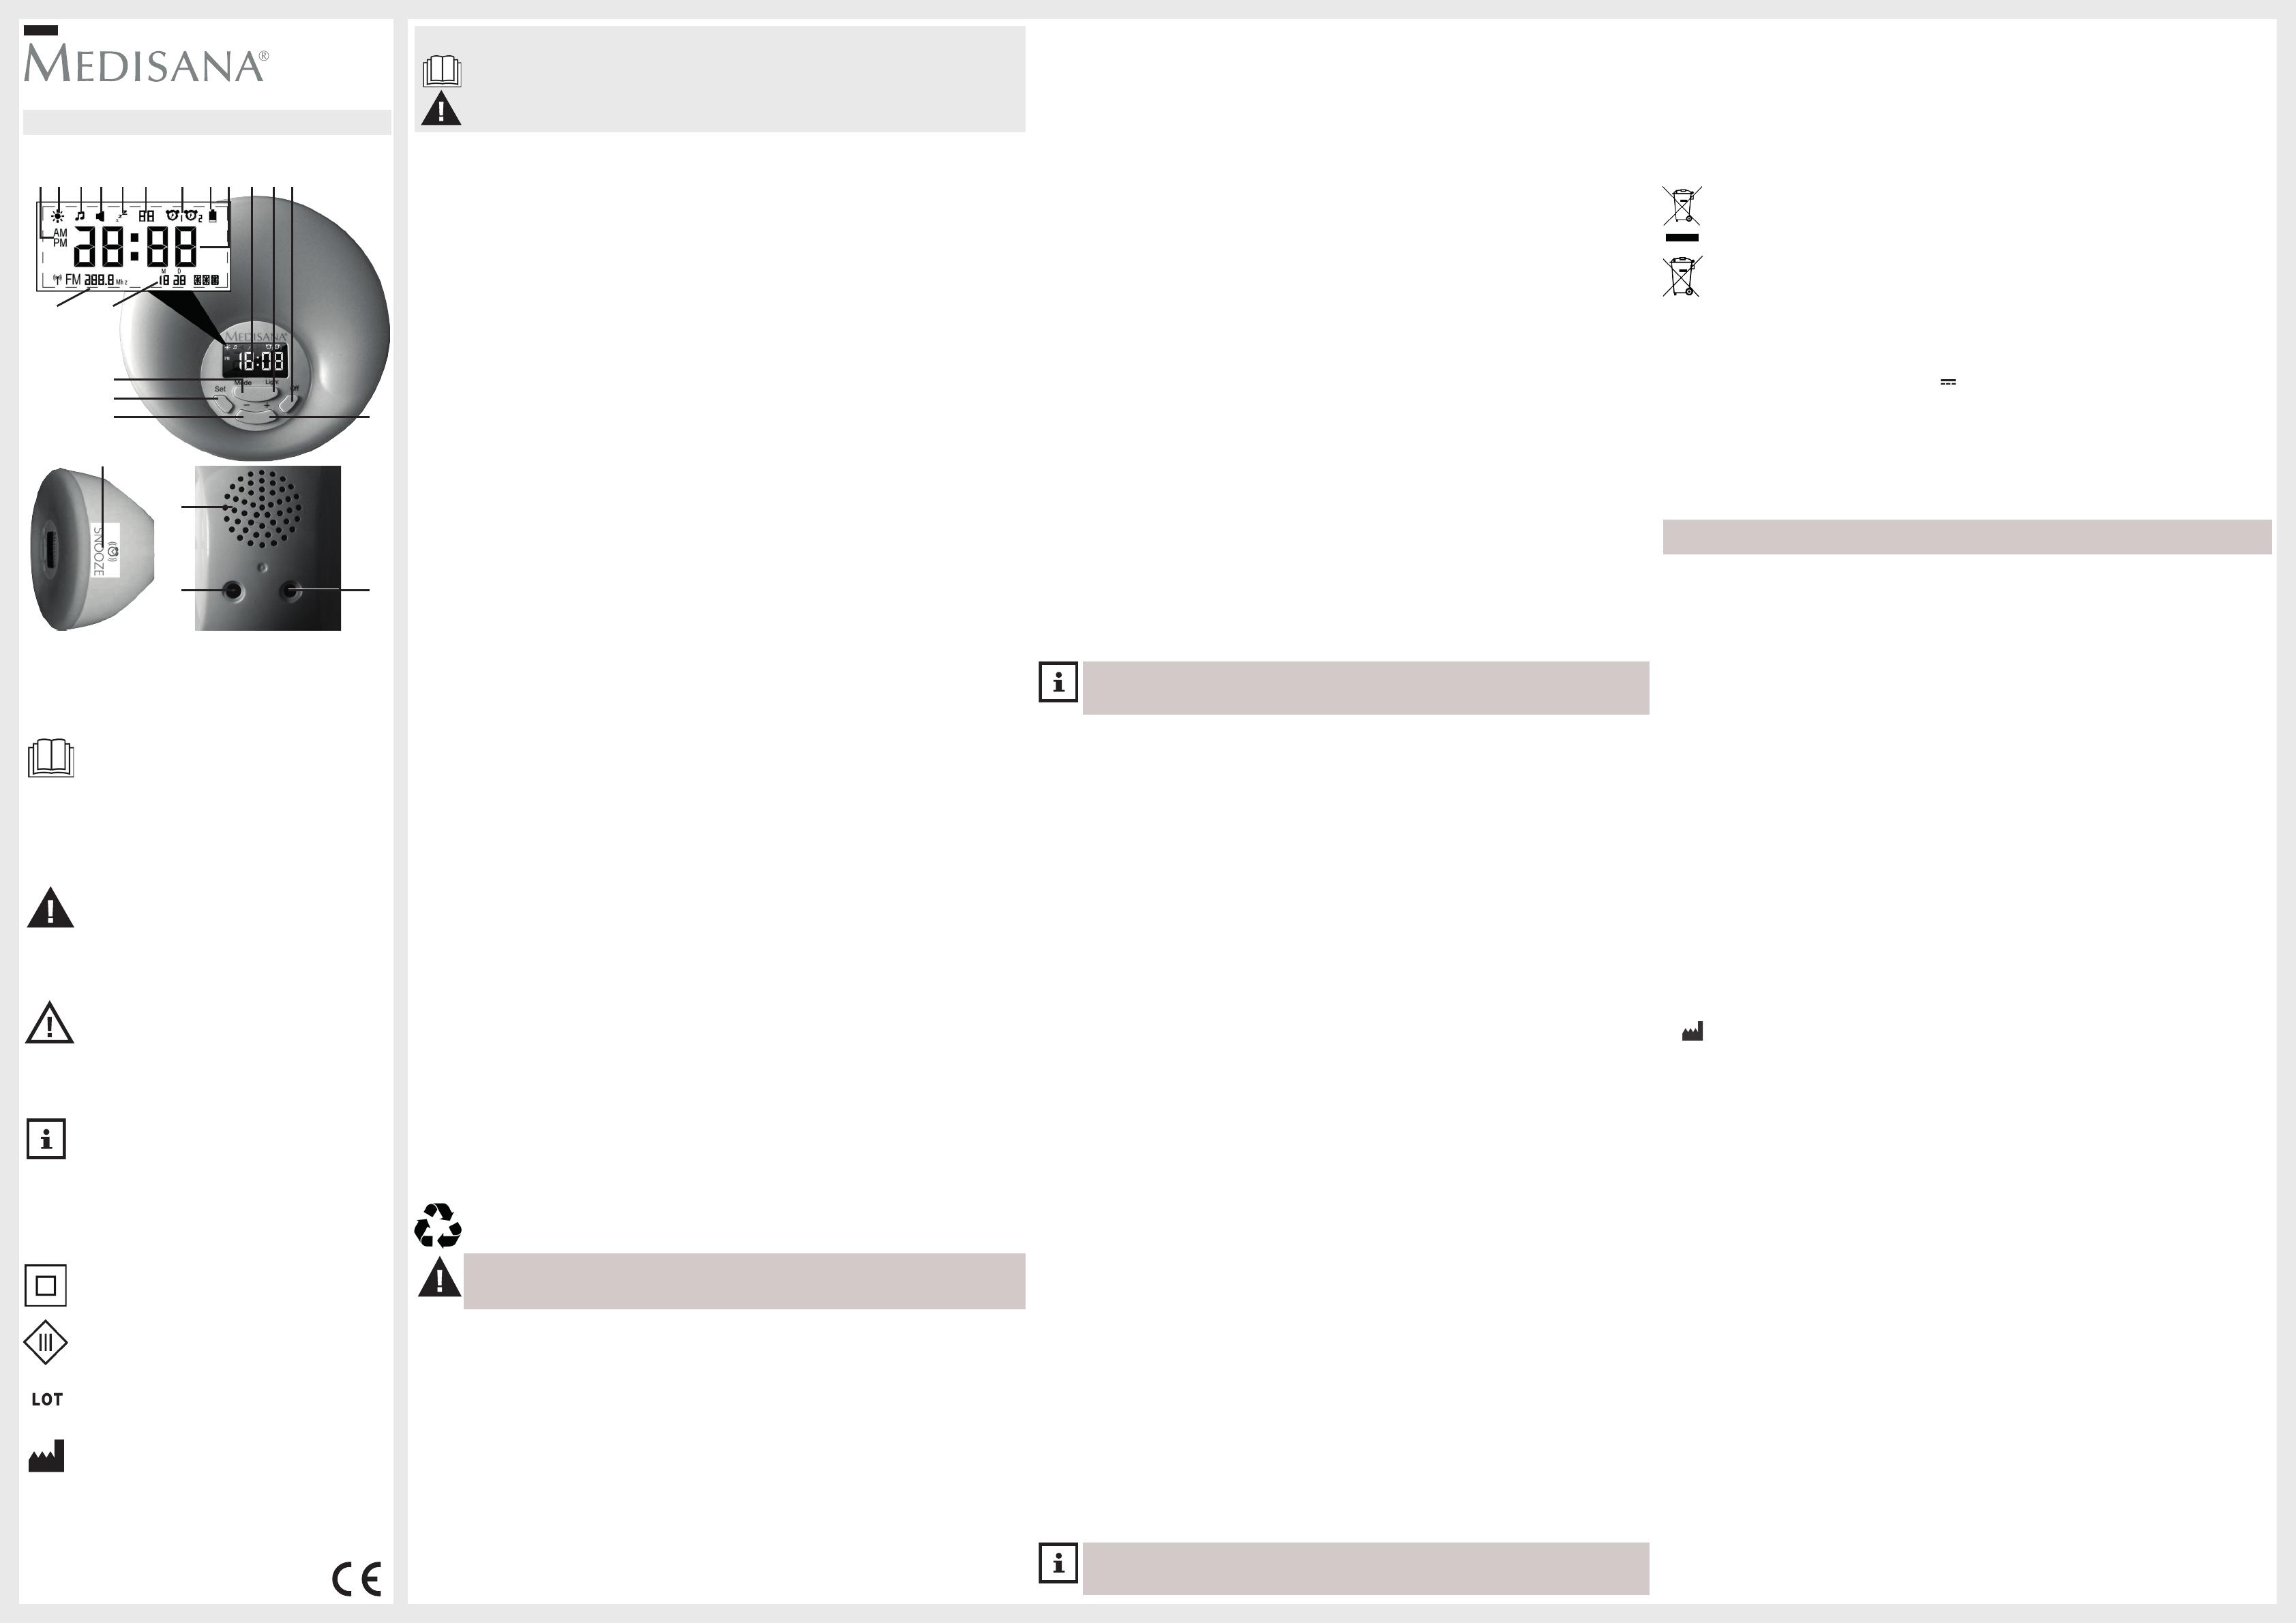
Controls and display:
1
Display
2
Light-button
3
OFF-button
4
„+“ -button
5
Connection for cable antenna
6
Connection for power supply
7
Speaker
8
Snooze touching point
9
„-“ -button
0
SET-button
q
Mode-button
w
Display of date & day of the week
e
Display of radio frequency
r
AM/PM indication
t
Sun symbol
z
Tone symbol
u
Volume symbol
i
Snooze symbol
o
Volume resp. tone setting or running time
p
Alarm 1/2
a
Battery symbol
s
Display of clock or alarm time or setting value
Positioning and setup
1. Place the device on a solid and at surface for use to ensure that it cannot tip over or fall down.
2. Position the device about 40 - 50 cm away from your head, for example, on a bedside table.
3. Connect the cable antenna plug to the connection for cable antenna
5
on the rear side of the
device.
4. Connect the plug of the power supply with the connection for power supply
6
on the rear side of
the device and plug the power supply into a mains power wall outlet. The display will be switched
on and the time of day and date will appear.
In accordance with our policy of continual product improvement, we reserve the right to
make technical and optical changes without notice.
The current version of this instruction manual can be found under www.medisana.com
MEDISANA AG
Jagenbergstraße 19, 41468 NEUSS, GERMANY
Warranty and repair terms
Please contact your dealer or the service centre in case of a claim under the warranty. If you have to
return the unit, please enclose a copy of your receipt and state what the defect is.
The following warranty terms apply:
1. The warranty period for MEDISANA products is three years from date of purchase. In case of a
warranty claim, the date of purchase has to be proven by means of the sales receipt or invoice.
2. Defects in material or workmanship will be removed free of charge within the warranty period.
3. Repairs under warranty do not extend the warranty period either for the unit or for the replacement
parts.
4. The following is excluded under the warranty:
a. All damage which has arisen due to improper treatment, e.g. non-observance of the user
instructions.
b. All damage which is due to repairs or tampering by the customer or unauthorised third parties.
c. Damage which has arisen during transport from the manufacturer to the consumer or during
transport to the service centre.
d. Accessories which are subject to normal wear and tear (batteries etc.).
5. Liability for direct or indirect consequential losses caused by the unit are excluded even if the
damage to the unit is accepted as a warranty claim.
The service centre address is shown on the attached leaet.
DE/GB
Disposal
This product must not be disposed together with the domestic waste. All users are obliged
to hand in all electrical or electronic devices, regardless of whether or not they contain toxic
substances, at a municipal or commercial collection point so that they can be disposed of in an
environmentally acceptable manner.
The battery should be disposed of seperately generally. Do not dispose of old batteries with
your household waste, but dispose of them at a battery collection station at a recycling site or
in a shop.
Technical specications
Name and model: MEDISANA Wake up Light WL 444
Power supply: Input: 100-240 V~ 50/60 Hz 350 mA
Output: 12 V 1000 mA
Power supply: Dongguan City Yingju Electronics Co., Ltd.
(Manufacturer and model) YJS010A-1201000G
Radio: FM, digital display
Sound system: Mono
Weight: approx. 370 g (without power supply)
Dimensions: approx. 17,5 x 17,5 x 14,5 cm
Item number: 45110
EAN number: 4015588 45110 2
Explanation of symbols:
IMPORTANT
Non-observance of these instructions can re-
sult in serious injury or damage to the device.
WARNING!
These warning notes must be observed to pre-
vent any injury to the user.
CAUTION
These notes must be observed to prevent any
damage to the device.
NOTE
These notes give you useful additional infor-
mation on the installation
and operation.
Protection category II
Protection category III
Lot number
Manufacturer
NOTE
During radio operation the light intensity cannot be adjusted with the „+“
4
- and
„-“
9
- buttons.
Backup battery / Battery mode
The device features a built-in rechargeable backup battery (Note: Before rst use, pull out the isolation
strip on the underside of the device). The battery cannot be removed and serves as replacement power
source in case of blackout, so there is no need to readjust time and date. Additionally time and date
can be displayed by pressing a button even when there is no power supply. After approx. 10 seconds
the display will automatically be switched off. Other functions are not supported in battery mode. The
battery symbol
a
shows a low battery status if this is the case. The symbol will not be displayed when
there is a mains power supply (through the power supply cable) available.
Adjusting the time of day and the date
We recommend adjusting at least the time of day and the date after connecting the device to the power
supply. Therefore press and hold the mode button
q
for approx. 3 seconds. The time gure
s
will
ash in the display. Press the „+“
4
- and „-“
9
-buttons to switch between 12 and 24 hours format for
the clock display. Press the set button
0
to enter hours setting mode. Adjust the hours with the „+“
4
- and „-“
9
-buttons. Press the set button
0
to enter the minute setting mode - you can adjust the
minutes again by using the „+“
4
- and „-“
9
-buttons. Proceed accordingly with the setting of the year,
the month, the day and the weekday. If no buttons are pressed during 10 seconds within the setting
mode, the last adjustments will be saved and the display returns to the normal clock/date mode.
Adjusting the alarm times
Press and hold the light button
2
for approx. 3 seconds. The symbol for alarm 1
p
and „OFF“ or „ON“
appear in the display. Switch between „OFF“ and „ON“ for alarm 1 with the „+“
4
- and „-“
9
-buttons.
Press set
0
to continue with the adjustment of alarm time 1. Adjust the hours and minutes with the „+“
4
- and „-“
9
-buttons and press set
0
for conrmation. Now the tone symbol
z
and the tone setting
o
start to ash. You may now choose between one of eight different nature sounds (1 to 8, e.g. birds‘
twittering, re, rain, waterfall etc.) or radio (9) as alarm clock tone with the „+“
4
- and „-“
9
-buttons.
a) If you have chosen a nature sound, press set
0
to continue to the volume setting for this sound.
Adjust the volume with the „+“
4
- and „-“
9
-buttons (the volume symbol
u
and the tone setting
o
appear ashing in the display) and press „OFF“
3
to exit or set button
0
to continue with the adjust-
ment of the alarm 2.
b) If you have chosen the radio as alarm clock tone press set
0
to continue to the selection of the ra-
dio frequency - this has to be stored before (please check chapter „Operation of the radio“). Choose a
stored frequency with the „+“
4
- and „-“
9
-buttons and conrm with set
0
. Now the volume needs to
be set with the „+“
4
- and „-“
9
-buttons (the volume symbol
u
and the tone setting
o
appear ashing
in the display). Press „OFF“
3
to exit or set button
0
to continue with the adjustment of the alarm 2.
If you have pressed the set button
0
, you may now adjust a second alarm time - please follow the
same steps as described above for the adjustment of alarm time 1.
The alarm function
If alarm time 1 or alarm time 2 have been set, the respective alarm symbol
p
appears on the display.
30 minutes before the active alarm time is reached, the device slowly starts to emit light (sunrise simu-
lation with slowly increasing light intensity). You may stop the light emission at any time by pressing
„OFF“
3
. If an alarm time is reached, the adjusted alarm clock tone (nature sounds or radio) will be
activated - as well as the light emission. If no further action is taken, the alarm will be shut off automati-
cally after approx. 5 minutes. After a pause of 5 minutes it will alarm again for 5 minutes. After that, it
will not automatically start to alarm again. The alarm will be active again on the next day.
You may exit the alarm by pressing any button or by touching and holding your hand for at least 3 sec-
onds on the snooze touching point
8
on the top of the device. If you want to use the snooze function
(stop the alarm, but activate it again after 5 minutes) just touch the snooze touching point
8
on top
of the device shortly. The snooze symbol
i
appears in the display and the alarm will start again in 5
minutes. You may repeat the snooze function. If you want to abort the snooze function and end the
alarm, press any button during the display of the snooze symbol
i
.
The light function
Press the light-button
2
to switch on the light. The device emits a white light, similar to daylight. You
may control the intensity of the light with the „+“
4
- and „-“
9
-buttons in 10 levels. Press the light-
button
2
a second time to switch to automatic light mode - the device emits colored light in 7 different
colors, which automatically change. In this mode, the intensity cannot be adjusted. A third press on the
light-button
2
will force the device to emit a single colored light. You can change the color by pressing
the „+“
4
- and „-“
9
-buttons. Here also no intensity can be adjusted. The fourth press on the light-
button
2
switches back to the white light emission mode.
To switch off the light, press „OFF“
3
.
Adjust the brightness of the LCD (only available if adaptor is connected)
During the clock display mode you can adjust the brightness of the LCD with the „+“
4
- and „-“
9
-but-
tons - there are 2 levels (level 2 = bright, level 1 = dimmed, level 0 = off). In case the brightest level
(level 2) is chosen, the device will automatically switch to level 1 after approx. 10 seconds without any
button press to save energy.
Operation of the radio
To switch on the radio, press and hold the set button
0
for approx. 3 seconds. Use the „+“
4
- and „-“
9
-buttons to choose one of the 8 memory slots with stored frequencies. Afterwards, shortly press set
button
0
to choose the volume for this station (0 to 10) or press and hold set button
0
for approx. 3
seconds to adjust the frequency
e
. Pressing the „+“
4
- and „-“
9
-buttons shortly enables you to ad-
just the frequency manually, press and hold either the „+“
4
- or the „-“
9
-button enables the automatic
channel search function, which stops if an adequate signal has been detected. If you want to store
the found station, press mode button
q
and choose the memory slot (1 to 8) with the „+“
4
- and „-“
9
-buttons. Press mode button
q
again to store the channel.
You can switch off the radio by pressing OFF
3
.
The radio timer:
The radio operation time can be limited - the device can automatically switch off the radio after 15 / 30
/ 45 or 60 minutes. Alternatively, you can choose unlimited operation (0 minutes). During active radio
operation, the preset running time
o
is shown in the display. To change the setting, put one hand for at
least 3 seconds on the snooze touching point
8
on the top of the device - the running time
o
will start
to ash. By short touches on the snooze touching point
8
you may change the setting. If the preferred
setting is adjusted, just take off your hand.
You may switch off the radio manually at any time by pressing the OFF-button
3
.
r 1
4
23
Top view Rear view
56
7
9
0
q
we
t zu i o p s
GB Wake up Light WL 444
a
8
45110 V1.5 08/16
NOTE
If no buttons are pressed during 10 seconds within the setting mode, the last adjustments will
be saved and the display returns to the normal clock/date mode.
Cleaning and maintenance
• Cleaning and user maintenance shall not be made by children without supervision.
• Before cleaning the unit, make sure that the unit is switched off and the mains adaptor is un-
plugged from the outlet.
• Dust the device regularly using an antistatic cloth. You can also used a slightly damp cloth.
• Do not use any aggressive detergents or abrasives.
